"Rocky" - 1981 F250 Restoration

Re: "Rocky" - 1981 F250 Restoration

Administrator
|
Interesting. I wouldn't have thought of twisting the cover. Cool!
What hood seal did you use? And I'm anxious to see the winch mounted. If I didn't have the Warn bumper...
Gary, AKA "Gary fellow": Profile
Dad's: '81 F150 Ranger XLT 4x4: Down for restomod: Full-roller "stroked 351M" w/Trick Flow heads & intake, EEC-V SEFI/E4OD/3.50 gears w/Kevlar clutches
|
|
|
This one: https://www.ebay.com/itm/233614141302 I've been getting a lot of parts on eBay lately. I just use the "Fits your Vehicle" search and buy whatever looks closest to what's on the truck. So far it seems to work OK with some caveats. First, you have to pay close attention to shipping because lots of parts are free but a few are just crazy, stuff like small $5 parts costing $15 to ship. But also I've noticed vendors don't always do a great job listing parts in the right categories. This was the right part number but it's only listed as fitting the Bronco. But it fit fine in mine. The same part is on Amazon for $70 which I thought was crazy, so I just searched for the same part number. It seems to work about 70% of the time. It was warm today and will be cold for the next week so I played a little hooky from work and got a ton of stuff done: 1. Windshield trim (mostly) reinstalled. Had trouble with two clips and couldn't find my trim-removal-tool to bend them the right way so I paused there. But it's close. 2. Antenna reinstalled on cowl. I THINK I screwed something up when removing this, the plug was very difficult to pull out of the bottom of the antenna and it looked like a raw-crimped connection, with shield braid kind of hanging out. But I couldn't find a replacement part for this and don't really listen to the radio that much anyway so I just pushed it back in and it seemed to seat OK. We'll see if it works at all. :) 3. Step bars installed. I went with the Westin kit and they look good, but I do wish the "step" portion extended about 6" further back but hey, better than nothing. The parts kit was super confusing, there were lots of unlabeled bolts with the same length and very close but NOT identical threads. It took some trial and error to figure out what went where. But it was definitely a no-drill installation. Not that that matters that much because... 4. Started installing the Torklift camper tie-downs. The old camper setup was tied right to the body panels via hooks bolted on there. I HATE that idea but also wanted something low-key for those times the camper wasn't in. The Torklift rang my bell here. This unfortunately IS a "drill the frame" type of installation and UPS rolled up with some of the above stuff as I was starting this, so I got distracted and didn't finish. :) 5. Transmission oil arrived. This time I got the right stuff, VP Classic 80W-90 GL-4 "for yellow metals". You can see below the old oil was black as night and there was definitely not 7 pints in there - more like 5. I found this task pretty stressful. I bought one of those "Slippery Pete" quart bottle pumps and definitely recommend any other product you can find. Just as the reviews say, the hose is too short and so is the pump stroke. But anyway I got the transmission refilled and closed up. 6. Painted the armrests. Since the "saddle" color isn't available anywhere, and apparently hasn't been for months, I bought the black ones from LMC. I actually did this a month ago and tried to paint them with the same paint I'd used on the dash - THAT was a mistake. It flaked off immediately. So I scrubbed all that off and this time I tried LMC's "adhesion promoter" and the saddle paint they sell from Coverlay just for this purpose. So far it seems to be adhering better though I haven't really rubbed on it yet (I'm giving it time to cure). 7. Got the radio bezel re-stickered. You may remember I'd done one already but I accidentally had the panel laser-cut not quite identically left-to-right - two slots have about a millimeter of offset. Also when I applied the sticker the first time I had a ton of air bubbles I couldn't get out. Well, it all worked out because I'd ordered five faceplates and ten stickers for experimentation (and to meet minimum order amounts) so I did another today from the correct side and with a spritz of water like they do for window tinting. Personally I think it looks great. Bear in mind this is still the prototype. I realized too late that I should have made the lettering white instead of clear, for example. But it looks so much better than the old cracked and scratched/faded one I had before. Really, the pic doesn't do it justice. 8. I need a new radiator. I had just enough time to replace my petcock but discovered I'd bought the wrong one (bought 1/4 NPT instead of 1/8 NPT as needed). But that's OK anyway because when I cleaned the whole area to prepare for the task I realized the leak is coming from the petcock weldment, not the petcock itself. So I guess I have to add a task to my board to replace that. Advice from the crowd on radiators? I have a lot of confidence in "performing" the task but can't make up my mind which actual radiator to BUY. In another thread (on this forum I believe) the Champion was recommended (https://www.championradiators.com/Ford-F-series-truck-radiator-1980-1984) but it's out of stock. Summit and Jegs both have options, and I could get both OEM and aftermarket options from Advance Auto Parts as well. What's the latest opinion on an "ideal" (but drop-in, no modifications needed) radiator for this early-80's era?   
--
1981 F-250 Custom. 6.6L V8, 4 barrel Holley carb, ARA aftermarket A/C. |
|
|
On the radiator, I have a Champion 3 row in my truck. Fit well, easy install. So far I really like it.
I prefer aluminum, I’ve had enough problems with the plastic and aluminum ones. Leaks at seams, and cracking and breaking. I’m doing less and less work on my vehicles, particularly in the winter. My Bronco is leaking and steaming at a seam. If it’s the original then it made it close to 30 years, so that’s darn good. I scheduled it today and asked the shop what they thought, he said he doesn’t remember any aluminum ones coming back. So I gave him the width and he ordered a 4 row (found out through a Marti report I just got that my Bronco has “Super Cooling”). It’s about $600 for the radiator but comes with a warranty. I think I paid around $300 for the 3 row Champion.
Dane
1986 F250HD SC XLT Lariat 4x4 460 C6-Sold 1992 Bronco XLT 4x4 351W E4OD 1998 GMC Sierra SLE K1500 350 4L60E Arizona |
Re: "Rocky" - 1981 F250 Restoration
|
Administrator
|
In reply to this post by taskswap
Glad the cowl seal worked for you. Thought you might have used the one at Documentation/Underhood/Cowl Seal.
 Sounds like you have a whole bunch going all at the same time. But you are making progress.  On the radiator, I went with a 4-row Champion and like it. However, it came with a horrible petcock that both leaked and dribbled all over everything when you tried to drain it. I replaced it with this one from Amazon on a recommendation from Scott.
Gary, AKA "Gary fellow": Profile
Dad's: '81 F150 Ranger XLT 4x4: Down for restomod: Full-roller "stroked 351M" w/Trick Flow heads & intake, EEC-V SEFI/E4OD/3.50 gears w/Kevlar clutches
|
|
|
Yeah I ended up getting the 3-row Champion, seems like a lot of folks have had good success with it. I wanted to also to an electric-fan upgrade but decided to defer that. I still have a lot to finalize and don't want to add another project to the plate.The rad will be here next Thurs. So once again... waiting for parts!
Not waiting that much though. It's fit and finish time now. Today I only did one small task but it was an important one - getting my climate control (more or less) back into place. This required a lot of fiddling with push-pull cables, old plugs, identically-colored wires, etc. I have it probably 90% sorted out. All the controls seem to work and fans run when I do the things that should make them run. My ARA aftermarket A/C blower is SUPER loud, it sounds like it has a bad bearing. Hopefully I won't need it much. :) The only thing that didn't quite work out is the temperature-selector slider. It definitely doesn't go as far right as it's supposed to. I'll adjust it later, it's not that critical right now. Tomorrow I hope to install my windshield wipers finally, and then start digging into the doors (setting up the electric locks and replacing the window seals) and trailer wiring (all the wiring is there, I just need to finalize the plug).
--
1981 F-250 Custom. 6.6L V8, 4 barrel Holley carb, ARA aftermarket A/C. |
Re: "Rocky" - 1981 F250 Restoration
|
Administrator
|
I think you'll be happy with the Champion. But I'd change out the drain valve before filling the system. Or at least make sure that one is sealed.
On the window "sweep" that goes at the top of the door panel, I don't recommend stapling them on. I've broken a door panel that way. Instead I drill and pop rivet them, with a washer spreading the load on the end of the rivet. As for the blower motor, later see if you can pull it apart and lube the bearing. Worked on one motor for me.
Gary, AKA "Gary fellow": Profile
Dad's: '81 F150 Ranger XLT 4x4: Down for restomod: Full-roller "stroked 351M" w/Trick Flow heads & intake, EEC-V SEFI/E4OD/3.50 gears w/Kevlar clutches
|
|
|
Will do, thanks for the tip. I have the right-angle one you and others recommended here that I'll be putting on. While I have the radiator out I may as well replace the thermostat and water pump too... I was probably talking about the wrong part. I mean the felt-lined U shaped piece that installs in the top and sides of the door, that 6' or so long rubber piece. When I got the truck, one of them was missing and the other was in poor condition. As I cleaned the truck out I found the missing one stuffed behind the bench seat, so clearly the previous owner knew this was an issue. I was able to reinstall it but it was cracked in a few spots so I figured I'd just get new ones for both sides. I'm trying to mix small and big jobs at this point to keep things moving. Up next: 1. Figure out how to permanently attach the radio. I got one of those Classic Car Stereos deals which is basically a standard 1-DIN radio with a custom front to look antique. My F250 has no side rails or carrier for it, and the radio came with just a metal bar you're supposed to attach to the back - which I have nowhere to attach it to on the truck. So I'll have to gin something up. 2. Sort out my trailer harness wiring. The cable's all there, I just need to add connectors. These things are cheaply made and I'm hard on them so I want it to be easy to replace. But my Weather-pack kit only goes up to 6 pin plugs. Probably I'll do a 5+2 arrangement (5 signal, 2 brake). 3. Mock up my winch mount. I have some cardboard I can use to template this out. Dry fitting very roughly, I think if I mount the winch on a 1" drop from the frame, and put the bumper on 1" standoffs, I can notch the bottom of the bumper instead of cutting a hole in it. That would keep it looking even more "stock". Since this isn't a rock crawler I'm not worried about entry clearance and I gained an inch of margin from my new tires anyway... 4. The great paint debate. I've always known this was going to be a "rattle can special". I'm just going to scratch it immediately anyway, I just prefer to scratch a red truck than a pale Pepto Bismol one.  The trouble is I have stuff like bed rail caps and stick on replacement trim that I want to mount permanently, but I want to paint before I do. But it's 30F out... What to do... Obviously I have to wait. I just don't wanna! The trouble is I have stuff like bed rail caps and stick on replacement trim that I want to mount permanently, but I want to paint before I do. But it's 30F out... What to do... Obviously I have to wait. I just don't wanna! 
--
1981 F-250 Custom. 6.6L V8, 4 barrel Holley carb, ARA aftermarket A/C. |
Re: "Rocky" - 1981 F250 Restoration
|
Administrator
|
The window felt makes a huge difference on noise. Installing new is the way to go as it isn't expensive.
On the radio, Ford made a bracket to go at the rear of the radio, and I have one of them holding the back of my Sony, as shown in this thread. Sounds like you have a good plan on both the trailer harness and the winch, but I'm wondering about the clearance on the winch so will have to see how that works out. As for the paint, good luck. I understand the concern, but don't have any suggestions.
Gary, AKA "Gary fellow": Profile
Dad's: '81 F150 Ranger XLT 4x4: Down for restomod: Full-roller "stroked 351M" w/Trick Flow heads & intake, EEC-V SEFI/E4OD/3.50 gears w/Kevlar clutches
|
|
|
In reply to this post by taskswap
The great paint debate. I am there with you.
I sm going to have a stretch of 50 degree weather this week so i may finish the hood on the 350.. i have enouhh base and clear to make it happen.
1985.5 F-150 XL Explorer standard cab 5.0 EFI AOD 4x4
Daily Driver. We call her Eunice the Ute. 1982 Bronco XLT Lariat 351W AOD 4x4 Code name Esperanza, or Espy to her friends. Please see my Project thread for the blow by blow. 1984 F-350 XL Centurion crew cab 460 T19 4x4 "Eylza Dual-little" |
|
|
In reply to this post by taskswap
Why do you need that many wires? 1-left turn / brake 2-Right turn / brake 3-Running lights 4-Ground You may have a 5-electric brake wire and a 6-power wire to charge a battery on the trailer (break away battery) If that is the case a 7 blade female on the truck side and a 7 blade on the trailer side, normal trailer plugs you can get anywhere, would be the way to go. (I forget what the 7th wire is for? think back up lights) There is a Tee connector that goes between the trucks frame harness and the tail light harness that dose the first 5 wires you can get so you dont have to cut into the trucks harness. Run the other 2 wires down the frame to the rear into the 7 blade connector. That is what I did for my trucks trailer light connector to hook up my car trailer.  You can get anything for the above at Etrailer.com and then some. If the other 2 wires are for the winch, on a trailer? then it should run off the battery on the trailer and the power wire from the truck through the connector should recharge it. Dave ----
Dave G.
81 F100 flare side 300 six / AA OD / NP435 / 2.75 gear http://cars.grantskingdom1.com/index.php/1980-Ford-F100?page=1 81 F100 style side 300 six/SROD parts truck -RIP http://cars.grantskingdom1.com/index.php/1981-Ford-F100 |
|
|
As you guessed further in your reply, it's for a 7-pin connector: 1 - LT / Brake 2 - RT / Brake 3 - Running Lights 4 - Ground 5 - Electric brake 6 - Reverse 7 - Aux The seventh / aux pin is a dedicated "hot in start/run" circuit typically on a 20-30A fuse and a 10ga or similar wire. It's typically used to help charge a battery on the trailer although in practice most folks find even at that rating, it's such a long run that the voltage drop stops you from getting full value out if it. All my current trailers have their own solar chargers but I like to have the circuit available just in case. I considered a tee but decided against it for reasons I hadn't mentioned here before. My harness has been cut and tapped a few times already, for what I can't say. But I have loose wires hanging all over, and worse IMO, wires that were tapped with those awful blue wiretaps and then REMOVED, so you can see bare copper corroding away through the insulation holes. My reverse lights just don't work at all, and two lights are missing all the way - including their sockets. So I'm thinking I'll just follow the wiring forward until I find the first un-molested section of the stock wiring, then build a loom back from there with a Weatherpack for the trailer connector in case I ever want to replaced that connector. Did a little "Rattlecan Rhumba" on the hood today. It came out fine. I had a few small runs but it was in the clearcoat so you don't notice unless you're close. The pic below isn't that flattering - it looks better than that in person. I think I was picking up reflections of stuff in my garage on the nose. This is the first in probably 20 years that Rocky has been remotely "shiny"! 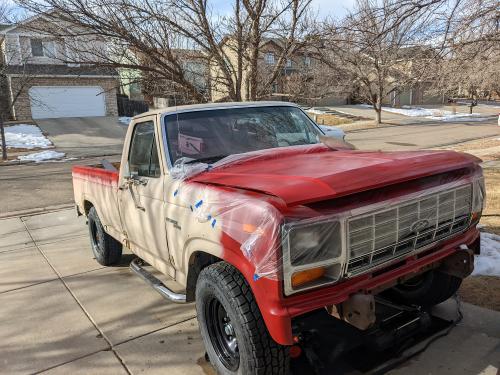
--
1981 F-250 Custom. 6.6L V8, 4 barrel Holley carb, ARA aftermarket A/C. |
|
|
So the weather pack will be used on the truck & trailer to hook the 2 together?
Or on the truck to make the trailer harness and use a normal 7 blade trailer connection? My guess they tapped into the tail light harness and being you are missing sockets even more so. At that point I think I would try and find a good tail light harness or make that side and use that trailer light Tee into a normal trailer hook up. This truck is the first I have used the Tee on, my other 2 trucks were factory tow set up and had the wiring in place. The last one even had the 7 blade female side out back and the socket under dash for electric brakes to plug in the controller. Any of the other tow units, before Tee's were a thing, the wiring went back to the tail lights out of weather and down to the hook up plug. If I ever pull a trailer with a flat 4 light plug I have adapters in the 2 trucks, my pick up & 02 Durango, I have to pull with so no messing with re-wiring. How is your finger after pushing that little button on the cans  Or did you have 1 of them trigger things for spray cans? Looking good Dave ----
Dave G.
81 F100 flare side 300 six / AA OD / NP435 / 2.75 gear http://cars.grantskingdom1.com/index.php/1980-Ford-F100?page=1 81 F100 style side 300 six/SROD parts truck -RIP http://cars.grantskingdom1.com/index.php/1981-Ford-F100 |
Re: "Rocky" - 1981 F250 Restoration
|
Administrator
|
In reply to this post by taskswap
Yes, I wired Big Blue for a 7-pin connector. And it is wired to match my 2015, that has it from the factory. Plus I have the 7 to 4-pin adapter. So I'm set.
And your paint job looks good. I think you are getting what you were looking for - a better paint job that you aren't afraid to use.
Gary, AKA "Gary fellow": Profile
Dad's: '81 F150 Ranger XLT 4x4: Down for restomod: Full-roller "stroked 351M" w/Trick Flow heads & intake, EEC-V SEFI/E4OD/3.50 gears w/Kevlar clutches
|
|
|
In reply to this post by FuzzFace2
Yes, on the back side of the 7-pin jack on the bumper. Just to make it easier if I ever have to replace that jack. Well, I bought one of those now!  I have one on the way from Amazon but it hadn't arrived yet so I just toughed it out. Minor cramping, it was just the hood. I sure wouldn't want to do the whole truck without one! I have one on the way from Amazon but it hadn't arrived yet so I just toughed it out. Minor cramping, it was just the hood. I sure wouldn't want to do the whole truck without one!
Just wet-sanded it to 600 grit, not because I care but for practice. Looks OK overall. I may pop over to Harbor Freight and grab a buffer and some compound, shine the hood up a bit. The big puzzle for today since I'm off from work is the door locks. Remember those slide locks I was dead set on using? Well I bit the bullet and cut the hole for them in the passenger side door. That's the side I have a more or less complete unit for. The previous owner had rigged up a clever way to keep the metal spring plate on the back:  Just drilled holes in the gussets and small wire ties to hold it on. It looks ghetto but works pretty well actually. Unfortunately when I went to install them I discovered that my pushrod is probably bent. It doesn't sit in the right spot to connect to the slider and still work smoothly. I ordered two totally new units (Dennis Carpenter now has them in stock in red if you don't mind repainting them) and matching push rods but they aren't here yet so I may just try to re-bend it myself. It would be really nice to have at least ONE door "done". Speaking of doors, mine don't close all the way. I've tried both of the basic tricks (replacing the stud on the door jamb and adjusting it inward, and using that "bender" tool LMC sells) and they helped a little but not enough. I have a door hinge pin kit but hadn't tried to install it yet because naturally my hinge pins are swaged over on the ends, no easy to remove clips. Guess I have to drill them out? That seems to be what other Youtubers are doing...
--
1981 F-250 Custom. 6.6L V8, 4 barrel Holley carb, ARA aftermarket A/C. |
|
|
I am not liking you much right now
You made me spend money at Dennis Carpenter. I went for the slider locks, they only listed 1 and not what side and in tan (red would have been nice), but I think they can be swapped sides and just have the writing upside down? I had none at all when I got my truck so I needed something. Also needed arm rest as the wood ones in the truck do look cool they hurt when you rest your arm on it. They did not have door panels that I saw and if they did it looked like for the later type pin type locks. So I may need to go back over the ones I have to make them better looking. Nice job on your lock Dave ----
Dave G.
81 F100 flare side 300 six / AA OD / NP435 / 2.75 gear http://cars.grantskingdom1.com/index.php/1980-Ford-F100?page=1 81 F100 style side 300 six/SROD parts truck -RIP http://cars.grantskingdom1.com/index.php/1981-Ford-F100 |
|
|
In reply to this post by taskswap
If I do my hinge pins again I’m looking into buying the whole hinge. I ended up adjusting the door anyway.
Edit to add, IIRC, I cut the pins in half and worked them out. I had the door propped up and stabilized so it wouldn’t move too much.
Dane
1986 F250HD SC XLT Lariat 4x4 460 C6-Sold 1992 Bronco XLT 4x4 351W E4OD 1998 GMC Sierra SLE K1500 350 4L60E Arizona |
|
|
In reply to this post by FuzzFace2
Yeah the lock bodies are only "handed" as far as the lettering is concerned. I'm lucky enough to have both face plates, I'm just missing the black slider and spring plate from one side.
I can definitely confirm that these take paint well, either the S.M. Arnold "Plastic & Vinyl Refinisher" or the Coverlay paint LMC sells. I bet if you wanted to, you could sand/file down the letters prior to painting the trim ring and it would look alright. Thanks! Well, don't congratulate me until I'm done. Today was sort of a wasted day. After botching the paint and clearcoat on the hood, I bought a shiny new buffer and botched the polishing job on top of it all. I went a little too hard in some spots and wore through to primer, and generally failed to get a smooth finish anywhere else. It doesn't really bother me, I learned a lot from this process, so maybe one warm day in future months I'll strip it back down and redo it. Haven't done anything else though, which is the main setback... And my radiator box arrived from Jegs with a nice hole beaten into the side of it:  I'm conflicted about it, definitely need to reach out to Jegs. On the one hand, it doesn't look so severe that it actually poked any holes in the radiator, but it DID go enough to bend a few fins. I don't know I'd ever really trust it, and I don't want to wait until after I install it to find out there's a leak... I'm sure Jegs will take care of it... But it's the delay that's the big issue...
--
1981 F-250 Custom. 6.6L V8, 4 barrel Holley carb, ARA aftermarket A/C. |
Re: "Rocky" - 1981 F250 Restoration
|
Administrator
|
Glad the locks are working out. I plan on using them in Dad's truck, so I'll follow your lead.
Bummer on the radiator. I faced a similar issue as the sealing surface for the cap on my Champion was scratched. I thought I could file it smooth but didn't want to do so until I asked, so called the vendor. He agreed with my approach but said if it didn't work he'd ship me another one. It worked.
Gary, AKA "Gary fellow": Profile
Dad's: '81 F150 Ranger XLT 4x4: Down for restomod: Full-roller "stroked 351M" w/Trick Flow heads & intake, EEC-V SEFI/E4OD/3.50 gears w/Kevlar clutches
|
|
|
In reply to this post by taskswap
Sorry to hear about the hood but you have to learn some how right?
As for taking it all down you dont have to do that unless the paint or primer is not sticking to the panel. This also goes for any paint be it factory or a repaint, if it is sticking just scuff it so paint sticks and paint. You dont have to really prim the panel unless it has bare metal and then only the bare metal but what will happen and why you may want to prim the full panel is you can get spots of different color over say dark color primer and a light color paint. This is when a sealer works as it will make the car / truck 1 color before painting. On your "fix" make sure it has setup / dried good and then hit it with 600 grit wet & dry paper and sand it wet. The water should have a little liquid dish soap (Dawn is what I like) and scuff the full panel to get it smooth of any orange peel. Make sure it is dry before repaint. Let it dry for a day or more, if it has orange peel you can wet sand it with the used 600 paper to knock down the high part of the peel and sand with 1000 & 1200 to get it a little smoother. I would not sand out all the orange peel as you want to leave a little for the buffing to take down. You also want a little "peel" as it will not show scratches as easy when it is glass smooth. Good luck Dave ----
Dave G.
81 F100 flare side 300 six / AA OD / NP435 / 2.75 gear http://cars.grantskingdom1.com/index.php/1980-Ford-F100?page=1 81 F100 style side 300 six/SROD parts truck -RIP http://cars.grantskingdom1.com/index.php/1981-Ford-F100 |
|
|
Thanks for the tips all. I knew about the 600 wet sanding but didn't know Dawn would help. I think my main problem was just rushing it. This is a hunt rig, ANY paint on it is going to be better than what it was. But I was cheating like crazy because I was in a rush. I knew this coming week would be cold but I had a warm day on Friday so I figured I'd do what I could.
So... after a bunch of prep (I took a fair bit down to eliminate rust, mostly, and to practice with Bondo a bit) I did basically the opposite of this advice. I sprayed two thin cost of Krylon rust protector primer, two coats of a Rust-Oleum enamel color coat, and two coats of clear coat. About 30 minutes apart.  I knew better, I just honestly was in a rush and wanted to see what I could get away with! Anyway it doesn't look too terrible. It has a sort of ... "redneck patina" now. Maybe it'll lower my theft risk! I knew better, I just honestly was in a rush and wanted to see what I could get away with! Anyway it doesn't look too terrible. It has a sort of ... "redneck patina" now. Maybe it'll lower my theft risk!
I wouldn't call today a super productive day - me going to Harbor Freight is always a time waster to begin with. But I guess I did get one project done, the passenger side door is "together":  I'm really happy with it although I do wish I'd shot a bit of primer on that rusty area lower-right before doing the final mount on everything. And I did not in the end get my power door locks hooked up. I just couldn't work out an angle that would work to mount it. But the manual lock works really well. This door still needs an alignment issue addressed (hinge pin, hopefully) but it's been through a lot since I started: 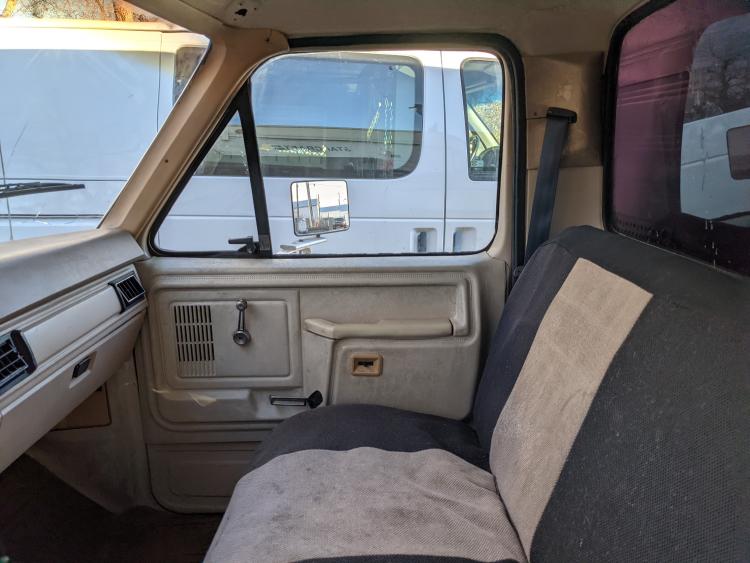 1. New window crank handle (old one was there but knob plastic cover was broken) from junkyard. 2. New window crank spring and spacer/sealer washer. 3. Cleaned and white-lithium lubed all window crank components to (mostly) eliminate massive squeaking. 4. New Coverlay door panel. 5. New Coverlay armrest, painted with LMC's adhesion promoter and Saddle paint. 6. New door glass run installed. 7. New door lock cylinder installed. 8. New Coverlay bottom liner and map pocket kit. 9. Slide lock push-rod tweaked with pliers to operate smoothly. 10. LMC stainless trim for both the carpet/door transition and the body rail below/outboard of that (under the door). Some regrets: 1. I wish I painted the slide lock trim plate before I knew LMC sold "saddle" color plastic paint, but it matches the dash so looks OK. 2. I could have tried a bit harder on the electric door locks. 3. I discovered at the last minute that my exterior horizontal window glass sealing strip has popped loose on one corner. It's actively scratching the window. But only in the millimeter right next to the edge of the window so it's not a huge deal / not very visible. So I left it. Waiting on parts again...
--
1981 F-250 Custom. 6.6L V8, 4 barrel Holley carb, ARA aftermarket A/C. |
| Edit this page |