"Rocky" - 1981 F250 Restoration


|
I wasn't aware of any "pin cushion cowl". Is there a part number or photo or link or something you can share? Part of me wants to try to reuse my current cowl since it's in really good condition considering the age of the vehicle. Around here, cars parked outside tend to get murdered by hail over the years, and despite being weathered almost to bare metal, it's pretty straight and not deformed. But if there's a drop-in alternative with a smarter vent design I'd definitely consider it. This design is... not Ford's brightest idea...  Today was a big day. I was finally ready to lay my carpet down plus do a bunch of other interior "trim" finalization: dome light, kick pieces, etc. And the moment I started it all went wrong. I dropped the shifter-cane alignment pin into the transmission! I was SUPER careful the first time I took this out - I had read about the problem and was ready with a magnet to grab it. What I didn't realize is that the pin itself had become a bit magnetic somehow, or maybe it just came that way. I got the pin in place just fine but when I went to drop in the cane, the nearby metal yanked the pin out sideways and down it went! Oh no..... Suddenly this is a bigger job than I'd originally planned but I'm a "life hands you lemons, grab the vodka" kind of guy. I had always intended to check the transmission oil level and now I had the perfect excuse for that and a visual inspection of the gears. I yanked the drain plug and pulled off the PTO cover so I could retrieve the pin. That was reassuring. I was worried for a 30-yr-old vehicle with unknown history and a manual transmission that there would be some gear damage. I had mentally prepared for a transmission rebuild at some point. But I think I have some time. The gears mostly look good, as much as you can tell at a glance. No broken or damaged teeth, and the magnetic pickup tool only pulled out a few small metal slivers (plus the pin). Nothing I wouldn't have expected for a tranny this old... 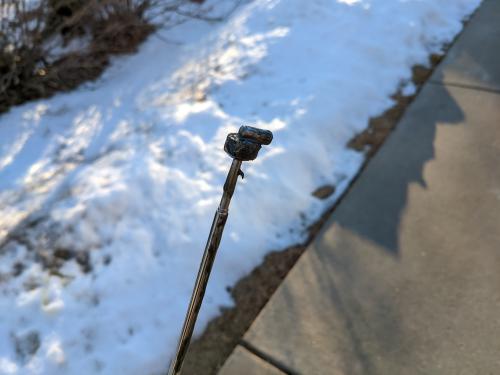  I'm 99% certain work was done to this thing at SOME point. The sealant on the cover was clearly Permatex Black, I would recognize that stuff anywhere, and it was very sloppily applied. So I'm wondering if maybe this thing had some transmission work done already. Here you can see all the scratches, which is where I'm betting somebody in the past cleaned up the original Ford sealant. Those are (almost totally) not from me - I used a brass bristle brush for my cleaning.  Unfortunately AutoZone was closed and Walmart didn't carry the right weight of oil, so I've got an order coming from Amazon (more waiting!) Thursday with the right stuff. But, since I was finally able to reinstall the shifter cane by this point, I was able to cut the hole in the carpet in the correct location, and lay that down. 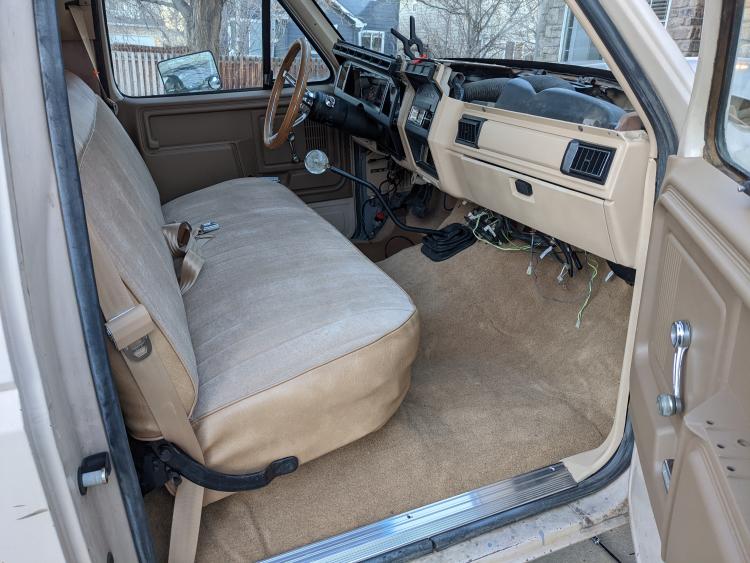 And that... well that just looks amazing to me. This isn't something you'd ever have in a showroom, but for a hunting rig for my wife and I to fart around in? It's perfect. I had bought some floor mats from Amazon to go along with this but I hate them so I'm going to spring for some nice Weathertech's to round it all out, and I should be able to finally start installing interior trim. One last project for the night, I may have mentioned I wanted to convert my dome light to the dome/map combo. I had already run an always-on (fused) circuit a week or so ago. But I didn't have one of those oddball black plastic screw/wire terminal connectors Ford uses on the dome light and wasn't in love with that setup anyway. I was also missing the plastic "spacer" piece the map/dome combo needs. So I cut that out of neoprene, and using some ring terminals, star washers, and a crimp style connector I converted the map light to have a nicer connector, then cut a spacer out of a sheet of 1/8" neoprene: 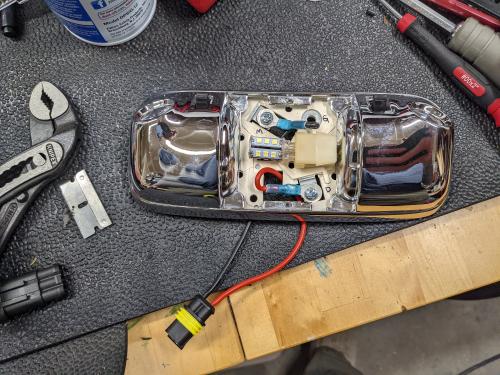  I'm pretty happy with how this all turned out. The only exception was at some point over the years I had bought a terminal/connector kit of some generic style (not Weather-pack). I had never used them because I like Weather-pack so much but figured this was as good a time as any to try it, since it's easy to access/replace later, and a non-critical item. (https://www.amazon.com/gp/product/B092Q11S98 if you're curious) Well... they're OK but not great. The pins don't seem to seat as firmly and the alignment isn't as smooth. If you're in the market, Weather-pack is where it's at IMO.
--
1981 F-250 Custom. 6.6L V8, 4 barrel Holley carb, ARA aftermarket A/C. |
Re: "Rocky" - 1981 F250 Restoration
|
Administrator
|
You had a big day! Well done! The truck is really coming together, and now you know the tranny is good. There's a silver lining in every cloud.
 As for the pin cushion cowl, it came out in 1987 so you should be able to find one in a salvage. The part number is shown below, and they obviously think the pin cushion version, which is the E7 part number, is superior to the Bullnose version 'cause they took the E0 Bullnose number out of the catalog.  And here's a shot of the one on Big Blue. It is a bolt-in on a Bullnose truck, and seems to solve the leaf or pine needle problem. 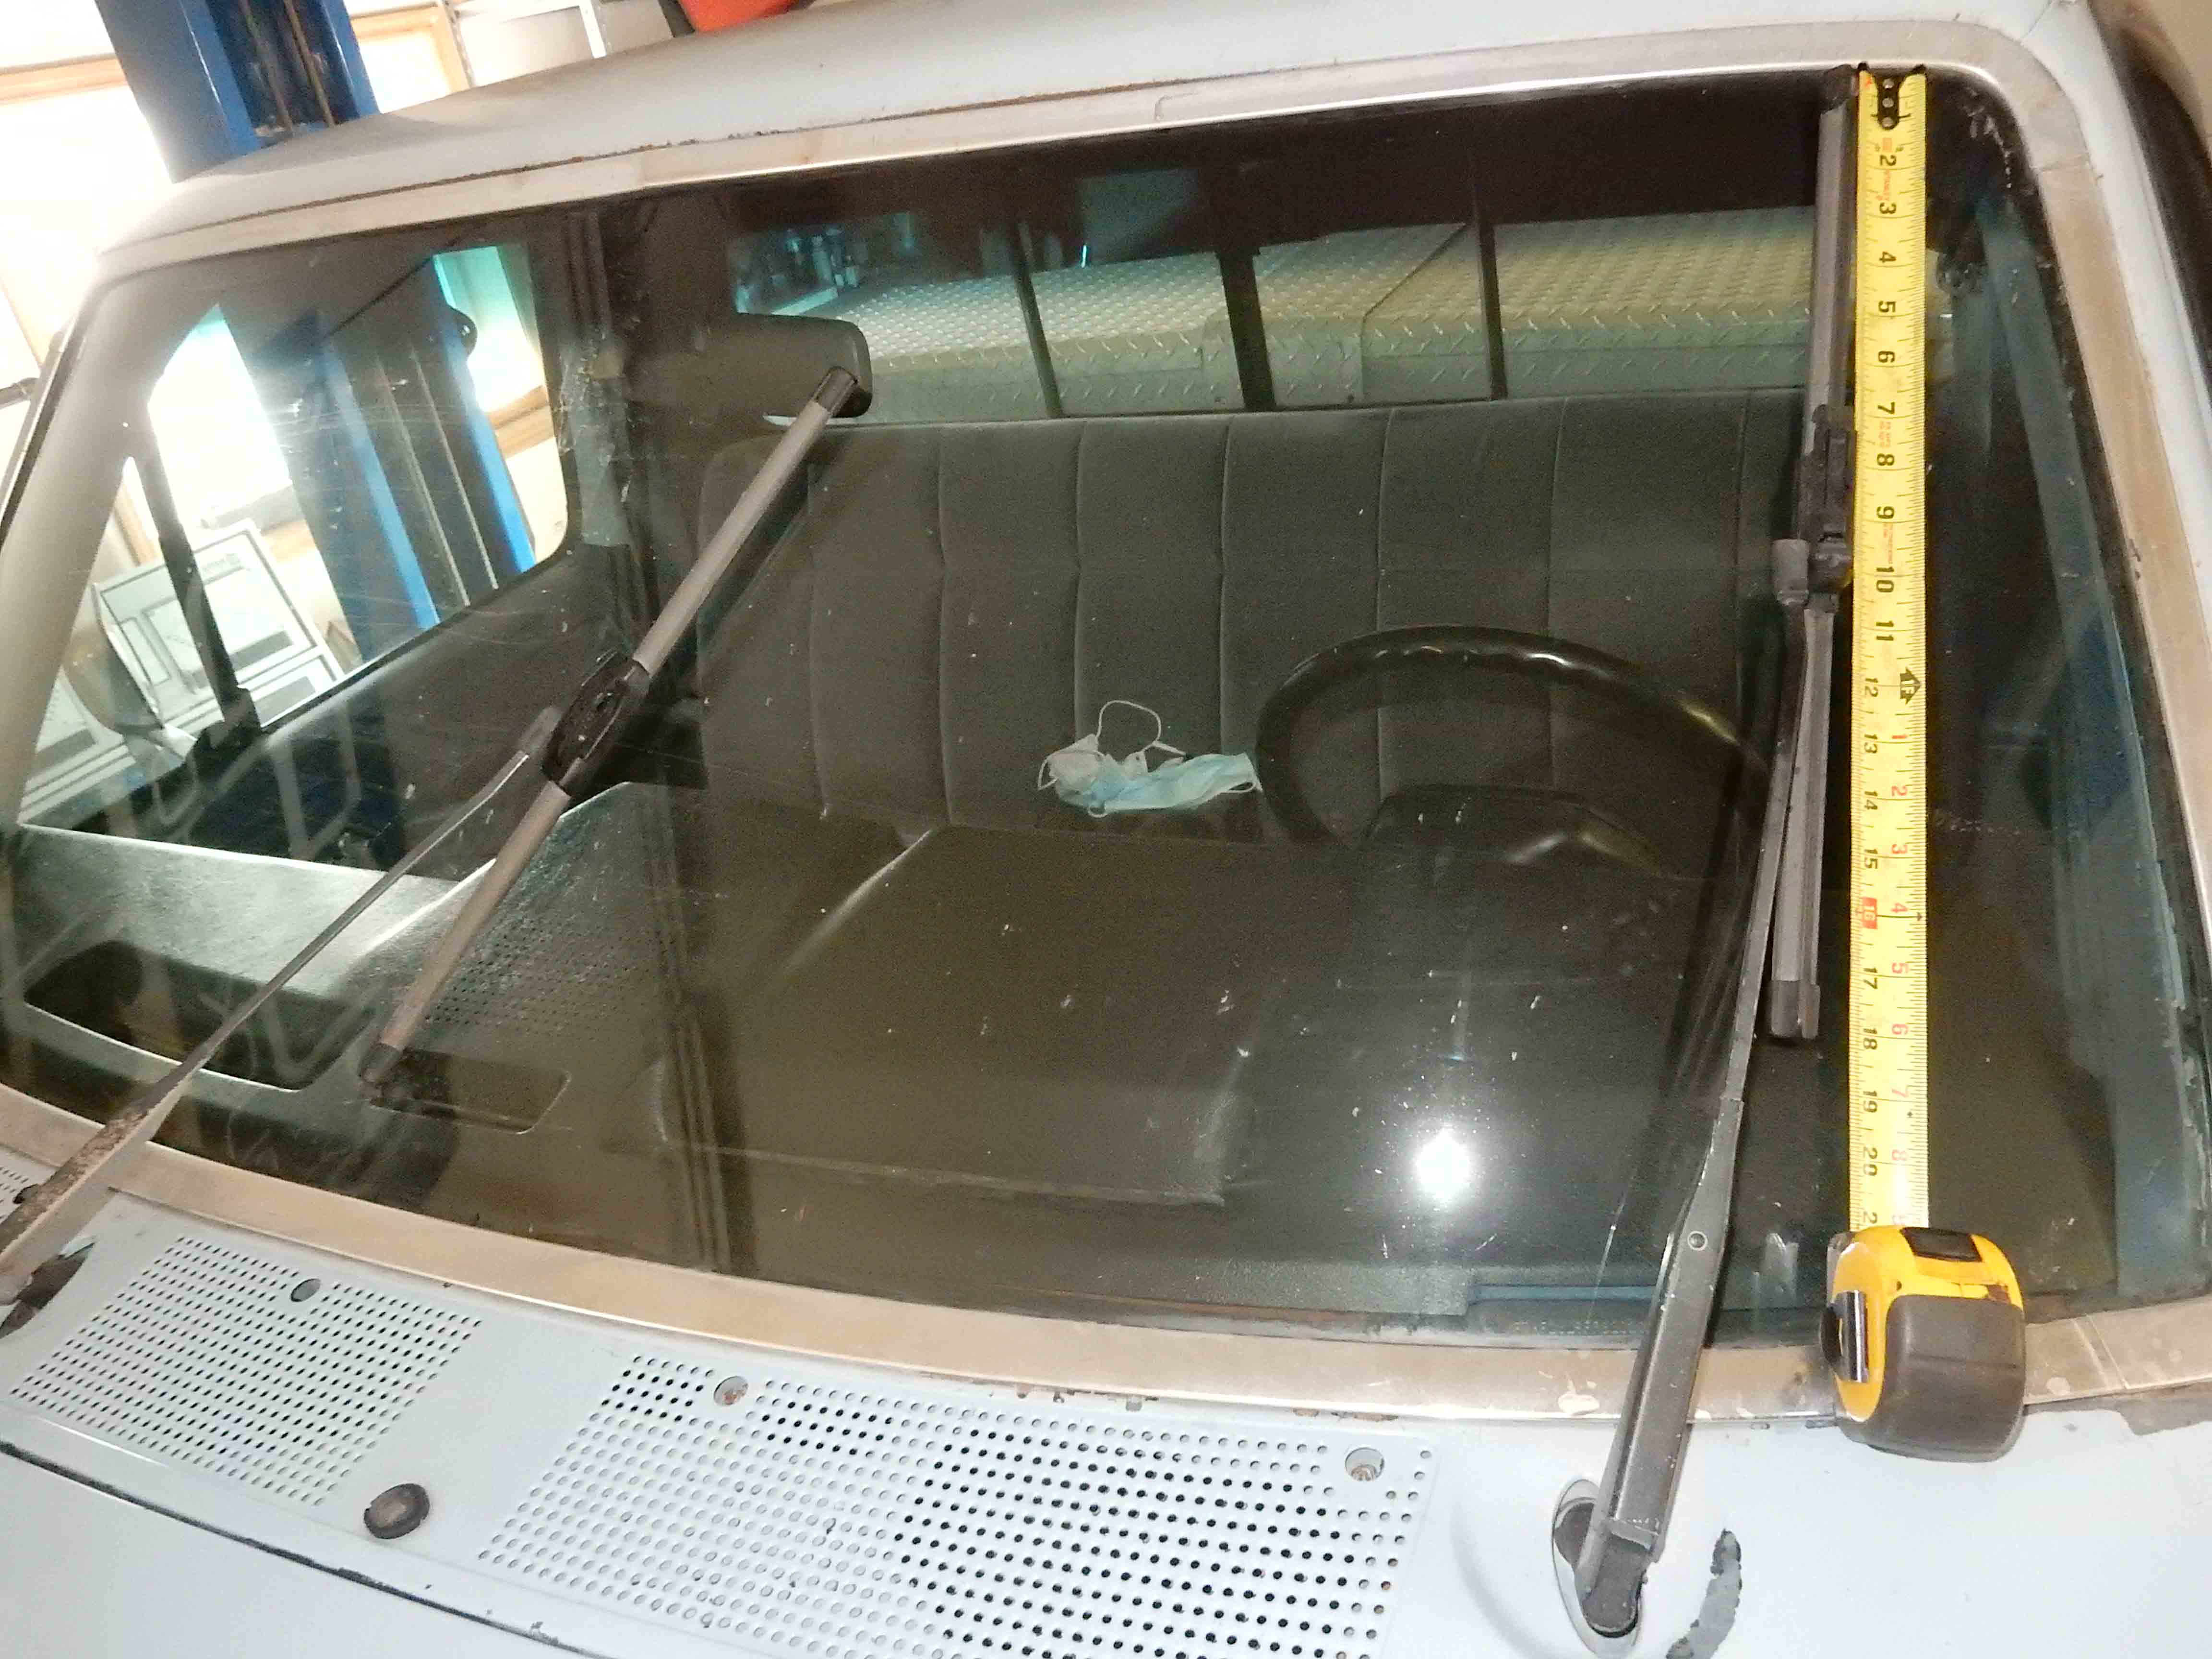
Gary, AKA "Gary fellow": Profile
Dad's: '81 F150 Ranger XLT 4x4: Down for restomod: Full-roller "stroked 351M" w/Trick Flow heads & intake, EEC-V SEFI/E4OD/3.50 gears w/Kevlar clutches
|
|
|
Thanks. If I see one of those at the junkyard I may pick it up, but I think I'm also going to give a go of re-using mine. It's in really good condition, so I might as well try...
I got a tiny bit of progress today, might do more tonight. I was originally going to LineX this thing but I'm overdue getting started on the camper restoration and that's going to take some money too, so I decided to stick with a rubber bed mat for now. I found one pre-cut for this bed and it looks really nice:   I also got the dome light mounted. The map lights are traditional amber/non-LED bulbs on purpose, I want a less-bright light if my wife uses the map light while I'm driving, and also I have probably a dozen of that kind of bulb floating around. The center I did put an LED into. It all turned out really well but there was one disappointment. Oh LMC... They sell a "clear dome light cover" for this unit and it was cheap so I got it. But caveat emptor, it doesn't fit very well. It won't stay on, it seems like the cover is just a millimeter off on the width and the mounting tabs are so short they don't grab the slots they go into very well. It's hard to tell from the photo but it's actually hanging down in the back here.  The neoprene gasket did do its job. This is the "wrong" light for my cab ceiling so my mounting boss is a smaller rectangle. I used the gasket both to trim out / fill the air gap where the new light sits on that boss and also make sure the terminals don't contact the roof of the truck. I could have made it about a millimeter smaller all around but it looks fine if you don't look too close. 
--
1981 F-250 Custom. 6.6L V8, 4 barrel Holley carb, ARA aftermarket A/C. |
Re: "Rocky" - 1981 F250 Restoration
|
Administrator
|
The dome light looks good, save for the lens. Obviously the one from LMC isn't acceptable.
 But your adaptation is well done. But your adaptation is well done.
And the bed rug should serve you well. Dad had one in his truck and it didn't cause the bed to rust. (But it did trap .22 casings - he shot a lot from the bed.)
Gary, AKA "Gary fellow": Profile
Dad's: '81 F150 Ranger XLT 4x4: Down for restomod: Full-roller "stroked 351M" w/Trick Flow heads & intake, EEC-V SEFI/E4OD/3.50 gears w/Kevlar clutches
|
|
|
In reply to this post by taskswap
I had ordered a regular lens for my f250, then saw the clear one from LMC. Bought two, the one in my Bronco works great.
The one in my truck is in the center console. Kept falling out. So I put the original style in to see if it would stay in, it does. I need to put the clear one in the garage as a back up for the Bronco. Weird, the two bases look the same to me. ¯\_(ツ)_/¯
Dane
1986 F250HD SC XLT Lariat 4x4 460 C6-Sold 1992 Bronco XLT 4x4 351W E4OD 1998 GMC Sierra SLE K1500 350 4L60E Arizona |
|
|
Ha! With the price of brass these days I doubt I'll be "losing" any rounds under the mat.
 Hmmm interesting. I didn't get a perfect view of it but from a quick glance I think my clear LMC lens has two problems. First, the "tabs" that hold it into the fixture aren't long enough. Second, the lens has a bit of ridge around all of its edges and this flares out very slightly - I think it's the "draft" from the mold used to make the lens. It's subtle, but I think it's just enough to cause it to not sit very well in the fixture, which has its own slight draft angle. I don't really want to sink a lot of time into this thing but I may try to shave a sixteenth off the outer edge with a dremel just to see what happens. If that fails I'll just use the original lens. It's yellowed, but otherwise in good shape.
--
1981 F-250 Custom. 6.6L V8, 4 barrel Holley carb, ARA aftermarket A/C. |
|
|
“I don't really want to sink a lot of time into this thing but I may try to shave a sixteenth off the outer edge with a dremel just to see what happens. If that fails I'll just use the original lens. It's yellowed, but otherwise in good shape.”
I’m interested to see if that works.
Dane
1986 F250HD SC XLT Lariat 4x4 460 C6-Sold 1992 Bronco XLT 4x4 351W E4OD 1998 GMC Sierra SLE K1500 350 4L60E Arizona |
|
|
I'll post here with details, hopefully tomorrow. In the meantime, a few items of interest...  So the "clear" lens cover from LMC various from stock in a few critical ways. First, you can see that the general "thickness" of the plastic (side lips) is higher than stock. My stock cover's "sides" are almost exactly 1mm thick, but the LMC lens is 1.9mm (each side). The stock unit is also 68mm "long" (between the sides where the tabs/fingers are) while the LMC lens is 71mm. Finally, the overall width is about 0.5mm wider on the LMC lens. It's hard to see the clear lens clearly in these pics, so I put a bit of blue marker on one section so you can see the difference better. I didn't try sanding mine yet but I will tomorrow and I'll report back. As for general progress, it was warm today (warmer than it will be for the next 2 weeks) but I wasted it on "work" and only had about an hour to play with the truck. But I got some small things done. The seat belts are finalized now. The brackets from Jegs worked out really well but I did end up cutting slots in the seat for them to pass through - they were clearly designed to do that. Overall it worked out really well, my seat belts stay put even when the seat-back is tilted forward, and they're long enough to comfortably fasten. I think I gained about 3" length overall between the bracket height, change in angle of the attachment TO the bracket, and passing them through the seat. Other small items included attaching a few more dashboard screws and installing my new sun-visors. I had bought the LMC ones with the chrome fixtures. They're not quite identical to stock but mostly in the screws themselves, oddly enough. The stock screws have what I believe is called an "oval" head screw but the LMC sun-visor brackets came with flat-head, countersunk style screws. But I ended up using what LMC provided because even though they don't look quite right, at least they weren't rusty.  I have a grinder with a buffing wheel but even I'm not crazy enough to try to "polish" six screws I'll barely see in normal use. Like I said, this isn't a showroom restoration... I have a grinder with a buffing wheel but even I'm not crazy enough to try to "polish" six screws I'll barely see in normal use. Like I said, this isn't a showroom restoration...
The rest of the week could get crazy. A lot of stuff arrives this week, in particular the correct ("yellow parts friendly") gear oil to refill my transmission, the Torklift camper tie-down attachments, the winch, etc. My hope is that I'll be getting into "exterior stuff" over the next few days, and get the truck running again by this weekend. Fingers crossed!
--
1981 F-250 Custom. 6.6L V8, 4 barrel Holley carb, ARA aftermarket A/C. |
Re: "Rocky" - 1981 F250 Restoration
|
Administrator
|
I'm tagging Keith/FORDification, who's Mr Ford @ LMC. He needs to know about how poorly their dome light lens fits.
As for the seat belts, I think the bracket is a good idea as several have complained bout the lack of length on the belts for these trucks. And good luck on getting all the things done so you can start the truck this weekend!
Gary, AKA "Gary fellow": Profile
Dad's: '81 F150 Ranger XLT 4x4: Down for restomod: Full-roller "stroked 351M" w/Trick Flow heads & intake, EEC-V SEFI/E4OD/3.50 gears w/Kevlar clutches
|
|
|
I didn't realize they paid any attention. :) Well if Keith wants more info I'd be happy to provide. To be clear, what I'm doing with Rocky would have been impossible without LMC existing, and I've probably thrown $5k their way so I'm definitely glad to have a vendor available! I particularly like how their parts diagrams are clickable, which makes it easy to home in on the exact thing you need, especially when it comes to hardware. The main issues are with what are generally third party components. Seat heaters, dome light lenses, floor insulation and carpeting... All those things seem to be "not perfect, but better than nothing". I'm pretty data driven as you've all probably guessed, and I'd be happy to share specific details on any items that might be improved... "Have calipers will share" and all that...
--
1981 F-250 Custom. 6.6L V8, 4 barrel Holley carb, ARA aftermarket A/C. |
Re: "Rocky" - 1981 F250 Restoration
|
Administrator
|
Keith is a friend of mine. He is Mr FORDification, the website/forum for earlier Ford trucks, and the way that came to be is much like the way ours came to be. We both started on FTE but soon became dissatisfied with things and started our own. And now we both have the go-to site for that era of Ford trucks, including the most documentation on them anywhere on the internet.
We met at a FORDification truck show in SW MO several years ago, and after talking things over in great detail realized our similarities and bonded. He's helped me immensely, like directing me to a guy who was giving away a large set of Technical Service Bulletins. And when I got them I discovered they included ones that went back into his era, so I shipped them to him. At the time he lived in Nebraska, but I don't remember what his job was. Then, not quite two years ago, he was recruited by LMC to be "the new head of the Ford Research & Development (R&D) team....and I've accepted the offer. I will be starting there full-time in about three weeks. Essentially, I'll be in charge of anything that has to do with Ford trucks and Broncos, and Ford-related products sold through LMC's catalogs." (You can read more about that here.) However, he's discovered that he doesn't have a lot of control. For instance, several of us won't use their catalog because it asks stupid questions about your truck when all you want to do is buy a light bulb - for instance. We've made him aware of that and he's discovered that they aren't going to change their catalog. So, while I've asked him to come see your post, I don't know that he will be able to effect a change.
Gary, AKA "Gary fellow": Profile
Dad's: '81 F150 Ranger XLT 4x4: Down for restomod: Full-roller "stroked 351M" w/Trick Flow heads & intake, EEC-V SEFI/E4OD/3.50 gears w/Kevlar clutches
|
|
|
Ah that makes sense. I'm very familiar with how much inertia companies can develop (against change) when they've done something a certain way for a long while. Always happy to share my thoughts but no expectations of course! Here's my latest madness. As I mentioned earlier in the thread, I've decided I want to keep my slide locks. I think they're cool, and I'm lucky enough to have the two plastic trim rings that seem to be the hardest piece of the puzzle. However, I only have one of the two "slide" actuator pieces. So... why not measure the one I have and have it 3D printed? Here's what I came up with. I'm fairly new to SketchApp and frankly find it very clumsy to use, but the price is right. :) So I didn't bother trying to round the corners on things, I figure I can do that when the parts get here. If somebody wants to improve on my design I've attached it below:  Slide_Lock_Actuator.stl Gary maybe we should start a "3D Models" section in Documentation? I also have that template for the climate control faceplate (which I'm going to be finalizing/installing in my dash this week, hopefully) and I may make some other things. 3D printing could be a good way to make some of these parts more accessible in the future. I used CraftCloud3D for the printing, I've had good luck with them in the past. (They don't do the prints themselves, they're just a marketplace.) Some of the quotes for basic plastics were as low as $5-6 per piece, but on a whim I sprang for the "fiber-reinforced nylon, polished" which was more like $20 apiece. If I get some time I may try to make a model of the trim rings as well but don't hold your breath. Given my skills, the complexity of the part may be beyond me. (If there's somebody here that wants to volunteer to do the actual modeling, I'm happy to take precise dimensions off mine and do a hand drawing!)
--
1981 F-250 Custom. 6.6L V8, 4 barrel Holley carb, ARA aftermarket A/C. |
|
Administrator
|
Nice build thread! I see some very familiar things that bring back memories of things I did, that courtesy light being one of them. Mine was pitted and some of the plastic parts inside were messed up due to the heat from the crazy bulbs they used back then. I found a relatively nice unit on ebay and merged parts from mine with the one I got on ebay. Drilled out those rivets and tapped the fixture such that I could use screws. Went with some LED bulbs in it and acquired the LMC cover you are having fit up issues with. Strange, but mine fit pretty good.
 
John
"Blackie" - 1986 F150 4x4 - Mildly warmed over 351W HO - Original owner |
Re: "Rocky" - 1981 F250 Restoration
|
Administrator
|
In reply to this post by taskswap
That's a good idea, and I think it belongs in the Resources folder. But, what do you think?
Gary, AKA "Gary fellow": Profile
Dad's: '81 F150 Ranger XLT 4x4: Down for restomod: Full-roller "stroked 351M" w/Trick Flow heads & intake, EEC-V SEFI/E4OD/3.50 gears w/Kevlar clutches
|
|
|
Whatever you think makes the most sense. I could also just link to my Thingiverse profile in my signature block... But I figured if we got this more popular I wouldn't be the only one posting, so I didn't want it to be all about me... Minimal progress today, I had work to do, but I did have a few small items: 1. Experimented with "leading," the alternative technique vs welding for filling small holes in body panels. If you don't consider yourself a welder but you have ANY experience with soldering I highly recommend this. It was super easy to do and worked the first time. Per some Youtube video recommendations I used an acid-core solder. This was to repair my cowl, which had a low spots where somebody had poorly applied bondo in the past and it was all cracking and falling out. I don't really care about dents and low spots (the cowl already has a few more that were NOT fixed) so I just fixed a few small holes, wire-brushed it, and gave it a few coats of primer, red paint, and clearcoat. I really did very little prep here, this doesn't look "showroom" any more than a cat looks like a dog, but from a distance it looks way better than it did...  I then promptly scratched the (still soft) paint messing around seeing how it would fit back on the truck. Oops. I also solved a mystery. You may remember I have water coming in my driver's side kick vent, and figured the bottom was plugged up with pine needles. Well it was plugged... but not with pine needles. Get a load of this: 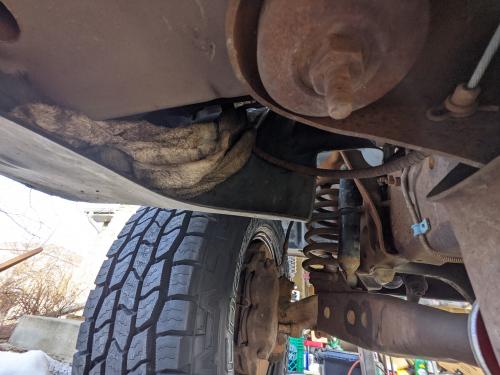  This isn't the nastiest thing I've pulled out of the truck, but it's definitely top 5. Anyway, it drains great now. Given my success with leading you'd think I would tackle that screen we had talked about a page ago but I changed my mind. The thing is where I am in Colorado there actually aren't all that many trees. The one near my house is a honey locust which has tiny leaves. And though I'll be taking this back-country (where there ARE pine trees) it'll only be a few days at a time - 3-10 days trips a few times a year at the most. Even when I do that, we tend not to park under pine trees. Sadly, there's a lot of "beetle kill" from beetles here in the state so we generally don't park under trees in the back-country unless it's our only option. Given all that, and that while I did clean "some stuff" out of the cowl it wasn't that bad (and I'm probably the first person to ever do it)... I decided not to bother. I'll hit it with the leaf blower once a year if needed. I have plenty more projects to be getting on with! Now I need to figure out what that rag was doing, though. It was stuffed in there pretty tightly - it's hard to imagine it "fell down in there" or "blew in ... somehow". So my assumption is a (recent) past owner was trying to catch something, probably a leak in one of the brake or fuel lines. I have pretty good brake performance even considering the rear are drums, so I'm guessing there's a slight fuel leak, maybe just a slow drip. I hope it's that simple (easy for me to fix) but I also kind of hope I'm wrong because wow, what a dangerous way to deal with that...
--
1981 F-250 Custom. 6.6L V8, 4 barrel Holley carb, ARA aftermarket A/C. |
Re: "Rocky" - 1981 F250 Restoration
|
|
In reply to this post by taskswap
Thanks for tagging me Gary. I grabbed one of these lenses of the shelf today, as well as the dome light fixture from one of our trucks, and attempted to install the new lens. And while there have been many who say their lens fits great, the one I tried had some minor fitment issues, so I spent a few minutes studying it and came up with the following.
First of all, it turns out that the lens edges were molded straight, when in fact the edge face should have been beveled just a bit, as pictured here in this comparison shot of the reproduction lens and an OEM lens.  So I grabbed my baby Dremel and started beveling the sides just a little bit. 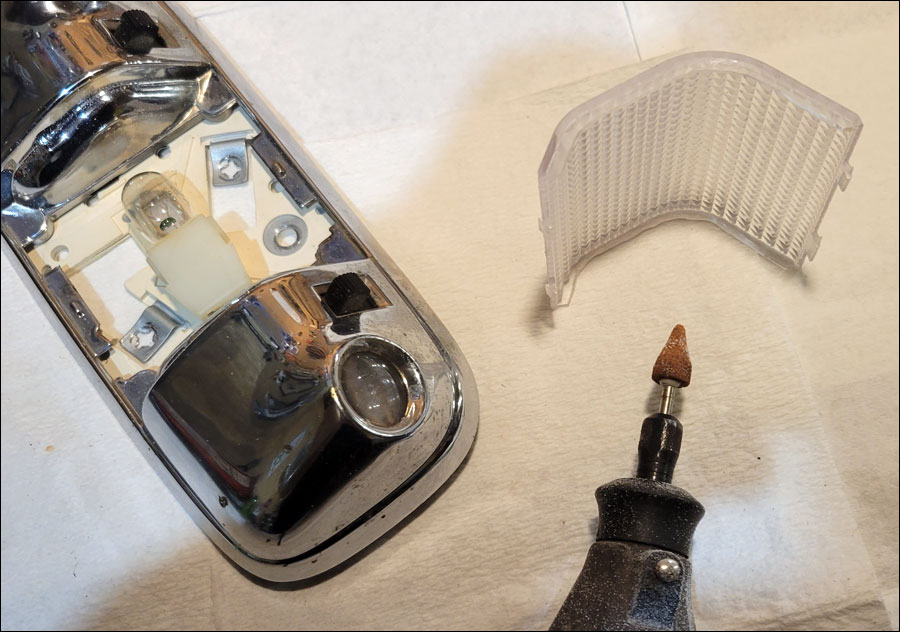 Now...you only want to bevel the bottom edge of the lens, the part that contacts the dome light body....and only the middle area. Do not bevel the ends, as they fit fine. Here you can see how I used a cone stone to do the bevel.  ...and in this shot, I've shaded the area that needs to be slightly beveled. Don't go all the way out to the outer face, nor out to the ends.  And then finally, you might have to also do a very light sanding on the bottom face of the lip, along the same area in the middle, between the red arrows shown here.  Just sand a little and test fit, and repeat, until it snaps into place with minimal effort. The tabs will lock the lens into place and it looks great.  It actually took me longer to analyze why exactly it wasn't fitting correctly than it took to fix it. All told, the sanding maybe took me 3-4 minutes. Hope this helps. :)
Keith
- FORDification.info/.com/.net - The '61-'79 Ford Pickup Resources
|
Re: "Rocky" - 1981 F250 Restoration
|
Administrator
|
Keith - Thanks a bunch! That will help a lot of people. And your directions are excellent.
Now, go build that 455. 
Gary, AKA "Gary fellow": Profile
Dad's: '81 F150 Ranger XLT 4x4: Down for restomod: Full-roller "stroked 351M" w/Trick Flow heads & intake, EEC-V SEFI/E4OD/3.50 gears w/Kevlar clutches
|
|
|
Wow, thank you for taking the time, much appreciated!
I am part of the club that has spent a few $$$ with LMC! 😎
1985.5 F-150 XL Explorer standard cab 5.0 EFI AOD 4x4
Daily Driver. We call her Eunice the Ute. 1982 Bronco XLT Lariat 351W AOD 4x4 Code name Esperanza, or Espy to her friends. Please see my Project thread for the blow by blow. 1984 F-350 XL Centurion crew cab 460 T19 4x4 "Eylza Dual-little" |
|
|
In reply to this post by FORDification
Thank you Keith! Appreciate you doing this.
Dane
1986 F250HD SC XLT Lariat 4x4 460 C6-Sold 1992 Bronco XLT 4x4 351W E4OD 1998 GMC Sierra SLE K1500 350 4L60E Arizona |
|
|
Thanks Keith! i can confirm this procedure definitely helped. I still wish the lens cover's "tabs" ("fingers"?) were a wee bit longer - the grip isn't very strong. But there's no doubt in the end this process is worth it. The clear cover is SO much brighter than the factory yellow one. Insert "night and day" joke here.
Just some text updates this morning, but after I get some morning work out of the way, I expect to be reporting back on a number of progress items. I got the cowl cover back on with minor scratching, avoidable now that I know the trick. So here's some advice. The cowl is flexible AND it also has two rounded areas on the left and right where the cowl "lip" doesn't go down as far. Those two details are the key. With the hood raised ALMOST (but not quite) all the way I rested the cowl cover on the cowl. I attached the wiper fluid spray nozzle and fed the antenna wire up through the cowl cover. Then on the passenger side, I "torqued" the cowl cover clockwise so the front lip was down an inch or so. This changes the angle of both the cover itself and the hole where the wiper arm sticks through and I was able to "sneak it" under the hood there and drop it over the passenger side wiper hub. The driver's side went the same way. Instead of sliding the cover forward to clear the wiper arm hub, I torqued it (counterclockwise this time). Again, this let me sneak the driver's side of the cowl forward under the hood without getting scratched. You can tell where this needs to be done because it's where the curved/shallower portions of the front lip of the cowl cover are. Anyway that's all done and I also installed a new hood seal while I was at it. My old one disintegrated as I took it off. That actually turned out to be frustrating. Three of the screws didn't line up so I needed to drill some new screw holes. I didn't want metal shavings dropping down anywhere bad so I had to spread a drop cloth over the engine first... But job done. Now I'm mounting my winch on my winch plate so I can start doing some test-fitting there. Today I also hope to refill the transmission gear oil (says it's "out for delivery") and fix my leaking radiator drain petcock.
--
1981 F-250 Custom. 6.6L V8, 4 barrel Holley carb, ARA aftermarket A/C. |
| Edit this page |