Diary of a Restore (Thread)

Re: Diary of a Restore (Thread)

|
I will post a bit more about my method here this weekend Gary. There was a little prep involved to minimize the time.

1980 Ford XLT F350
400 Engine (rebuilt to 406) Holley 2300 500 CFM manual Choke Carb Under Restore (1st time) |
Re: Diary of a Restore (Thread)
|
|
Here is the write-up of how I hung the doors—I posted a pic earlier.
The first thing I did was measure the center top bolt hole of the top hinge on the door to the center top bolt hole of the bottom hinge of the door. This would be my most important measurement. It was about 14” I maintained this distance no matter what changes I made to the hinges. The next thing I did was level the hinges, and then took a laser from the bottom hinge through the upper bolt hole and leveled it, shot to the striker side of the door where it would approx land if hung. I then measured from there to the center of the striker. I then strung a line from that bottom bolt hole on the door on level and measure to the center of the latch on the door unit. This was my baseline. I could then arrange the hinges and get in the ballpark of hanging the door before I tried my first fitting. The reason I did this was because, as I am using a hoist, and I am NOT removing the fenders, I wanted to get at the three hinge bolts on the cab easily. The door off allowed this using a socket and u-joint with an extension. I also used an off-set box end wrench. All of this saved the frustration of trying to tighten the bolts with the door on. That in itself saved time and was the price of admission. Highly recommend. The hoist allowed this ease and relatively quick operation: 4 bolts hold on the door to the hinge. I could easily tighten and release the door using a gearwrench. The door would hang there near me for rapid reattachment. No on/off, lower/lift back up. I could easily lower the hoist and remove the straps and hang them on the door as I tested fit. If it did not, reattch and take up the slack a little, and remove the 4 bolts. The prep measurements did get me in the ballpark. The pass side took 6 attempts before I got it right, and the door shut with ease—rubber OFF at this point. Pass side door was centered, but needed the hinges to move back. I went slowly here, because even a slight centimeter move could throw off the entire door—I took baby steps here. Patience! I could also then line up the lines of the truck outer, and move the door in and out from the cab—note: My lines are not exactly correct, maybe a 16th off on the low side from the rest of the truck panels. If I moved one hinge, I measured to make sure I maintained the 14” separation. Once I got one part of the door set, it was only moving one hinge forward or back to line of the rest of the door. Again, remeasured the 14” every time. Then there’s the inner outer fender clearance. Remember my pass door would NOT open because it was hitting the fender. This was in part because the bushings in all my hinges were shot. I rebuilt them (and bought a new hinge because I was missing a spring on one). Newbie note: The fender is also an adjustment feature that should not go overlooked. There is a ½” bolt you can access through the door hinges with the door open with an extra long extension to move the lower fender in and out. I had to move mine out on the pass side to get the door to clear. I need to move it back in slightly to make the body align better. One other tip: chase the threads on the door, and the bolts before doing any of this. It makes screwing in the bolts a breeze. That’s it! The D side door took 5 attempts before I got it right. Each door took me 2-3 hours to get right as I went in baby steps with each adjustment, and frequent toweling off—100 degress here every day, and HUMID. I bought LMC new door seals, and let me tell you, it is TIGHT! I mean really tight. The doors did not want to close to the second latch click. It took some pushing and a little forceful persuasion to move the door to the final click/latch. On the D side, it took me pulling in the upper door to the cab more (loosening the 2 bolts). That helped. Doors have been shut for two days now for forming of the rubber to the door. Pass side door now closes easier, but seriously, the new seals are bonkers tight. It appears the culprit is on the striker side of the door. I removed the seal to see where the issue was. Both sides shut easier until I left my test piece on the striker side of the door. There is a tape on seal for the upper part of the doors I need to order. I can see why they are used. There is a lot of opportunity for water to leak and be trapped up there. Almost every Ford for our year at the Pick still has them, if in degraded shape. The vent window seals, and channel I also got form LMC. They seem to work rather well. Lots of finesse and soapy water to get the vent seal in tightly. I need to find LONG rivets for the cab side rattler (or whatever it is called). Mine are too short especially with adding a washer. OK that’s it. If anyone has quesitons, let me know.
1980 Ford XLT F350
400 Engine (rebuilt to 406) Holley 2300 500 CFM manual Choke Carb Under Restore (1st time) |
|
Administrator
|
Wow! You did do a thorough job - both with hanging the doors as well as writing up the process.
 As for how hard it is to close the doors, crack a window open and see what difference that makes. The new weatherstripping has been on Big Blue for probably three years now and it still takes a significant push to get the second door shut - unless you have a window open. The cab is that tight and the air is getting compressed.
Gary, AKA "Gary fellow": Profile
Dad's: '81 F150 Ranger XLT 4x4: Down for restomod: Full-roller "stroked 351M" w/Trick Flow heads & intake, EEC-V SEFI/E4OD/3.50 gears w/Kevlar clutches
|
Re: Diary of a Restore (Thread)
|
|
In reply to this post by AmericanSavage
So today, I finished up the door panels, and riveting in the rattle window seal (inner)—used washer on the back side, it helped.
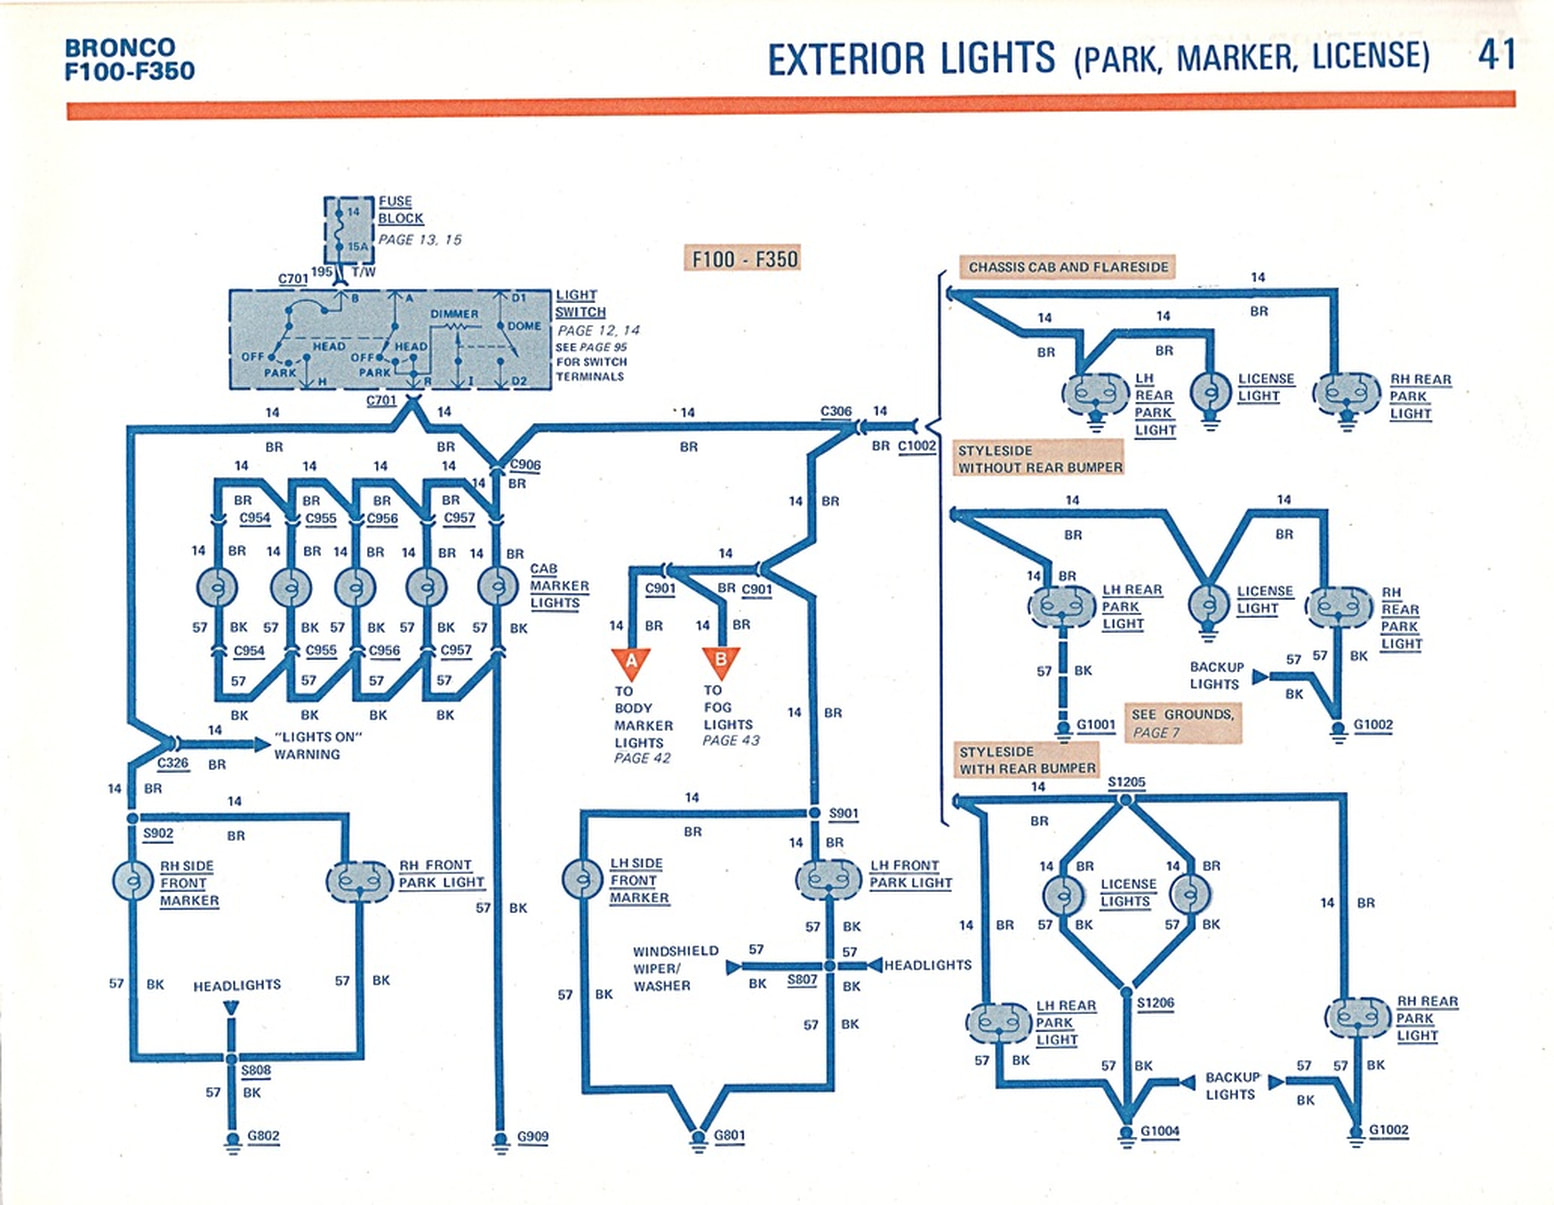
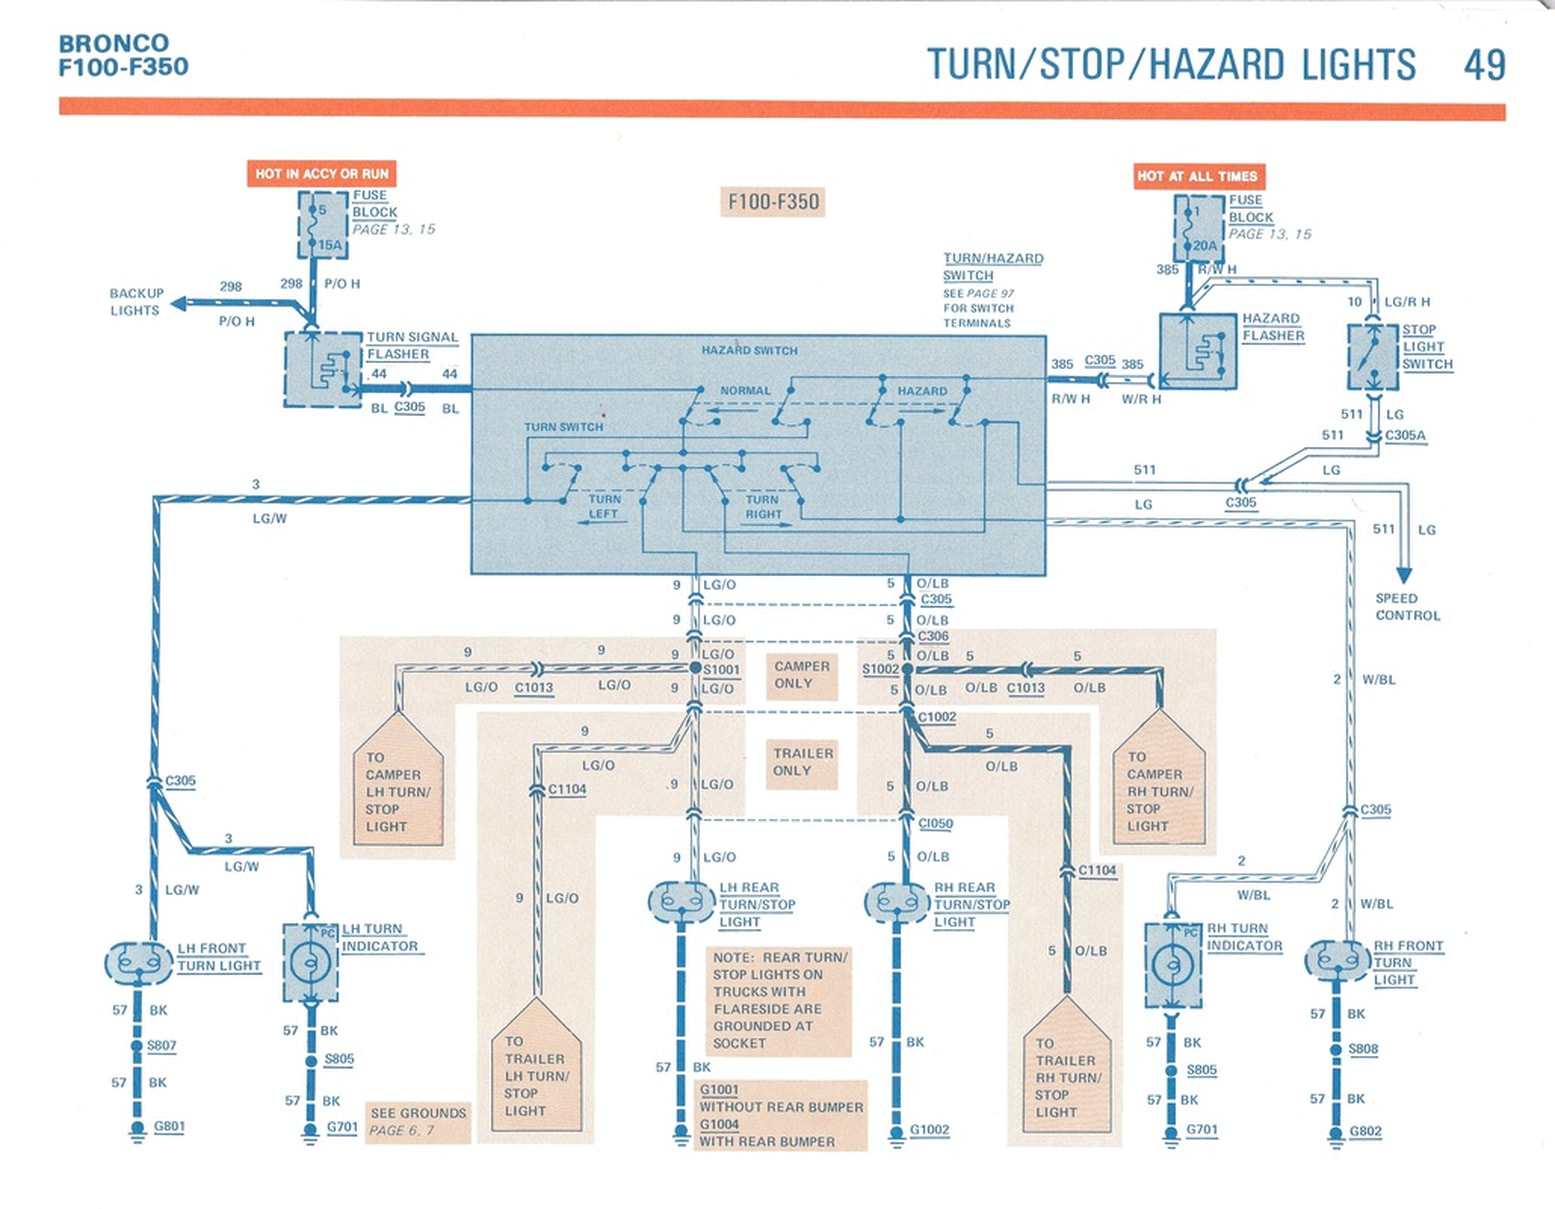
Anyway, one of the persistent problems when I got the truck was, as we drove it back for the first time, the park lights seemed brighter on one side than the other. Same for turn signal. Flasher is fast too in both directions. I thought I would get to this later. Now is later. I rewired the rear, putting in deutsch plugs, all sockets and bulbs are new. On D-side, front park light socket is new. All bulbs new on front. Headlights work dreamy BTW. Here is the problem. On the D side, both in the front parklight, and the rear tailight, it is bright. It looks to me BOTH filaments are lit up in the front and the rear. Hence, left blinker barely registers. Pass side: both front and back light are dimmer (small filament is lit up). Blinking is more noticeable. Has anyone experienced this? I did some searching, and cannot find a particular answer to any of this. Crossed wires? Short circuit someplace? Switch? Flasher issue too? Maybe I should post this to the general community as well. If anyone has ideas, or can point me in some direction, I am more than happy to do some footwork here. Electrical was easier on the Harley. Motor vehicles, not so much 
1980 Ford XLT F350
400 Engine (rebuilt to 406) Holley 2300 500 CFM manual Choke Carb Under Restore (1st time) |
|
Administrator
|
The park/turn lights have two separate circuits in them, as do the tail/brake lights. And about the only thing in common is the fuse and the ground. So it seems like there's a short somewhere.
Gary, AKA "Gary fellow": Profile
Dad's: '81 F150 Ranger XLT 4x4: Down for restomod: Full-roller "stroked 351M" w/Trick Flow heads & intake, EEC-V SEFI/E4OD/3.50 gears w/Kevlar clutches
|
Re: Diary of a Restore (Thread)
|
|
Well now this is embarassing….
 OK, so I started looking at the wires on the D side today with the schematics both Gary sent, and the super big one I have on hand showing all the wires and where they go for the entire truck. I found (unrelated) three wires going nowhere on d side engine compartment that are hot when the key is off (I am assuming all the time they are hot). I post pic below. You can see them with plug ends and nothing going to them. They are located quite close together. I looked at truck schematic, and have no idea where/what these are for. OK, onto the task at hand: I tried the flashers with the ignition off. The pass side was bright and the D side was dim. On the D side last night, recall, the park lights were the D side bright and the pass side dim. I had an extra flasher on me, and to test the blinkers (remember they went super fast) I changed it out. That Fixed THAT problem! Then I turned on the park lights again. Same problem (of course) as last night. I started to look at the bulbs. I thought last night both filaments were lighting up on the D-side. My eyes are not what they used to be. A closer and better look today it was only the lower brighter filament making it appear both were on. 1157 bulbs have an upper and lower filament. They run on a different resistance (if that’s the way to put it). On the D side, the park lights went to the smaller (lower, brighter) filiment. On the pass side the opposite. So, I concluded, someone before me swapped the wires in the D side. So I swapped them back. It seems problem is solved. I have uniformity all around. Flashers work, turn signals work and blink at the normal rate. I feel like I am living in a dream. It cannot be that easy. 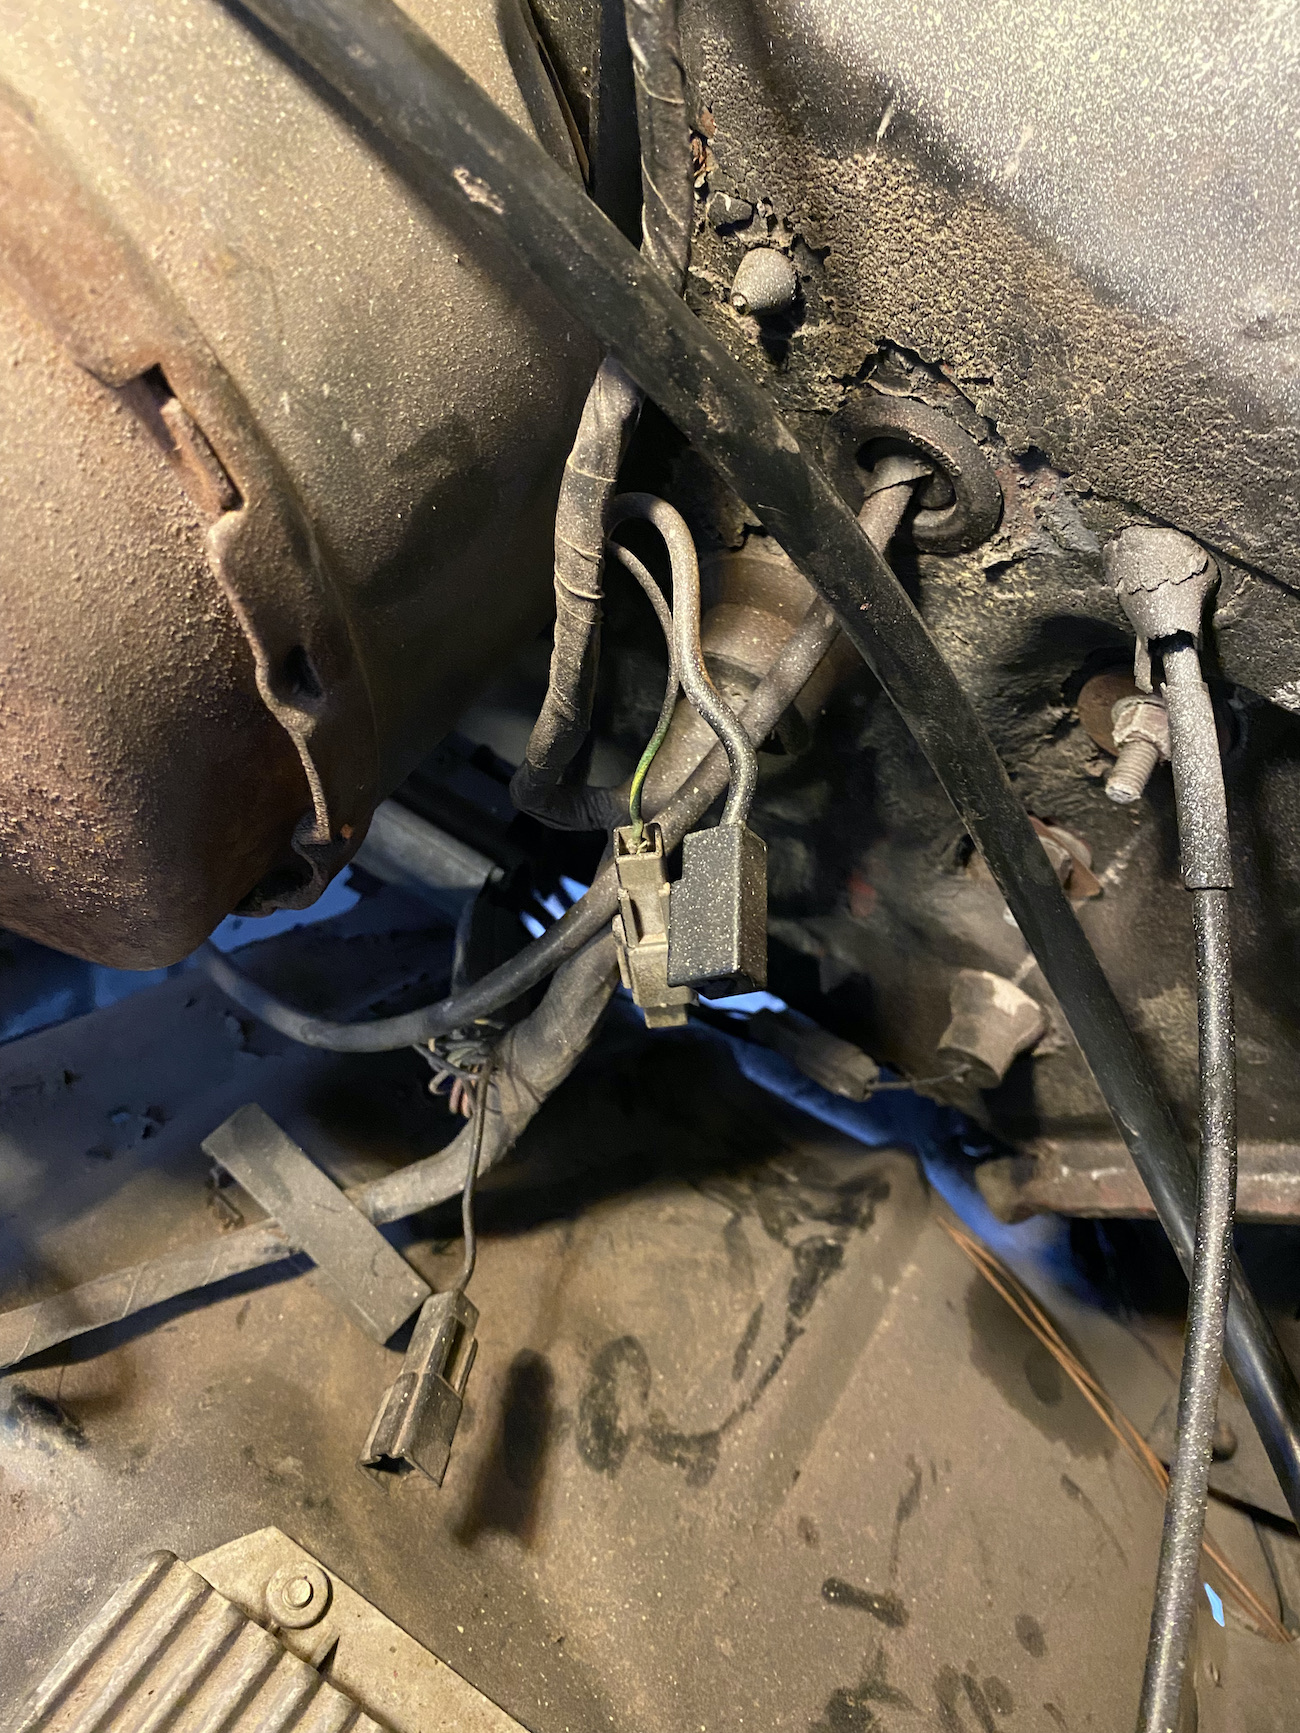
1980 Ford XLT F350
400 Engine (rebuilt to 406) Holley 2300 500 CFM manual Choke Carb Under Restore (1st time) |
|
|
Are you sure they are ALL HOT with the key off? Where the lights on when you checked? I want to say 1 of the wires is to a trailer relay when you have the tow package and that would be hot with lights on. I would have to look atmy truck to see what I have them going to as I used 1 maybe 2 for different things like to my fog / driving lights and maybe trailer brake controller? Dave ---- god job on fixing the dim lights
Dave G.
81 F100 flare side 300 six / AA OD / NP435 / 2.75 gear http://cars.grantskingdom1.com/index.php/1980-Ford-F100?page=1 81 F100 style side 300 six/SROD parts truck -RIP http://cars.grantskingdom1.com/index.php/1981-Ford-F100 |
|
Administrator
|
In reply to this post by AmericanSavage
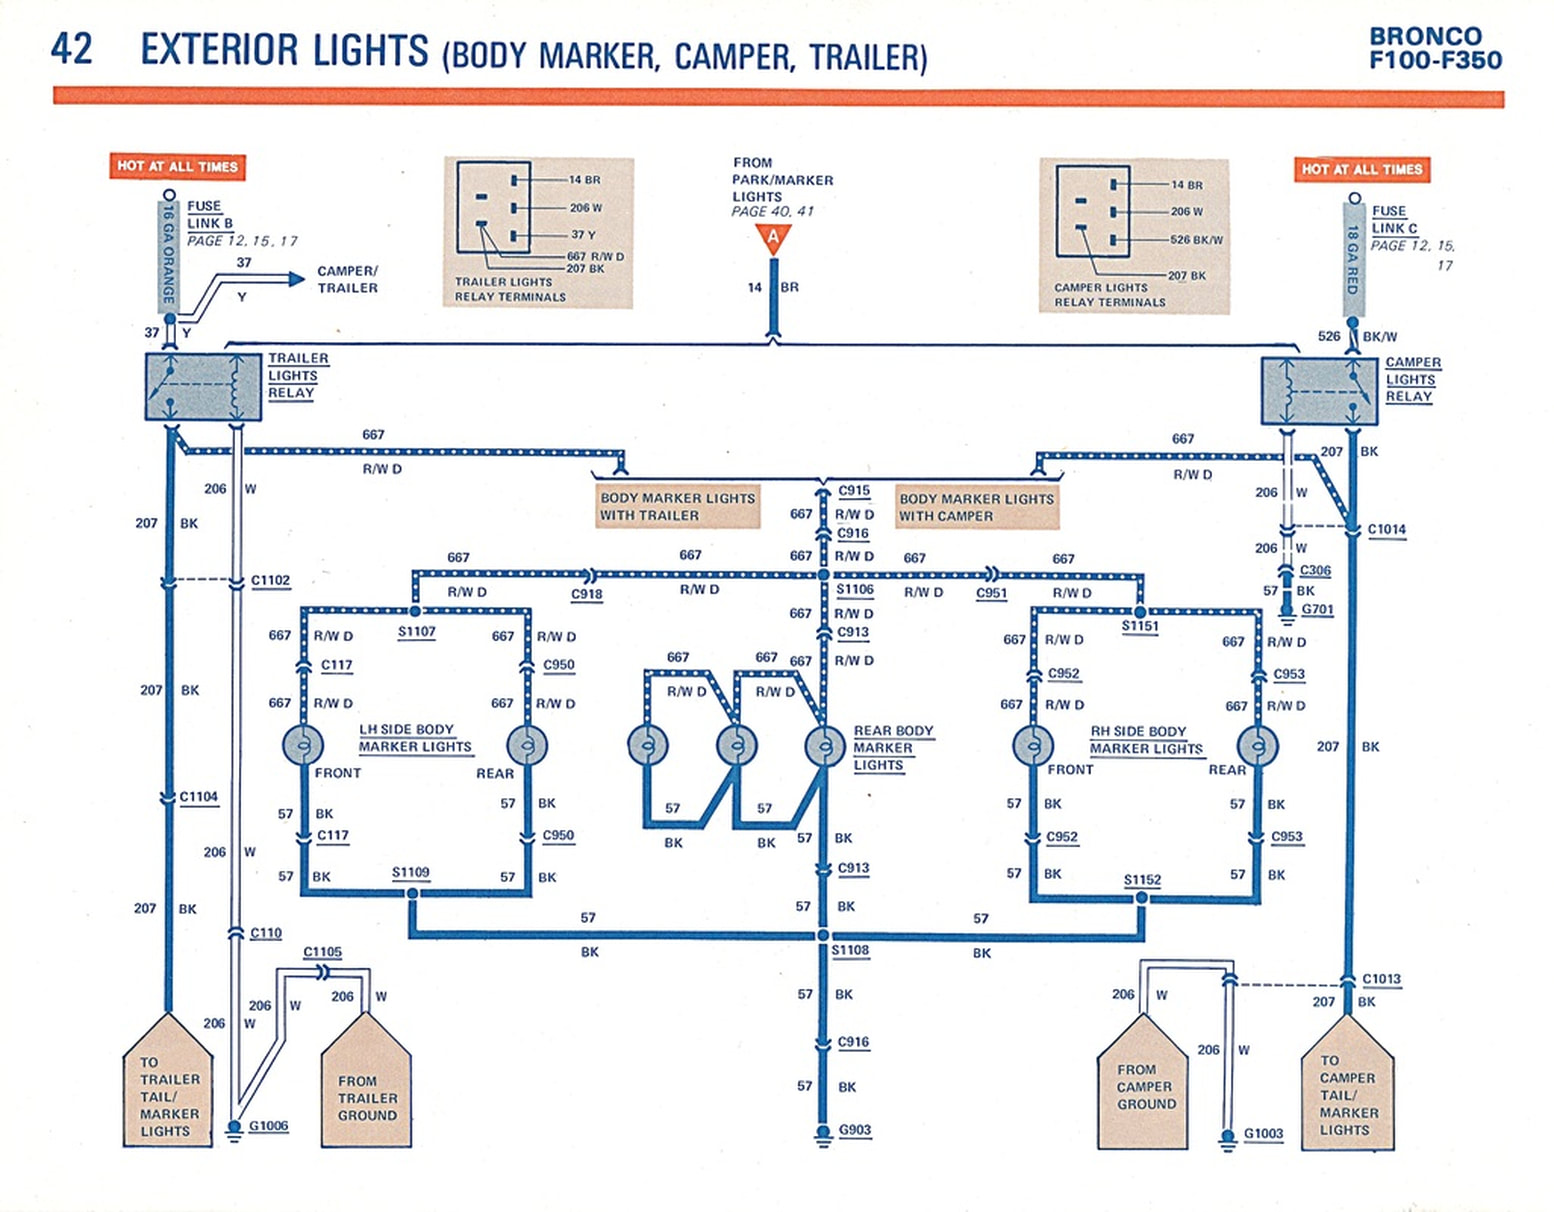
One wire is probably the Yellow wire to Trailer Power as Dave suggested. Another might be the BK/W for the Camper. See the schematic below.
And the third might be the one for the underhood light, and I don't have the color nor schematic to-hand. 
Gary, AKA "Gary fellow": Profile
Dad's: '81 F150 Ranger XLT 4x4: Down for restomod: Full-roller "stroked 351M" w/Trick Flow heads & intake, EEC-V SEFI/E4OD/3.50 gears w/Kevlar clutches
|
Re: Diary of a Restore (Thread)
|
|
This post was updated on .
Hey Dave,
Yes, ALL were hot with the key off. I will check this again tomorrow. Could one be like for a throttle position sensor? But that would seem to run off the ignition, so...... I have no under the hood light, and so, if I can find a new unit for that application, that will be added. But the other two? the 12 gauge(?) wire (it is thick) is black yellow (or orange, or some such). The smaller yellow/black has the end of the plug still in it, with the wire ripped out. Thank you all. I will look at my big schematic again tonight and see if I can see anything. I know it has a section on tow package schematic on a 4th sheet. I have it printed on three 11x17 papers taped together. Cheers!
1980 Ford XLT F350
400 Engine (rebuilt to 406) Holley 2300 500 CFM manual Choke Carb Under Restore (1st time) |
|
|
After reading what Gary posted I would go with what he posted as I forgot about the under hood light and that would be hot all the time.
I will have to look at my turn, still in vac mode LOL, to see what I am using as I know I used 1 or 2 of them wires. But other wise they dont get hooked to anything. Dave ----
Dave G.
81 F100 flare side 300 six / AA OD / NP435 / 2.75 gear http://cars.grantskingdom1.com/index.php/1980-Ford-F100?page=1 81 F100 style side 300 six/SROD parts truck -RIP http://cars.grantskingdom1.com/index.php/1981-Ford-F100 |
Re: Diary of a Restore (Thread)
|
|
Gary and Dave,
I found this from the 1981 schematics--it is not on my 1980 schematic, which also has a nice little part on adding a 2nd battery like with Gary's Blue! Anyway, here it is. I have circled it. It matches in color scheme one of my wires there. Now what to purchase a hood lamp. Suggestions? I still have not checked the other two wires with the key off. And in Assc, and ON. Will do that. Crazy day today and not much done on the truck, but I did manage to break one of those terrible dome connectors.  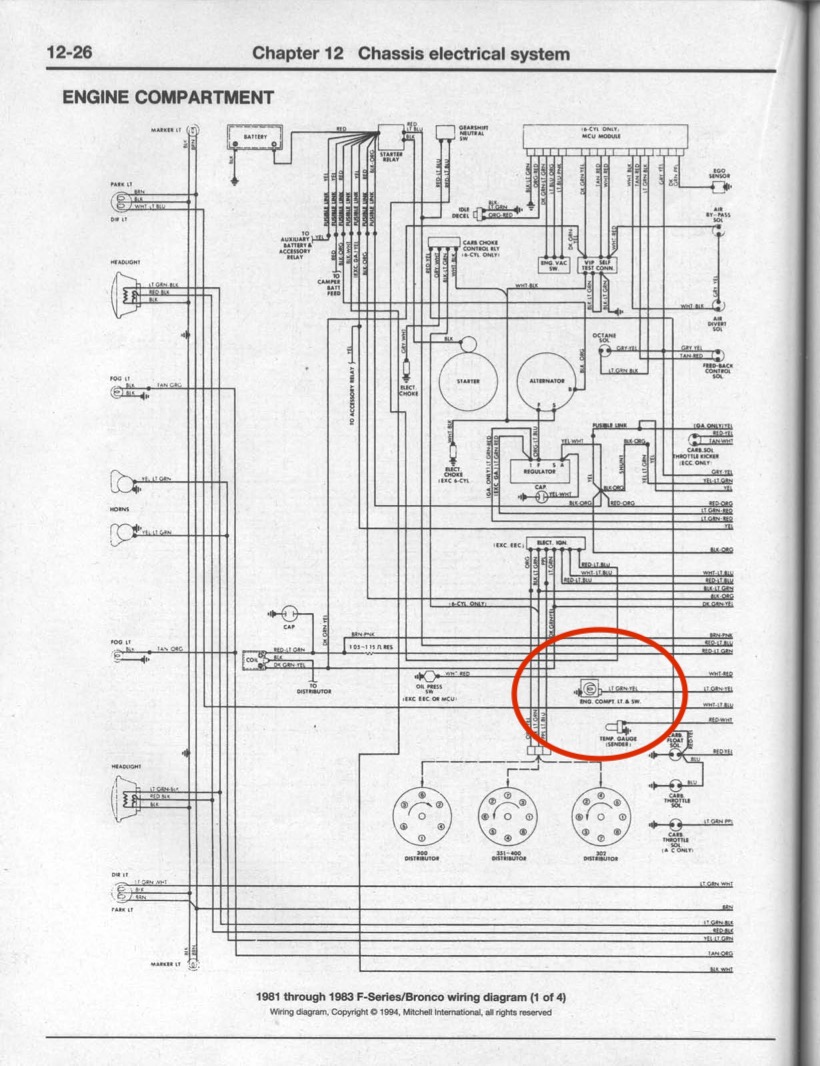
1980 Ford XLT F350
400 Engine (rebuilt to 406) Holley 2300 500 CFM manual Choke Carb Under Restore (1st time) |
|
Administrator
|
I found the engine compartment light in the '81 EVTM, as shown below.
As for getting one, I did a search on the forum for "engine compartment light" and got this. Note that there are multiple pages to the results. 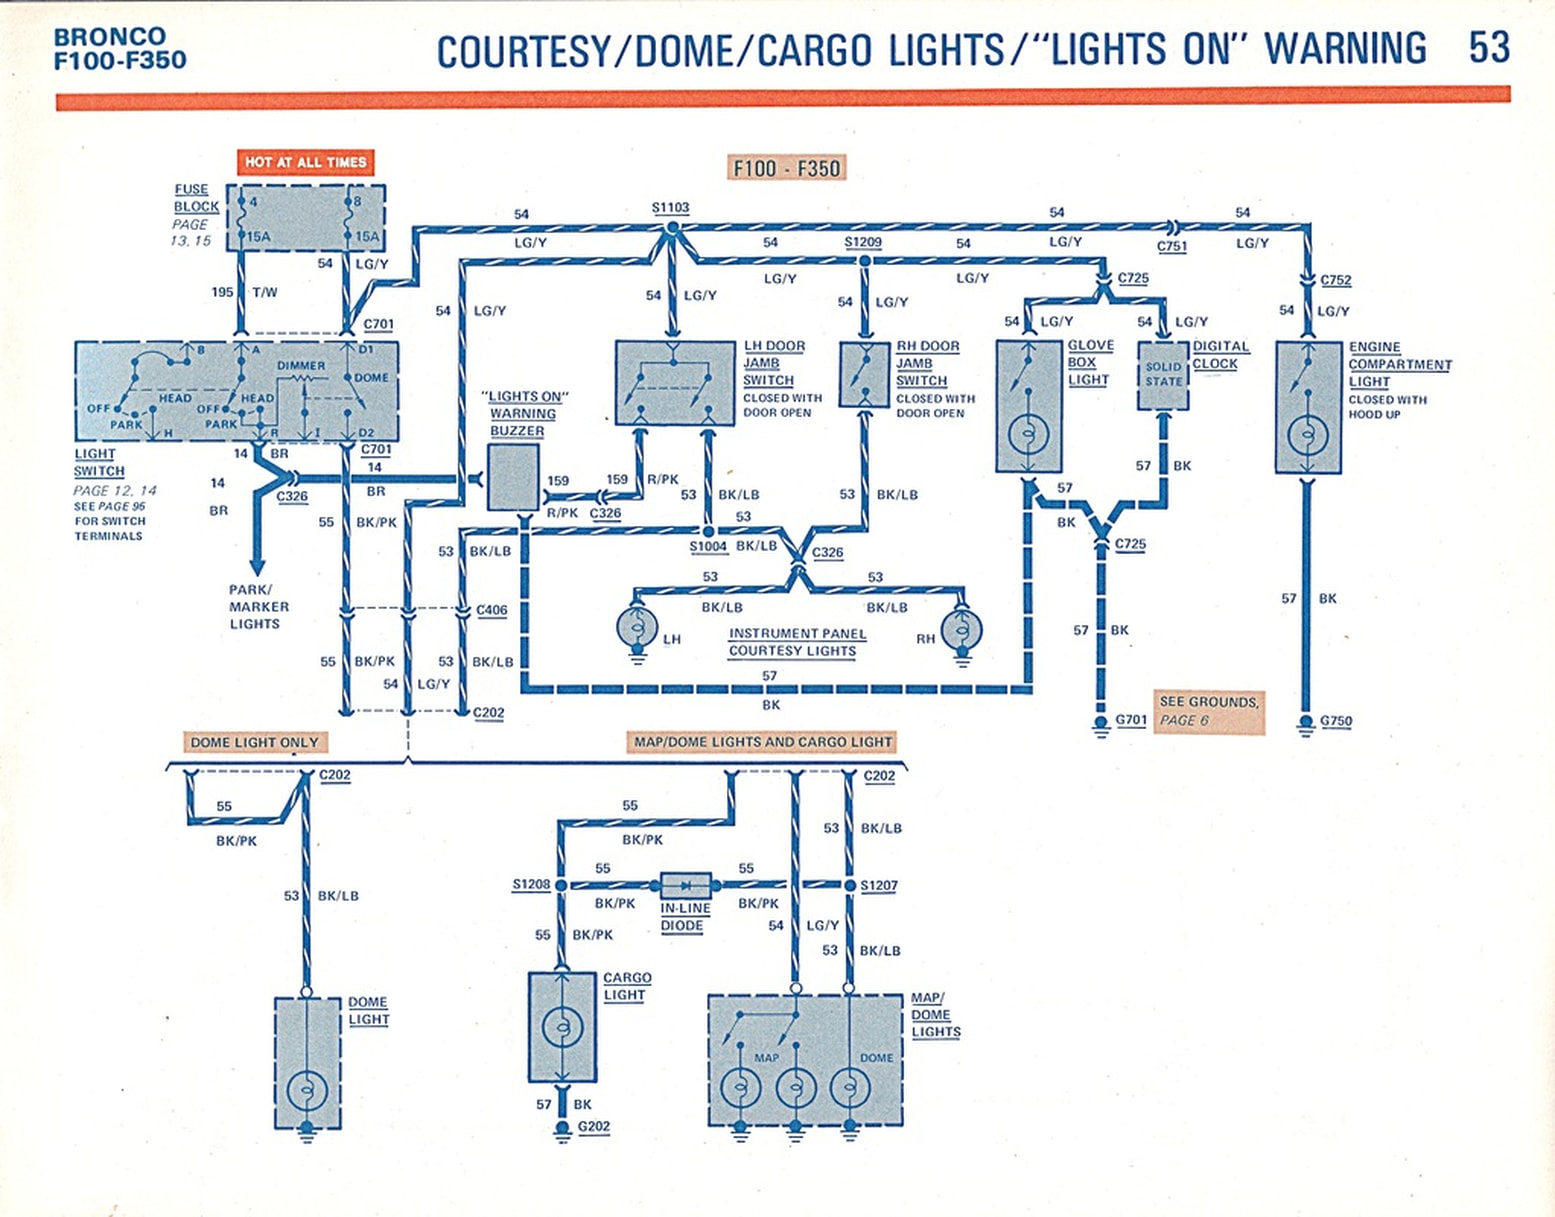
Gary, AKA "Gary fellow": Profile
Dad's: '81 F150 Ranger XLT 4x4: Down for restomod: Full-roller "stroked 351M" w/Trick Flow heads & intake, EEC-V SEFI/E4OD/3.50 gears w/Kevlar clutches
|
Re: Diary of a Restore (Thread)
|
|
In reply to this post by AmericanSavage
Gary and Dave,
Ok I finally had time today to recheck the three wires in the engine. From the pic I sent above--the two upper wires are indeed hot all the time. One of those is the hood light as we discussed. The lower wire I must have checked with the park lights on because....not hot all the time, but does come on when park lights are on even with the key out of the ignition. I am guess part of the tow/camper package?
1980 Ford XLT F350
400 Engine (rebuilt to 406) Holley 2300 500 CFM manual Choke Carb Under Restore (1st time) |
|
Administrator
|
If the wire is Brown it is probably the one shown in the middle top of the schematic as being From Park/Marker Lights. It would serve to pull either relay in when the lights come on.
Gary, AKA "Gary fellow": Profile
Dad's: '81 F150 Ranger XLT 4x4: Down for restomod: Full-roller "stroked 351M" w/Trick Flow heads & intake, EEC-V SEFI/E4OD/3.50 gears w/Kevlar clutches
|
|
|
In reply to this post by AmericanSavage
If it is the seal I think it is it is not for water but air noise. It is on the upper front edge of the window frame right? Think they found air would get cough in the frame to cab post and cause noise. I cant remember ifmy seal kit came with that part or not now and if it did I have not installed it yet. Then again I dont know how much noise it would stop rest of the truck is pretty noisy but its a truck LOL Yes I have rug down, it helped a lot, and peel & stick inside the doors that also helped. Dave ----
Dave G.
81 F100 flare side 300 six / AA OD / NP435 / 2.75 gear http://cars.grantskingdom1.com/index.php/1980-Ford-F100?page=1 81 F100 style side 300 six/SROD parts truck -RIP http://cars.grantskingdom1.com/index.php/1981-Ford-F100 |
Re: Diary of a Restore (Thread)
|
|
Hey Dave!
I have been doing a lot of final touch-up and detailing of late—I will post on that later. As to your question, it goes along the full front and top opf the door. LMC calls it a weatherstrip. Here is a pic: 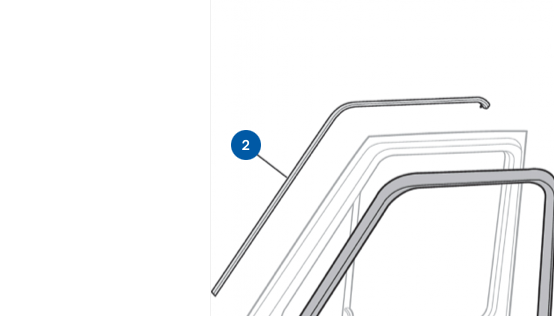
1980 Ford XLT F350
400 Engine (rebuilt to 406) Holley 2300 500 CFM manual Choke Carb Under Restore (1st time) |
Re: Diary of a Restore (Thread)
|
|
I ordered mine from LMC.
Had to drill a little hole at one extremity, it is not just stick holding on the door edge, one end needs to be clipped.
Jeff / 1984 F350 Crew Cab 4x4/5.8L w351 4V/ T18/ D50 4.10 front/ 8' bed.
Restored 2019-2022. Nicknamed «Big Brother 1984», due to its soooo-looong shape & nod to George Orwell's 1984 famous novel. |
Re: Diary of a Restore (Thread)
|
|
I just got them today==took a week to get here. There is a plastic end to push through on mine as well, but I have no hole, and I do not know how I feel about drilling one. All the originals I have seen are pure stick.
1980 Ford XLT F350
400 Engine (rebuilt to 406) Holley 2300 500 CFM manual Choke Carb Under Restore (1st time) |
Re: Diary of a Restore (Thread)
|
|
In reply to this post by BigBrother-84
OK, so while I waited for the weatherstrip to come, I went to the pick and retrieved a headliner off a 86 truck. It was aftermarket and the board was new. The headliner itself is not stock—green fall leaves. This means that I will order a new headliner at some point to fir the stock interior, but the board itself was in excellent shape, and it fit. $20 was a bargain.
So, I have been detailing the interior a bit, and repairing the dome light connectors. Found many of those breakable things at the pick. While I have been waiting, I decided to crawl under the truck. I greased all the fittings and looked around. I have a few questions/issues. 1. The oil pan leaks from where, it seems, the gasket was crushed in several places. I am thinking a 4 piece milodon. I assume a single piece would not be finagled into place without dropping the whole pan. But, I do not know how difficult this would be to not jack the engine and work with the pan in place resting on the cross. Can it be changed without jacking up the engine? Looks tight in the front. Gary, I noticed on your blue restore you used what looks like corner reinforcements on your pan. Where did you get them? 2. The front differential looks…god awful. No drain plug, so I need to siphon it out (same for rear diff). I have 75-90 to replace (I cannot find an exact rec from Ford other than a part # which seems like it is lighter than 80-90. I have the normal 80-90 for the rear. So, what does anyone use to siphon oil? See pic. The rear diff, transmission oil looks good, but I will probably replace the fluids. I have the rear limited slip fluid (Motorcraft, 4oz) to replace with it as well. 3. I have Mercon for the transfer, but I have a drain plug and that looks easy enough. Does anyone use a pressurized system to fill all these back up? What do you use? I suppose one could use the jugs it came with and drill for a hose through the cap, and an air compressor line to pressurize it by drilling another hole in the jug at the top. 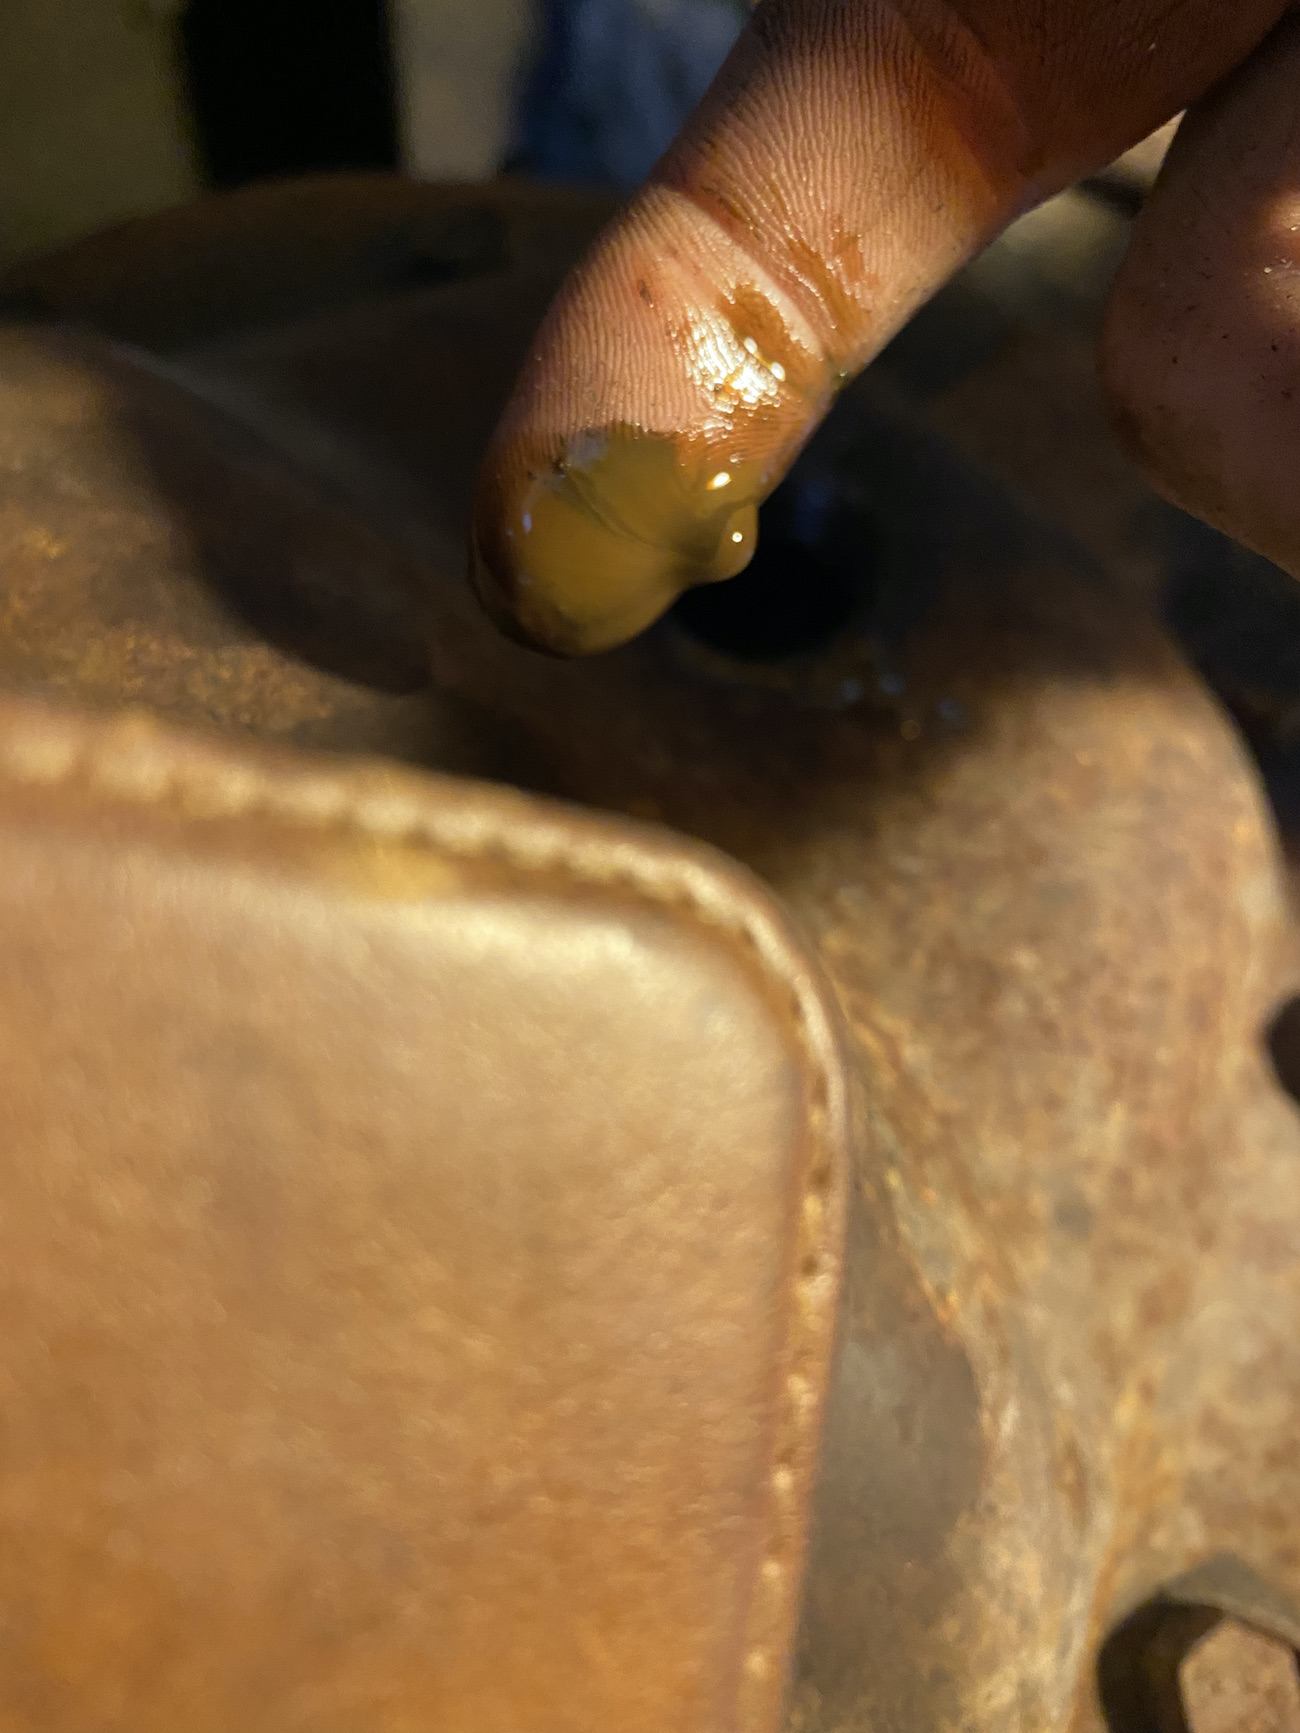
1980 Ford XLT F350
400 Engine (rebuilt to 406) Holley 2300 500 CFM manual Choke Carb Under Restore (1st time) |
|
Administrator
|
Those reinforcements are factory. They were on the '90 460 in Huck the half-truck. So I used them. But I've seen them on other later 460's as well.
As for replacing the pan gasket in situ, good luck. I know of one guy that said he'd pour gas on his truck and light it before trying that again. I've done it on a 351W and felt about like that guy. But I haven't tried it on a 351M/400 and I'm sure that wouldn't be much better. But I'm pretty sure you can't do it w/o jacking the engine up. You'll want to pull the fan shroud and the exhaust, and put a block under the harmonic balancer to jack the engine up. Then when you get it up block the engine up at the mounts 'cause the block on the balancer might slip.
Gary, AKA "Gary fellow": Profile
Dad's: '81 F150 Ranger XLT 4x4: Down for restomod: Full-roller "stroked 351M" w/Trick Flow heads & intake, EEC-V SEFI/E4OD/3.50 gears w/Kevlar clutches
|
| Edit this page |