Fuel Injection upgrade


Administrator
|
I assume the breather cap won't rotate so the barb points toward the center of the engine? Wouldn't that make the routing easier?
The way it is I'd be afraid that the hose would kink. However, you can try it and then change if it does. Otherwise, it is looking GOOD! I hope the dizzy is shipping next week.
Gary, AKA "Gary fellow": Profile
Dad's: '81 F150 Ranger XLT 4x4: Down for restomod: Full-roller "stroked 351M" w/Trick Flow heads & intake, EEC-V SEFI/E4OD/3.50 gears w/Kevlar clutches
|
|
|
Thats what I thought while messing with the engine today trying to come up with an idea. Photo below shows what I came up with, I put the 5/8" barb on the breather towards the center of the engine and routed the 5/8" hose along the front of the sniper down the passenger side. 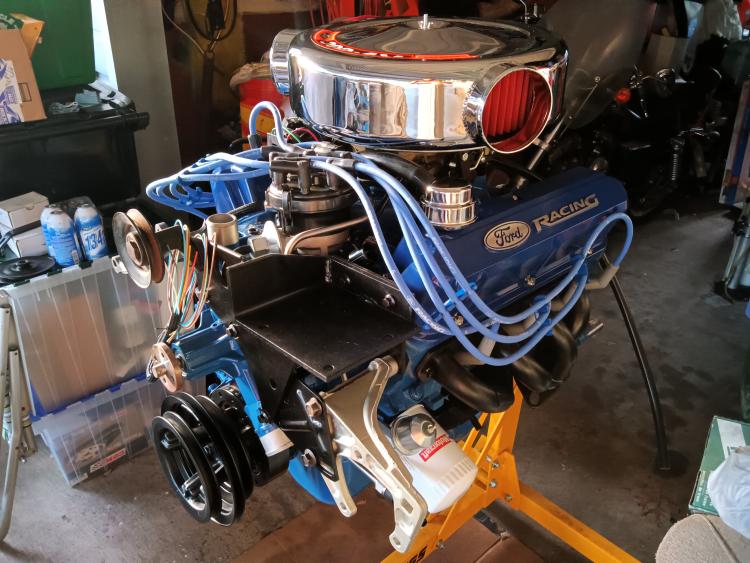 I found the following fitting, its a stainless steel 5/8" barb bulkhead fitting. My plan is to cut off the barb flush with the threads as it will not be needed and then find out what the OD is of the threaded part of the fitting is to source a rubber washer to create a seal to the air cleaner. This will be drilled and mounted in the horizontal flat spot on the air cleaner and the hose will simply go straight up. The place it will be placed will place it next to the breather if I rotate the air cleaner base and I can try that to see how that will look.  And this is how the hose will be route I am thinking on the passenger side where it will go behind the 3/8" stainless steel fuel line. 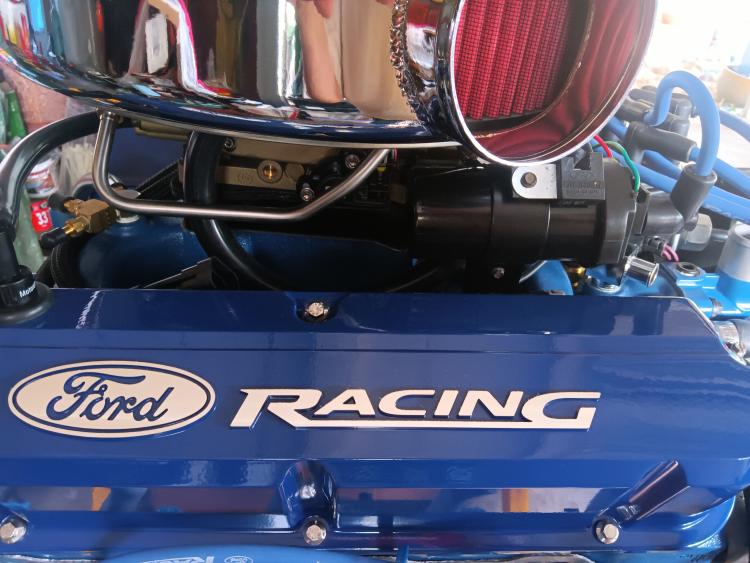
"Old Blue" - '56 Fairlane Town Sedan - 292-4V, Ford-O-Matic transmission, 3.22:1
'63 Belair 2dr sdn - 283-4V, Powerglide transmission, 4.56:1 '78 Cougar XR7 - 351-2V, FMX transmission, 2.75:1 9inch "Bruno" - '82 F150 Flareside - 302-2V, C6 transmission, 2.75:1 9inch, 31x10.50-15 BFG KO2 |
|
Administrator
|
That routing should work and look good. No sharp bends to collapse the hose.
 On the rubber washer, you might look at drain plug washers. Some of those have a rubber center on a metal frame.
Gary, AKA "Gary fellow": Profile
Dad's: '81 F150 Ranger XLT 4x4: Down for restomod: Full-roller "stroked 351M" w/Trick Flow heads & intake, EEC-V SEFI/E4OD/3.50 gears w/Kevlar clutches
|
|
|
Instead of buying them I was going to look at work at the A/C sealing washers we have see if we have one that will fit if so I can toss the metal washers and just use one of theses. Other wise I will have to look into buying and I really dont want to buy cause everything is in huge bags that I will never need. Another option I could try is put a small bead of ultra black silicone on one side of the washers and let it cure over night to be a sort of O-ring and then tighten the nut down compressing the silicone. I really dont need a bag of 50+ rubber washers lol. Im also waiting on the fitting it said it would be delivered by Amazon 1 day, by 6pm today now its showing 10pm today but it still hasnt shipped. I had hope to take care of this tomorrow at work cutting the barb off and seeing if we have a sealing washer in the proper ID to fit this fitting. I also need to slide the silicone hose on it and measure the OD of the hose so I can source a constant tension clamp on it to ensure it doesnt fall off. The other end fits pretty snug on the 5/8" barb so I will leave it without a clamp at the breather, that way I can easily pull the hose off by hand and pull the breather to add oil. Its why I turned the air cleaner where its not perfectly square which bothers the hell out of me cause the air cleaner decal is centered on the left edge to the passenger side snorkel but its off center to the driver side. I did that to ensure I locate the air cleaner properly by using the dash between 302 and 4V as the center line. This should allow the breather to be easily accessible without having to pull the air cleaner to add oil during oil changes or top offs which I shouldnt have to do. I also need to measure some of the other fittings I have such as on the cylinder 4 intake runner that supplies vacuum to the brake booster, cruise control, and the plastic manifold on the firewall which feeds vacuum to the transmission modulator. The brake booster hose fits a bit loose on the brass barb so I do need a constant tension clamp there without a doubt.
"Old Blue" - '56 Fairlane Town Sedan - 292-4V, Ford-O-Matic transmission, 3.22:1
'63 Belair 2dr sdn - 283-4V, Powerglide transmission, 4.56:1 '78 Cougar XR7 - 351-2V, FMX transmission, 2.75:1 9inch "Bruno" - '82 F150 Flareside - 302-2V, C6 transmission, 2.75:1 9inch, 31x10.50-15 BFG KO2 |
|
|
Still no bulkhead fitting, its listed as delayed and not shipped yet so I might have to cancel that order.
On the distributor I called up D.U.I. today and they informed me that they are currently building the distributor and that it will ship this wed without a doubt. That will be good because I am anxious to find out if I can use my NOS blue cap adapter or if it will be too close to my sniper temp sensor in the intake manifold. It looks like it might be but the distributor I currently have in the engine is a new aftermarket one by cardone so it may be different using a OE housing.
"Old Blue" - '56 Fairlane Town Sedan - 292-4V, Ford-O-Matic transmission, 3.22:1
'63 Belair 2dr sdn - 283-4V, Powerglide transmission, 4.56:1 '78 Cougar XR7 - 351-2V, FMX transmission, 2.75:1 9inch "Bruno" - '82 F150 Flareside - 302-2V, C6 transmission, 2.75:1 9inch, 31x10.50-15 BFG KO2 |
|
|
Ok some updates.
First, I got notified yesterday during lunch via email my distributor shipped. Tracking number as of last night was updated and its slated to be delivered Thursday. Second, I got the 5/8" stainless steel hose barb bulkhead fitting yesterday. The hole I will need to drill will have to be 3/4" which I can achieve with my unibit. The clamps I wont be using but the metal washer I will be using even though the ID is abnormally large for the fitting. Third, I ordered more parts via amazon for this weekend. I measured all the silicone hoses and found their OD. I then ordered a bunch of constant tension clamps in black finish 1mm smaller. So I got for the 5/8" PCV vent hose a 23mm clamp I measured just over 24mm, for the 3/8" brake booster hose I got a 14mm clamp I measured right at 15mm, and for the distributor advance line I got a 9mm clamp I measured right at 10mm. I also got a pack of 50 (smallest pack I could get) of black Nylon sealing washers that are listed as a 5/8" hole size but a listed 0.75" ID x 1" OD x 0.06" thickness. I figure this in conjunction with the supplied washers should provide a excellent air seal to the air cleaner base. These constant tension clamps and nylon washer should arrive tomorrow.
"Old Blue" - '56 Fairlane Town Sedan - 292-4V, Ford-O-Matic transmission, 3.22:1
'63 Belair 2dr sdn - 283-4V, Powerglide transmission, 4.56:1 '78 Cougar XR7 - 351-2V, FMX transmission, 2.75:1 9inch "Bruno" - '82 F150 Flareside - 302-2V, C6 transmission, 2.75:1 9inch, 31x10.50-15 BFG KO2 |
|
Administrator
|
Progress!!!
 Glad things are starting to move along. Can't wait for you to get it installed and fired up.
Gary, AKA "Gary fellow": Profile
Dad's: '81 F150 Ranger XLT 4x4: Down for restomod: Full-roller "stroked 351M" w/Trick Flow heads & intake, EEC-V SEFI/E4OD/3.50 gears w/Kevlar clutches
|
|
|
Yep. Distributor came in only thing is the DSII lead is very short compared to the Cardone model I have. I would have to check my truck this weekend as I dont have any photos that shows the distributor lead and how long it is. It very well could be the Cardone model used an excessively long lead and the lead on my DSII from D.U.I. is the OE length which I think is the case cause looking on rock auto the pickup has a short lead just like the D.U.I. one. I didnt get a full mechanical advance curve but they did provide on the instruction sheet that the mechanical advance is 24* @ 3,000 rpm all in, which means on the highway I wont be at full mechanical advance as I am shooting for 75 mph @ 2,750 rpm. This in conjunction with my planned 12* initial will put me at 36* which is the limit I have read for heart shaped combustion chambers like my AFR 165`s have. I would have liked for 22* @ 3,000 that way even at 12* initial it would still be 34* but I could try to bump it up to 14* initial if my starter will like it when the engine is hot. But I lived with 12* initial on the smog engine up from the spec of 8* and this motor should make well over double the power of the emission era engine if it makes my goal of 300hp. Only thing left to do is this weekend get everything situated, prime the oil pump again, apply some Driven assembly grease on the distributor gear stab it and rotate the engine a few revolutions to get the grease on the cam gear and then lock the distributor down at about 12* initial. Then I can pull their grey cap adapter off and see if the NOS blue cap adapter I purchased will fit and clear the Sniper temp sensor. I already cut the barb off on the 5/8" bulkhead fitting and used a file to smooth it out. Just waiting on the nylon washers to come in to make sure they fit the fitting then make mental note to bring home my small unibit from work so I can drill a 3/4" hole. Once I get this done I guess the next step is electrical. Need to start sourcing my metri pack connectors for my fuse/relay box, need to source some Motorcraft 5 pin relays rated at 40-50 amps, and I still need to pick up a 3G alternator so I can mock it up and make necessary modifications on the engine stand vs while leaning over the fender of the truck. I have to go through some 50 pages of notes cause I remember I wrote down what car to order the 3G alternator from so I wouldnt have to worry about reclocking it. I just would have to worry about removing the multi ribbed pulley and replacing it with a V belt pulley. I also need to measure the crank pulley so I can calculate what pulley size to get for the alternator. Seeing as the motor wont spin over 6,000 rpm I could size the pulley to up the alternator rpm to put out more amps at idle while keeping the alternator rpm below max when at 6,000 rpm which I would never hit anyways.
"Old Blue" - '56 Fairlane Town Sedan - 292-4V, Ford-O-Matic transmission, 3.22:1
'63 Belair 2dr sdn - 283-4V, Powerglide transmission, 4.56:1 '78 Cougar XR7 - 351-2V, FMX transmission, 2.75:1 9inch "Bruno" - '82 F150 Flareside - 302-2V, C6 transmission, 2.75:1 9inch, 31x10.50-15 BFG KO2 |
|
|
Got a lot done today even if it wasn't much to do in the first place.
First off, I installed the D.U.I. distributor. While wiping the distributor gear off before applying my Driven Assembly Grease, I noticed on one of the teeth had a chip on it. It's on the top half and I don't think it will mesh with the camshaft, I think the camshaft only meshes on the bottom half of the distributor gear. I will have to do some more digging cause if not I will have to get another gear if the gear on the new Cardone distributor isn't the same and replace the gear. I also found out I can't use the blue cap adapter as it has a raised bump that hits the sniper coolant temp sensor, so I have to stick with the D.U.I. gray cap adapter that has their "Performance Distributors" decals on it. I also found out the blue distributor cap doesn't have the cast 1 for cylinder one so I tried to use the Cardone distributors black cap, and it required some effort to force it firmly onto the cap adapter and removal also was trying to yank the cap adapter up off the spring clips. I decided to keep the blue cap from D.U.I. as on the inside cast into the plastic is "Made in USA" and it fits perfectly. I might try to find a blue distributor cap with the 1 and swap it out as I think D.U.I.`s cap adapter is more OE correct while the one from Cardone might not be made right. Secondly, I got the fitting installed in the airbox and found out the listing for the nylon washers was not correct. Amazon listing said the washers were 5/8" but it also listed 0.75" I.D. which is what I needed 0.75" I.D., well they weren't 0.75" I.D. and I had to go through a few of them till I was able to get one drilled out enough with a unibit so it would fit. Only thing I question now is if the nylon is providing a good seal and isn't leaking air into the air box past the air filter. Third, I got the constant tension clamps on and all of them fit just right. Only issue I found is the 3/8" silicone hose I am using from the cylinder 4 intake runner to provide vacuum to the brake booster, still is able to be spun on the 3/8" hose barb with the clamp on. The others require more force to spin the hose on the barb with the clamp on, so I am comfortable with them I only question the 3/8" barb. I can't get a constant tension clamp in 1mm smaller than I got because I had to open this clamp all the way and squeeze the silicone down to get the clamp on the hose so I can't go any smaller. Hopefully sitting for a few days, the clamp will create a seal if there isn't a good seal. Besides that, I'm waiting for JetHot to get back with me next month as they said they would touch base with me in November to see if I was ready to ship my headers in. If they do message me back, I will try and see if I can get them to work with me to get a better price because I still feel almost $700 is too much for ceramic coating shorty headers. I'm also thinking about spending tomorrow online going through my records and seeing what connectors I decided on for my auxiliary fuse/relay box. I am going to start making the wiring up for the box I think next. On the other forum I didn't think about it, but it was brought to my attention instead of using a temperature vacuum switch for my Evap system like I was thinking I could just use the sniper and that is right. There are a few programmable wires that I can program one to provide a ground on the wire at 160* which is when the sniper goes into learn mode. I can then use that ground wire to trigger a relay which can send battery voltage to a vacuum solenoid that will open the vacuum port via electrical solenoid. Similar to how the bowl vent solenoid worked on these trucks. Only thing is I already have all the relay ports spoken for, but I do know that Bosch makes a 5 pin mini relay that is good to 50 - 60 amps and I could consolidate the two reserved relay spots into a single relay for if I decide to run a roll bar with four more auxiliary lights. I would go with a 5 pin Mini relay good for at least 50A - 60A but get one with dual 87 terminals, that way I can splice double wires into each terminal to obtain four wires to provide individual power to each auxiliary light. This would open up a relay spot for use as a vacuum solenoid to maintain functionality of the evap system. I also need to revisit my wiring schematics and make these changes I also need to review my connectors as I will be having a short 6" minimum lead coming out of the fuse/relay box so I can work on the wiring outside of the truck and then mount the box and then make the wires up to the connectors on the truck. I know my plan was three connectors, a heavy gauge connector with battery power and battery ground for the box, a connector for auxiliary circuits ie headlights, driving lights, four auxiliary roll bar lights, CB, and CB Amp, and a connector for the engine itself for the EFI, the A/C clutch and the Evap system solenoid if I decide to retain that functionality. Now for the photos. This is the photo of the small chip in the distributor gear that I believe is high enough to not contact the camshaft. 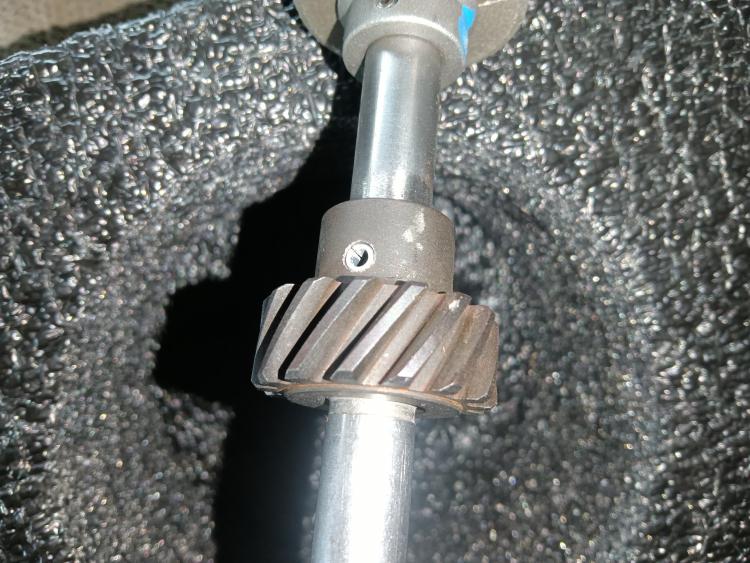 This is the photo of the 5/8" hose barb bulkhead fitting I modified, installed in the airbox base. 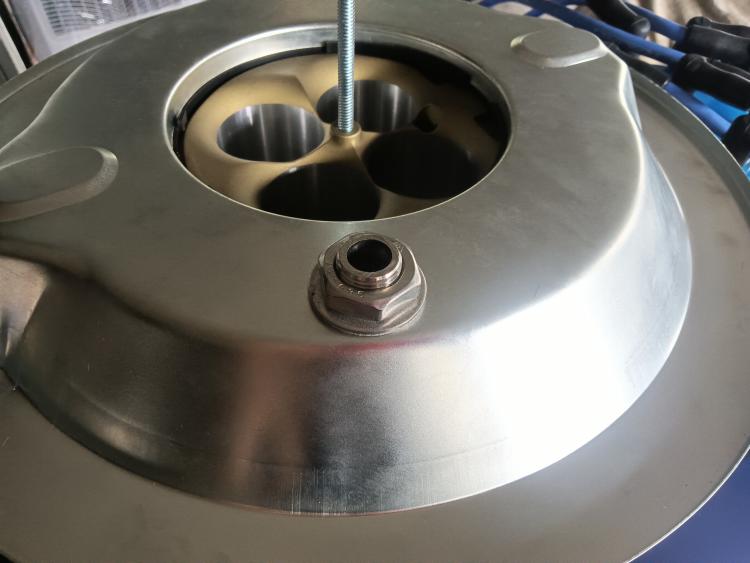 This is the photo of the 5/8" vent hose attached and routed.  This is the photo of the D.U.I. distributor installed using their blue cap and their gray cap adapter. 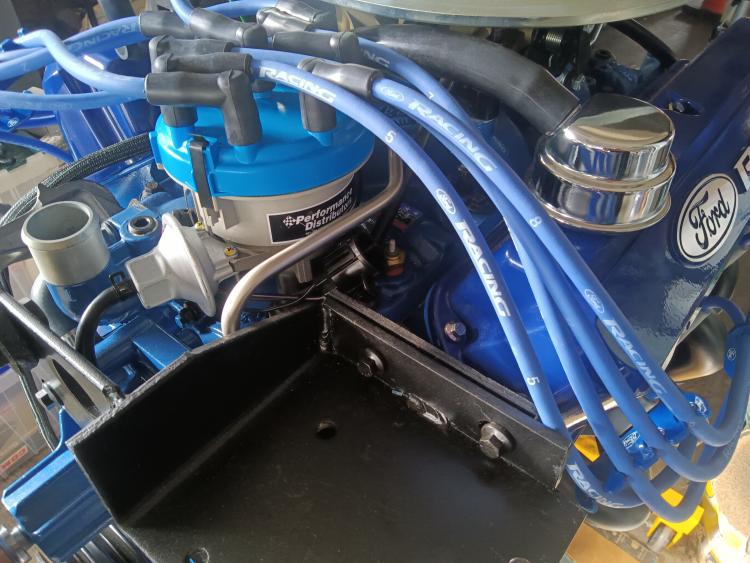 This is a photo of the constant tension spring clamp on the 3/8" silicone hose for the brake booster. This is the one that still spins but with more effort required than without the clamp. 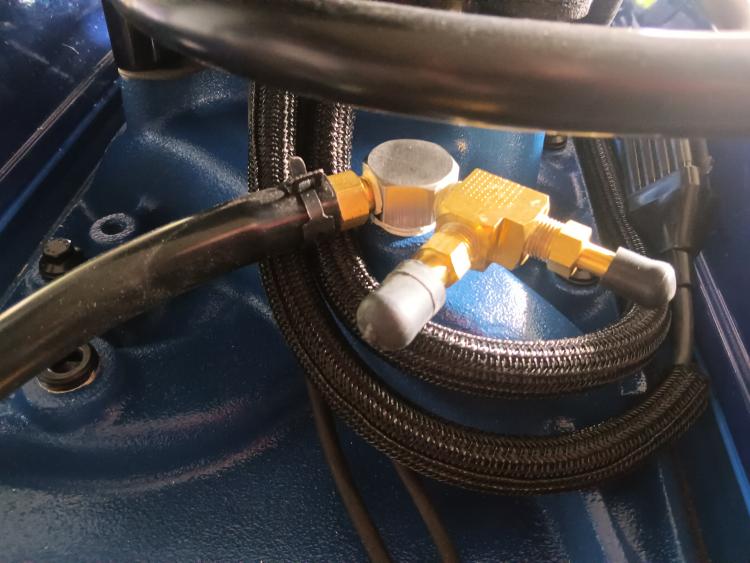 And a final photo of the airbox reinstalled with the D.U.I. distributor. 
"Old Blue" - '56 Fairlane Town Sedan - 292-4V, Ford-O-Matic transmission, 3.22:1
'63 Belair 2dr sdn - 283-4V, Powerglide transmission, 4.56:1 '78 Cougar XR7 - 351-2V, FMX transmission, 2.75:1 9inch "Bruno" - '82 F150 Flareside - 302-2V, C6 transmission, 2.75:1 9inch, 31x10.50-15 BFG KO2 |
|
Administrator
|
It is really coming together!
 On the distributor cap adapter, can you grind that bump off? It really wouldn't be seen, would it? Air box fitting looks good, but I'd put some Loctite PST on it to ensure it doesn't leak. Seems like you have the connectors planned out. But the relay/vacuum switch combo seems more complicated that a coolant temp switch to open a vacuum port. However it should work fine if you have room for the relay and the vacuum switch.
Gary, AKA "Gary fellow": Profile
Dad's: '81 F150 Ranger XLT 4x4: Down for restomod: Full-roller "stroked 351M" w/Trick Flow heads & intake, EEC-V SEFI/E4OD/3.50 gears w/Kevlar clutches
|
|
|
This post was updated on .
I thought about grinding the bump off or down but this NOS cap adapter was quite hard to locate and I hate to do that when I could just as easily have a local paint shop scan the cap adapter to get the blue off it and mix up some spray paint for me and just spray paint a replacement style cap adapter the same color blue as I am only after the blue look but after seeing the gray I kind of like the gray more as it breaks up the black and blue color ensemble that I seem to have with this engine. Its why I keep really leaning towards overpaying for the Jet Hot ceramic coating at $680 for the Off Road 2000 in Titanium color which appears to look like unpolished bare stainless steel. I just can't go with black with how much black I already have. As far as being seen, I could use finer and finer sandpaper and polish the plastic back out till you wouldn't know the bump was ground off. Would take some time but it's something I would consider if it just wasn't so hard to locate these blue cap adapters NOS now a days. On the fitting, I been thinking about taking it back off and maybe redoing the nylon washer because I tried my best to get the raised bump ground down on the air cleaner where my unibit punched through, but I didn't get it perfectly smooth as all my drum sanding discs for my air tools and drills are at work and I didn't have anything here at the house to do it. Im a little concerned the bump might be holding the nylon up if the nylon didn't crush down. I did tighten the fitting as tight as I could get it but it's something I think I want to double check. I also will be ordering the nylon washers again this time in 3/4" hose size seeing as the ID spec they give is not correct. That way I won't have to drill a new nylon fitting out if this one I drilled out is damaged by the raised lip I didn't fully get ground down. I don't believe the fitting would get loose, but I have thought about using some of my blue Loctite when I reinstall it just as an added precaution. I also thought about adding another nylon washer on the inside just as double assurance of no leaking around the fitting. On the relay/vacuum solenoid goes it would be more complicated than just simply adding a temperature vacuum switch in the thermostat housing and just hooking my hose up to that. The thing that has me very unsure about it is I am starting to clutter the engine up with way too much stuff and my whole goal was to reduce how cluttered the engine is once installed. I guess either way I go I will still have the cluttering as one way it will be cluttering in the form of an electric vacuum solenoid mounted to the engine and the other would be a temperature vacuum switch mounted in the thermostat housing. Only major difference is no matter what temperature vacuum switch I get it won't open ported vacuum to the purge valve on the charcoal canister till the thermostat opens up since it will be after the 195* thermostat. With the sniper operating it I can have the sniper activate the relay exactly at 160* when the sniper goes into learn mode to ensure the O2 sensors are being monitored when the engine starts to purge the canister. That is if the small bleed in the top of the high flow thermostat doesn't allow enough coolant to bleed through the upper radiator hose to actually warm the vacuum temperature switch up enough to open. before the thermostat starts to open at 195*. I do have to go back through my saved chart however and see what switch is the one I would need as I was looking at a two-port switch that opens above 160*, I think OE was around 130* but I wouldn't want it to open that low if the thermostat bleeds enough coolant through during warm up to heat up the switch. For the relay, currently my plan was for Relay 7 and Relay 8 to be reserved for my roll bar auxiliary lights which I may or may not do until I have firm confirmation that the roll bar won't require drilling through my new stainless steel bed rails. My plan was to use a 30A Bosch relay with dual 87 pins so I would have one light hooked to each pin 87. If I consolidate into one I would need to use a 50/60A Bosch relay with dual 87 pins and then double up the power wires for the two spot lights and the two flood lights into each 87 pin which might be hard to do seeing as what gauge wire I would need to run to prevent a amp drop going from the battery where this box will be mounted down the passenger side frame and up through the bed and up through the roll bar tube to the four lights. That was why my current plan was two 30A Bosch relays with dual 87 pins so I can hook each individual light up to a single terminal. Another option I could do is delete Relay 10 which is nothing more than a relay providing battery voltage to the ignition hot for the sniper when the key is turned on. Reason why I did this is cause the sniper handheld shows voltage but the voltage it shows is the voltage on the key hot wire. Also, I was very seriously considering splicing into the key hot wire for the DS II ignition module as that wire is hot in run and crank positions and I don't believe having that same wire trigger a relay would have an adverse effect on the ignition system. But I may still just drop the column to get to the ignition switch and find which circuit is hot in run and crank and just splice in there just to play it safe. If Dakota Digital releases the RTX cluster for our trucks and I will use it, I do plan on using the Sniper Interface module that will plug into where the sniper handheld plugs in. This will provide decoded information to the Dakota Digital controller for the cluster, this module will when hooked to a Sniper provide to the Dakota Digital cluster information on engine rpm, engine temperature, intake/manifold temperature, MAP/boost, and A/F ratio. This would prevent me having to run a wire inside for coolant temp which is a 3-wire shielded wire as well as splicing into the coil connector again to run a tach signal inside to the Dakota Digital box. This also means I can pull the distributor to pull the Sniper temp sensor and plug it and relocate it to where the OE temp sensor is and I could then throw the NOS blue cap adapter on as the temp sensor is no longer by the distributor. But this is only if Dakota Digital releases their Retro RTX cluster if they dont then I will be forced to run two temp sensors one for Sniper and one for the OE cluster. It also will provide me with MAP which is also engine vacuum, intake air temp and A/F ratio which I can set up warnings to warn me when my O2 sensor goes full lean when the sensor goes bad. It also will allow me to monitor how well my cold air induction system is working by reading intake air temp. It however won't give me a read out on voltage and the Dakota Digital cluster will get its voltage from the battery hot/ground that is connected to the controller. So, in all reality I could eliminate relay 10 and just run a straight key hot from my ignition switch to the sniper and be done. So, there are two ways to open up a relay spot for going electric or coolant controlled vacuum switch. Today however I am just sitting here with my coffee right now going through my wiring folder double checking what connectors I need and verifying if I go with or without a relay controlled vacuum solenoid, I will have enough terminals to make the connections. I really want to order the Delphi connectors today and get them coming so I can at least start making some of the wiring up next weekend on the fuse/relay box. I also need to adjust my wiring schematic as well. My most recent schematic is version 2.6 and I need to make changes to it. For example, I don't think I will be using a DPDT toggle any more to switch between Off, Relay 7, or Relay 7 and 8 being active. I do know I need at the very least an on-off switch as I can't leave my roll bar lights tied into my high beam circuit. That wouldn't be street legal but leaving my driving lights tied in without an on-off switch would be perfectly legal, I did wire up an on-off toggle just in case if some state inspector gave me a hard time having them tied into my high beam circuit but I've never flipped that switch off so when I redo the wiring there will be no wire coming inside to add/take away the ground to my driving light relay. It will just be hard wired to always be active when my high beam relay is active. I also wish I could cut down on the A/C relays I have, currently I have x3 A/C relays in my box. Relay 4 is my A/C shut down, this relay the sniper will ground the relay via Output #6 when the TPS hits a specified value in my case I will find out what the TPS reads at WOT and have it ground Output #6 around 15% before. This will activate Relay 4 which will turn my A/C compressor off if it's on, my A/C compressor would be connected to terminal 87A that is normally hot. Relay 5 is my A/C kick relay, this relay is required as it will when the A/C is on apply ground to Input #1 wire on the sniper which tells the Sniper the A/C is on. Default this kicks the IAC up to prevent a rpm drop with the AC coming on, I however will be switching it to be an RPM bump to override the default idle speed which I hope to have it at OE spec of 575 rpm to the new idle speed of 650 rpm with the A/C on. I will have to see how my engine likes idling at those speeds, it should be fine as both the OE and my Hughes converter should be in the stall so it shouldn't be lugging the engine down in neutral or drive. Then I have Relay 9 which is my A/C clutch relay, since I have dealer A/C the way how I control temperature of the interior of the cab is to adjust the temperature knob which then changes the set point on the temperature bulb that cycles the clutch. To turn the A/C down to be not as cold means the clutch is cycling off and on quickly and I really don't like that load being on this switch. So, I will be running the clutch wire to the box to activate Relay 9 which then will daisy chain directly to Relay 4 which is the cutout relay. The trigger wire to trigger Relay 9 will be daisy chained to Relay 5 to trigger both Relay 9 and 5 at the same time. That is a lot of A/C relays at the end of the day, but they are all required to do what I want. Even if I omit Relay 9 I still have to run the A/C clutch wire to the box for Relay 4 so I can have the sniper cut the clutch out when I am flooring the throttle which would be great on my truck with the power robbing York Compressor I am running. So hopefully I can come up with some changes to the wiring schematic and get a more precise figuring on the connectors I will need as well as figuring out what terminals I need as I plan on depinning the Sniper connectors and making my own wires to plug in between the sniper connector and the connector on my fuse/relay box.
"Old Blue" - '56 Fairlane Town Sedan - 292-4V, Ford-O-Matic transmission, 3.22:1
'63 Belair 2dr sdn - 283-4V, Powerglide transmission, 4.56:1 '78 Cougar XR7 - 351-2V, FMX transmission, 2.75:1 9inch "Bruno" - '82 F150 Flareside - 302-2V, C6 transmission, 2.75:1 9inch, 31x10.50-15 BFG KO2 |
|
Administrator
|
I like the gray/blue on the distributor also, so maybe just stay with it?
On the fitting and possibly a ridge, I use a bolt and washers to flatten things like that. Put the biggest bolt you can get through with a couple of washers each side and tighten down a nut. Flattens it nicely. As for the A/C system, when the Sniper drops the clutch out at 85% throttle will it bring it back in immediately when you let off? I'm not sure the clutch on the old York compressors will like coming in at 6000 RPM when you shift if they are looking at a fully-pressured system. On the lights for the roll bar, is there any chance of using a waterproof relay near the lights?
Gary, AKA "Gary fellow": Profile
Dad's: '81 F150 Ranger XLT 4x4: Down for restomod: Full-roller "stroked 351M" w/Trick Flow heads & intake, EEC-V SEFI/E4OD/3.50 gears w/Kevlar clutches
|
|
|
That is what I am leaning towards right now just sticking with the gray/blue cap and cap adapter for now. I may lose the blue cap in favor of a gray or black cap, a Ford cap with the 1 on it only comes in black. Aftermarket I can get a replacement in gray with the 1 but there is no blue offered with a 1 on it. I could probably do that, what I normally do at work is I knock the ridge down by letting the next step in my unibit bevel the edge on both sides. Sadly, I didn't bring my large unibit just my small one that cuts up to 3/4". On the A/C if I set it to cut the clutch out at say 85% throttle that means every time, I hit 85% throttle or more the sniper will apply ground to the A/C cutout relay which will switch the relay on and move the relay to power terminal 87 with the A/C clutch being on terminal 87A. The clutch will not re-engage till the throttle is below 85%. I may play with the percentage to custom tailor it to keep the rpm down when it re-engages but I believe when I cut the throttle the engine rpm should drop down fairly quickly. Thankfully when I have Broader Performance build my C6 for me I am going to have him play with the standard modulator that shifts out at wide open throttle at 4,500 rpm to 5,500 rpm so the engine should never hit 6,000 rpm when floored in gear. If it poses too much of a problem the simple fix would be to just simply disconnect the sniper trigger to ground the relay to cut the A/C out. I do not believe it will be a problem however at least I hope so, cause the cut out of the A/C will help me performance wise both on the street as well as on the highway. I know in stock form the C6 on the highway will not kick below 2nd gear. Based on the math if I am going around 2,750 rpm in 3rd gear @ 75 mph when I nail the throttle I will drop down into 2nd gear which would start off at around 4150 rpm, by time I hit 5,500 rpm at the shift point at wide open throttle I would be going almost 100 mph. When I shift into 3rd at 5,500 the rpm will drop down to around 3,500 rpm. Only time I would be passing someone is when they are going slower than me and I typically go the speed limit or 5 mph over. So when the limit is 60 - 65 I will be going 65 - 70 and when it hits 75 I will be going 75 as there is no point pushing our trucks much faster than 75 on the highway. If I encounter like I normally do someone going 60 in a 75 and I slowed down to match speed to wait to pass if there were cars in the passing lane already then I would be turning roughly 2,000 rpm @ 60 mph in 3rd gear and when I nail the throttle I will down shift into 2nd gear and be right around 3,300 rpm and I would only have to take it up to about 80 to get around them and get some distance and move over so I will be letting up off the throttle around 4,400 - 4,500 rpm which should be no different than in stock form with the clutch cycling at wide open throttle. Now if I am doing a drag race, things will be a little different I would either stay in gear till I shift into 2nd then let up or stay in it till I shift into 3rd then let up. Usually, the times I've done that it was from a standstill and the moment I hit 2nd gear I let up and, in my case, it would be 55 mph in first gear roughly when I shift which is a little bit slower than the FMX in my '78 Mercury which doesn't shift out of first gear till 60 mph at 4,500 rpm. By time I hit that speed I would already be done anyways so I honestly don't believe the A/C clutch kicking back in would be a huge problem. Just for fun the calculator I use gave these numbers. Mph / Gear / Rpm 20 / 3rd / 716 30 / 3rd / 1074 40 / 3rd / 1432 50 / 3rd / 1790 55 / 3rd / 1969 60 / 3rd / 2148 65 / 3rd / 2327 70 / 3rd / 2506 75 / 3rd / 2685 80 / 3rd / 2864 For top end this is what I am seeing Gear / Mph / Rpm 1 / 55 / 5415 2 / 100 / 5514 3 / 155 / 5550 I know my truck would never hit 5500 rpm in 3rd gear, best I could hope for is 3,500 - 4,000 maybe 4,500 with this engine which would put me at between 100 - 115 mph maybe 128 mph which is I believe is very achievable. Still I highly doubt I would go over 80 in this truck out side of maybe trying it once to see what the truck can do. Besides that below is the Bosch relays I decided I will be using for my circuits. 0 332 014 112 : 12V, 30A, x2 87 terminals. This relay would be used for my low beam, high beam, and driving lights. The dual 87 terminals means I wont have to double up on wires on the single 87 terminal to feed power to dual bulbs. 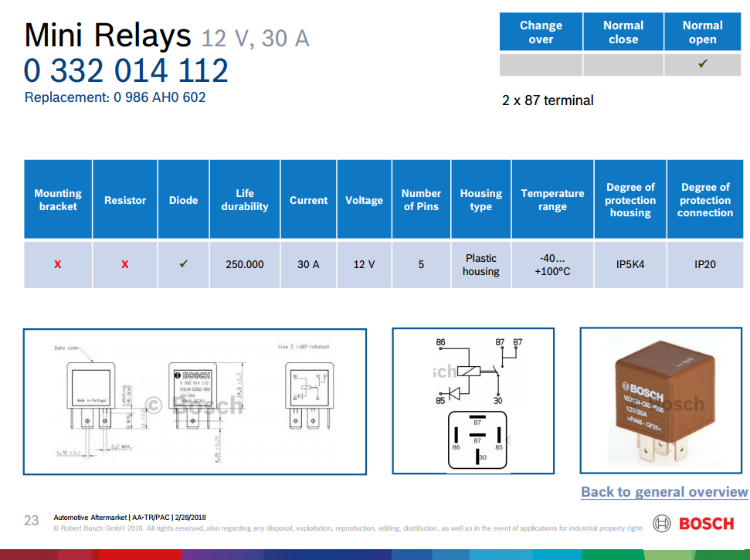 0 332 014 112 : Replacement for above  0 332 019 109 : 12V, 50A, x2 87 terminals. 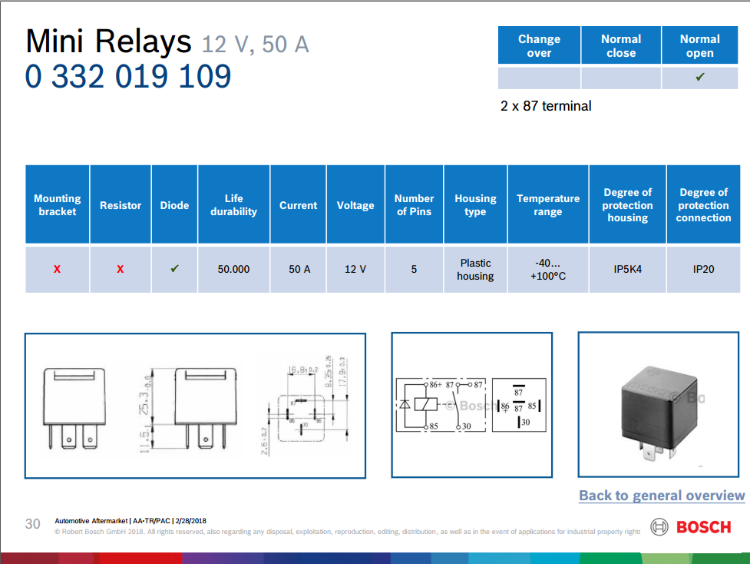 0 332 209 152 : 12V, 30/20A, Change Over. This relay would be used for all other circuits, I dont like the 30/20A but this is the closest 30A one I could find without a mounting tab with a diode. 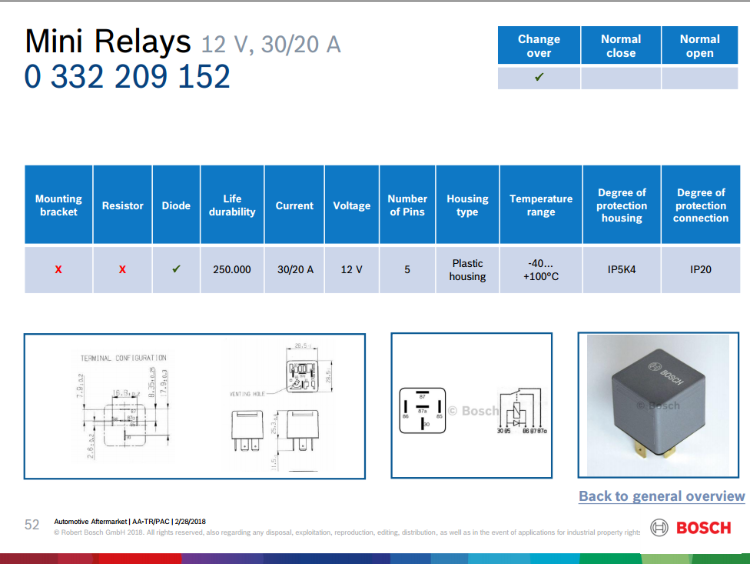 0 986 AH0 151 : 12V, 30A, Change Over. This relay I may go with to run all other circuits over the one above. I just dont like how it doesnt have a diode on the trigger. 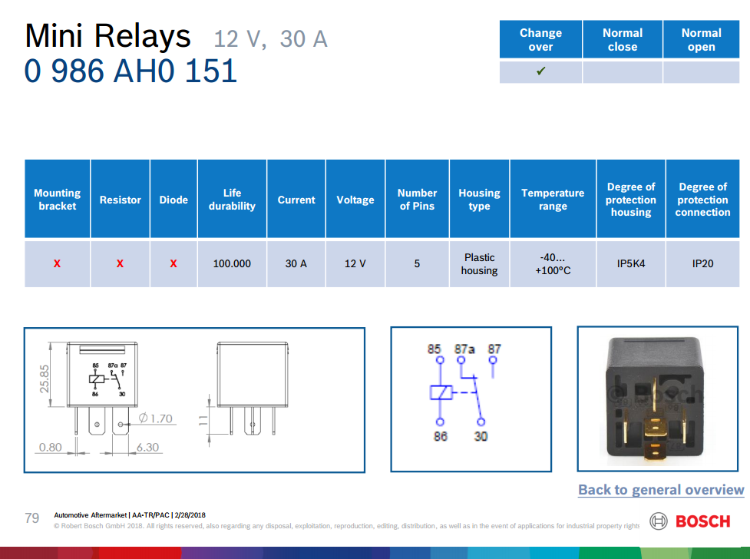 On the roll bar lights, I have thought about putting like a battery lug junction on the frame and just run one fairly large gauge wire from the relay to the lug junction and then hook the bulbs up to this vs running multiple wires to the rear. This is most likely what I will do how ever I just have to calculate how long a run it will be and how big a gauge of wire I need to prevent a over load condition.
"Old Blue" - '56 Fairlane Town Sedan - 292-4V, Ford-O-Matic transmission, 3.22:1
'63 Belair 2dr sdn - 283-4V, Powerglide transmission, 4.56:1 '78 Cougar XR7 - 351-2V, FMX transmission, 2.75:1 9inch "Bruno" - '82 F150 Flareside - 302-2V, C6 transmission, 2.75:1 9inch, 31x10.50-15 BFG KO2 |
|
|
This is what I was able to come up with for my connectors. Still is a work in progress and I am thinking about possibly going with a ten terminal connector for the engine connector and relocate the CB and CB amp wiring to another connector seeing as I may or may not keep my CB down the road. If I could get a good function out of my CB by having the antenna mounted on the roll bar above the cab I would go for it, but I am wary of using the magnetic base after I have the truck painted.
 Wiring wise I have to find another company to get my SLX Crosslink wire, Wiring Depot where I have been buying my wiring from, they don't have their listings for 20ga wiring anymore and I need 20ga to make up the sniper harness connectors. Dont think I will be making anything up on my fuse box this weekend though since I havent ordered anything yet such as connectors. I do have some wiring and I could make some terminals up and just leave them long to make the connector end up when I get the connector.
"Old Blue" - '56 Fairlane Town Sedan - 292-4V, Ford-O-Matic transmission, 3.22:1
'63 Belair 2dr sdn - 283-4V, Powerglide transmission, 4.56:1 '78 Cougar XR7 - 351-2V, FMX transmission, 2.75:1 9inch "Bruno" - '82 F150 Flareside - 302-2V, C6 transmission, 2.75:1 9inch, 31x10.50-15 BFG KO2 |
|
Administrator
|
Why go CB? The new thing is GMRS. Much smaller antenna, and much smaller radio.
Gary, AKA "Gary fellow": Profile
Dad's: '81 F150 Ranger XLT 4x4: Down for restomod: Full-roller "stroked 351M" w/Trick Flow heads & intake, EEC-V SEFI/E4OD/3.50 gears w/Kevlar clutches
|
|
|
It was more of a 80s/90s period thing. I'm also thinking about getting a colored translucent bug shield like was popular in the 80s and 90s and have the name of the truck pinstriped on it like which was big in the 80s and 90s. But as of right now I am seriously doubtful I would keep it but I would keep the circuit because I could repurpose the circuit to provide battery power to the Dakota Digital cluster, it requires its own battery hot, key hot, and ground. So in this case I could repurpose one of the wires. My big thing is its fun listening to and would be usable out on the rural highways especially in bad weather but I am just not sure if its something that would be a huge benefit to me. I did have a Cobra 29 with weather band but it was a custom built refurbished unit that failed on me twice and the guy that built it is not wanting to work on it again so I bought a Galaxy radio to replace it that had a warranty and kept it stock but it has no weather band but it does have side band which is very popular among preppers. Its just like I thought about replacing my current alarm with a viper alarm that has remote start for warming truck up and heater during the winter while I get ready for work. I like the idea of it but doubtful I would benefit from it.
"Old Blue" - '56 Fairlane Town Sedan - 292-4V, Ford-O-Matic transmission, 3.22:1
'63 Belair 2dr sdn - 283-4V, Powerglide transmission, 4.56:1 '78 Cougar XR7 - 351-2V, FMX transmission, 2.75:1 9inch "Bruno" - '82 F150 Flareside - 302-2V, C6 transmission, 2.75:1 9inch, 31x10.50-15 BFG KO2 |
|
|
This post was updated on .
Ok two things, first I got a email reply from D.U.I. and they reviewed the photo of the chip on my distributor gear and said it should not pose a risk to anything as the cam gear shouldn't ride on the outside edge of the gear but should be riding on the inside of the gear. So, what I will do is bring my socket home from work that fits the crank and my breaker bar and rotate the engine over to spread the grease around onto the cam gear and then pull the distributor to look at the contact pattern and see for myself. Either way I will be letting it ride because I didn't know Ford distributor gears are not like GM distributor gears, Ford gears press on while GM gears just slide.
Second, I got an email reply from wiring depot about their SLX Cross Link wire and how I made my list earlier this year and was going to buy the wiring for my project, but they don't have the 20ga wire anymore. I asked if they would be getting it back in stock and was informed that sadly they won't as their manufacturer is no longer making 20ga SLX cross link wire. So, the wiring I got for my headlights will be SXL from them as I got that already and I got a 20ga wire for my choke that I won't be using that I may repurpose for my CB circuit. I did find however Wire Barn who has a great calculator for figuring what gauge wire you need for a set current and set length of wire, I did not know they actually sold wire as well I never really looked. They don't have SXL cross link wire but they do have GXL cross link wire which the only thing different between GXL and SXL is the SXL has slightly thicker insulation than the GXL but they are both automotive rated wire for use in high temp environments as per SAE J-1128, states that it has a temp range of -40C to +125C and has a 50V maximum recommended voltage the same as SXL, it's just not as abrasion resistant. Currently my cart has the following that I have to make sure as I want to get all the wiring, I need at one time to save on shipping and handling. GXL 20ga Yellow 25ft length GXL 20ga Pink 25ft length GXL 20ga Orange 25ft length GXL 20ga Gray 25ft length GXL 12ga Red 25ft length GXL 12ga Black 25ft length GXL 12ga Dk Blue 50ft length I need to check on the length for the Dk Blue cause that will be my fuel pump feed wire and I know Holley`s supplied harness is 12ga but if it's close to the limit I rather upgrade to the next larger gauge size wire. But the above wiring however is currently setting me at $65.95 which I think is a good price for the wires. The 20ga wires are for the sniper accessories and key hot wires, the 12ga red and black is for not just the sniper main power and ground but also will supply main power and ground to my auxiliary box which I will be jumping 18ga wires off of for short runs to the fuses. So, for this weekend I won't do much wiring, I can use the wire I have for the headlights and wire up the circuits for the headlight relays in the box as well as the driving lights and just leave semi long pigtails out of the box till I decide what connectors to go with. ~update~ Talked with the engine builder I know before I left work, he recommended I replace the distributor gear unless D.U.I. will warranty any damage done to the engine. He told me about a tool that is now discontinued but I found on Ebay that is designed to pull and install the distributor gear on Ford TFI distributors which should work on a DSII distributor as well. Only question now is do I use the gear off the Cardone new distributor or buy a new gear from summit. I looked at the MSD gear for $107 that is micro polished and cut for a tight fit to eliminate timing fluctuation, but I also saw a reviewer stating it would be nice if they had the pin location in the OE position on the gear instead of wanting you to drill a new pin hole. So, I guess this weekend I will pull my D.U.I. distributor and mic the distributor shaft and mic the Cardone distributor shaft if they are both the same, I will just swap gears. If they aren't the same, then I will have to do my research and find a gear to buy.
"Old Blue" - '56 Fairlane Town Sedan - 292-4V, Ford-O-Matic transmission, 3.22:1
'63 Belair 2dr sdn - 283-4V, Powerglide transmission, 4.56:1 '78 Cougar XR7 - 351-2V, FMX transmission, 2.75:1 9inch "Bruno" - '82 F150 Flareside - 302-2V, C6 transmission, 2.75:1 9inch, 31x10.50-15 BFG KO2 |
|
|
Been a while, havent done much since my last post. I ended up taking a break but spent the day today working on ordering electrical wiring. Below is what I currently have.
14Ga SXL Wire Orange, this I wont be using for its intended spot light circuit, since I found the dual 87 pin relays I can get away with running 16Ga for each light. 16Ga Blue, this wire will be used for my trigger and for my relay to high beam circuits at each headlight bulb. 16Ga Black, this wire will be used for my trigger ground and for my relay to lighting grounds 16Ga Green, this wire will be used for my relay to driving lights power wire 16Ga Brown, this wire will be used for my relay to auxiliary flood lights 20Ga Green, this wire wont be used, it was planned to be used for my AC clutch relay trigger wire but the AC clutch wire is 18ga not 20ga. Wires I ended up ordering are as follows 16Ga White, this wire will be used for my trigger and for my relay to low beam circuits at each headlight bulb. 16Ga Orange, this wire will be used for my relay to auxiliary spot lights. 18Ga Green, this wire will be used for my AC clutch relay circuit 20Ga Blue, this wire will be used for my Sniper Fuel Pump Relay trigger wire 20Ga Pink, this wire will be used for my Sniper Ignition relay circuit. 20Ga Orange, this wire will be used for A/C Kick relay to Sniper Input #1 circuit 20Ga Grey, this wire will be used for A/C cutout to Sniper Output #6 circuit. I havent bought connectors yet, my plan is to make up what I can on the box and attempt to bundle the wires together to get a better idea of how I want to bundle the wires. I have some ideas for connectors, I have a Aptiv formerly Delphi 150 series connector with 16 pins that I can get the complete set with pins in 20-22Ga for $16.99, I also have a Aptiv 280 series 16 pin connector in 12-16Ga for $17.99 on my wish list, realistically I think I need 10 pin connectors in the 280 series rated at 30A but cant find any on Ebay, I would need two of them one for my headlights/driving lights and another for the roll bar auxiliary lights. I know I need a 480 series 3 pin so I can run my hot and ground wires into the box for the fuses/relays but I havent really looked at those as I found a Aptiv 2, 3, 4 pin terminal kit for $75 that I can pick up and use the two pin connectors for my driving lights and for my roll bar lights at a later date. Still havent done my ceramic coating yet, but I did get a email from JetHot back in December and I was informed that they have a setup now with UPS Ground which would help reduce the shipping costs. I just havent been able to take and go this route as I got in December yet another letter from the IRS that they still cant access my account on their computer and need another 60 days to process my refund. This refund is what I was going to use to buy a bunch more parts for my build and not tax my credit anymore than it is. It is a shame though cause it screwed me more ways than one, like Holley stock prices was down at $2.00 a share and I could have turned $800 of my tax refund into around $5,000 by selling it when it got back up to the price it was before. Just like right now Jet-Hot is doing a discount of 10% off coatings for the month of January if I get the headers sent in by the end of this month. Aside from that, earlier today I was looking at coolant filters. Was looking at 5/8" coolant filters to put before my heater core and a 1 1/2" coolant filter to put before my radiator in the upper radiator hose. Only thing is I am concerned about restrictions to the coolant flow especially considering I have a GMP HD high flow water pump and a Robert-Shaw high flow thermostat which is why I decided to swap my 3 core copper radiator for a 2 core HD Cold Case aluminum radiator.
"Old Blue" - '56 Fairlane Town Sedan - 292-4V, Ford-O-Matic transmission, 3.22:1
'63 Belair 2dr sdn - 283-4V, Powerglide transmission, 4.56:1 '78 Cougar XR7 - 351-2V, FMX transmission, 2.75:1 9inch "Bruno" - '82 F150 Flareside - 302-2V, C6 transmission, 2.75:1 9inch, 31x10.50-15 BFG KO2 |
|
Administrator
|
That's a lot of info. Sounds like you have a plan. Hope it works out, and hope you get your refund soon.
On the coolant filter, I've assumed that eventually all of the coolant gets run through the heater hose, so placing a filter there would do the trick. That way there'd be no slowing of the main flow.
Gary, AKA "Gary fellow": Profile
Dad's: '81 F150 Ranger XLT 4x4: Down for restomod: Full-roller "stroked 351M" w/Trick Flow heads & intake, EEC-V SEFI/E4OD/3.50 gears w/Kevlar clutches
|
|
|
Should work out, I tried doing this on paper but I need to just do it and then fly by the seat of my pants. Same thing I did with the stainless steel fuel line on the engine. No amount of planning on paper resulted in what I ended up finding a good looking workable layout. I do too, I hope to get the refund soon cause I will be filing last year this first week of February, if I could get this new filing quickly I could just throw it all on my bills, I should be able to pretty much pay off my paypal credit bill and just leave me focusing on my cc bill. Thats what I was thinking, I was thinking of just running a heater core filter, problem I ran into is this guy on fb had a RV one that he picked up off amazon that has a threaded sediment bowl type setup with a stainless steel mesh and 3/4" npt fittings in the plastic nylon housing. Problem is one guy asked about using it on engine coolant and they seemed to not recommend using it on hot coolant as its mainly for use with RV water not engine coolant. I did look at the Gano inline one but lots of bad reviews on that one. I also found one that looks like the glass fuel filter just bigger for a 5/8" heater hose but some people stated the filter leaked around the glass to end cap housings. Im still digging trying to make a decision as I do want to filter the coolant cause the engine is a fresh build and radiator will be new as well as all hoses will be new. Heater core was replaced two years before I parked the truck so I dont know if I can flush it out good enough. My plan was to just put the filter in the heater hose line to the water pump. This is the Jegs one I was looking at for the radiator hose, its in 1 1/2" and its an anodized aluminum, lots of people were complaining about the painted and plated ones flaking off after the filter putting flakes into the cooling system. https://www.jegs.com/i/JEGS/555/53262/10002/-1 The ones I found for the heater hose are also the same as the radiator with the glass tube that you can take apart to clean the stainless steel mesh filter. I much rather prefer the clear filters over the solid filters as I would want to be able to see when I need to clean the filter vs guessing.
"Old Blue" - '56 Fairlane Town Sedan - 292-4V, Ford-O-Matic transmission, 3.22:1
'63 Belair 2dr sdn - 283-4V, Powerglide transmission, 4.56:1 '78 Cougar XR7 - 351-2V, FMX transmission, 2.75:1 9inch "Bruno" - '82 F150 Flareside - 302-2V, C6 transmission, 2.75:1 9inch, 31x10.50-15 BFG KO2 |
| Edit this page |