Fuel Injection upgrade


Administrator
|
It is all in the details. And when you get right down to the end the details come out of the woodwork.
So hang in there and do it "your way" and it'll turn out great. 
Gary, AKA "Gary fellow": Profile
Dad's: '81 F150 Ranger XLT 4x4: Down for restomod: Full-roller "stroked 351M" w/Trick Flow heads & intake, EEC-V SEFI/E4OD/3.50 gears w/Kevlar clutches
|
|
|
This post was updated on .
Thats all it is. I could attempt to modify my dipstick but I dont know if its the oil pan I have now but I have 5 quarts in the engine and the dipstick from the truck doesnt even touch oil. At 5 quarts it should be on the stick but at the add mark. The oil pan I got is the new replacement part number oil pan from the parts guide and it has some differences. So I am browsing LMR right now to see if there is anything else I can get that is universal that will work. They have the distributor boot that keeps water off the distributor but LMR wants $80 for it when I can get it else where for $40. Sadly I see nothing else on the site to really purchase and the dipstick isnt listed on amazon so I may have to just buy the dipstick by itself. After thinking about it, I think I will just go with the mustang one and after bolting it in place I will grab it and tweak the bracket to pull it a little away from the engine. Probably be months of thinking to decide if I leave it bare zinc coated or if I spray it underhood satin black or gloss corporate blue like the rest of the engine. Update Placed my order, I didnt know LMR is located here in Texas so I probably could have saved some money with USPS shipping over paying extra for FedEx to get it April 4. I decided to go with FedEx cause an antenna I ordered from Concours came through USPS and it got bent. I dont want to have my dipstick come in bent and have to wait another week when the weather is good and there is good amount of light to mess with my engine. I only got the dipstick and I will have to decide what to do, I will see if I could swing the dipstick tube out and use a piece of threaded rod with the stainless steel tube as a spacer like I had planned on the truck dipstick. This would angle the dipstick towards the outside of the truck and would take it out of line with the dealer York AC compressor which may make it hard to remove the dipstick if I mount it straight to the header flange. I may still bolt it to the header flange if it appears I could grab the tube and pull it out bending the bracket to get some clearance. Tomorrow how ever I will pull the engine out and mock up the 70/100A alternator adjustment arm that I got NOS and see how my spare 1G alternator fits as I believe the spare I have is a 60A or smaller 1G. I didnt get a 3G yet but I do know I am looking at a Lester 7752 numbered alternator with the terminals situated at 7 o'clock. I found two Remy ones on Rock Auto, a new one under number 92309 and a reman under number 20201. I tried looking locally and all reman locally is over $200 compared to rock auto having a price tag of $109.79 including core charge. I will keep looking locally how ever as Id like to go with a local store that way I can take it back if there is a problem long as I get the engine in and running before the warranty runs out like it has on the rest of the components on my engine lol.
"Old Blue" - '56 Fairlane Town Sedan - 292-4V, Ford-O-Matic transmission, 3.22:1
'63 Belair 2dr sdn - 283-4V, Powerglide transmission, 4.56:1 '78 Cougar XR7 - 351-2V, FMX transmission, 2.75:1 9inch "Bruno" - '82 F150 Flareside - 302-2V, C6 transmission, 2.75:1 9inch, 31x10.50-15 BFG KO2 |
|
|
Hey Rusty,
I spent a lot of time trying to find a proper dipstick/tube for my 302 build. This issue around here is that they rust out and end up perforated, especially near the exhaust manifold. The mounting tabs usually rust through and break off also. I ended up finding a decent one from a 1994 F150 (I think it was a '94, but could have been '92 or '93). I sanded it down and painted it, and I welded a new mounting tab on it to fit with my headers. I had to make the mounting tab a little longer and narrow the end of it where it mounts next to the header tube. It worked great, and I like the longer stick as it's nice and easy to reach in the long nose of my '52 pickup. 6 quarts of oil reads at the full mark with an FL1A filter, same as my other 302's. 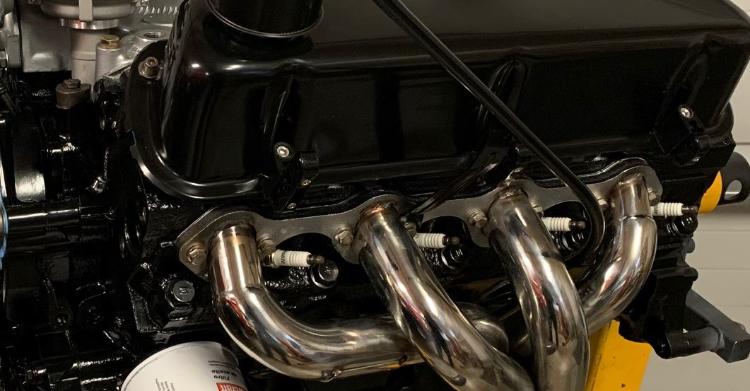   I assumed they were all the same from the later 5.0 trucks to fit around all of the EFI gear. Don't you guys have all kinds of rust free stuff in the junkyards down there to grab parts like this from?
1994 F150 4x2 Flareside. 5.0 w/MAF, 4R70W, stock.
1984 F150 4X2 Flareside. Mild 302 w/ 5spd. Sold. 1980 F150 4X4 Flareside. 300i6 w/ 5spd. Sold in 2021. 1980 F100 4X2 Flareside. 351w/2bbl w/NP435. Sold in 1995 |
|
|
Thats what I was looking at was EFI equipped 5.0L engines I knew the dipstick would be kicked out to clear the EFI system. The Mustang dipstick that I ordered is supposed to fit 1982 - 1993, the tab on this one is welded on unlike my original truck dipstick that clips on. The problem with my truck one was that Watco who built the engine back in 1992, the same builder that built this engine where it used 1 qt of oil every 70 miles from new and still did till I switched to 20w50 and was able to get 200 miles till I had to add a quart. Well, they didn't tighten the manifold stud down tight enough and over tightened the nut holding the dipstick on. I couldn't get a wrench on the back side as nothing I had was thin enough to fit between the lock washer and the tab to grab the head of the bolt. So I had to pretty much try to use a screwdriver and force it which broke both teeth off the mounting tab. I could slide the mount down on the tube to get more length and cut a new cutout and make it work. That wasn't the issue for me, the issue is mine bolts to the 3rd bolt from the rear on tube for cylinder 7. I just couldn't get a nut to thread on where the bracket is supposed to mount at as the nut would hit the tube and I didn't want to force it by and knock the ceramic coating off. I could try to build a new bracket and try to make a clip like the factory did or take and cut the clip off and weld the clip to a new piece and make a new one that I could move further out. I may still do this as a last resort, but I am not too happy with how at 5 quarts I was in the hash marks on my motor but with this replacement part number NOS Motorcraft oil pan I am not seeing oil on the stick at 5 quarts, and I doubt 6 quarts would put it on the stick into the hashmarks. I don't know if it's the pan, the fact that I am running a thicker one-piece rubber pan gasket or if the F1SE block has a different depth half-moon cut where the dipstick tube goes. I will however fill the crank case up to the hash marks because I don't believe the blocks are different and the hash mark will still be in the same spot. I know with 4 quarts of oil in after about a minute of priming I was sucking air which I don't believe should happen because I've ran engines 2 quarts low on oil from 5 quarts that's 3 quarts still in the pan and the pickup should be submerged enough to be fine. I have this feeling that with the thick blue one-piece rubber gasket and the replacement style Motorcraft oil pan I will probably be 6 1/2 quarts to full on the hash marks. Which if that is the case, I would try 7 quarts and see how far out of the hash marks goes as I hate doing 1/2 quarts and always round up long as it's not a mile past the full mark. At the end of the day be it 1/2 quart or 1 whole quart over OE to get it into the hashmarks that is good as more oil is always better. I just hope my pan isn't sitting too much lower where the OE style Y pipe is going to contact the oil pan that is something I am concerned about now, if it's not the gasket then it could be the front half of the oil pan it may be lower than my original pan which shouldn't be a problem as there is a mile between the original pan and my cross member. On the modifications, yep these are very wide brackets from the factory as they bolted on the outside of the manifolds so there was no reason to make them narrow. I knew I would have to cut/grind down the front side of the bracket to clearance the header tube. The mustang one I bought is supposed to be already clearance for use with headers so I will see how that is. I know lots of the people reviewing it stated to wire brush the zinc coating off the part of the tube that goes into the block as they didn't account for the thickness of the coating, and it doesn't fit the block unless you remove the coating. I don't mind doing that I just have to see how tight it fits I might have to put a small smear of black RTV on it as I don't want any seepage of oil. I know my original truck dipstick it fits kind of loose and I probably would have to use black RTV in a small coat to create some kind of seal. Or take some teflon tape and wrap one wrap around the tube just to take up the gap, downside to doing this is teflon just like silicone and do a number on the oil pump gears if it got into the pan same as it can lock up your needle and seat in a carb. Around here we don't have a huge rot problem at least for its age, I have to replace my hood as in the last 4 years since I parked the truck my hood rotted out on the underside to the point it's not salvageable even though I stripped it down years ago and painted it. But this is the original hood from 1982 and now I am not sure what to go with hood wise with my dual duct air box I thought about getting the HD fiberglass mustang GT500 style hood with the ram air ducts that I can cut out and make functional for cold air vs using the OE ducts behind the grill. I just don't like the rear of the hood how they did it they put no thought into it and sloping it down to meet the wiper cowl. I know I wont go with the cowl hood they look funky on our trucks with how narrow they have the cowl. I probably will end up going with the stock replacement steel hood unless that Arizona junkyard I know of has a good original hood I can get for less than a new one. Problem we have around here is junkyards don't keep old vehicles, the oldest you typically find in junkyards are 10 years old. Every now and then you will see a older vehicle come in because it was finally taken off the road but typically the junkyard sells those for scrap when scrap prices come up. Thats what's sad around here is because I would use the junkyards to browse but everything is just so new it's not worth my time, so I am forced to go online. This is a photo one of the reviewers posted on LMR for the mustang dipstick tube and dipstick, it mounts off the same fourth from front bolt as your build does, it just does not angle as far up as yours. I can't have one angle up too high as I have a dual snorkel air box and it would interfere with the ductwork. It is why I am looking to lean the tube outwards and keep it low. I don't mind if I have to pop the duct off to check the oil I just don't want the duct rubbing against the dipstick and knocking a hole in the duct since they are $45 a piece. This however I think would put it closer to the front than my OE truck one which is way back by the master cylinder and with my 31x10.50-15 tires all around it was a pain leaning over the fender and down into the engine bay to get it. I might be able to reuse my OE truck dipstick if they are both the same length and the truck dipstick would give me more length as the handle is longer than the mustang one.  Since I don't remember what page, the hoods were posted if I even posted them on this thread this is the fiberglass GT500 inspired hood I was mentioning. It uses the OE hood hinges and OE springs as the hood is as strong as the OE steel hood. The ram air scoops are blocked off and you can cut them open they sell the duct that fits on the back side to make your attachments. If I did that, I would find the lowest spot in the scoop and drill a decent 7/16" drain hole so when I am driving hopefully rain will drop out of the duct before it gets injested into the engine. I am also looking at getting a filterwear prefilter that should stop water droplets from getting to the filter itself as added protection if I did this.  I think it's a real clean looking hood for our trucks I just am not a huge fan of the rear of the hood and still to this day can't find any photos showing the back side of the hood like you are seeing from the driver's seat. I am fearful they just simply blocked the back side off but it may have been done like a cowl induction hood which might not be as bad looking but I couldn't say. The other issue is I just can't imagine how my truck would look with its more retro truck look I am going for with the A/T tires, white wagon wheels, grill guard with KC driving lights and later on hopefully a roll bar with KC spot/flood lights. I also dont know how it would look under the hood to have the duct work attached to the hood and have them lift up every time the hood is opened. Upside it would lift the duct away from the dipstick and prevent me from having to remove one like if I had it hooked up to a modified OE duct on the driver side.  Haven't looked at the price lately, but I know this composite tech fiberglass hood is $689 when I last looked compared to a steel hood from Dennis-Carpenter priced at $495.95 or a Goodmark steel cowl hood priced out at $731.79. This is one thing that causes me to take something simple and drag it out because I just can't decide. I know the GT500 style hood is a sporty hood and having functional scoops in the front complete with stainless steel or body painted mesh over the openings would really improve the sporty look, but I just don't know if sporty is what one should be looking for, for that 1980s/1990s truck look. I know in the 1980s/1990s we had all kinds of styles of trucks, but I don't want to mix styles, it does more against your build to blend styles like say mixing low rider style with a 1960s gasser theme. At the end of the day, I most likely will just go back with a stock steel hood just to play on the safe side because I know the stock hood will look good and will go with the truck and the 1980s/1990s truck look I am going for my build. This isn't my truck but this is kind of the 1980s/1990s look I am going for. I won't be running square lights on the grill guard and I have that same grill guard just mine is a Rally brand that the tubes bolt on not welded on. I have the KO2 tires like this truck has with white lettering out in 31x10.50-15 but I have white wagon wheels with OE style stainless steel beauty rings. I have the regular car style mirrors and no running boards. I won't run the bed rails either. So my build would have the grill guard like this truck with my two KC 6" black apollo driving lights and the roll bar will have x4 KC Chrome Daylighters x2 spot and x2 flood to a chrome single on single bars. Exhaust on this one angle out under the rear bumper mine will be like stock, I will be taking the replacement tailpipe I have to an exhaust shop to have them bend the tail pipe like the OE just in 2 1/2" and have them weld the OE hanger on the tail pipe to bolt to my OE hanger on the truck. Same with the muffler I will be buying a cheapie walker OE muffler to drill out the spot welds for the OE hanger then mockup my Stainless steel Magnaflow XL 3 Chamber 6" round muffler and use a paint pen to mark where the bracket will weld to the muffler to position the muffler properly. Then I will take it to the exhaust shop since the muffler is 409 stainless steel and the bracket is plain steel and have them weld it together. Realistically if I could find someone local to bend some 409 stainless steel tubing, I would just pay the extra money to have a stainless-steel tail pipe done since as of now the Flowmaster Y pipe is stainless steel, the muffler is 409 stainless and I will get 409 stainless pipe to straight pipe it from the Y pipe to the muffler. But this is what I mean with a look like this I don't know how my truck would look with that fiberglass GT500 inspired hood. It may look fine on a red truck like this but might look horrible on my dark blue metallic and silver two tone flare side. 
"Old Blue" - '56 Fairlane Town Sedan - 292-4V, Ford-O-Matic transmission, 3.22:1
'63 Belair 2dr sdn - 283-4V, Powerglide transmission, 4.56:1 '78 Cougar XR7 - 351-2V, FMX transmission, 2.75:1 9inch "Bruno" - '82 F150 Flareside - 302-2V, C6 transmission, 2.75:1 9inch, 31x10.50-15 BFG KO2 |
|
|
Did a little today but didn't make any progress, actually took a step back. I have to pull the crank pulley off and strip it down and repaint it. The alternator adjustment arm that was snugged up by hand fell and contacted the pulley and chipped the paint off down to either the primer or the metal its hard to tell. I could spray more Eastwood chassis black on it and live with it but I don't know if it's going to peel off without scuffing or not over time. I think my only choice is to strip and reprimer/paint. Downside is I don't know why we can't buy good paint that mimics the OE factory paint. I'd pay $100 a can for OE factory paint that won't chip if you hit it with a hammer like the OE finish painted on the pulleys but no, no one wants to make anything like that.
Up side I found out the difference between the 40/60A alternator adjustment arm and the 70/100A alternator adjustment arm is not the shape but the bend in the bracket is more pronounced. The 70/100A bracket hits the 1G alternator ear like the 40/60A alternator adjustment arm hits the 3G alternator ear. So I will without a doubt have to hammer this bracket flat no different than the 40/60A bracket on my engine. I mocked up and measured it appears I need the 8" ear to ear spacing 3G, this will allow the swing of the alternator to cover the travel in the arm while the smaller ear spacing will work but it would require loosening the adjustment arm to allow it to move through the travel of the alternator as well. So I will be looking at the long ear 3G alternator. Now I just need to decide do I want to get one that is powder coated in a color or do I just go and get a cheapie reman for around $100 including core charge and leave it plain finish. I measured the brass pulley from the take off 1G from the truck at work I did the 5.0 Coyote swap on its a 2 1/2" pulley and the crank pulley is 8" so I will use this to calculate the alternator speed and see if I need to change to a different single sheeve pulley or not. I do have the soft start regulator a Motorcraft NOS one that is supposed to be a 6 second soft start. I still want to make sure that I am not over driving the alternator as I rather give up some charging at idle which will help reduce belt slip on start up even more. I know a 130A 3G alternator will still put out more at idle than a 1G even if I size the pulley to slow the alternator speed down. So the rest of my day I will be looking online to purchase a 3G alternator since everything local is $200 and I dont want to go junkyard hunting since we are talking about 90-93 Taurus alternators and the junkyards here dont keep much after 10 years old. Id rather get it local so if there is a problem I can warranty it but the way I see it now, I cant justify paying $200 for something I can get through rockauto for $100 for the same Remy Reman alternator. I will also be going to my hardware guy online and picking up a ARP 4 1/2" 7/16" bolt for my Alternator pivot bolt I will be reusing the OE alternator adjustment bolt as ARP doesn't make a serrated washer headed bolt. I will also be looking to order the washer off ebay I found to place it behind the pulley on the alternator and I need to get a alternator boot since I will be making my own charge harness up.
"Old Blue" - '56 Fairlane Town Sedan - 292-4V, Ford-O-Matic transmission, 3.22:1
'63 Belair 2dr sdn - 283-4V, Powerglide transmission, 4.56:1 '78 Cougar XR7 - 351-2V, FMX transmission, 2.75:1 9inch "Bruno" - '82 F150 Flareside - 302-2V, C6 transmission, 2.75:1 9inch, 31x10.50-15 BFG KO2 |
|
Administrator
|
Man, that's a lot to take in!
Bummer on the pulley, but I think you need to keep the attention to detail you've had or otherwise you will regret it. So I'd refinish the pulley. On the hood, I like the look of the reddish truck more than the white/blue one. The reddish one is clean, but the other one is getting busy. Have you looked at a Lokar dipstick? That's what I finally went with on Big Blue as I couldn't find what I wanted elsewhere. It seems well made and works nicely. As for the alternator, I have one I powder coated for Dad's truck but the natural-finished one I have on Big Blue is holding up nicely. So I'm not sure I'd powder coat another one as much work as there was in it. Especially since it would void the warranty and alternators are known to fail so might get replaced.
Gary, AKA "Gary fellow": Profile
Dad's: '81 F150 Ranger XLT 4x4: Down for restomod: Full-roller "stroked 351M" w/Trick Flow heads & intake, EEC-V SEFI/E4OD/3.50 gears w/Kevlar clutches
|
|
|
Im going to, it wont be hard to do but I think I might try hitting the pulley with some pre paint prep and just spray it with the under hood black again. I have to get a flash light and get a good look at the pulley the 2K engine grey primer might still be there the chip might not be down to bare metal. I dont think I would want to let it sit without paint on it as primer doesnt really stop rust long term. On the dipstick I have looked at Lokar everything I found is a bit more pricy than I want to go with. On the alternator I just ordered from Rock Auto the Remy Reman 20201 which is the same as the Lester 7752 with the plug clocked at 7 o'clock. I also got the 8" version, right now I am looking at pulleys. I did the math and at 6,000 rpm engine speed the 2 1/2" single sheeve pulley I have will translate into a 19,200 rpm alternator shaft speed. At 5,500 rpm which is where my max shift point is going to be set at the alternator speed is still 17,600 rpm. I cant find clear cut but it seems the number I am seeing the most is 15,000 shaft speed is the max for a 130A 3G alternator. A 3" alternator pulley at 6,000 engine speed would be 16,000 rpm alternator speed which would put it at 14,667 rpm alternator speed at 5,500 rpm. Down side is I just cant find a 3G V belt alternator pulley that is 3" diameter for a 1/2" wide belt. I think I found a dual V belt one but it is 2.99" diameter.
"Old Blue" - '56 Fairlane Town Sedan - 292-4V, Ford-O-Matic transmission, 3.22:1
'63 Belair 2dr sdn - 283-4V, Powerglide transmission, 4.56:1 '78 Cougar XR7 - 351-2V, FMX transmission, 2.75:1 9inch "Bruno" - '82 F150 Flareside - 302-2V, C6 transmission, 2.75:1 9inch, 31x10.50-15 BFG KO2 |
|
Administrator
|
2.99 is close enough to 3", but can you find a crank pulley to run two belts? If so that would probably ensure you don't have belt squeal. I think I found that there are pulleys that will do that.
We have the pulley charts at Documentation/Engines/Pulleys.
Gary, AKA "Gary fellow": Profile
Dad's: '81 F150 Ranger XLT 4x4: Down for restomod: Full-roller "stroked 351M" w/Trick Flow heads & intake, EEC-V SEFI/E4OD/3.50 gears w/Kevlar clutches
|
|
|
This post was updated on .
Its close to 3" but I am trying to get more padding to prevent over running the alternator. I would like to run a dual groove pulley but I cant. I have a bolt on Dealer A/C pulley that runs the York A/C compressor and it would result in me losing my functional A/C to run a second belt to the alternator. I found a good selection of pulleys, just the ones I found are double groove which I can run it, not going to hurt anything, I just would prefer to have a single since I am not running an air pump. Im also trying to see if I can find a 3 1/2" maybe a 4" it would give me more belt wrap and drop the speed down more. Below is what I am currently looking at with the 2 1/2" pulley, 2.95" pulley and a 3.50" - 4.00" pulley. 2.50" pulley Idle (600 rpm) : 1,920 alternator rpm Cruise (2,750 rpm) : 8,800 alternator rpm Max (5,500 rpm) : 17,600 alternator rpm Redline (6,000 rpm) : 19,200 alternator rpm 2.95" pulley Idle (600 rpm) : 1,627 alternator rpm Cruise (2,750 rpm) : 7,458 alternator rpm Max (5,500 rpm) : 14,915 alternator rpm Redline (6,000 rpm) : 16,271 alternator rpm 3.50" pulley Idle (600 rpm) : 1,371 alternator rpm Cruise (2,750 rpm) : 6,286 alternator rpm Max (5,500 rpm) : 12,571 alternator rpm Redline (6,000 rpm) : 13,714 alternator rpm 4.00" pulley Idle (600 rpm) : 1,200 alternator rpm Cruise (2,750 rpm) : 5,500 alternator rpm Max (5,500 rpm) : 11,000 alternator rpm Redline (6,000 rpm) : 12,000 alternator rpm From what I could read online, it appears the 130A 3G puts out 80A at idle, 2,000 rpm alternator shaft speed and 160A max at 6,000 rpm alternator shaft speed. So if its on a even scale I assume with a 2.95" diameter pulley I should be putting out some where around 50A at 600 rpm engine speed. Even up to a 4" pulley I should not go below 40A output at idle so all of those pulley diameters are viable for me. I just dont see any that big. Only thing I am worried about with the 2.95" diameter is with how close it is to 15,000 shaft speed that if the belt doesnt sit flush with the surface of the pulley it would go past the 15,000 shaft speed threshold. There is one guy online I seen stated he thinks 18,000 rpm is the max shaft speed of a 3G alternator and no one corrected him but everyone else I am seeing is saying 15,000 rpm is the max shaft speed. If it truly is 18,000 then I am safe either way. I am playing it safe by using the lower figure. ~Update~ Well I found from LethalPerformance they sell PA Performance 3G alternators and it state "An alternator needs 1800-2000 at idle to make power and will make maximum output at 6000 rpm, and will start to fail at 16,000 RPM." Looks like I need to stick with the 2 1/2" pulley cause if I cant drop alternator speed below 1,800 to produce power I might not produce power at full idle as my goal is for OE idle speed of 525 rpm which would put me at 1,680 alternator rpm. Might have to forget that plan and go for a 600 rpm idle speed with a 650 - 675 rpm idle speed with the A/C on vs 525 rpm idle and 675 rpm with A/C on. Running this 2.50" pulley would save me some $50 over buying another pulley but running the 2 1/2" pulley means a full hard pull to shift point of 5,500 rpm it would over spin the 3G alternator and cause it to fail. That is what sucks cause I cant really get a pulley to drop the high rpm speed while maintaining min speed for the alternator. I do see lots of people swearing they are running OE stock V belt pulley and turning their quality 3G alternator to 7,000 engine rpm with no failures and that the people running cheap PA Performance 3G alternators are seeing failures at 5,000 engine rpm. Going to have to be something I take a chance on and let it rip and hope I dont have a problem with a Delco-Remy reman 3G alternator.
"Old Blue" - '56 Fairlane Town Sedan - 292-4V, Ford-O-Matic transmission, 3.22:1
'63 Belair 2dr sdn - 283-4V, Powerglide transmission, 4.56:1 '78 Cougar XR7 - 351-2V, FMX transmission, 2.75:1 9inch "Bruno" - '82 F150 Flareside - 302-2V, C6 transmission, 2.75:1 9inch, 31x10.50-15 BFG KO2 |
|
|
This post was updated on .
Big update here, lots was done yesterday and today.
Starting off with yesterday. I swapped the V-belt pulley from my spare 1G alternator to my 3G alternator. First thing I found out is I used my caliper to measure the OD of the V belt pulley and I got 2.6195" or 2 5/8" not the 2.50" or 2 1/2" as I eyeballed with a ruler. This isnt a huge change but it is a big enough change to create difference in the alternator shaft speed. Second thing I found out is the pulley I have didnt need a washer under it to space it up off the case. Once fully tightened into place you could see visible light between the pulley and the case all the way to the shank that is pressed up against the inner bearing race. Third thing I found out is the 5/8" hole machine bushing would not fit the shank of the alternator it was too small and when I measured out the two pulley`s came out to 0.6715" ID while the ID of the 5/8" washer I had was slightly more than 5/8" at 0.6195" ID creating a 0.052" undersize. I tried to drill the machine washer out with a unibit but the material was too hard to drill. If you are looking for a washer you would be better off finding a 41/64", 21/32", 43/64", or 11/16" ID machine bushing over a 5/8" as it will not fit past the step in the shaft. My calculations for shaft speed is as follows with my new measurement of the alternator pulley. Engine rpm - Alternator rpm 525 - 1600 550 - 1676 575 - 1752 600 - 1829 625 - 1905 650 - 1981 675 - 2057 700 - 2133 1000 - 3048 1500 - 4571 2500 - 7619 3000 - 9143 5500 - 16762 6000 - 18286 With 15,000 - 16,000 as a safe alternator speed and many sources citing that most alternators can handle 18,000 shaft rpm I think I will be ok with this pulley. Going larger will shift my pulley ratio from 3.05:1 down to 2.71:1 which is below the recommended 3:1+ for street vehicles. Next off my Remy reman 3G alternator came with a test report for it and it listed the following specs. Max Alternator Output : 159A Maximum output Power : 2039W Voltage Set Point : 14.6v Leakage Current : 0.43mA Alternator Turn-on Speed : 1600rpm Output Current @ 2000 rpm : 102A Output Current @ 2400 rpm : 117A Output Current @ 3500 rpm : 139A Output Current @ 5000 rpm : 154A Output Current @ 6000 rpm : 159A The chart at the bottom of the test report has the following that I estimated from the performance curve. 1000 rpm : 5A 1200 rpm : 25A 1400 rpm : 45A 1600 rpm : 65A 1800 rpm : 90A 2000 rpm : 102A So I can idle my engine down to 525 rpm and maintain 1600 rpm shaft speed putting out 65A at idle. My idle speed with AC on was to be 675 as OE spec if my aftermarket roller cam will allow these speeds. This will result in producing around 102A at idle with AC on. Now for today, I got the mustang dipstick mounted and it fits great, I don't know how hard it will be to pull the dipstick once in the truck with the York compressor directly in front of the dipstick, but it might be doable. The stick that came with the tube reads right on the bottom with 5 quarts in the pan and should be in the hash marks at 6 quarts, especially once the engine is in the truck with the slight rake to the rear. I tried the OE truck dipstick, and it was reading in the middle of the hashmarks with 5 quarts in the engine and 6 quarts would put it well over the hashmarks. Second, I got the alternator bracket flattened out and it fits great, currently it is hanging up to dry for 24 hours before I install it on the block for photos tomorrow evening. I didn't put the voltage regulator I have NOS on as the connector is different than the one that you can find for conversion kits. I did find a connector that looks like it may be right listed as a 1993 - 1995 Crown Victoria w/police package or a 1995 - 2000 Contour. This connector has the wire you press to release the connector similar to what is used on fuel injector connectors. Problem is I can't get a premade one with the stator terminal I can only get the pig tail that will require me to make connections which I really don't want to do seeing as they make premade conversion terminals for this. So, I am currently looking for the OE part number to try and source a NOS Motorcraft 3G 130A regulator with the LRC, one I have is a 6 second LRC and the only one I have been able to find so far is a F795 number which I think is the motorcraft GR814 number but it's a 2.5 second LRC. I might have to go with that seeing as the regulator I have has a connector that is hard to even find in the first place. Third the belt for the alternator I can use the belt I have which is a Napa XL number 25-09653 which apparently is a old number and isn't out there anymore. This leaves me almost no adjustment once I tension the belt. I need to search online for a NOS 25-09653 belt with the box included as it states the dimensions of the belt, I think it may be over 39". Looking on Rock Auto for a '82 F150 with a 302 the following is the belts I found in my preferred Gates brand. Gates 7390 : w/o Air Pump ; w/o 70/100A alternator - 39" effective length / 0.41" top width Gates 7380 : w/ Air Pump ; w/o 70/100A alternator - 37.98" effective length / 0.41" top width Gates 7405 : w/o Air Pump ; w/ 70/100A alternator - 40.5" effective length / 0.41" top width Gates 7375 : w/ Air Pump ; w/ 70/100A alternator - 37.5" effective length / 0.41" top width My truck should have a 7380 belt which puts it at 38" length and if my truck had a 70/100A alternator it would be a 37 1/2" belt. I think I am going to try the 37 1/2" length belt as I don't have the air pump, I have a 2 5/8" diameter pulley which I don't think is the same diameter as the OE pulley and being a 0.41" top width belt, I don't know how far it will sit in the groove. I do not believe 1/2" in belt length will make it impossible to fit to the alternator as the correct 38" belt I know falls on easily when fully adjusted inward. Upside to this is if this belt size will work, I should be able to tell anyone at the parts store I need a belt for a '82 F150 with a 302 with a 100A alternator and a Air Pump and get the right belt regardless of brand if I am in a pinch. I wouldn't have to remember the part number of 7375 to give every time I need to replace the belt. Now onto the photos. First few photos is of the Mustang dipstick and dipstick tube installed. I may revisit this at a later date if its too problematic to check the oil level once in the truck. I also have decided to leave the bare zinc coated steel tube its natural zinc color, long as it doesn't start to rust I will leave it be. If it does, I will tap the dipstick tube out of the block scuff it up and paint it Dark Corporate Engine Blue to match the rest of the engine.    Next few photos is of the 3.8L V6 3G 130A alternator mocked up with the old belt off my truck to check for alignment with the crank pulley as well as to see if the OE belt would work or not. This is also before I stripped the old flaking paint off the adjuster bracket and went over it with a file to remove most marks and painted it Eastwood Under Hood Black to match the rest of the brackets.  This one is showing the alignment of the belt and the decent airgap between the single sheave pulley and the 3G case without a shim.  This one is showing how little adjustment I have to tension the belt using the old Napa belt that I need to find the dimensions of as I suspect the belt is not the right size as listed for my original application.  So I am effectively looking for a LRC voltage regulator with the same connector as the one I have uses a oddball connector that I cant seem to find. I am also looking up the specs of the Napa belt I have to compare it to the Gates numbers I am looking at above and lastly I am going to hit up Allen Fastener`s to see if he has any 3/8" flange head bolts with serrated edges like the OE tensioner bolt so I can get one that will thread in further into the aluminum housing on the alternator. More thread engagement would be better as it will help reduce the risk of stripping out when cranking down on the bolt to lock it in place.
"Old Blue" - '56 Fairlane Town Sedan - 292-4V, Ford-O-Matic transmission, 3.22:1
'63 Belair 2dr sdn - 283-4V, Powerglide transmission, 4.56:1 '78 Cougar XR7 - 351-2V, FMX transmission, 2.75:1 9inch "Bruno" - '82 F150 Flareside - 302-2V, C6 transmission, 2.75:1 9inch, 31x10.50-15 BFG KO2 |
|
Administrator
|
You have made really good progress!
 I think you did well on that alternator. I keep hearing a noise that I think may be the bearings in mine, and might have to go the way you did for a replacement. At idle you are kicking out plenty of current. But I ran into the same problem as you on the LRC regulator. Finally settled for the 2.5 second one to get the right connector. The dip stick looks good, but I'm worried about access when the A/C compressor is on. We shall see.
Gary, AKA "Gary fellow": Profile
Dad's: '81 F150 Ranger XLT 4x4: Down for restomod: Full-roller "stroked 351M" w/Trick Flow heads & intake, EEC-V SEFI/E4OD/3.50 gears w/Kevlar clutches
|
|
|
This post was updated on .
That is something I am trying to avoid as well, I keep looking at photos and the belt is sitting too high on the pulley on the alternator which tells me one of two things, either the pulley is not the right width for the belt, or the pulley has a different angle than the belt. I don't like how high its riding but there is nothing I can do as I can't find another pulley like this online when looking. I don't know where this pulley came from as it was from a old 1G alternator that came off that 5.0 Coyote swap I did at work. I robbed lots of parts off the 302 before we sent it to the junkyard for scrap since no one wanted to buy it and I didnt have the room to save it. I think I am going to have to just get the 2.5 second one, I keep finding them online under no name brands need to try and find the Motorcraft number so I can get a NOS Motorcraft one. I would have found it by now but I spent the last 8 hours trying to get my pc to connect to wifi that just was lost out of the blue after I made my post here. I did find out how ever the Napa XL Belt is comparable to the 7380 belt, and I found specs listed online as the top width being 0.438" with a outside circumference of 38.625. The 7380 from Gates has a top width of 0.41" which will be narrower and an outside circumference of 38.81" which makes the 7380 Gates belt that its supposed to be comparable to not only narrower in width than the Napa XL belt but also a larger outside circumference. This means this Gates belt will ride deeper in the crank pulley vs the flush the Napa belt does. I wish I could find out what angle the Napa XL belt I have is. I know in the Ford Parts and Illustration guide it states the alternator and the water pump/power steering pump belts are supposed to be 1/2" wide which these belts are not and the 0.438" Napa belt fits perfectly like it should. On the dipstick that is something I will have to look into. If it becomes a problem once installed, I might do like was mentioned previously and cut the bracket and add some material to the bracket to move it outward more while still mounting flush with the header flange. I also could try to make a new bracket from scratch that will snap onto the original truck dipstick tube and have it mount outside of the header tubes. For now I will live with having to bend the dipstick up or down to remove and install I have some cars that are like that from the factory but if its drastic I will come up with something to make it easier. ~Update~ After some extensive searching I found the following. The regulator I am looking for is a F4RU-10316-AA also known as a GR814. Unfortunately I was unable to find a single Motorcraft GR814 offered for sale online. If I go with the GR814 I will have to get a off brand regulator. On the other hand I found the connector for the F5RU-10316-AA GR819 regulator I have with the 6 second load response. Its sold as a pigtail by standard under the part number S745 which comes with a 6" lead for each terminal. The 6" lead should be enough for the S terminal to crimp it to the terminal connector for the stator but I would have to buy that terminal as well. Would be cheaper to just buy the GR814 style connector also known as the round connector but would require giving up a NOS Motorcraft regulator for some replacement one.
"Old Blue" - '56 Fairlane Town Sedan - 292-4V, Ford-O-Matic transmission, 3.22:1
'63 Belair 2dr sdn - 283-4V, Powerglide transmission, 4.56:1 '78 Cougar XR7 - 351-2V, FMX transmission, 2.75:1 9inch "Bruno" - '82 F150 Flareside - 302-2V, C6 transmission, 2.75:1 9inch, 31x10.50-15 BFG KO2 |
|
|
This post was updated on .
Since I could not find a NOS Motorcraft regulator with the GR814 number I did some searching instead for the connectors with the plan to build my own harness for the regulator I have which is a GR819 NOS Motorcraft regulator which I can pick up more NOS units for under $20 a piece which I think I will be doing as the GR814 is nonexistent online for NOS Motorcraft units which I trust more than these no name brand units I find online as GR814 replacements or the Standard brand which I dont mind using for terminals/pigtails but would never use if I can avoid it for electrical components themselves.
First order of business was to find the terminal that plugs into the GR819 regulator which I finally found last night as a Standard brand pig tail under part number S745 as shown below.  Second order of business was to find the stator terminal that goes from the regulator to the stator terminal on the alternator. I could not find one as a connector and terminal that I could just simply crimp and solder to the pigtail from the S745 connector above, so I will have to go with the Standard brand S2377 terminal which looks to be the correct terminal end for the stator, it does not come back on Rock Auto as fitting a 1993 3.8L Taurus which is the alternator I ordered is listed as fitting its listed as fitting 1994 and newer. The 1990-1993 is a two terminal stator connector which I know is not right. This connector looks just like all the other 3G stator connectors and this one even though its a Standard brand the plastic connector appears to have a Ford part number on the latch of E0BB-14489-CA. 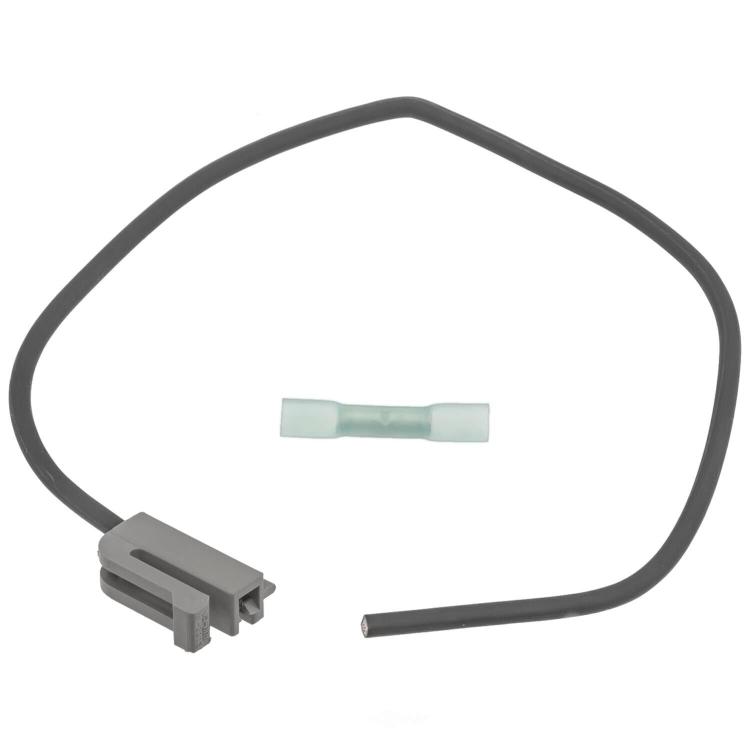 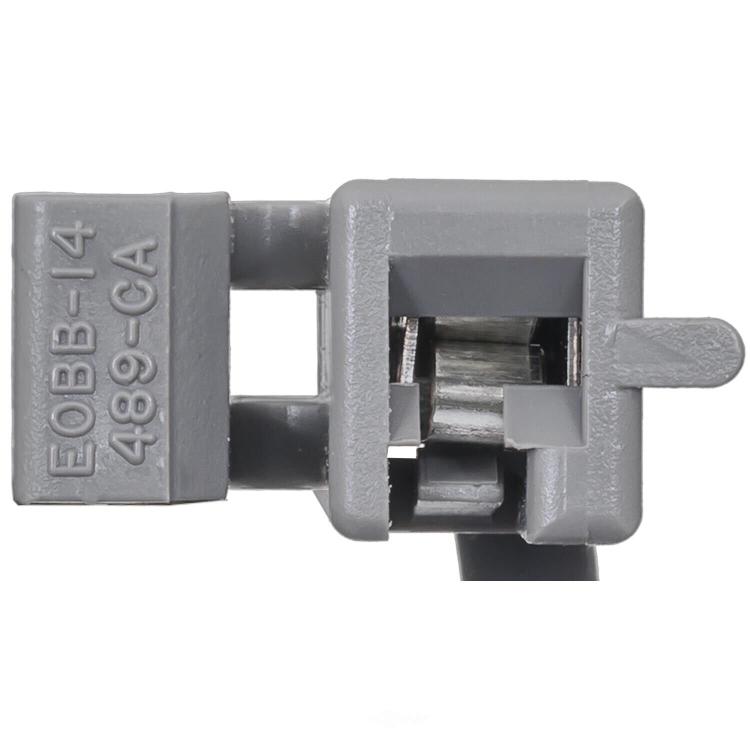 Third order of business is to see if I can locate the terminal itself for the above pigtail so I can just simply crimp and solder the wire directly to avoid an unsightly crimp in the middle of such a short run of wire. I found as much information I could on the Napa XL 25-09653 V-belt I have before I turned in for the night at 2am. I couldn't find any more information outside of the belt having the following specifications. Outside Circumference : 38.625" Top Width : 0.438" The belt I am planning on running is the Gates 7375 V-belt which is for my '82 F150 with Air Pump and the 70/100A alternator. This belt has the following specifications to compare to the Napa belt I have that is too long. Outside Circumference : 38.33" Top Width : 0.41" I think this may not be short enough seeing the outside circumference is just 0.295" smaller, but I do know the effective length of the belts are quite a bit different, the Napa 9653 belt is comparable to the Gates 7380 belt which is 37.98" effective length and the 7375 belt has an effective length of 37.5" so its a 37 1/2" belt vs a 38" belt which I know 1" difference in belt is drastic. So, I will be ordering that belt off amazon to save money on the belt in the off chance it does not fit. I know Napa XL belts are not bad I just have always preferred Gates, but I wish I knew what the exact application this belt I have is for because the current belts that Napa offer for my truck are belts like the 25-7380 w/air pump w/o 70/100A alternator that is 37.98" effective length with a 0.41" top width or the 25-7375 w/ air pump w/ 70/100A alternator that is 37.50" effective length with a 0.41" top width no different than the Gates belt. Either way I will be going with Gates out of personal preference and how ever it fits is how it fits, I know my crank pulley is OE the Alternator pulley is not how ever and I don't know who made it nor the specs on it as there is no part number on it to verify what V-belt it is designed for. ~Update~ Back to the drawing board for the regulator connector S745. One photo I saw showed it had grooves under each terminal to fit multiple applications but the stock photo I posted shows only the single slot in the middle which will not work as the regulator has a off set terminal. Back to looking online for 1995-2000 Ford and 1995 - 2002 Mercury regulators to find the pigtail. So far everything keeps coming back as the same connector that is used on the GR814 regulators which are plentiful connectors. I wish I knew what Ford did here cause this regulator has a F5 design date which puts it in 1995 but yet there is no easily found pigtail for this regulator everything is for the F4 design from 1994.
"Old Blue" - '56 Fairlane Town Sedan - 292-4V, Ford-O-Matic transmission, 3.22:1
'63 Belair 2dr sdn - 283-4V, Powerglide transmission, 4.56:1 '78 Cougar XR7 - 351-2V, FMX transmission, 2.75:1 9inch "Bruno" - '82 F150 Flareside - 302-2V, C6 transmission, 2.75:1 9inch, 31x10.50-15 BFG KO2 |
|
|
Little update, first off, the Standard brand S745 voltage regulator plug can be modified to work with the GR819 regulators. I won't be modifying however, I found a guy on Ebay that actually had the correct pigtail connector with the correct key slot. I went ahead and ordered it and it arrived today, plugs it nice and tight to the GR819 voltage regulator I have so this weekend I will be installing the GR819 voltage regulator with its 6 second LRC and will make my own harness up using this connector.
I found the name of this connector is a TE/AMP 3P also known as a Junior Power Timer Connector Series which I found a selection of connectors and terminals at the site below. I will be taking a risk and buying the terminals from here as every place I found on amazon is way too pricy at hundreds of dollars and on Ebay they are all in China or Europe which is too far and too long of a wait for me to verify fitment. http://www.cycleterminal.com/junior-power-timer.html I will be ordering x3 of the TE-Amp Jr Power Timer Female Socket Terminal in 17 - 20 awg and x3 of same terminal in 20 -24 awg since they are so cheap. Will also be ordering x3 of the weather seals to see if they will fit the connector I have, this connector doesn't have a weather seal but it does have a orange gasket to seal against the regulator. Without the wire side having seals the point of the connector end having a seal is moot as moisture and water can enter the regulator connector from the unsealed wire side. If the seals don't fit, I will remedy this with a simply small dab of silicone to seal the end. I did not how ever order the Standard brand stator connector as cheapest I could find it for was on Summit for $25, I was able to pick up a Pico brand stator connector for $6 off amazon. If the connector is no good, I can always buy the Standard one and de-pin the wire and swap it to the Standard brand connector housing. I have not tried it yet, but I also got in my Gates XL 7375 belt to try over the 7380 belt my truck should use with the 40/60A alternator, the 7375 is the belt for our trucks with the 70/100A alternator and is a good 1/2" shorter which should put my alternator in the middle of its adjustment. No photos as I have been letting the alternator pivot bracket dry all week before installing it for a mock up of the belt this weekend, but I do have a photo of the connector that I sourced off Ebay that fits the GR819 regulator which means I will be buying up the NOS Motorcraft GR819 regulators off Ebay for $10 - $15 a piece to stash away if I ever need to replace my regulator down the road vs having to buy aftermarket replacements. 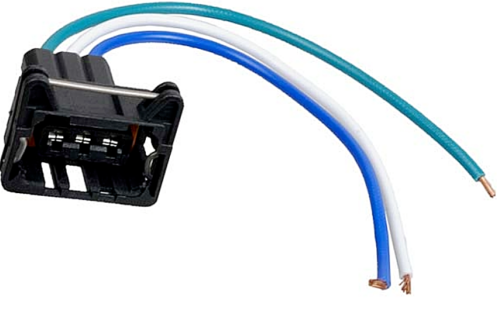 For the wiring, what I will be doing is making my own wires from the regulator and will run the exciter wire and the voltage sense wire all the way to the factory voltage regulator. I will be unplugging the OE voltage regulator and will be using spade terminals to connect the exciter wire to the OE key hot wire used to excite the OE regulator and will be using the battery sense terminal at the regulator plug to connect the 3G regulator voltage sense wire to. Most people simply loop that wire to the charge wire terminal on the back of the alternator and this is not a good way to do it. It will force the regulator to cycle rapidly as its reading output voltage at the alternator, when wired like the OE did at the starter solenoid or the battery itself the sense wire is actually reading the battery voltage and doesn't cycle as rapidly. Likewise, if your charge fuse is blown the alternator will see no change and will slowly ramp up output and if it still sees no change at the battery then it will go in essential standby mode putting out just enough output. If you wire it to the alternator and the main fuse is blown it will not go into this standby mode and it could burn the alternator out. Realistically I probably should crimp and solder the connections, but I am thinking about the future and any slim possibility of a OE restoration to original condition and it has me reluctant to cut OE wiring when I can repurpose it or just simply leave it disconnected. So, it appears I will be using a 6 second LRC regulator from newer 3G alternators dating from 1994 - 2000 over the more comment terminal end that fits the 2.5 second LRC regulator.
"Old Blue" - '56 Fairlane Town Sedan - 292-4V, Ford-O-Matic transmission, 3.22:1
'63 Belair 2dr sdn - 283-4V, Powerglide transmission, 4.56:1 '78 Cougar XR7 - 351-2V, FMX transmission, 2.75:1 9inch "Bruno" - '82 F150 Flareside - 302-2V, C6 transmission, 2.75:1 9inch, 31x10.50-15 BFG KO2 |
|
Administrator
|
I think I'm following, but need to ask a few questions to make sure.
First, the GR819 regulator fits the 3G but came out in '94 and takes a different connector. And it is those regulators that you can find for $10 - 15 each? That's cheap, but only if the connector is available and cheap as well. But does that also mean that the alternator you'd need to buy if yours fails isn't available off the shelf in a parts store? You'd have to also buy the GR819 regulator and install it? And you found a connector, but I don't think you gave us the source or the part number. However, you said it "plugs it nice and tight to the GR819 voltage regulator", but then you talk about terminals. So the connector didn't come with terminals? If so, how can it be nice and tight? I missed something. As for the terminals, you found a source for them in several different wire sizes. But wouldn't #17 be too small for the power connector? Or, maybe the connector comes with terminals but you want to replace some of them with ones for smaller wire? Sorry, but I missed something somewhere. 
Gary, AKA "Gary fellow": Profile
Dad's: '81 F150 Ranger XLT 4x4: Down for restomod: Full-roller "stroked 351M" w/Trick Flow heads & intake, EEC-V SEFI/E4OD/3.50 gears w/Kevlar clutches
|
|
|
Yeah, I was a bit all over the place let me clarify. 1) Yes the GR819 regulator is listed as fitting the following vehicles -1995 to 2000 Ford Contour -1993 to 1994 Crown Victoria w/ Police Interceptor Package -1993 to 1994 Lincoln Town Car -1999 to 2000 Mercury Cougar -1995 to 2000 Mercury Mystique 2) The regulator does take a different connector, the GR814 regulator has the following connector with the latch facing the alternator housing.  The GR819 regulator has the following connector and uses a Fuel Injection connector spring clip that faces to the rear of the alternator for easy access. 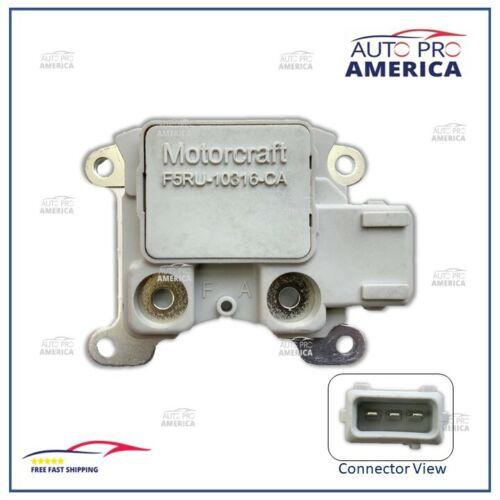 3) NOS Motorcraft GR819 regulators I have found on Ebay for as little as $10 and as high as $20 compared to the GR814 in aftermarket brands that I couldn't find for under $50 online. Below are some Ebay listings of various prices for the GR819 regulator which you might have to search for under the OE part number to get more hits as not all are listed under GR819 https://www.ebay.com/itm/324011820621?hash=item4b709c064d:g:E7sAAOSwh9Je4kWl&amdata=enc%3AAQAHAAAA4KoxtYHLbU2Uim5lFiSYmsGByJKEnMWC6ArGFDZmXh8rhWMIq1j9vqSqOaSmYDJQTU87V2%2Ftk5Qs8tx0MhETUxI8MpahtsQYddAbKEMIRr0zithP0YfrhlQ5CrgxTA6It3F%2Bf9%2FWUH1jljsygMyKvsL6fCPDZX0TdNWxAOxCmEYVXrNPlJQE9ZIDrluYKSBu4IV8YfJiljKPYyDb8iXbHSslyFqzK4Fs0r3VbOlL2v1mvlVrP7dYgFQnaVU1ira8Hy%2BhGRh50gpAsa4Ry86iZGW1O4HvDNmUvJWcGIlHu%2Fg8%7Ctkp%3ABFBMhM32uu9h https://www.ebay.com/itm/225434038635?epid=6037805112&hash=item347cea716b:g:kKUAAOSwyWdj8lNk&amdata=enc%3AAQAHAAAA4J%2F%2Bpzpnq%2FfJeHg1BJDR%2BSKqy6rj1M2V6TtBxxxKScKs%2Fua0RI%2BMo8b0wHc2TdrbEABoatlrW2lt27xGNCiygBYUvdKZzS%2FyGc0T3qX3ZecDs%2B1ZGLRUWDuBhu9o85eph9tP5a0%2Bxp51hSpYshA1GOP%2FtUqSvVKI2Zqiud92eVg3xEGCqcNFxkc9UF6XFRLKx8uqtw5gZxhMA%2B6IbmBTcom%2FCL%2FBSW56PPvXmOvpaNSTvZUEbm2eUqAksUlplLsxH1ZDGoKKBbiXUvOFsVbdy%2BoT3bSXotxNCShyjblXr%2B%2Fm%7Ctkp%3ABk9SR4TN9rrvYQ https://www.ebay.com/itm/403882000140?hash=item5e093e3f0c:g:YrQAAOSwkiBjHzDD&amdata=enc%3AAQAHAAAAwKjvFpaSyS2ygy3TrEYwPlbtM6veWfuKvv5GhPpTl%2BGUPUFnVjx5Q35GQ0GmEelstl%2Fg0gwxX1%2FEGss3B9FUlhxtKoHcE7djSwS9xcANLP6TS0i5CFEcquYfv2B1ru8xl%2BRuIsuxDwW%2FUztRn9%2F0LA076GnR2cP8aTpgAOolFoSMIwSckVU9TVx%2BEWDDa8GREgn%2B9y9WDp01PEME0afRS9FojAyic5bbsvSo%2F85Opf30HQkmdKrgkSw7UoaCI5A%2BZg%3D%3D%7Ctkp%3ABk9SR4TN9rrvYQ There was one listing guy was selling x4 lots of 5 each NTO (New Take Off) GR819 regulators that were put on new alternators that were never finished being built at the factory for one reason or another. I picked up them for $25 per lot of 5, they don't have the brush assemblies though, but I feel you can't beat NOS Motorcraft regulators at $5 a pop even without the brush holder assembly. Regulator I have is the following part number F5RU-10316-AA Some other part numbers I found under the GR819 number is as follows I believe they are also a 6 second LRC as the one above that I have since they all sport the GR819 number F5RU-10316-BA F5RZ-10316-A F5RZ-10316-B For non Ford numbers Visteon Alt-C-069 F786 4) The connector is available on Ebay, the one I got was the last one this guy had was $13.96 including shipping. Below is another vendor that has multiples for sale, I went with the one I got because it was cheaper, and the seller was in Texas, so I got it in 2 days with regular USPS shipping. https://www.ebay.com/itm/285144797879?_trkparms=ni_actn%3Anav%7Cni_nt%3AWATCHITM_GTC%7Cni_apos%3A3%7Cni_sg%3A1%7Cni_pos%3A3%7Cni_st%3AREAD%7Cni_wh%3A1%7Cni_nid%3A740785864312%7Cni_nsid%3A285144797879%7Cni_bn%3A1&_trksid=p2380424.m570.l5997 Connector is a JAE brand and if you look at number 3 from the top this connector will plug in but will require sanding off the locating peg on the back side of the regulator which wouldn't be hard to do as you'd still have the two locating pegs on the opposite side to prevent plugging the connector in backwards. The clips latches on the sides so there won't be a problem making that one minor modification for a sub $5 connector from here if the well drys up on Ebay for the right connectors. http://www.cycleterminal.com/junior-power-timer.html 5) The alternator you wouldn't be able to buy to fit our trucks off the shelf, the regulator can be swapped out how ever with a torq bit however. Could also wait till you get back home and just baby the truck to prevent belt slippage due to no LRC regulator. 6) Correct, you would have to buy the GR819 regulator separate for the alternator that fits our trucks. The swap isn't hard, you carefully remove the assembly and push the brushes back up into their tracks and install a small pin to hold the brushes retracted for assembly then bolt in place and pull the pin out to let the brushes drop. My NOS Motorcraft one with the brush assembly has the brushes pinned and I plan on keeping the pin for when I need to do a regulator swap. 7) The talk about terminals is for the connector, it comes pre terminated with short 4" pigtails, one can simply crimp a wire onto these pigtails and use the connector as is. For myself I didn't want to crimp the white stator wire to the stator connector pig tail and have a unsightly splice on such a short piece of wire. That is why I a getting terminals so I can simply loop the existing wire and crimp it to the new terminal and plug it in directly to the regulator connector. I don't need to do this for the other two wires for the turn on and voltage sense as I could just crimp and solder then apply marine shrink wrap on the splice, since one can buy the terminals cheap, I figure I would just run all new wires and avoid splices. 8) The regulator wires are not large gauge; they appear to be 18ga from eyeballing the pigtails. These wires do not carry a heavy load they are no different than the wires from your 1G alternator to the external voltage regulator. One wire simply excites the alternator by applying 12V key hot to the wire, the other wire is a sense wire for the regulator to sense how much voltage is at the battery and the other wire is just simply going from the regulator to the stator.
"Old Blue" - '56 Fairlane Town Sedan - 292-4V, Ford-O-Matic transmission, 3.22:1
'63 Belair 2dr sdn - 283-4V, Powerglide transmission, 4.56:1 '78 Cougar XR7 - 351-2V, FMX transmission, 2.75:1 9inch "Bruno" - '82 F150 Flareside - 302-2V, C6 transmission, 2.75:1 9inch, 31x10.50-15 BFG KO2 |
|
Administrator
|
Thanks for the thorough response. I now understand.
Gary, AKA "Gary fellow": Profile
Dad's: '81 F150 Ranger XLT 4x4: Down for restomod: Full-roller "stroked 351M" w/Trick Flow heads & intake, EEC-V SEFI/E4OD/3.50 gears w/Kevlar clutches
|
|
|
In reply to this post by Rusty_S85
Got the alternator squared away, only thing left now is to get the terminals and the depinning tool. I think I am going to use the stator pigtail wire as it is long enough to cut down some and loop to the regulator itself.
First photo is the regulator that came with my 3G alternator removed and the NOS GR819 regulator mounted. Was a straight swap with no problem, they are both exactly the same outside of the connector being changed between the GR814 and GR819. 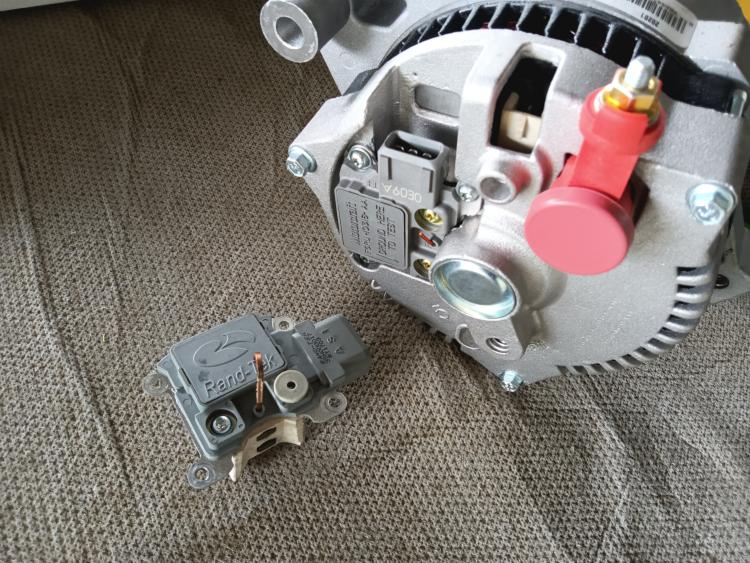 Second photo is the alternator mounted with the painted adjustment arm installed as well as the new 7375 belt that gives me more adjustment, might switch how ever to a 7370 belt to get more adjustment but if this belt works for me then I will stick with it. 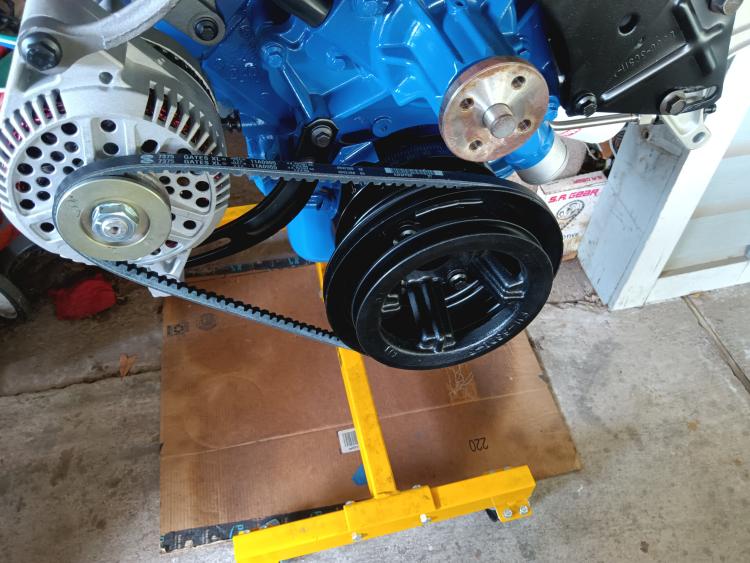 Third photo is of the alternator showing the belt alignment with the new 7370 belt and fit. Also showing the correct GR819 regulator connector and the stator connector. Can see the pigtails for the stator are to be so short there is no point in splicing, thats why I want to just crimp the correct regulator terminal on the wire and plug it into the regulator connector directly. 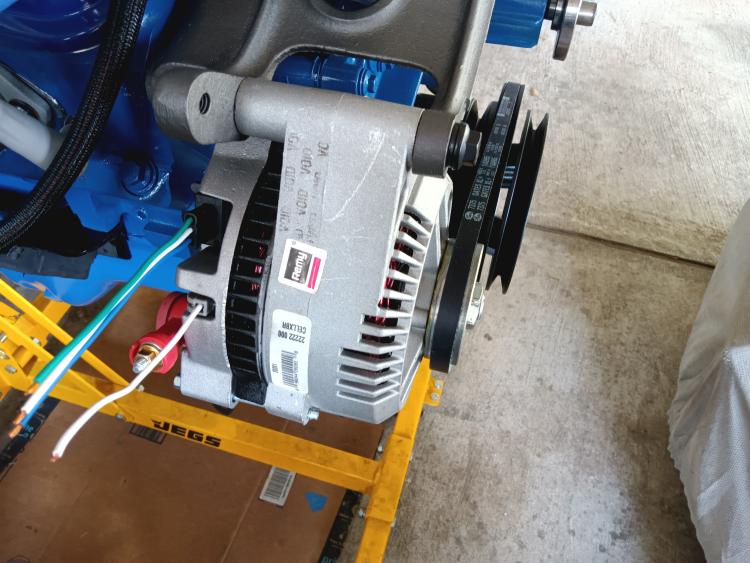 Fourth photo is of the regulator connector showing how easy it is to unplug the regulator with the GR819 regulator unlike the GR814 regulator with the tab you have to lift that faces the alternator body. One modification I had to make how ever was the spring wire clip has ears that were too long and would contact the alternator body before the connector could be plugged in. I used some side cutters and clipped the wire closer to the bend now it plugs and unplugs easily with no effort. I am quite happy with using the GR819 regulator as I have had to unplug the regulator plug on the GR814 and know how easy it is to break the tab when trying to lift it. 
"Old Blue" - '56 Fairlane Town Sedan - 292-4V, Ford-O-Matic transmission, 3.22:1
'63 Belair 2dr sdn - 283-4V, Powerglide transmission, 4.56:1 '78 Cougar XR7 - 351-2V, FMX transmission, 2.75:1 9inch "Bruno" - '82 F150 Flareside - 302-2V, C6 transmission, 2.75:1 9inch, 31x10.50-15 BFG KO2 |
|
Administrator
|
That looks like very good progress. And I see why you want the terminals so you don't have to splice. Plus, I agree how much of a pain the old connectors are to get off and can see why Ford changed.
Gary, AKA "Gary fellow": Profile
Dad's: '81 F150 Ranger XLT 4x4: Down for restomod: Full-roller "stroked 351M" w/Trick Flow heads & intake, EEC-V SEFI/E4OD/3.50 gears w/Kevlar clutches
|
|
|
Yep, it's real shame the new production regulators don't use this connector and just give the pigtail to make the swap. I know years ago when you bought a improved part from Ford they would give you the connector pigtail to splice in. One thing I forgot however, was the photo below that is showing how much adjustment I have now with the 7375 belt and why I might still go smaller to a 7370 belt. 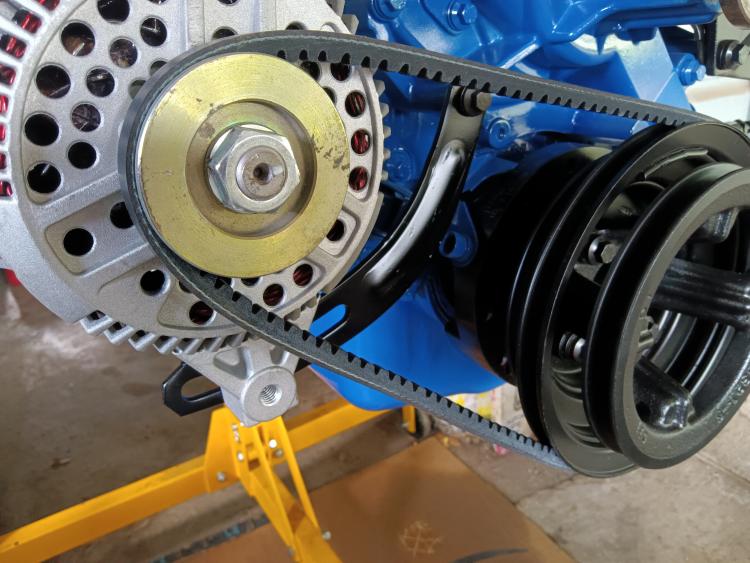 With the 6 second LRC regulator I shouldn't need to tension the belt that tight so I might be ok with the 7375 belt with the amount of adjustment I have. Another thing, I am thinking about making a ground strap for the alternator. Not far from the alternator itself is the point where the negative battery cable mounts to the block. It wouldn't be hard to make a 10ga wire and place it atop the negative battery cable at the block to ensure the alternator case is grounded.
"Old Blue" - '56 Fairlane Town Sedan - 292-4V, Ford-O-Matic transmission, 3.22:1
'63 Belair 2dr sdn - 283-4V, Powerglide transmission, 4.56:1 '78 Cougar XR7 - 351-2V, FMX transmission, 2.75:1 9inch "Bruno" - '82 F150 Flareside - 302-2V, C6 transmission, 2.75:1 9inch, 31x10.50-15 BFG KO2 |
| Edit this page |