"Rocky" - 1981 F250 Restoration

classic Classic list List threaded Threaded
479 messages Options
123456 ... 24
Reply | Threaded
Open this post in threaded view
|

Re: "Rocky" - 1981 F250 Restoration

taskswap
Thanks for the encouragement! Projects like these definitely have their ups and downs.

I did trace that wire out and finally figured it out. It's poorly documented but it's the "ignition key warning buzzer". It appears to be only one wire because the ignition key itself is metal and grounded. And has that weirdly shaped tab on the end. I guess in certain models of steering column, this wire and its white socket connect to the ignition cylinder and are activated when the key is in. Cutting it is no problem because in my 1981, that wire isn't actually carried through to the harness on the vehicle side. I don't have the buzzer in the first place.

Every new project is a new discovery. My goal this week is to sort out the wiring, improving/repairing some of the "DIY" stuff that was done (I HATE those blue wire taps) and testing literally every component, especially things like fan blowers that are hard to get to. (I want to do all this before reinstalling the dash/instrument panel.) Last night I was poking around at basic battery stuff and I found that the main battery ground wire was crushed halfway along it. It still "works" but obviously this should be replaced. A very easy item to fix, wish all the tasks were!

Still having a lot of trouble finding trim parts. My seat belt retractor covers are just destroyed and those are apparently hard to find. I've found a few in junkyards that weren't much better, same with the eBay listings. I'm learning that there are some things you can solve instantly with money (e.g. Loosely Matched Components purchases) and some take lots of time, luck, and research. I'm sure y'all are having a chuckle about this now but it's been a learning experience for me!
--
1981 F-250 Custom. 6.6L V8, 4 barrel Holley carb, ARA aftermarket A/C.
Reply | Threaded
Open this post in threaded view
|

Re: "Rocky" - 1981 F250 Restoration

rcarlisle
Check operation of all the doors in the HVAC system while you have the dash out.   I don't have to mention cleaning out mice nests, etc.  I found a skeleton intact.   Heater core maintenance replacement?  Speaker wires to doors and beyond if you are upgrading any of that?  

Be gentle with interior plastics - hard to find and are about as brittle as uncooked lasagna noodles.  

Weatherstripping around doors?  Window regulators?  So many things...  I can tell you to avoid Cheap window cranks.  They may not last.  

Carry on.  Always fun to watch a new member go through and improve.
Randy

Mt. Airy, NC   81 F-150 STYLESIDE regular cab 2wd.   302 Auto Zone crate.  5 spd M5od-R2  
Reply | Threaded
Open this post in threaded view
|

Re: "Rocky" - 1981 F250 Restoration

taskswap
Yeah, HVAC checking "every little thing" is a huge part of my list. We did find some fun gremlins inside, in our case a mud wasp nest! It's long since dead but we saved it as a fun memory. (We're weird.)

Question back on the wheels. So it looks like these 16" Wheel Vintiques Gary recommended look like a great fit. But double checking some things I noticed that the heat/dust shield on the back side of the front rotors is REALLY big, its radius is almost as wide as the inside of the rim. There's about a 5/8" gap all around so going 1/2" narrower on the rim "shouldn't" be a problem in theory, but I thought I'd ask if any of you had to make any brake modifications to accommodate modern rims?
--
1981 F-250 Custom. 6.6L V8, 4 barrel Holley carb, ARA aftermarket A/C.
Reply | Threaded
Open this post in threaded view
|

Re: "Rocky" - 1981 F250 Restoration

Gary Lewis
Administrator
No mods were made to Big Blue to run those wheels. The original backing plates were on it before I swapped the D60 in.
Gary, AKA "Gary fellow": Profile

Dad's: '81 F150 Ranger XLT 4x4: Down for restomod: Full-roller "stroked 351M" w/Trick Flow heads & intake, EEC-V SEFI/E4OD/3.50 gears w/Kevlar clutches
Blue: 2015 F150 Platinum 4x4 SuperCrew wearing Blue Jeans & sporting a 3.5L EB & Max Tow
Big Blue: 1985 F250HD 4x4: 460/ZF5/3.55's, D60 w/Ox locker & 10.25 Sterling/Trutrac, Blue Top & Borgeson, & EEC-V MAF/SEFI

Reply | Threaded
Open this post in threaded view
|

Re: "Rocky" - 1981 F250 Restoration

taskswap
Good to know thanks.

Aligned the doors today. The front edge (near the hinges) of the passenger side door was rubbing on the body when you opened/closed it. Sounded terrible and the paint is rubbing off so rust is forming. I used one of those Steck door alignment tools to sort it out. It was harder than I hoped. Even with an 18" breaker it took all my strength just to bend it upward a little and I started worrying about breaking something. Probably I'll need to look at the hinge pins at some point for damage/wear, but at least for now I was able to move it a few millimeters, enough to clear it.

Now that I have the doors closing at least halfway OK and the windows up, the cabin is sealed from the elements. I was able to move the dash pad and cover, instrument panel, etc. into the truck for storage. That's important because it opens up two new tasks: working on electrical (testing switches, lights, and other components - my bench was too cluttered to do this before) and tearing down the bench seat (which is nasty and ripped, but we're hoping the foam "base" might be intact/steam cleanable to avoid the high cost and shipping delay of replacing that part.

We found a vendor on Etsy that makes GORGEOUS seats in our. budget range, and seems to get good reviews. But they haven't responded to initial inquiries. We had already bought the seat re-upholstery kit from LMC before we found them, so we're talking about just using that for now and recovering it in the future. Right now the truck is totally not drivable, and it's important to me to get it back to minimally usable condition because that'll make it a lot easier to evaluate other things like the fuel system, drive train, etc.

Happy Monday.
--
1981 F-250 Custom. 6.6L V8, 4 barrel Holley carb, ARA aftermarket A/C.
Reply | Threaded
Open this post in threaded view
|

Re: "Rocky" - 1981 F250 Restoration

Gary Lewis
Administrator
It might be easier to move the fender than the door.  I did this recently on Big Blue.

There's a bolt on the bottom of the fender just ahead of the door.  And two bolts at the back/top of the fender that hold it to the cab.  Then there are two bolts that hold the angle brace to the radiator support in front.  Loosen all of those and, in my case, the fender moved forward on its own.
Gary, AKA "Gary fellow": Profile

Dad's: '81 F150 Ranger XLT 4x4: Down for restomod: Full-roller "stroked 351M" w/Trick Flow heads & intake, EEC-V SEFI/E4OD/3.50 gears w/Kevlar clutches
Blue: 2015 F150 Platinum 4x4 SuperCrew wearing Blue Jeans & sporting a 3.5L EB & Max Tow
Big Blue: 1985 F250HD 4x4: 460/ZF5/3.55's, D60 w/Ox locker & 10.25 Sterling/Trutrac, Blue Top & Borgeson, & EEC-V MAF/SEFI

Reply | Threaded
Open this post in threaded view
|

Re: "Rocky" - 1981 F250 Restoration

taskswap
Gary Lewis wrote
It might be easier to move the fender than the door.  I did this recently on Big Blue.
That seriously never occurred to me. This truck was in a very mild fender bender, not enough to do visible body damage but enough to bend the front bumper a quarter inch. I wonder if it shifted a body panel. Thanks for the suggestion, I'll poke at it today.

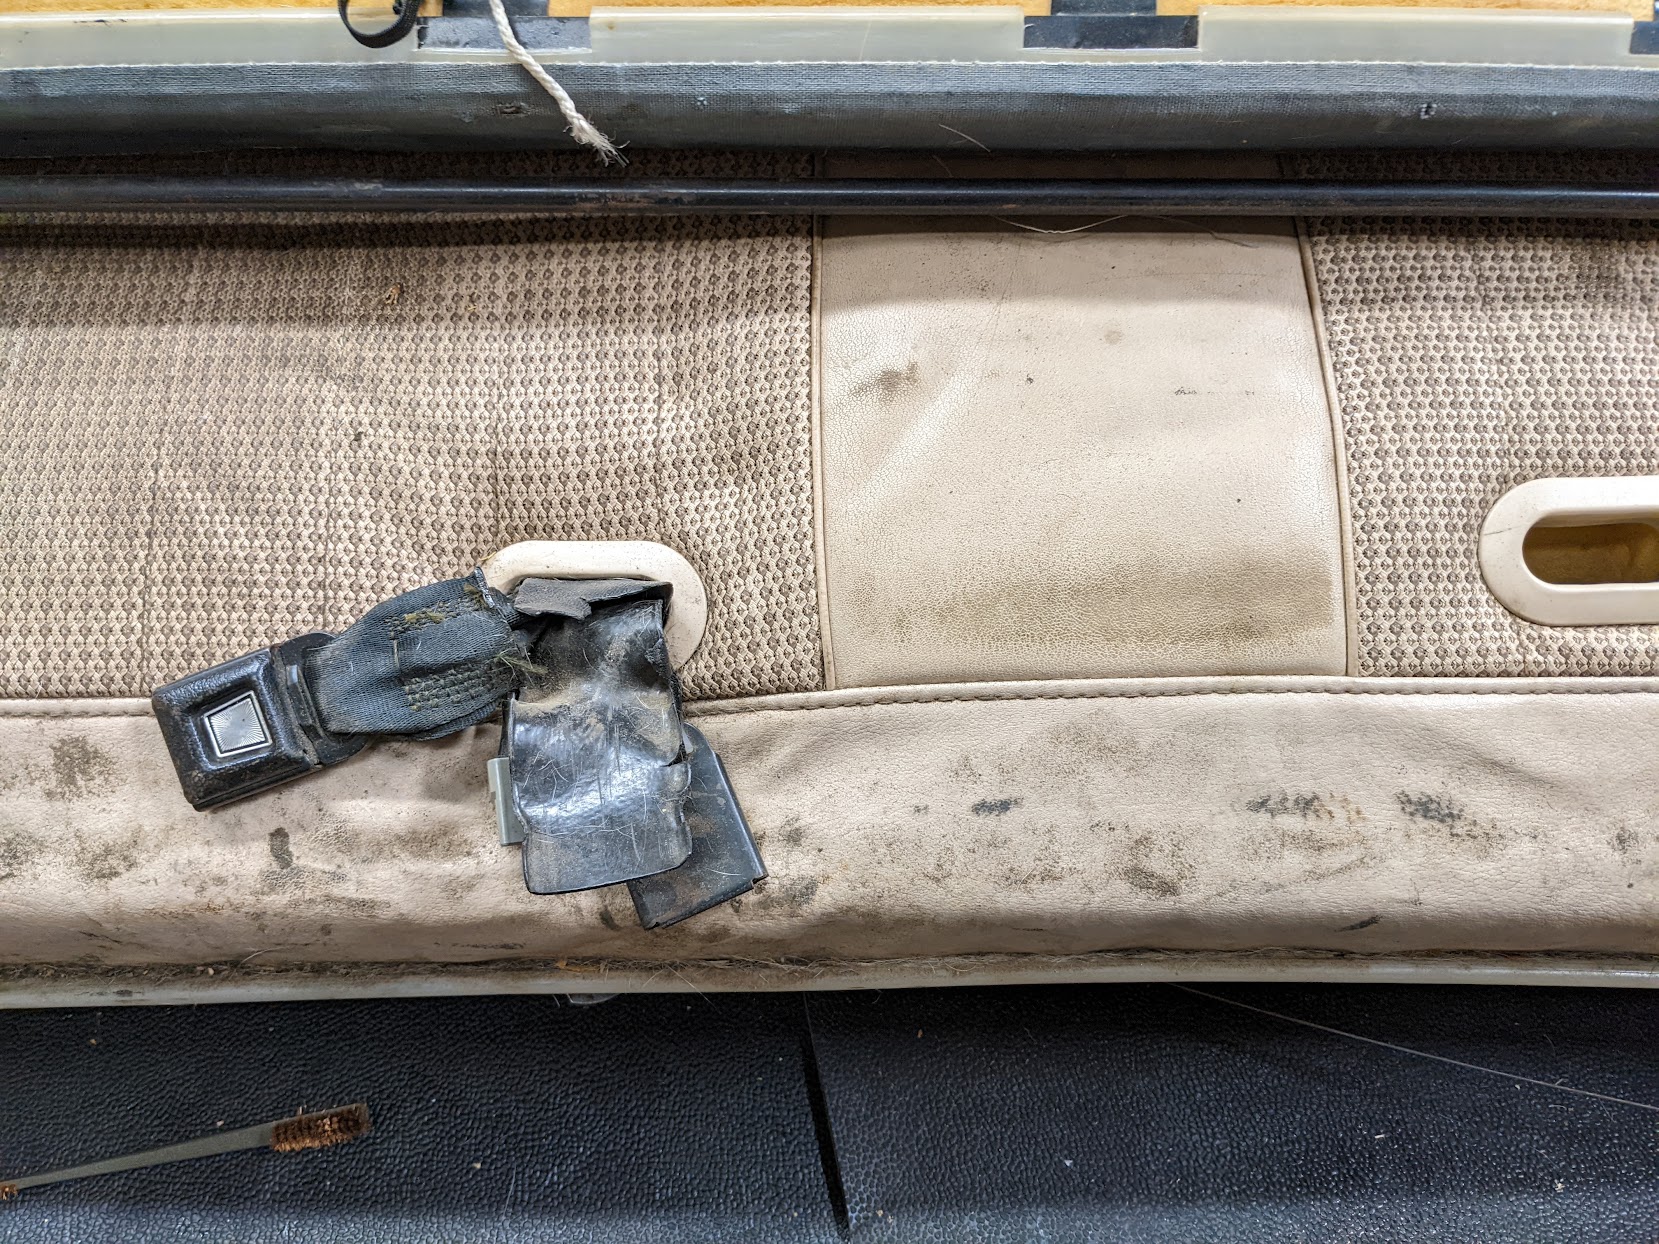
Meanwhile, the upholstery is... "almost done?" I made a lot of progress but also hit some snags. I didn't get a good photo of the old seats but they were in very rough shape. Imagine the entire seat looks like this photo (but more rips and oil stains):


As I'm learning with LMC, they often have "stuff you need" but not always "great stuff" or perfect fits even if it's advertised as being for your model year. I ran into a few problems:

1. We got the seat heater kit and it seems "ok"... but not perfect. The controls are very short so they'll have to be installed in the seat itself, which I guess is OK in the end although I had had a spot on the dash already picked out for them. (I don't have the energy to extend the switch connectors, it's not that big of a deal). But they also come with this adhesive tape to attach them and it's absolute garbage, it barely holds at all. I may actually replace it with duct tape, at least on the back, because...

2. They were also EXTREMELY difficult to get onto the seats. They came with only minimal instructions and all they said was basically they're expected to be very tight. Well tightness wasn't the main issue. Once you slide any kind of fabric over foam the friction gets so high it's almost impossible to move it the last inch. By accident at the end I discovered that if you slide something slippery like carboard underneath it, you can get it to move. I got the seat bottom "more or less" in place, but the back is still short by an inch. I may remove it today, hang a lawn-and-leaf bag on the seat, then reinstall the cover and slide the bag out at the end. I think that'll work.

3. The instructions say to hog-ring the covers back where the original factory ones were... but my original factory covers only had like 5 hog rings across the bottom. The entire rest of the cover was held on with plastic clips to the frame. There's nowhere solid enough to attach some of this. I haven't decided what to do about it. For now it still looks good enough to keep so I'm just letting it hang. I guess I could always just get some stout thread (I have some for a leather-working project I never got around to) and lace it onto one of the bottom bars the hog rings won't reach.

4. The seat covers didn't have holes cut for the seat-back-hinge arms or latch. I cut some as neatly as I could with a utility knife but I made a hash of it. I may try to find a thin plastic disc / washer of some kind on McMaster to serve as "trim" for the holes.

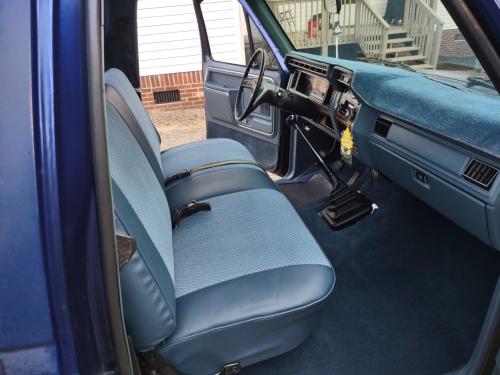
Despite the issues, it still looks SO much better than the old ones. We found a seller on Etsy with some much nicer custom covers but they aren't replying so we're actually thinking we'll keep these for a few years, not just as a temporary placeholder. We'll get some use out of them then maybe recover them in the future when they start to get ratty again. Then we don't need to worry about seat covers (I hate seat covers).

Today's goals:
1. Make a final decision on the Coverlay dash pad cover and dash pad underneath, whether I need to stabilize anything. I want to dremel out the speaker area a bit so it's all 100% removed in that area (right now it's still full of crumblies...) and I need to understand how this whole thing attaches. Very little of what LMC supplies seems to come with instructions...

2. Try to find sources for the A and B pillar trims. I had REALLY good luck with that vinyl / plastic "restorer" paint on the dash, but these pillar trims seem to have had some kind of two-layer surface, part plastic and part a thin foam or vinyl cover.

3. Go to Discount Tire. I found some decent tire/wheel combo packages that I'm happy with thanks to all your suggestions, but their Web sites won't let me order them because they don't think they'll fit my vehicle! Need to badger a sales clerk into doing it in person.

4. Find an auto shop that does A/C service to drain my R-12 system. I've changed my mind. I want to convert it to R134a. There will never be a better time to do this, it's not that hard, and it'll be so much easier to service myself in the future (I have all the stuff, including a vacuum pump, manifold gauge set, fittings, etc.) Once the system is drained I'll replace the hoses and fittings. The current ones are "mostly" in good condition but there are a few sketchy sections starting to show signs of cracking. Again, there'll never be a better time.

5. Start cleaning and testing electrical components.
--
1981 F-250 Custom. 6.6L V8, 4 barrel Holley carb, ARA aftermarket A/C.
Reply | Threaded
Open this post in threaded view
|

Re: "Rocky" - 1981 F250 Restoration

Gary Lewis
Administrator
I'll bet that fender was moved back a smidgen.

The upholstery looks sad.  Begging for help.  Glad you are figuring out how to do it.  Good idea on the trash bag.  

I've not seen A or B pillars with a foam or vinyl surface.  But SEM has preps made for different materials, so maybe you have the wrong one?

On the tires, good luck.  Sometimes the "systems" won't allow the customer to get what s/he wants.

And you are right on the A/C system.  Now is the time.  I had to replace two hoses on Big Blue after I'd already charged the system.  
Gary, AKA "Gary fellow": Profile

Dad's: '81 F150 Ranger XLT 4x4: Down for restomod: Full-roller "stroked 351M" w/Trick Flow heads & intake, EEC-V SEFI/E4OD/3.50 gears w/Kevlar clutches
Blue: 2015 F150 Platinum 4x4 SuperCrew wearing Blue Jeans & sporting a 3.5L EB & Max Tow
Big Blue: 1985 F250HD 4x4: 460/ZF5/3.55's, D60 w/Ox locker & 10.25 Sterling/Trutrac, Blue Top & Borgeson, & EEC-V MAF/SEFI

Reply | Threaded
Open this post in threaded view
|

Re: "Rocky" - 1981 F250 Restoration

rcarlisle
LMC has a video on installing their seat covers.   They use trash bags on the back pad to get it to slide.  But he kinda wrestles the bottom on.  I compared and eventually had a local shop do it custom for me.   He fixed the broken steel hat channel on back, fixed the drivers pad and bottom springs.   Vinyl with cloth inserts for $508 out the door.  THat got all of it fixed.  We were going to do the LMC cover, but studied on it and decided to spend the money to get whole seat fixed.  

New door panels from Dennis carpenter.   Carpet dash cover from Amazon.  Other bits and pieces from here and there.  Picture from October reminds me it's time to change out my little tree.  LOL.   But seats and carpet took care of the armpit and old truck smell.

Randy

Mt. Airy, NC   81 F-150 STYLESIDE regular cab 2wd.   302 Auto Zone crate.  5 spd M5od-R2  
Reply | Threaded
Open this post in threaded view
|

Re: "Rocky" - 1981 F250 Restoration

taskswap
Out with the old:


In with the new:


I also removed the A pillar trim on both sides, cleaned them, and recolored them (so far SM Arnold Vinyl/Plastic Restorer in "Doeskin" is turning out the nicest). Both sides were cracked but not beyond repair so I scuff-sanded the back sides around the cracks, duct-taped the fronts to hold the cracks closed, then put on 1 ply of fiberglass BID and epoxy. When that cures I'll re-finish the front sides just to get a bit of the coloring agent into the crack and they should be ready to re-install.

I'm now starting to bench-test electrical components. I got all the light bulbs sorted out, only needed to replace two. I apparently have the "blue" light lenses, which isn't actually my favorite but I don't want to bother changing it.

Testing the gauges has been a little harder. I know the fuel level gauge is not working so I decided to start with that. I carefully traced out the IP circuits and set up a test rig. The gauge did move but from halfway to way-past-full as I moved the sender between its limits which is probably because I couldn't find an 8-9ohm resistor handy. I'm going to proceed on the assumption that the gauge is fine and the sender is bad (or the wiring is flakey, plenty of other wires were messed up so far). That's good because it means I can start re-assembling the dash.
--
1981 F-250 Custom. 6.6L V8, 4 barrel Holley carb, ARA aftermarket A/C.
Reply | Threaded
Open this post in threaded view
|

Re: "Rocky" - 1981 F250 Restoration

Gary Lewis
Administrator
The new looks good!  The old looks...yukky!

On the gauges, the range is from 10 to 72 ohms, with 22 ohms being midpoint, if I remember correctly.  And this would be a good time to replace the ICVR with a real voltage regulator.  We have a page on that (Documentation/Electrical/ICVR) but there are now commercial versions if you don't want to make your own.

And you are right to assume the gauge is good and the sender bad.  The gauges are pretty rugged and rarely fail while the senders fail frequently.

On the lights, I'd ditch the blue filters and put in some HIPO LED's.  The blue filters rob so much of the light output of the already woefully inadequate incandescent bulbs you can't see the gauges.  I've done some testing with various lights, and you can see the results here.
Gary, AKA "Gary fellow": Profile

Dad's: '81 F150 Ranger XLT 4x4: Down for restomod: Full-roller "stroked 351M" w/Trick Flow heads & intake, EEC-V SEFI/E4OD/3.50 gears w/Kevlar clutches
Blue: 2015 F150 Platinum 4x4 SuperCrew wearing Blue Jeans & sporting a 3.5L EB & Max Tow
Big Blue: 1985 F250HD 4x4: 460/ZF5/3.55's, D60 w/Ox locker & 10.25 Sterling/Trutrac, Blue Top & Borgeson, & EEC-V MAF/SEFI

Reply | Threaded
Open this post in threaded view
|

Re: "Rocky" - 1981 F250 Restoration

taskswap
Gary do you have a link or a product number for the HiPo Cool Whites from your other post? I really like the look of them but can't seem to find them in current searches...
--
1981 F-250 Custom. 6.6L V8, 4 barrel Holley carb, ARA aftermarket A/C.
Reply | Threaded
Open this post in threaded view
|

Re: "Rocky" - 1981 F250 Restoration

Gsmblue
From my last hipo order:

245 lumen 20x Plasma SMD Bulb 194 T-10 Wedge - 360 Wide Angle
1985.5 F-150 XL Explorer standard cab 5.0 EFI AOD 4x4
Daily Driver. We call her Eunice the Ute.

1982 Bronco XLT Lariat 351W AOD 4x4
Code name Esperanza, or Espy to her friends. Please see my Project thread for the blow by blow.

1984 F-350 XL Centurion crew cab 460 T19 4x4
"Eylza Dual-little"
Reply | Threaded
Open this post in threaded view
|

Re: "Rocky" - 1981 F250 Restoration

Gsmblue
Link

https://www.hipoparts.com/245-lumen-20x-plasma-smd-bulb-194-t-10-wedge-360-wide-angle/
1985.5 F-150 XL Explorer standard cab 5.0 EFI AOD 4x4
Daily Driver. We call her Eunice the Ute.

1982 Bronco XLT Lariat 351W AOD 4x4
Code name Esperanza, or Espy to her friends. Please see my Project thread for the blow by blow.

1984 F-350 XL Centurion crew cab 460 T19 4x4
"Eylza Dual-little"
Reply | Threaded
Open this post in threaded view
|

Re: "Rocky" - 1981 F250 Restoration

Gary Lewis
Administrator
In reply to this post by taskswap
I think this is what you are looking for: https://www.hipoparts.com/245-lumen-20x-plasma-smd-bulb-194-t-10-wedge-360-wide-angle/

If you talk to them, tell Bill I sent you.  
Gary, AKA "Gary fellow": Profile

Dad's: '81 F150 Ranger XLT 4x4: Down for restomod: Full-roller "stroked 351M" w/Trick Flow heads & intake, EEC-V SEFI/E4OD/3.50 gears w/Kevlar clutches
Blue: 2015 F150 Platinum 4x4 SuperCrew wearing Blue Jeans & sporting a 3.5L EB & Max Tow
Big Blue: 1985 F250HD 4x4: 460/ZF5/3.55's, D60 w/Ox locker & 10.25 Sterling/Trutrac, Blue Top & Borgeson, & EEC-V MAF/SEFI

Reply | Threaded
Open this post in threaded view
|

Re: "Rocky" - 1981 F250 Restoration

Gary Lewis
Administrator
In reply to this post by Gsmblue
Beat me to it.  You like yours?
Gary, AKA "Gary fellow": Profile

Dad's: '81 F150 Ranger XLT 4x4: Down for restomod: Full-roller "stroked 351M" w/Trick Flow heads & intake, EEC-V SEFI/E4OD/3.50 gears w/Kevlar clutches
Blue: 2015 F150 Platinum 4x4 SuperCrew wearing Blue Jeans & sporting a 3.5L EB & Max Tow
Big Blue: 1985 F250HD 4x4: 460/ZF5/3.55's, D60 w/Ox locker & 10.25 Sterling/Trutrac, Blue Top & Borgeson, & EEC-V MAF/SEFI

Reply | Threaded
Open this post in threaded view
|

Re: "Rocky" - 1981 F250 Restoration

Gsmblue
I have them in all 3 of my musketeers!
1985.5 F-150 XL Explorer standard cab 5.0 EFI AOD 4x4
Daily Driver. We call her Eunice the Ute.

1982 Bronco XLT Lariat 351W AOD 4x4
Code name Esperanza, or Espy to her friends. Please see my Project thread for the blow by blow.

1984 F-350 XL Centurion crew cab 460 T19 4x4
"Eylza Dual-little"
Reply | Threaded
Open this post in threaded view
|

Re: "Rocky" - 1981 F250 Restoration

Gary Lewis
Administrator
Isn't it great to be able to see the instruments!?!?  What color did you get?
Gary, AKA "Gary fellow": Profile

Dad's: '81 F150 Ranger XLT 4x4: Down for restomod: Full-roller "stroked 351M" w/Trick Flow heads & intake, EEC-V SEFI/E4OD/3.50 gears w/Kevlar clutches
Blue: 2015 F150 Platinum 4x4 SuperCrew wearing Blue Jeans & sporting a 3.5L EB & Max Tow
Big Blue: 1985 F250HD 4x4: 460/ZF5/3.55's, D60 w/Ox locker & 10.25 Sterling/Trutrac, Blue Top & Borgeson, & EEC-V MAF/SEFI

Reply | Threaded
Open this post in threaded view
|

Re: "Rocky" - 1981 F250 Restoration

taskswap
This forum is the single greatest thing that ever happened to the task of restoring an old Ford.
--
1981 F-250 Custom. 6.6L V8, 4 barrel Holley carb, ARA aftermarket A/C.
Reply | Threaded
Open this post in threaded view
|

Re: "Rocky" - 1981 F250 Restoration

Gary Lewis
Administrator
Wow!  That is high praise!  Thanks!  
Gary, AKA "Gary fellow": Profile

Dad's: '81 F150 Ranger XLT 4x4: Down for restomod: Full-roller "stroked 351M" w/Trick Flow heads & intake, EEC-V SEFI/E4OD/3.50 gears w/Kevlar clutches
Blue: 2015 F150 Platinum 4x4 SuperCrew wearing Blue Jeans & sporting a 3.5L EB & Max Tow
Big Blue: 1985 F250HD 4x4: 460/ZF5/3.55's, D60 w/Ox locker & 10.25 Sterling/Trutrac, Blue Top & Borgeson, & EEC-V MAF/SEFI

123456 ... 24