"Rocky" - 1981 F250 Restoration

classic Classic list List threaded Threaded
479 messages Options
12345 ... 24
Reply | Threaded
Open this post in threaded view
|

Re: "Rocky" - 1981 F250 Restoration

taskswap
Yeah that's a good thought (VIN). It does seem to. It has a notch in the black edge band about where the VIN is.


All Rustoleum'd up. Not exactly showroom quality - I didn't quite scrape all the old carpet adhesive off so it's a little shaggy in spots (but not spots where there's rust.) That's OK, nobody is ever going to see this.

I'm in a mad rush to get a few painting tasks done. It's going to be almost 70 here tomorrow as well, then next week winter returns. We occasionally get some very warm days here in CO even in the winter, but I can't count on it for awhile. With this task out of the way, I can spend the next few weeks messing around with smaller items in my garage, then start reassembling the interior.

Priority wise my next task is to understand the door lock and window mechanisms. My windows are very hard to get up and down and my doors auto-lock when they're closed if the windows are up. Since I don't have a door key it's urgent that I get that sorted out before we get any weather, otherwise I'll have to tarp it.
--
1981 F-250 Custom. 6.6L V8, 4 barrel Holley carb, ARA aftermarket A/C.
Reply | Threaded
Open this post in threaded view
|

Re: "Rocky" - 1981 F250 Restoration

Gary Lewis
Administrator
Glad you got the right windshield.  That can be a major problem.  BTDT.

Yes, it was WARM today here as well.  But that is going to change, soon.  Sunday night, they say.

The paint looks good.  And a little bit of fuss won't hurt at all.

The door lock mechanism runs very close to the window, and if it is bent it can easily be moved by the window.  I had a problem on Big Blue where the PS door would lock correctly with the window down, but not up.  So I pulled the panel and watched as the window moved.  Sure enough, I could see the problem.

Then I pulled the linkage from both sides and laid them side by side and it was obvious that the PS linkage was bent differently than the DS linkage.  So I re-bent it and it worked!
Gary, AKA "Gary fellow": Profile

Dad's: '81 F150 Ranger XLT 4x4: Down for restomod: Full-roller "stroked 351M" w/Trick Flow heads & intake, EEC-V SEFI/E4OD/3.50 gears w/Kevlar clutches
Blue: 2015 F150 Platinum 4x4 SuperCrew wearing Blue Jeans & sporting a 3.5L EB & Max Tow
Big Blue: 1985 F250HD 4x4: 460/ZF5/3.55's, D60 w/Ox locker & 10.25 Sterling/Trutrac, Blue Top & Borgeson, & EEC-V MAF/SEFI

Reply | Threaded
Open this post in threaded view
|

Re: "Rocky" - 1981 F250 Restoration

taskswap
So now I'm stressed about this VIN :) There is a notch to view the VIN... and the VIN plate is near it, but it's offset a bit. It's just riveted on there and there could not be a better time to move it. Think it's worth it?
--
1981 F-250 Custom. 6.6L V8, 4 barrel Holley carb, ARA aftermarket A/C.
Reply | Threaded
Open this post in threaded view
|

Re: "Rocky" - 1981 F250 Restoration

Gary Lewis
Administrator
Can you read it?  Best not to move it if you don't have to.  Those hex-headed rivets aren't readily available, and round ones might raise a flag.  But, if you saved the rivet heads and glued them awa the VIN label on...  
Gary, AKA "Gary fellow": Profile

Dad's: '81 F150 Ranger XLT 4x4: Down for restomod: Full-roller "stroked 351M" w/Trick Flow heads & intake, EEC-V SEFI/E4OD/3.50 gears w/Kevlar clutches
Blue: 2015 F150 Platinum 4x4 SuperCrew wearing Blue Jeans & sporting a 3.5L EB & Max Tow
Big Blue: 1985 F250HD 4x4: 460/ZF5/3.55's, D60 w/Ox locker & 10.25 Sterling/Trutrac, Blue Top & Borgeson, & EEC-V MAF/SEFI

Reply | Threaded
Open this post in threaded view
|

Re: "Rocky" - 1981 F250 Restoration

mat in tn
i will definitely add to the windshield comment. you mentioned a notch in the black band. if it came with a black band, IT IS THE WRONG WINDSHIELD!! yes, the vin tag is 2-1/2'' further out on the later trucks than the bullnose. the correct one will not have a black heat bonded border and the installer must prime the glass before using the modern urethane adhesive. even though it has a window notch it is not lined up and comes up on the glass higher to hide seams around the leading edge of the dash cap. the dash pad and certainly any cover you may choose to install will make reading the vin tag difficult to say the least. kind of like looking through two doors offset in a hallway with the reflection of the angled glass. i know this may seem oddly thorough and specific but let's just say ''i have bought my share of bullnose windshields. haha
Reply | Threaded
Open this post in threaded view
|

Re: "Rocky" - 1981 F250 Restoration

taskswap
Speaking of dash pads, I got the thing everybody else seems to get: the Coverlay. It looks pretty nice, I thin it will work fine. But like most others, my dash pad underneath is crumbling. I think I'm lucky in that mine is still moderately intact. But I was wondering if any of you have done anything to stabilize it before covering it. I have a ton of fiberglass left over from other projects and it's tempting to throw a ply of BID on there first just to encapsulate it. Or is it a waste of time?

--
1981 F-250 Custom. 6.6L V8, 4 barrel Holley carb, ARA aftermarket A/C.
Reply | Threaded
Open this post in threaded view
|

Re: "Rocky" - 1981 F250 Restoration

Pete Whitstone
Depends... mine looked similar to yours but it was mostly cosmetic. The underlying plastic was still in good shape. Have you removed the dash pad from the truck, so you can see how it holds its shape without the support of the metal dash?

Mine was fine in that regard, so the outer covering and foam were stripped, and the radio hole was patched, then it was re-covered, and that was all it needed.

If it's all floppy or broken when it comes out of the truck, then fiberglass would be my fix of choice.
81 F150 Flareside, Edelbrock Pro Flow4 FI, hydraulic roller 351W, E4OD, 4x4, BW1356
92 F150 RCLB 351W E40D BW1356 mostly stock
Reply | Threaded
Open this post in threaded view
|

Re: "Rocky" - 1981 F250 Restoration

Gary Lewis
Administrator
In reply to this post by taskswap
I agree with Pete, but I'll bet it'll just be surface cracking and not structural.  And what I've done in that case is to sand the cracks smooth.

Also, I don't install the Coverlay cover with the dash pad on the truck.  Instead I have it on the bench and us all sorts of clamps and rubber bands to hold the cover to the pad while the glue is setting up.

Speaking of which, I've not had good luck with the RTV they send.  I'm thinking that the next time I'll use spray contact cement.
Gary, AKA "Gary fellow": Profile

Dad's: '81 F150 Ranger XLT 4x4: Down for restomod: Full-roller "stroked 351M" w/Trick Flow heads & intake, EEC-V SEFI/E4OD/3.50 gears w/Kevlar clutches
Blue: 2015 F150 Platinum 4x4 SuperCrew wearing Blue Jeans & sporting a 3.5L EB & Max Tow
Big Blue: 1985 F250HD 4x4: 460/ZF5/3.55's, D60 w/Ox locker & 10.25 Sterling/Trutrac, Blue Top & Borgeson, & EEC-V MAF/SEFI

Reply | Threaded
Open this post in threaded view
|

Re: "Rocky" - 1981 F250 Restoration

FuzzFace2
I had 2 pads to work with and took the worst to try and fix, like 3 times as nothing I tried would fill the cracks and sand smooth the way I liked.

I picked up a cover and on test fits thought it best to remove some of the edging that would show.
That was a BIG mistake as the cover did not fit or look right.
I have bought the fiber glass rosin and fleece blanket to recover it like on YouTube just have not gotten to it yet.

I ended up putting the cover on the other pad and like Gary said did in off the truck and used clamps & heavy things to push it into place.
I am pretty sure I used the RTV that came with it and so far no issues.
I did wash the old pad many times before I installed the cover.
I then used SEM paint and painted it to match the rest of the panels inside the truck.

I think it came out pretty good.


Dave ----
Dave G.
81 F100 flare side 300 six / AA OD / NP435 / 2.75 gear
http://cars.grantskingdom1.com/index.php/1980-Ford-F100?page=1
81 F100 style side 300 six/SROD parts truck -RIP
http://cars.grantskingdom1.com/index.php/1981-Ford-F100
Reply | Threaded
Open this post in threaded view
|

Re: "Rocky" - 1981 F250 Restoration

mat in tn
In reply to this post by taskswap
the simplest answer is to trim off anything that is sticking up and or loose. clean thoroughly and use the glue they send. I'm even tempted to buy another tube and over glue it, but I have not done it. i have used three or four of them though and usually have been happy. one more tip i will give is to lay in on dry and look around all of the openings and through the speaker grill. note any of the pad underneath that you can see and may want to trim. also, once it fits well back drill for the four screws holding the pad at the defrost ports. i have seen people glue a cover on in place and who ever needs to remove it later is screwed trying to figure out what's still holding it. four hidden screws! that's what!
Reply | Threaded
Open this post in threaded view
|

Re: "Rocky" - 1981 F250 Restoration

FuzzFace2
mat in tn wrote
the simplest answer is to trim off anything that is sticking up and or loose. clean thoroughly and use the glue they send. I'm even tempted to buy another tube and over glue it, but I have not done it. i have used three or four of them though and usually have been happy. one more tip i will give is to lay in on dry and look around all of the openings and through the speaker grill. note any of the pad underneath that you can see and may want to trim. also, once it fits well back drill for the four screws holding the pad at the defrost ports. i have seen people glue a cover on in place and who ever needs to remove it later is screwed trying to figure out what's still holding it. four hidden screws! that's what!
Yep thats what I did.
Off the truck, test fit and fix why it will not sit right.
I may have drilled the 4 holes at the defrost after it was glued on from the back side.
Dave ----
Dave G.
81 F100 flare side 300 six / AA OD / NP435 / 2.75 gear
http://cars.grantskingdom1.com/index.php/1980-Ford-F100?page=1
81 F100 style side 300 six/SROD parts truck -RIP
http://cars.grantskingdom1.com/index.php/1981-Ford-F100
Reply | Threaded
Open this post in threaded view
|

Re: "Rocky" - 1981 F250 Restoration

Gary Lewis
Administrator
I drilled the holes after it was glued.  That way I knew exactly where to drill.
Gary, AKA "Gary fellow": Profile

Dad's: '81 F150 Ranger XLT 4x4: Down for restomod: Full-roller "stroked 351M" w/Trick Flow heads & intake, EEC-V SEFI/E4OD/3.50 gears w/Kevlar clutches
Blue: 2015 F150 Platinum 4x4 SuperCrew wearing Blue Jeans & sporting a 3.5L EB & Max Tow
Big Blue: 1985 F250HD 4x4: 460/ZF5/3.55's, D60 w/Ox locker & 10.25 Sterling/Trutrac, Blue Top & Borgeson, & EEC-V MAF/SEFI

Reply | Threaded
Open this post in threaded view
|

Re: "Rocky" - 1981 F250 Restoration

taskswap
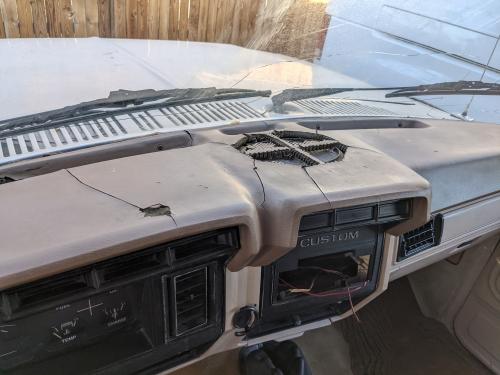
I think I might take a chance and cut out the speaker grille. I'm installing a new speaker and the Covercraft cover has its own grille. The one I have is a hot mess full of crumbly foam and I think any kind of actual audio under it will just shake the rest of it to bits. :) After that, yes, I think the bulk of this is structurally sound. I don't dare wave it around in the air but it seems pretty intact. It's not a super difficult item to remove later so maybe I'll just leave it be for now (I have plenty of other projects) and move on to other tasks. I can come back to it later.

I had a good day overall. I didn't really get many good pics because I was too busy banging away:

1. Installed new turn signal switch and chrome turn signal lever. I haven't reinstalled the wheel, because it's easier to reinstall the dash without it but also I have a mystery wire on the new switch. This thing didn't come with instructions, anybody know what the small white socket-looking-thingy that only has one wire on it is for? Nothing in the FSM or EVTM seems to mention it. Something for a later year?

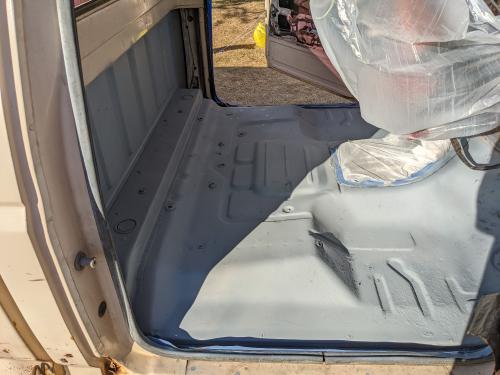
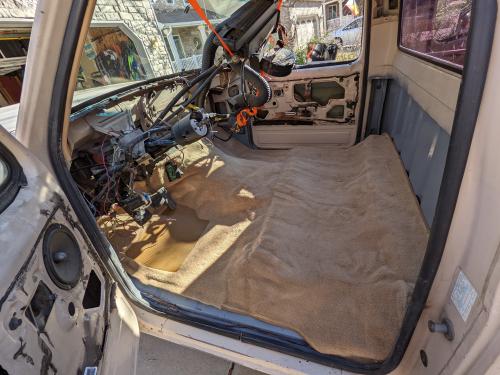
2. Installed insulation on the floor. This was the 3-piece kit from LMC but I only installed 2 parts of it. I didn't really like the look and feel of the thin/heavy extra insulation sheets so I passed on those. The carpet looks... OK I guess. It's super bunched up in some spots and wrinkled in others from shipping. Hopefully it will relax now that it's in the vehicle.

3. Figured out the window/lock interaction issue, or at least part of it. On the passenger side the window was out of its tracks and hitting the lock mechanism pushrods. I got it back in the track and rolled up and the door can open/close without auto-locking. On the driver's side... not so much but I opened the vent window a little bit and I can reach my arm in to open it if need be :) I'm not worried about it being stolen (see #4 below) I just don't want any moisture getting in there now that the carpet's in.

4. Removed the shifter cane (Warner T18). Discovered several issues, one I knew about but was confirmed. The "pin" that always gets chowdered up giving you play in the shifter is... chowdered up. I'll get a new one. I also found there's some kind of active leak going on there because the foam-rubber pad (that never seems to be in any diagrams I have) that sits on top to cushion when you slam the shifter too hard is SOAKED with oil and the top of the transmission is a hot mess. A future task to track down. Also while I was there I found the reverse switch was installed but there were no wires to it! Now I know why that wasn't working.

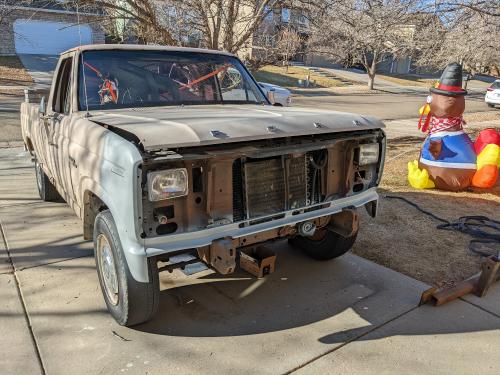
5. Painted painted painted. We're going to get a proper paint job some day but it's not a budget priority right now and I wanted to at least get some of the rust mitigated. Most of the body is actually in decent shape and I don't want it to deteriorate. I got all the rust on the "nose" and about a foot of the left/right front quarter panels treated, then primed, then I was holding this can of paint my son picked out and made a bad decision. He had gotten it has one of three options for a bumper paint (he wasn't sure what I would like best) and I thought, hey, this is nicer than primer, why not? So I sprayed it on.

It's textured.

Oopsie. No big deal, it'll all get removed anyway when I start getting the body ready for its real paint job. But I did feel like an idiot. I was in a rush and made a mistake. Story of my life. All was not lost though. Right then, Amazon rolled up with some gloss red I had wanted to throw on just to see how we liked the color on the truck in general. I quickly sanded some of the texture off and threw the red on and it came out pretty nice in the end. Plenty to hold it through the winter.

6. Not all the paint was a problem. I did get my rear primer de-rusted, primed, and painted. I went with this metallic silver my son also found and THAT looks AMAZING. I have a pic here but it does not do it justice. I threw on two coats of that plus a clear coat. I'm pretty easy on my bumpers, I tend to drop the tailgate and climb in to get stuff 99% of the time, so I think it'll last awhile.


--
1981 F-250 Custom. 6.6L V8, 4 barrel Holley carb, ARA aftermarket A/C.
Reply | Threaded
Open this post in threaded view
|

Re: "Rocky" - 1981 F250 Restoration

Gary Lewis
Administrator
Man, that's a LOT of WORK!  (I'm seeing Maynard G. Krebs saying that.)  I got tired just reading the list.  

I don't know what the white socket thing is as I've not seen it.  A pic?

Glad you got the window and lock bit sorted.  Or, sorta sorted.

Insulation is good, but sound deadening below it helps even more.

On the tranny, if someone filled it too full it might overflow.  They are to be filled to the bottom of the fill plug, but some people pour it in through the shifter housing.

As for the painting, we have a saying: Pics or it didn't happen.  
Gary, AKA "Gary fellow": Profile

Dad's: '81 F150 Ranger XLT 4x4: Down for restomod: Full-roller "stroked 351M" w/Trick Flow heads & intake, EEC-V SEFI/E4OD/3.50 gears w/Kevlar clutches
Blue: 2015 F150 Platinum 4x4 SuperCrew wearing Blue Jeans & sporting a 3.5L EB & Max Tow
Big Blue: 1985 F250HD 4x4: 460/ZF5/3.55's, D60 w/Ox locker & 10.25 Sterling/Trutrac, Blue Top & Borgeson, & EEC-V MAF/SEFI

Reply | Threaded
Open this post in threaded view
|

Re: "Rocky" - 1981 F250 Restoration

taskswap
Thanks! I was really pushing yesterday, I knew the weather was going to turn today and today's a family day (decorating the house). I probably won't get much done today, but I'll get some better photos.

Meanwhile I could use some advice. So I have 8-lug 16.5" rims on this thing with a mis-mosh of tires I'm sure came from a boneyard. I can only find one single vendor selling an R16.5 tire (the Firestone Transforce) outside of Super Swampers or military hummer tires, neither of which is a good choice for this truck. I really want a better choice available because I'm going to be taking this back-country a fair bit, not rock crawling but definitely forest service roads. For reference, I usually run something like a Nitto Grappler or a Toyo Open Country M/T.

As near as I can figure it, replacing the rims is my only option. But rim choices for an 8-lug 6.5" pattern ALSO seem to be limited. Not as bad, but there's maybe a dozen options, not exactly hundreds.

What I'm trying to figure out is if it's better to use one of the limited 8-lug options, or put on adapters. I know lug-pattern adapters exist but I don't have any experience with them. Are there downsides (other than pushing the wheels a few inches outboard)? I don't know if there are anecdotes about people having them fail, or other types of problems...
--
1981 F-250 Custom. 6.6L V8, 4 barrel Holley carb, ARA aftermarket A/C.
Reply | Threaded
Open this post in threaded view
|

Re: "Rocky" - 1981 F250 Restoration

Gary Lewis
Administrator
I'm running Wheel Vintiques 82-680804 16 x 8 wheels on Big Blue.  And Cooper Discoverer S/T Maxx in LT285/75R16 tires.  Makes for a good combination.
Gary, AKA "Gary fellow": Profile

Dad's: '81 F150 Ranger XLT 4x4: Down for restomod: Full-roller "stroked 351M" w/Trick Flow heads & intake, EEC-V SEFI/E4OD/3.50 gears w/Kevlar clutches
Blue: 2015 F150 Platinum 4x4 SuperCrew wearing Blue Jeans & sporting a 3.5L EB & Max Tow
Big Blue: 1985 F250HD 4x4: 460/ZF5/3.55's, D60 w/Ox locker & 10.25 Sterling/Trutrac, Blue Top & Borgeson, & EEC-V MAF/SEFI

Reply | Threaded
Open this post in threaded view
|

Re: "Rocky" - 1981 F250 Restoration

Tarheel Blue
Absolutely love my Cooper Discoverer A/T 3s
Kurt K
'85 XLT Lariat, 4.9L, NP435, 3.08LS, DSII, 130a 3G, PMGR, '87 MC, P235/R75
Reply | Threaded
Open this post in threaded view
|

Re: "Rocky" - 1981 F250 Restoration

taskswap
Those are all great tires and if I had 16" rims they'd definitely be on the list. The question is: what's the best path to 16" rims from here? Is it to try to find a decent 16" on an 8-lug/6.5" pattern? Which do seem to be available but with limited options... Or to use a lug-pattern adapter to a 5" or 6" lug where I have more rim choices? Curious whether there's some reason one or another is "better"...
--
1981 F-250 Custom. 6.6L V8, 4 barrel Holley carb, ARA aftermarket A/C.
Reply | Threaded
Open this post in threaded view
|

Re: "Rocky" - 1981 F250 Restoration

taskswap
Ohhh I replied too soon. I didn't see the Wheel Vintiques, they definitely look nice. I'll explore them more, thanks!
--
1981 F-250 Custom. 6.6L V8, 4 barrel Holley carb, ARA aftermarket A/C.
Reply | Threaded
Open this post in threaded view
|

Re: "Rocky" - 1981 F250 Restoration

rcarlisle
In reply to this post by taskswap
taskswap wrote
1. Installed new turn signal switch and chrome turn signal lever. I haven't reinstalled the wheel, because it's easier to reinstall the dash without it but also I have a mystery wire on the new switch. This thing didn't come with instructions, anybody know what the small white socket-looking-thingy that only has one wire on it is for? Nothing in the FSM or EVTM seems to mention it. Something for a later year?
That wire and light bulb is for a van or later truck or something.    I snipped mine.  Put heat shrink over it, heated it to melty at the end and crimped it off, stuck it back in the wire wrapping.

One warning good for everyone, If you're making two consecutive turns, let the stalk reset on it's own.  If you force the second signal, you can damage the plastic parts in the signal mechanism.  Yes I found that out the hard way.  

Good luck and keep at it.  I think most of uys have been where you are at some point.   I'm not a year in yet, but am familiar with all you're doing so far other than the wheels - mine are 15s on a F150


Randy

Mt. Airy, NC   81 F-150 STYLESIDE regular cab 2wd.   302 Auto Zone crate.  5 spd M5od-R2  
12345 ... 24