"Rocky" - 1981 F250 Restoration


|
We're the brackets from your old bumper?
If so they might been a package deal, bumper & brackets to fit the truck. Now you want to use the old brackets with new bumper and it don't fit! Measure say from the ball mount to the bracket holes and you may find they are different between the two bumpers. Dave ----
Dave G.
81 F100 flare side 300 six / AA OD / NP435 / 2.75 gear http://cars.grantskingdom1.com/index.php/1980-Ford-F100?page=1 81 F100 style side 300 six/SROD parts truck -RIP http://cars.grantskingdom1.com/index.php/1981-Ford-F100 |
Re: "Rocky" - 1981 F250 Restoration
|
Administrator
|
In reply to this post by taskswap
I have a used pair of Westin Platinum Series step bars on Big Blue. But as light as the tubes are they are certainly not rock sliders, although I wish they were.
I had to make the mounts that attach to the frame but initially used the original brackets which attach the bar to the mounts. Here are some pics, although if you are interested I can take more. But, suffice to say that there was a LOT of fabrication. In this first pic you can see the rear brackets on the left and the front brackets on the right. And each pair has the original bracket on the right and my beefed-up version on the left. Basically, what I did was to put a second side on each and a piece of angle that bolts to the bottom of the mounts. And I did that because in the recent trip to Colorado we attached a winch line to the step bar and wound up bending the bracket. That won't happen now.  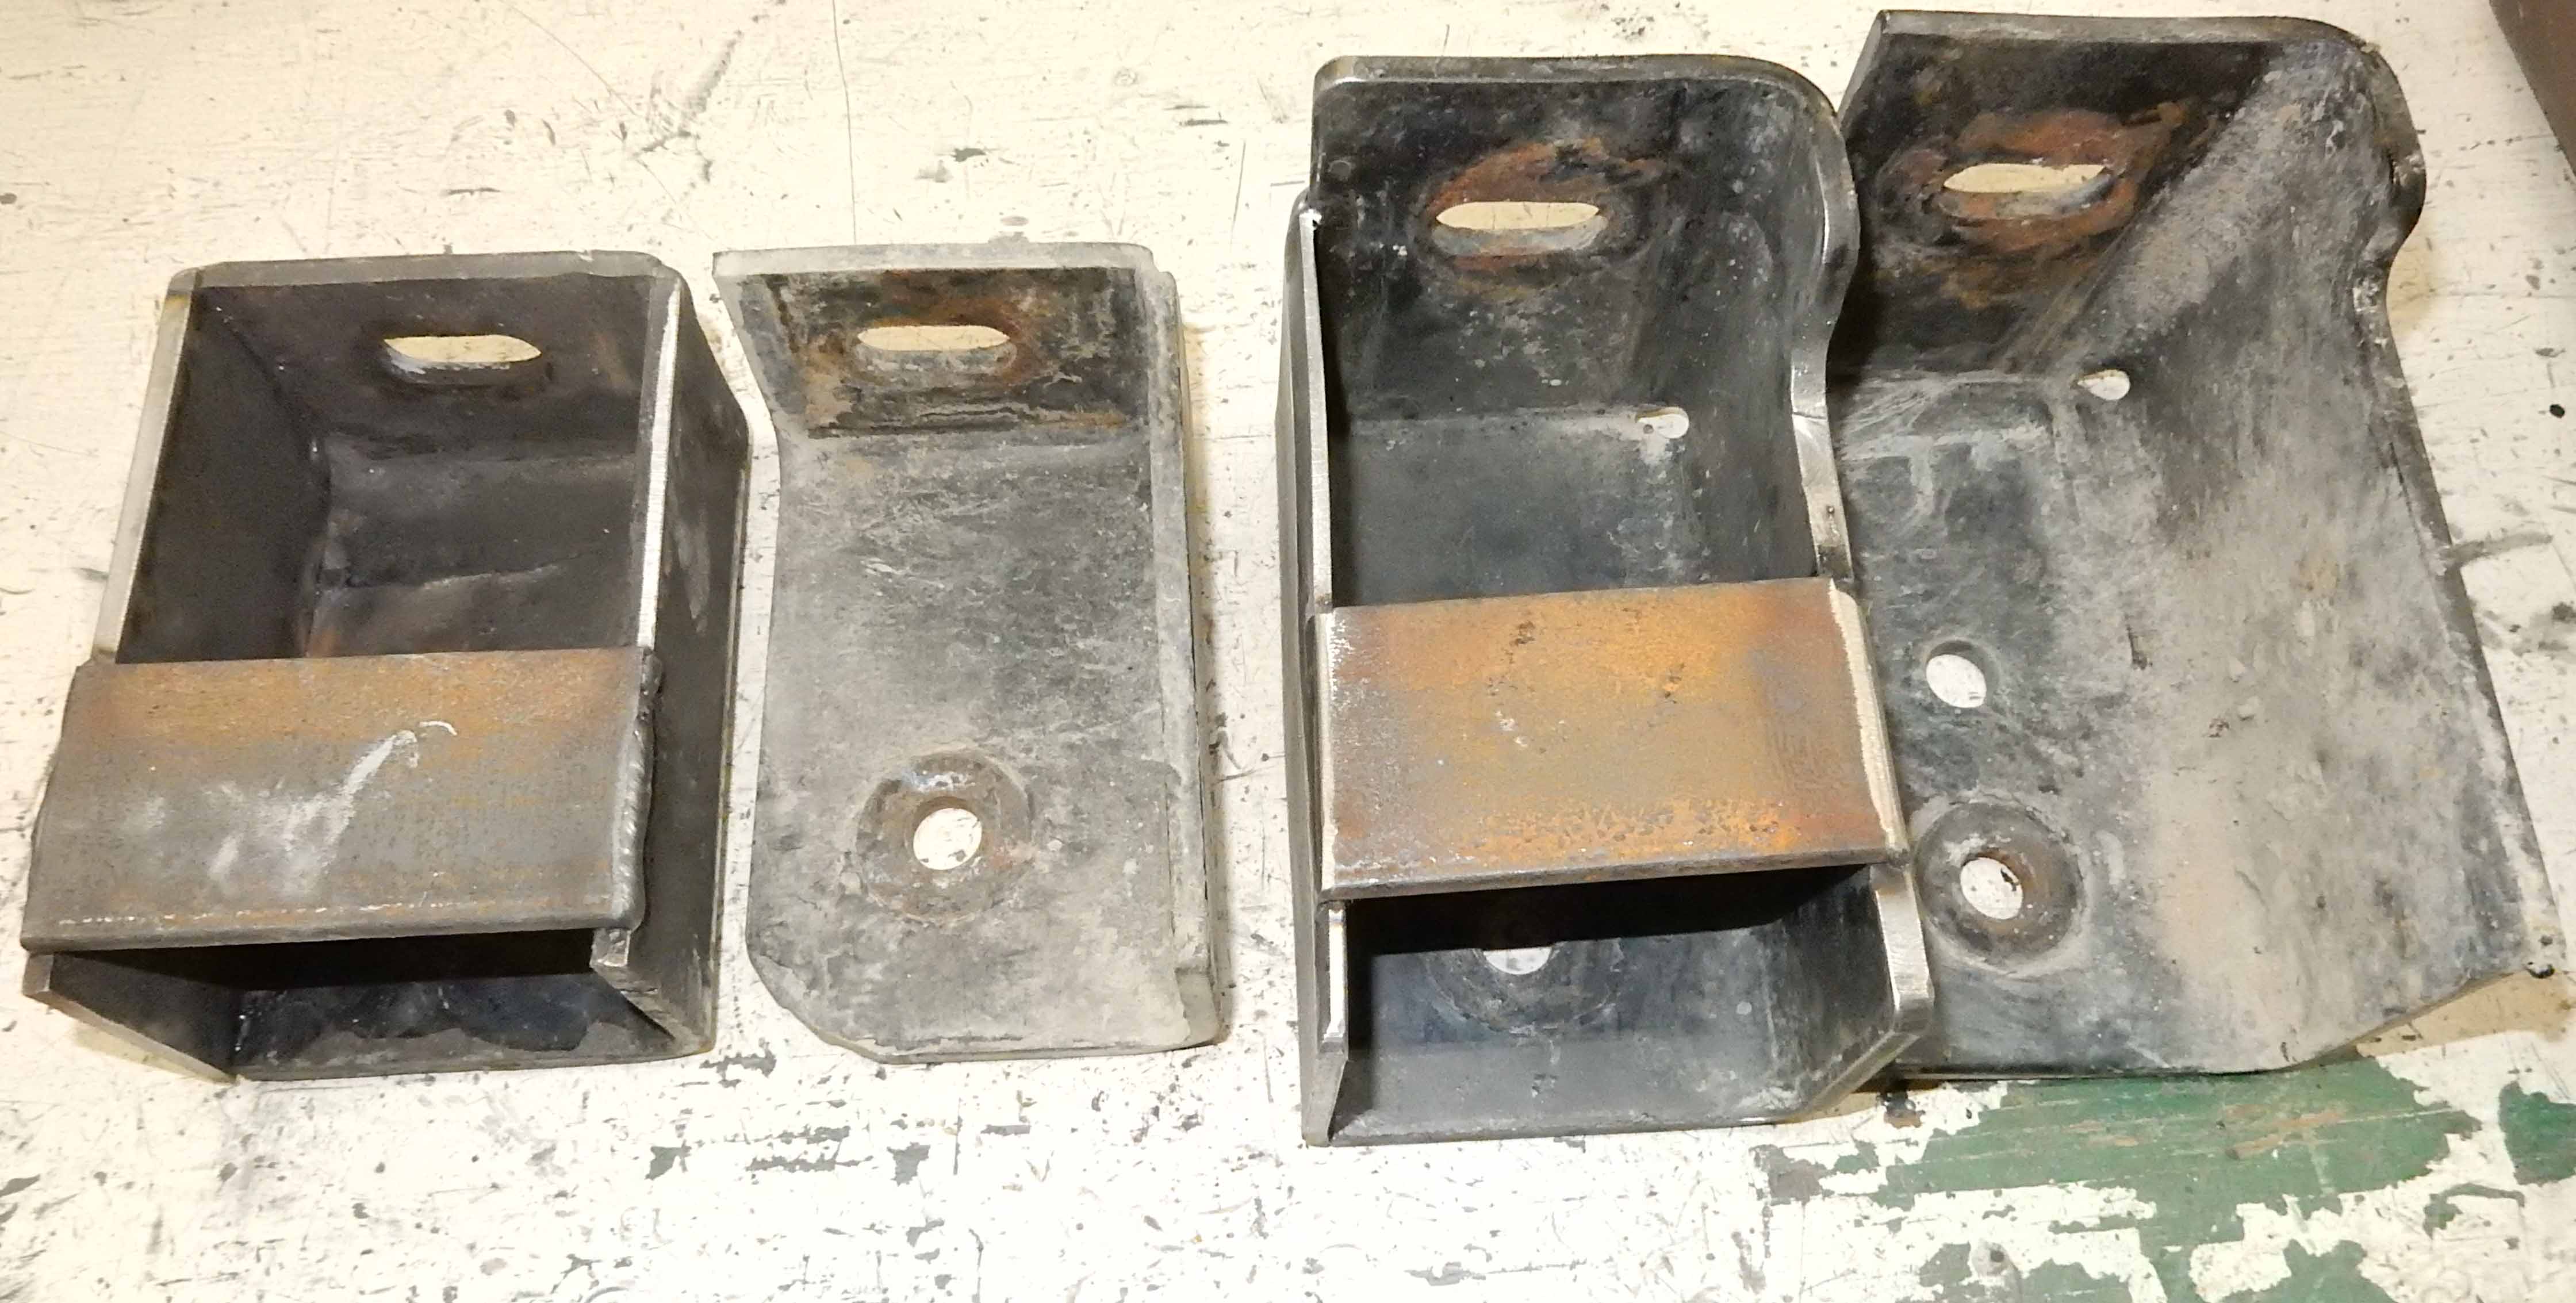 And in this pic you can see everything powder coated. On the left are the front mounts that attach to the frame, and on the right are the rear mounts that attach to the front spring hanger for the rear spring. And in the middle are the brackets that attach to the mounts. They slip over the ends of the mounts and bolt to them top and bottom. And the step bar itself bolts to the bracket. 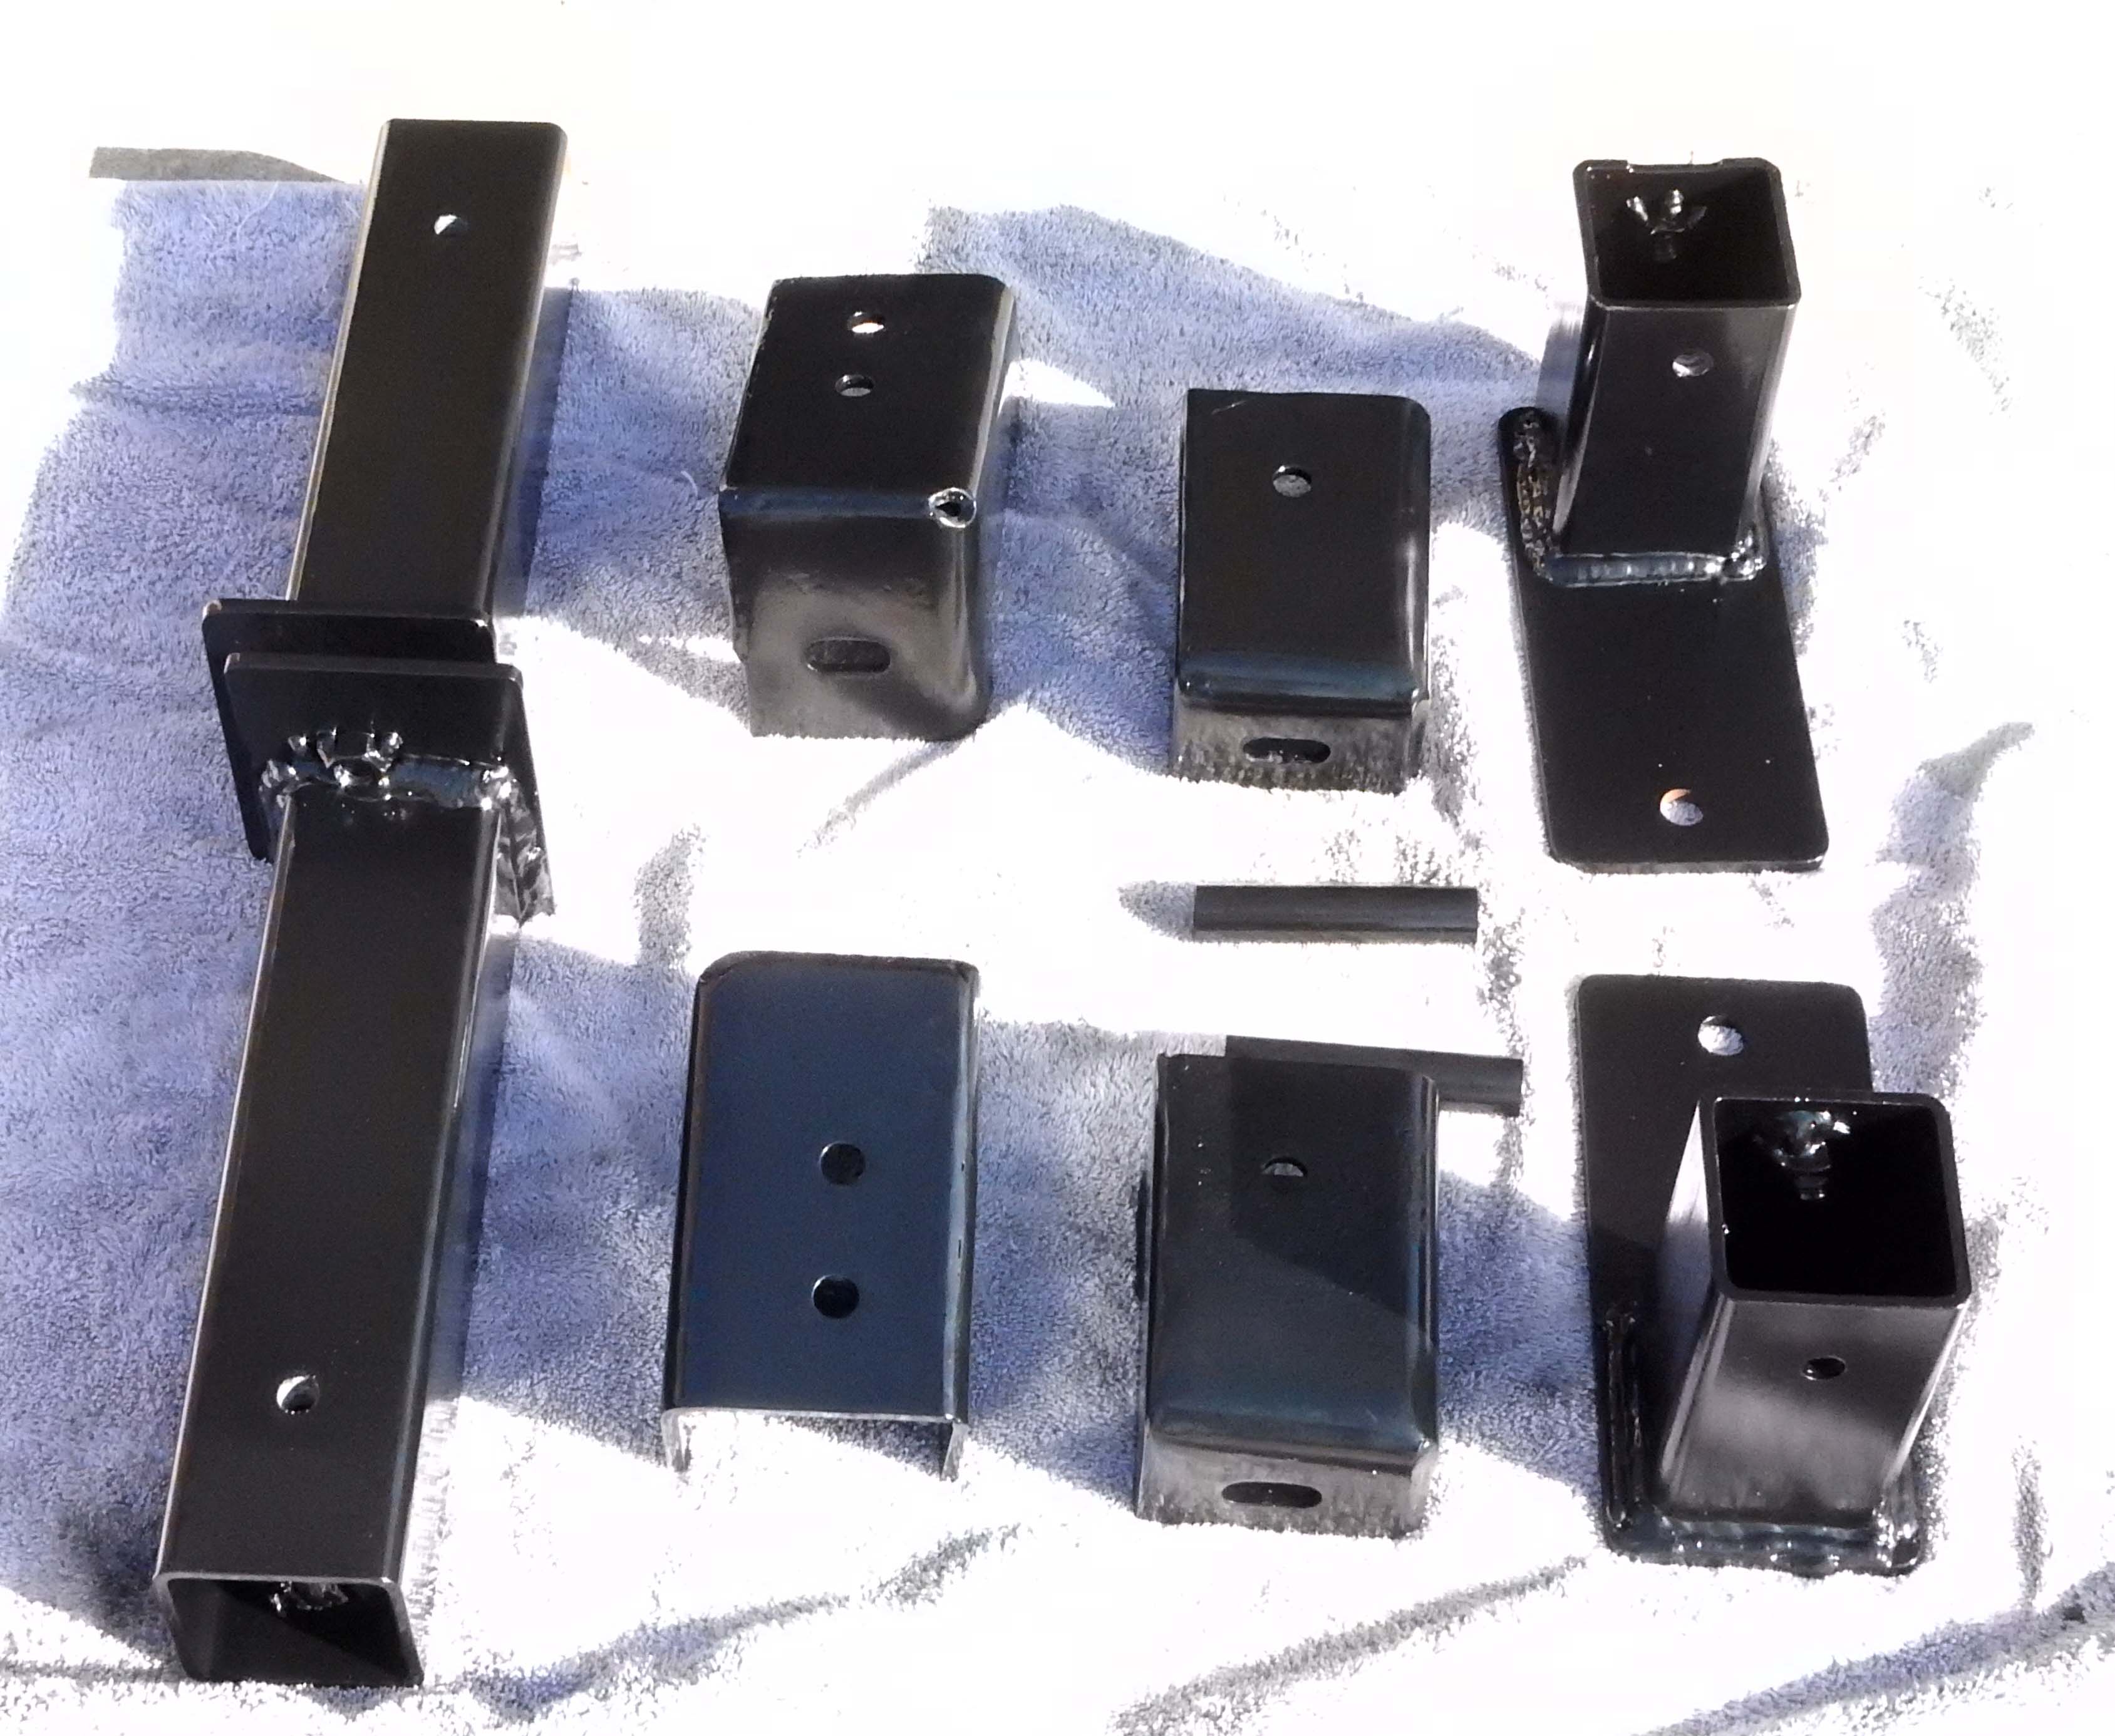
Gary, AKA "Gary fellow": Profile
Dad's: '81 F150 Ranger XLT 4x4: Down for restomod: Full-roller "stroked 351M" w/Trick Flow heads & intake, EEC-V SEFI/E4OD/3.50 gears w/Kevlar clutches
|
|
|
Wow those are gorgeous. A bit above of my skill level though I think! I'll keep poking around.
On the 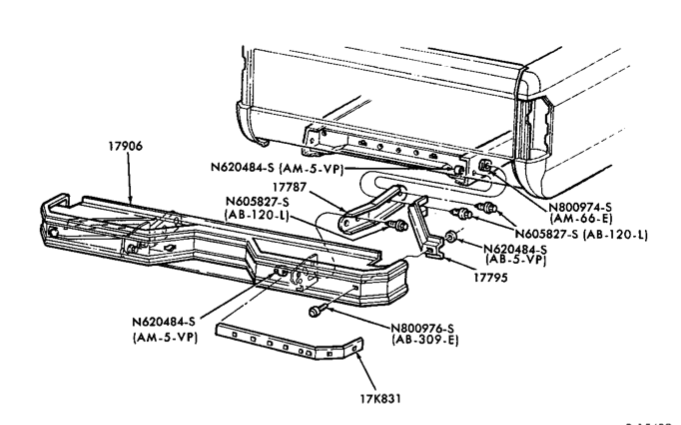 Regarding the bumper I didn't take the brackets that came with this one but they LOOK the same. They're definitely both some kind of "step bumper" because you can tell those by the diamond-plate tread across the top. But they clearly are different at least a little. In the diagram above there's a ghost view of what looks like a single plate welded into the inside of the bumper, but it's not, it's actually a single bent U-shaped piece from one side to the other, including the step section. On my old bumper that measures about 37.5" from side plate to side plate. The new one came off an '83 F150 and measures 33" or so. The Illustrated Parts Manual doesn't have measurements here but they do have a different bumper (looks the same but different part number) starting in '87. I didn't pay much attention to the truck I took this off of (I was moving fast, there were literally two guys pulling from the same truck as me that day) but I suppose maybe somebody had an accident and replaced the bumper at some point with whatever they could get. But the '87 doesn't really answer it either because that has some kind of replaceable top surface piece. Mine is the same diamond-plate as my old one. 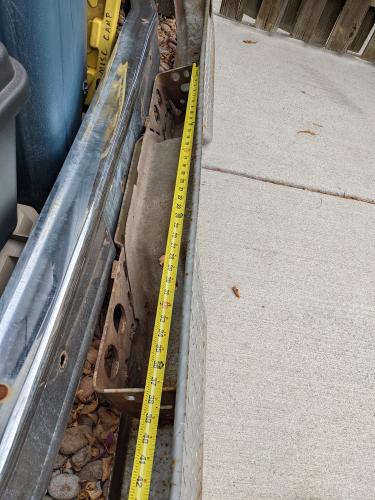 Anyway, a fun mystery. But after looking at it I think it's not really that big of a deal to make up the gap. I'll probably just put in some pieces of rectangular tubing, use longer bolts, and put bushings inside the tube to prevent them from getting crushed. I think it'll work fine. I'm not going to bumper-pull anything anyway.
--
1981 F-250 Custom. 6.6L V8, 4 barrel Holley carb, ARA aftermarket A/C. |
|
|
Picking away at little items. Got the 7/4-pin combo trailer socket installed (but not wired yet).
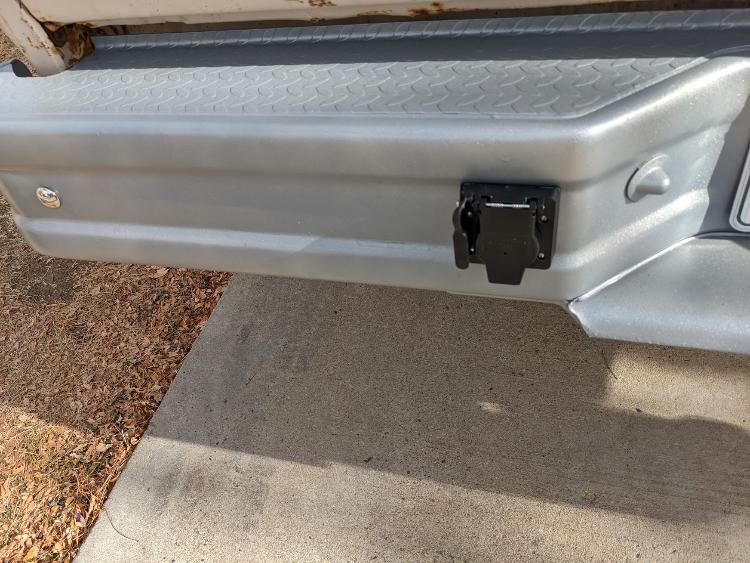 I also got the license plate camera frame installed (also not wired). Electrical is my big upcoming task so I'm trying to get all the peripherals mounted so I can sort out connections to them.
--
1981 F-250 Custom. 6.6L V8, 4 barrel Holley carb, ARA aftermarket A/C. |
|
|
i agree .it's a great find as condition goes and certainly looks to be made for a ford. if you can make up the difference within the bumper at its mounting points ,i can't see it being any weaker. possibly weaker if you were to space it at the frame but hard to say for sure or by how much
|
Re: "Rocky" - 1981 F250 Restoration
|
Administrator
|
In reply to this post by taskswap
Making progress.

Gary, AKA "Gary fellow": Profile
Dad's: '81 F150 Ranger XLT 4x4: Down for restomod: Full-roller "stroked 351M" w/Trick Flow heads & intake, EEC-V SEFI/E4OD/3.50 gears w/Kevlar clutches
|
|
|
Yep!
So today was a bunch of little things and one big thing. I got the wheels! 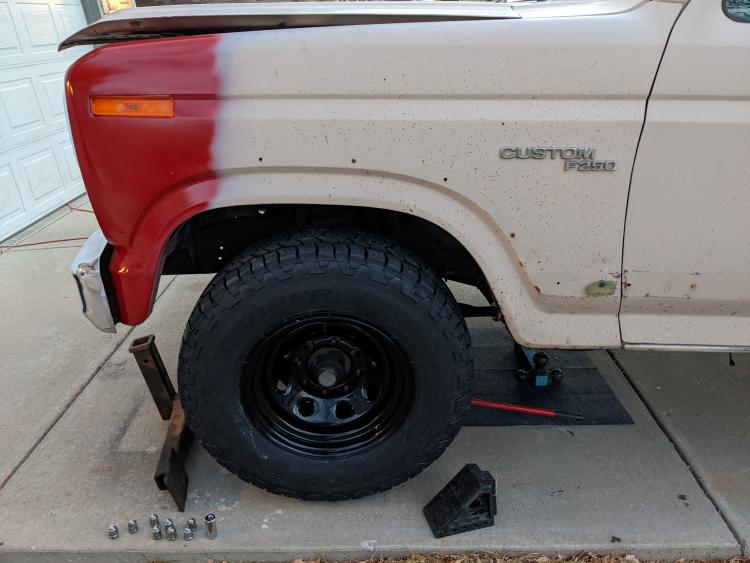 I'll take a better pic of the whole truck tomorrow. The photo is modern-camera-magic - it was way darker than it looks. The sun was down and it was getting late. I got 3 of the 4 wheels mounted and then ran into a snag. So typical "Oh... Rocky..." moment. Every set of lug nuts was different on every wheel. I had my whole socket set out. Not kidding. Things went fine for the first 3 wheels but on the 4th EVERY lug nut is frozen on there. I normally would never use PB Blaster or anything around a brake, but I chanced it and still no go. Guys, I'm no He-Man but I'm not a wilting daisy either. Even with a large lug wrench and a 2' breaker bar stuck in one end of it I couldn't budge these nuts. I actually stopped because I've broken engine manifold studs before doing this and figured I was about in that territory. Tomorrow's a new day but I know I don't have a ton of options. I don't really want to use a torch because I don't want to risk annealing the studs. I can't drive the truck to a tire shop to have them use their biggest impacts on it right now because you know, no steering wheel or instrument panel makes that a MITE challenging. I could tow it over, it's only a few streets away, but I'm slammed with work the next few days pre-holiday. I'm tempted at this point to get some nut splitters. I've never tried one on a lug nut - the angle of the wheel makes it complicated. But barring any other options it might be my best plan... Somebody stop me from doing something idiotic...
--
1981 F-250 Custom. 6.6L V8, 4 barrel Holley carb, ARA aftermarket A/C. |
|
|
yeah, the new cameras can make low light look like mid-day. and in some cases make part of your fender look red. really like the three ball hitch although i have not used one there before. maybe i gotup too early today. haha.
|
Re: "Rocky" - 1981 F250 Restoration
|
Administrator
|
In reply to this post by taskswap
Before you strip the nuts or studs off, check to see if they have left-hand threads. Some of the F250's and F350's came with LH threads on the left side of the truck.
I'm not remembering which axles got those threads, but yours might. There may be an "LH" on the end of the stud, but I may be confusing these trucks with the Chrysler products which did the same.
Gary, AKA "Gary fellow": Profile
Dad's: '81 F150 Ranger XLT 4x4: Down for restomod: Full-roller "stroked 351M" w/Trick Flow heads & intake, EEC-V SEFI/E4OD/3.50 gears w/Kevlar clutches
|
|
|
So apparently I have left hand threads on my left rear wheel This truck is "special" in so many ways LOL. Every wheel has different lug nuts, apparently replaced/sourced over the years. You wouldn't by any chance happen to know the standard thread sizes here would you? I can't find my thread gauge anywhere and was hoping to order some new ones today. My wheels came with new nuts as part of the package but none of them fit. I can tell for one thing that the front and rear threads are different. The front also takes a 13/16 socket and the rear takes a 1-1/16. So I think the rear must be 1/2-20 and the front might be 9/16-18? But I'm not positive.
--
1981 F-250 Custom. 6.6L V8, 4 barrel Holley carb, ARA aftermarket A/C. |
Re: "Rocky" - 1981 F250 Restoration
|
Administrator
|
Glad you caught it before twisting them off.
 As for the size, all I can tell you is what I read in the MPC - to paraphrase a famous Okie. Here 'tis, but I need to immortalize this on a page in the documentation.   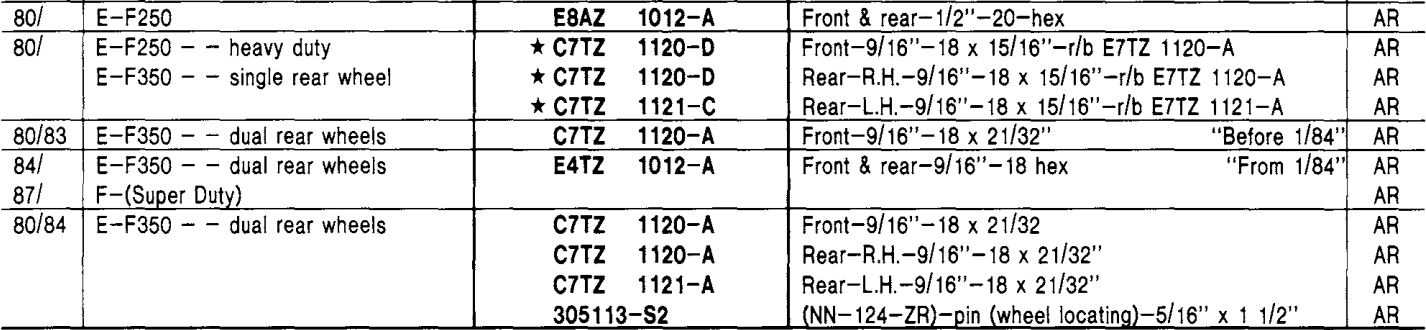
Gary, AKA "Gary fellow": Profile
Dad's: '81 F150 Ranger XLT 4x4: Down for restomod: Full-roller "stroked 351M" w/Trick Flow heads & intake, EEC-V SEFI/E4OD/3.50 gears w/Kevlar clutches
|
Re: "Rocky" - 1981 F250 Restoration
|
Administrator
|
And as I look at it, that info is confusing. It could be construed to say that all 1980 - 89 (80/) F250 HD trucks and all F350's with single rear wheels had LH threads on the rear. I know it doesn't really say that, but it could be construed that way. And that isn't the right interpretation.
Big Blue's 10.25" Spicer doesn't use LH threads. So I'm thinking that when they went from the Dana to the Spicer that changed. And that change happened in '85.
Gary, AKA "Gary fellow": Profile
Dad's: '81 F150 Ranger XLT 4x4: Down for restomod: Full-roller "stroked 351M" w/Trick Flow heads & intake, EEC-V SEFI/E4OD/3.50 gears w/Kevlar clutches
|
|
|
I'm learning my truck is "exceptional" and sometimes "off the books" on parts and measurements for two reasons: DIY work done by previous owners, and it was made in 3/81. From the history pages here and other sources it seems that was a changeover point for a lot of "80-87 stuff". For instance, most people have pop-up door locks from '81 on, but _I_ have the (now impossible to find parts for) slide locks because mine was made in Kansas and they didn't change until April. As far as I can tell I have 9/16-18 x 15/16 RH studs on both front wheels, 1/2-20 x 1-1/16 RH on the right rear, and 1/2-20 x 1-1/16 LH on the left rear. All four sets of nuts are different, even on the same wheel, so I'm guessing some were lost over time and replaced with whatever the owner(s) could find. I'm going to get replacements for all of them, run a wheel-lug-repair set around the whole mess, and see where I land. Out with the old: 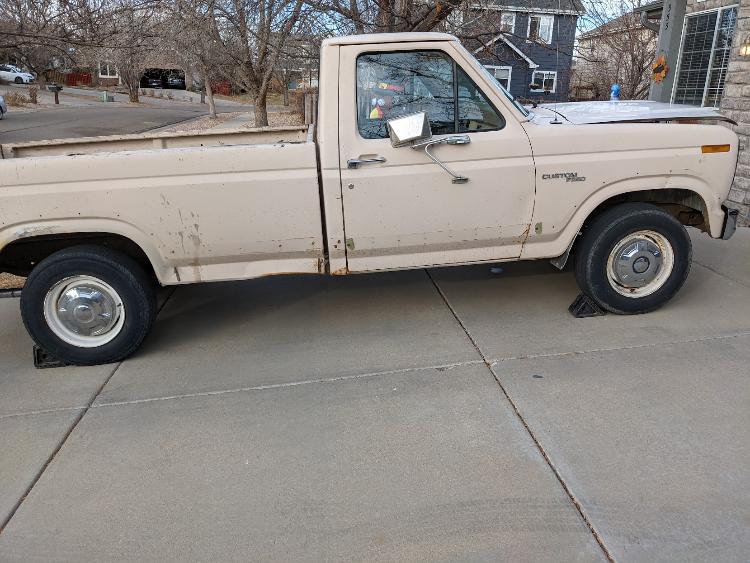 In with the new: 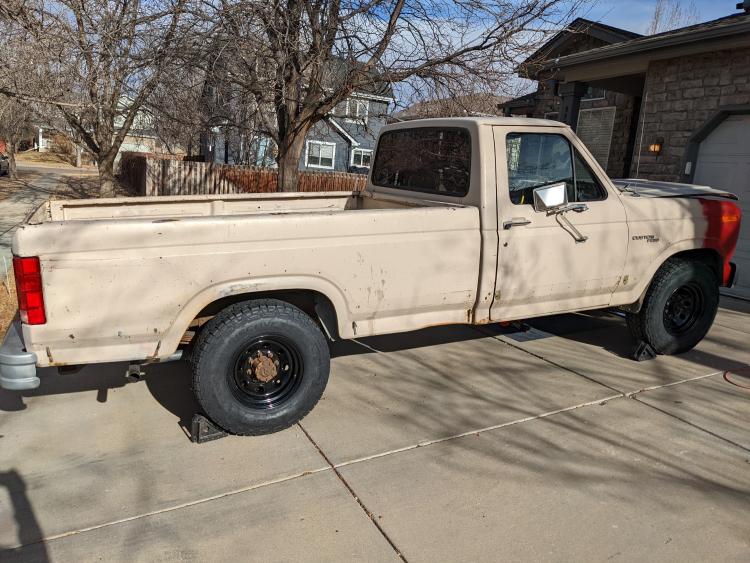 They look great IMO, very happy. With any luck they'll last the life of the truck at this point. I could change my mind but at the moment I'm not looking to put a ton of miles on this thing.
--
1981 F-250 Custom. 6.6L V8, 4 barrel Holley carb, ARA aftermarket A/C. |
Re: "Rocky" - 1981 F250 Restoration
|
Administrator
|
I like the new wheels!!! Winner!
And yes, your truck is "special". It was built in that transition period on locks and turn signals, so is unusual. And, I kinda like that. Dad's truck is one of those as well. 
Gary, AKA "Gary fellow": Profile
Dad's: '81 F150 Ranger XLT 4x4: Down for restomod: Full-roller "stroked 351M" w/Trick Flow heads & intake, EEC-V SEFI/E4OD/3.50 gears w/Kevlar clutches
|
|
|
What a massive difference! I am amazed how such a seemingly minor thing like wheels/tires can transform a vehicle.
1985.5 F-150 XL Explorer standard cab 5.0 EFI AOD 4x4
Daily Driver. We call her Eunice the Ute. 1982 Bronco XLT Lariat 351W AOD 4x4 Code name Esperanza, or Espy to her friends. Please see my Project thread for the blow by blow. 1984 F-350 XL Centurion crew cab 460 T19 4x4 "Eylza Dual-little" |
|
|
Me too, guys. It's a huge difference. I got five so I have a full-size spare, too.
It's time to start reassembling the interior. My A/C has a drain tube that apparently was always left just dangling inside. I got some new tubing to run it properly, then discovered that the channel in the passenger-side kick area where it goes down (which I know it goes to because there was an old broken bit still there) a) still had its plug in (so it could never have drained) and b) is full of pine needles and other stuff. Getting it out is a chore because it's tight quarters but I'll also need to sort that out. I've also been cleaning up and wire-loom-taping the various dangly bits like the intermittent wiper control, A/C components, etc. Hopefully in the next few days I can start putting the dash back in!
--
1981 F-250 Custom. 6.6L V8, 4 barrel Holley carb, ARA aftermarket A/C. |
|
|
In reply to this post by taskswap
On the trailer wiring you know Etrailer (and others) make a Tee harness that plugs in between the frame harness and the tail light harness so no cut-n-splicing. You will stil need to run (10ga) wires for electric brakes and power to charge a battery on the trailer. Not hard as I did all that on my 81 F100 as it is a back up to pull my car trailer. I am old school and no back up camera Dave ----
Dave G.
81 F100 flare side 300 six / AA OD / NP435 / 2.75 gear http://cars.grantskingdom1.com/index.php/1980-Ford-F100?page=1 81 F100 style side 300 six/SROD parts truck -RIP http://cars.grantskingdom1.com/index.php/1981-Ford-F100 |
|
|
Electrical is probably the only solid thing I brought to the table in terms of prior knowledge in this project. I've done some brake and suspension work but I'm as green as a four leaf clover when it comes to engines/drivetrains/cooling/etc. Most of this stuff I'm making up as I go along, plus knowledge from here, Youtube, etc. But if it has a copper wire in it... I tend to get a little carried away. I'm going to be doing a few things here. I'm not a huge fan of tee harnesses not because they're bad in general but because it's just one less thing to maintain/have corrode under there. I can make these connections hard-wired as proper extensions of the loom, so I may as well. But more important, this is a hunt/camp rig for my wife and I. About 80% of the time it's driven, it's going to have a camper in the bed or towed, plus some "special stuff" like a modular LiFePo4 battery box and charge controller for the camper, Quick Connect power ports for things like water pumps and winches, backup camera, aux lighting, and so on. I'm going to be pulling a new fuselink-protected ACC line from the alternator back to the bumper and to an accessory port near the front of the bed, to plug into the camper and battery box charge controller. I'll also be adding a dedicated electric-brake line and harness to the interior where you'd normally install one. Currently the only trailer I have is a fifth wheel, and I'd never put it on this truck - I haul it with a RAM 2500 and I'm near my limits with that. But I have VERY fond memories of a Jumping Jack trailer I used to own and I've had some thoughts of getting one again. They're cool trailers because you can use them as utility trailers, but they're also a 5x8 canvas tent rig when you want that. They have very high cargo capacities (a 5x8 can carry two UTVs on top), have electric brakes, and are pretty off-road capable (torsion axles). I just love them. It wouldn't shock anybody who knows me if I picked one up again. Anyway, to answer your question, basically replace any "here's a sensible and cost effective option for this electrical hookup" with "what could you do some imagination, beer, the right tools, and your wife unaware of your plan" and you probably have what's going in Rocky 
--
1981 F-250 Custom. 6.6L V8, 4 barrel Holley carb, ARA aftermarket A/C. |
Re: "Rocky" - 1981 F250 Restoration
|
Administrator
|
You and I think alike, and that can't be good for you.
That battery looks good, but where are you going to put it? My aux battery is under the hood in the factory aux battery position, and the two batteries are tied together using a Cole Hersee smart battery isolator. That way the 3G keeps both of them up to snuff but neither can pull the other down - unless I want it to. And ALL of my "small" connections are soldered and covered with adhesive-lined heat shrink, although the "large" connections are crimped with a hydraulic crimper. As I explained to the tech lady at Pormido when discussing splicing their camera cable, I've been soldering my connections for probably 65 of my 75 years, and it works. And, speaking of Pormido, I really like their mirror/camera system, with the exception that they don't have a sealed front camera. But you might be able to use their "front" camera on the inside of the windshield as they intended, and not have to worry about waterproofing it like I am. However, the tech told me this morning that she is going back to the engineers and push for a version with a waterproof front camera. She's following my <a href="http://Installation Of A Pormido 998 Mirror/Camera System">Installation Of A Pormido 998 Mirror/Camera System thread and now sees the need for it. (And, hopefully, a more elegant way to mount the mirror.)
Gary, AKA "Gary fellow": Profile
Dad's: '81 F150 Ranger XLT 4x4: Down for restomod: Full-roller "stroked 351M" w/Trick Flow heads & intake, EEC-V SEFI/E4OD/3.50 gears w/Kevlar clutches
|
|
|
I'm fond of Weather-Pack connectors where I might need a device to be removeable/serviceable (e.g. a blower or light fixture). I do the same as you re: solder, heat shrink (I use the waterproof adhesive type) and wire-loom-tape for permanent connections. Definitely jealous of your hydraulic crimper though. :) I've done a few DIY battery cables but don't bother anymore. There are too many good vendors like batterycablesusa.com that make them any way you want. For the few cables I need... The battery box will be an accessory for the slide-in camper. It has limited internal space and used to draw straight from the truck or an outside power pole/generator. I'll be adding solar instead, but there's not a lot of room for batteries, charge controllers, inverters, etc. So I'm either going to use a commercial "solar generator" or just make one DIY, and it will live in the empty space in front of the wheel well. (I'll have an access door to get to it in emergencies, but these things are pretty bulletproof.) 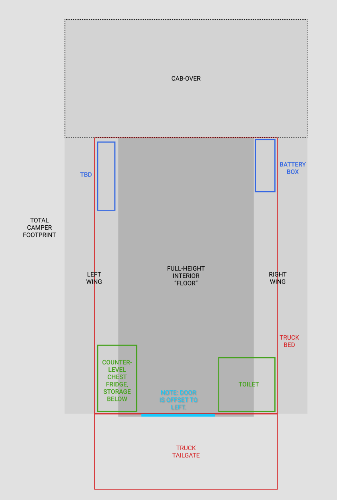 That box will have inputs for solar from the camper roof and a DC-DC charge controller from the truck's alternator. The feed from the truck will be isolated like yours. I'm not worried about a second battery for the truck itself - I carry one of those lithium jump packs and they work great for my needs. This will keep a heavy, less-frequently-used item out of the camper "footprint" and also isolate the camp rig from the truck while still giving me plenty of power. When the camper isn't installed, I can use the battery box for other things. This is sort of off topic for this forum, but I'm converting the camper to all-electric. The old propane lines are sketchy and I don't trust them safety-wise. The only two things that use propane are the stove and fridge (there's no hot water heater). I'll replace the fridge with one of those new chest-style units the van life folks are switching to, and the stove can run on 1lb bottles. Think that camera would still work if you sealed it yourself? People make all kinds of containers for cameras, you might get away with it for a long while if you add any kind of barrier at all. I don't know how big it is but if you don't care about voiding your warranty maybe you can carefully epoxy-pot it, just with a brush, you know? And just tape off the lens while you do it?
--
1981 F-250 Custom. 6.6L V8, 4 barrel Holley carb, ARA aftermarket A/C. |
| Edit this page |