The Deuce Build Thread


Administrator
|
That sounds like a deal - parts and instructions as well. And the tools seem reasonable.

Gary, AKA "Gary fellow": Profile
Dad's: '81 F150 Ranger XLT 4x4: Down for restomod: Full-roller "stroked 351M" w/Trick Flow heads & intake, EEC-V SEFI/E4OD/3.50 gears w/Kevlar clutches
|
|
|
Ooo! Please post more as you get through the transmission!
1985.5 F-150 XL Explorer standard cab 5.0 EFI AOD 4x4
Daily Driver. We call her Eunice the Ute. 1982 Bronco XLT Lariat 351W AOD 4x4 Code name Esperanza, or Espy to her friends. Please see my Project thread for the blow by blow. 1984 F-350 XL Centurion crew cab 460 T19 4x4 "Eylza Dual-little" |
|
|
In reply to this post by Pete Whitstone
Got the A/T disassembled today, all components cleaned up and inspected. This trans is in amazingly good shape for 162k miles and 26 years old. I did not find any components in it that needed replacing outside the normal consumables (friction plates and bands). The only exception to this was the bronze bushings for the sun gear on the output shaft, and wear is expected there.
Here the homemade tool is pulling the pump from the case. 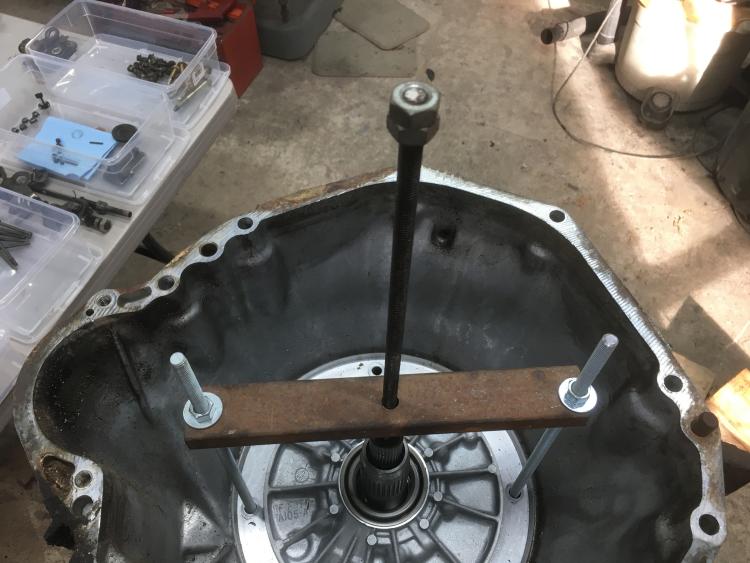 Once out, that exposed the overdrive part of the E4OD. I assume these parts are not present in the C6, who the E4OD's internals are based on. 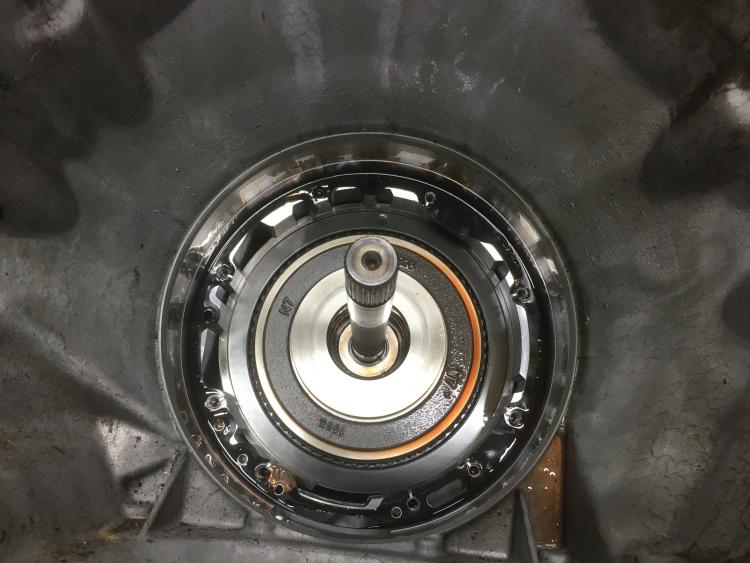 And digging deeper and deeper in. 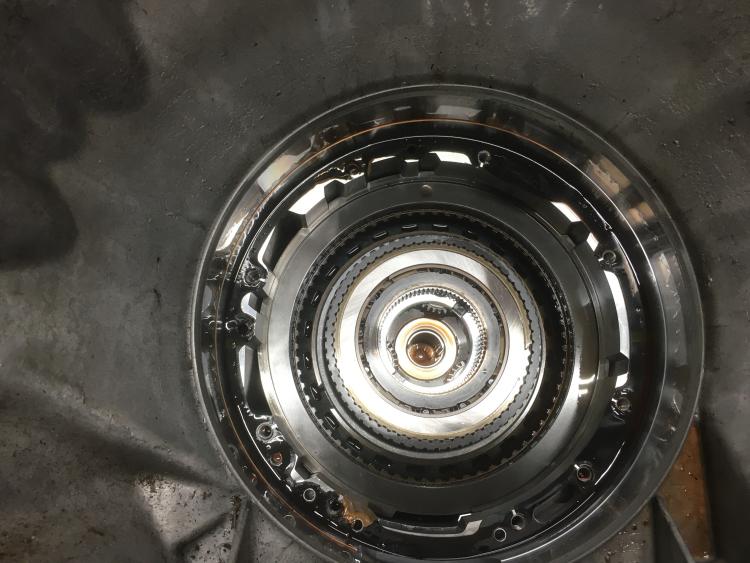 The homemade tool is used again in a slightly different format to compress a spring which allows the removal of the snap ring, held in place by the large "finger" spring. 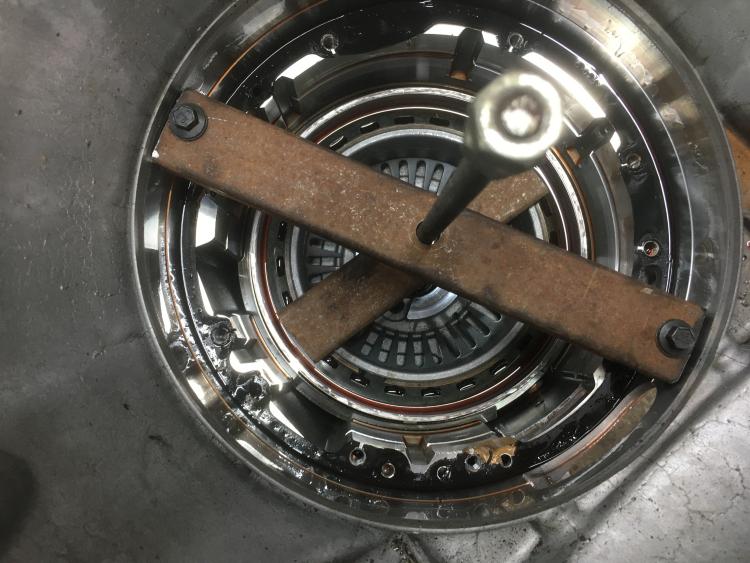 Finally deep enough that we are at the center of the transmission, in an area known as the "center support". Basically a big plate in the middle of the transmission to locate things. 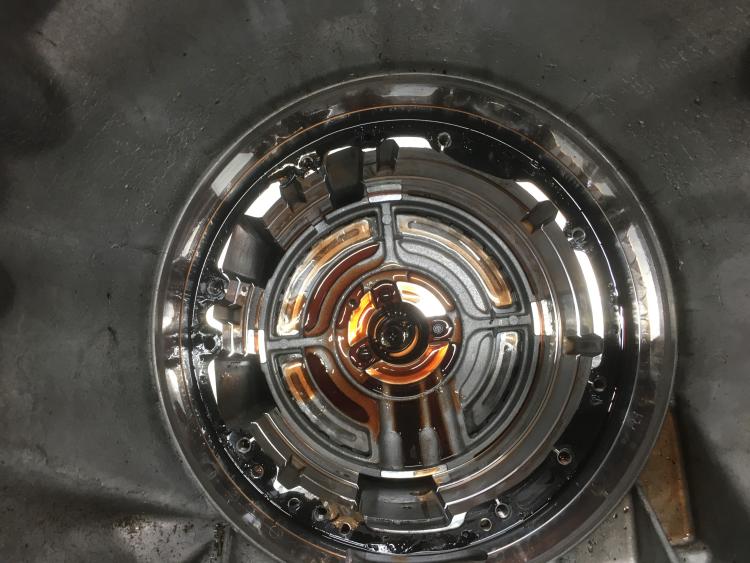 After that came out, it exposed the back half of the trans. First wave of panic... there was a roller bearing there that supported the output shaft, ball bearings running around loose. Worse, this part was not described at all in the videos. I'm going to contact The Transmission Bench and see what they think. 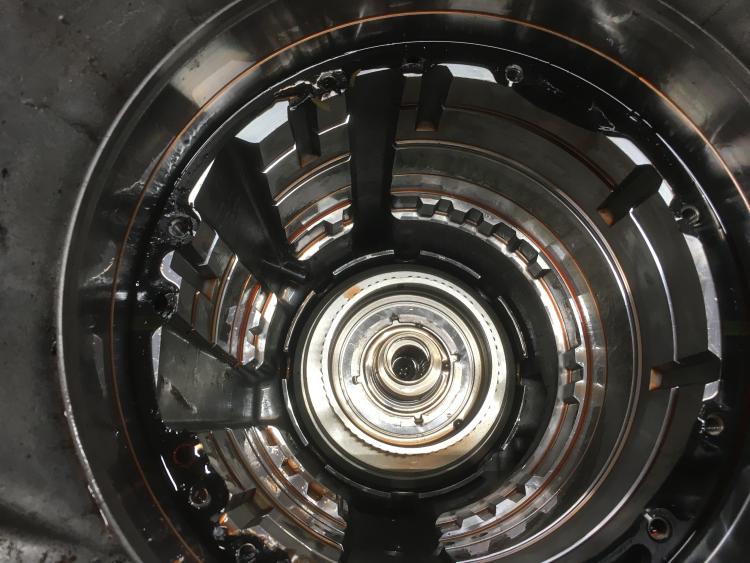 The ring of the roller bearing is visible in the center, slightly offset to the top. The ball bearings have fallen down into the recess in the end of the output shaft. Delving deeper into the trans. 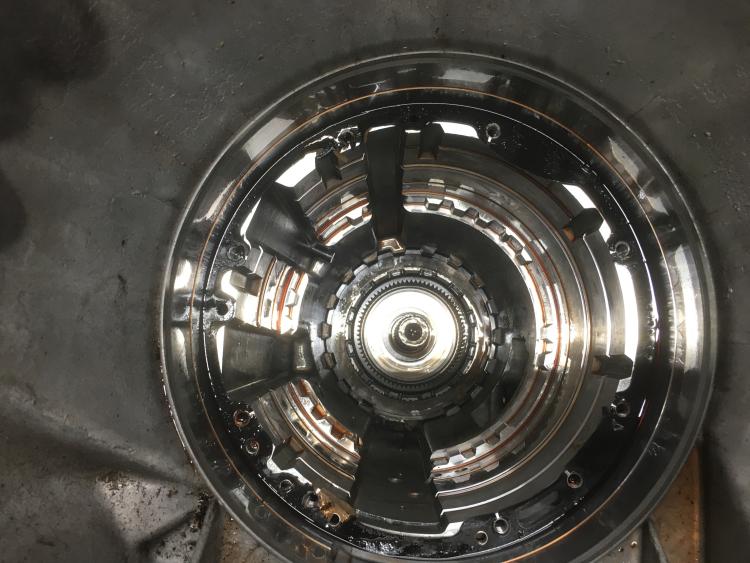 Disassembly mostly complete.  Now starting to take apart the subassemblies. Pump is first. 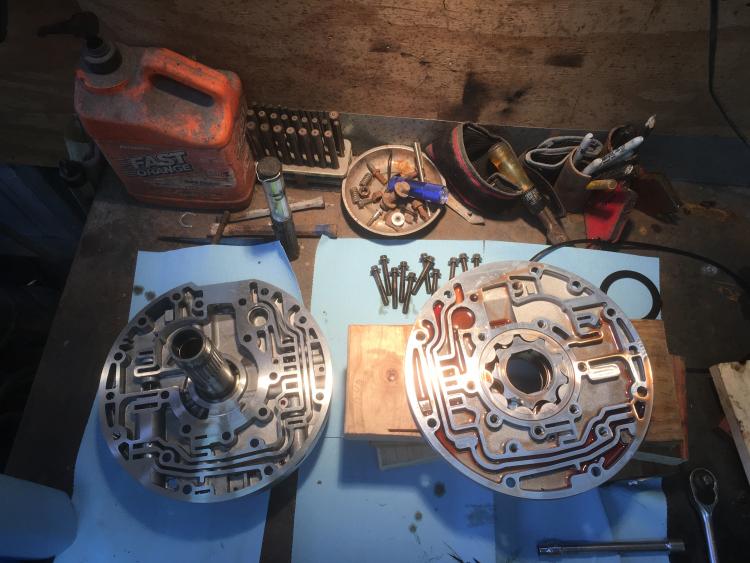 I'm finding an A/T is vastly different than, say, an engine. An engine is a number of components that are mostly individual. There is the crankshaft, the connecting rods, pistons, rings, etc. For the most part, stuff that is assembled one part at a time (although repeated on a multi-cylinder engine). But a transmission is about 20 subassemblies, each of which breaks down into 10-20 parts of its own. The number of unique parts is astounding. I would estimate that around 600-700 individual components are working in an area of about 1 square foot. What could possibly go wrong??? :) The second major panic is when I pulled apart the overdrive stuff, which is pretty much the subassembly past the pump. The videos are rebuilding a 4R100, which is extremely similar to an E4OD, except in this area. They totally changed the design after 1998, and the video doesn't really cover the E4OD components very well. So I had to rely on pictures I took to break down the subcomponents, inspect, and get everything reassembled. This is the area I'm talking about. 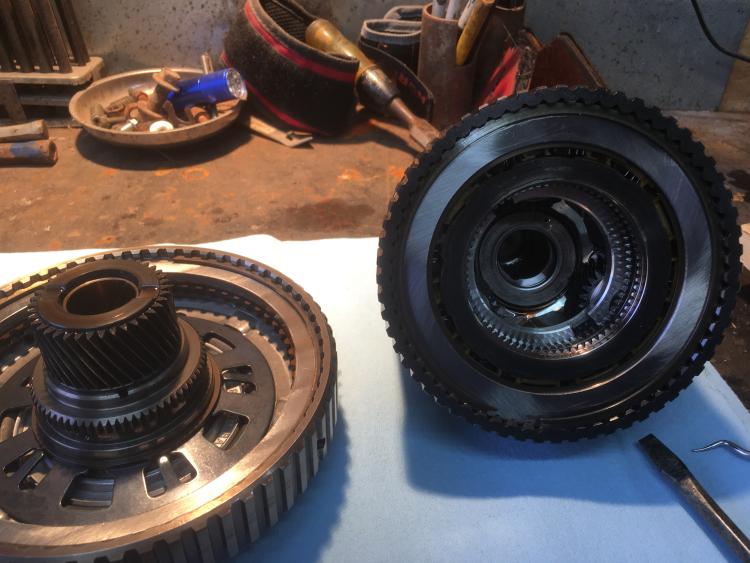 After that, the video followed my transmission fairly well, which was a huge relief. I did make a modification to the one tool I bought. This was another area where the 4R100 documented in the video differed from the E4OD I was rebuilding. The 4R100 had a flat spring pack in this area, while the E4OD had a big bellville spring with a taper on it. When I tried to compress the spring to remove the snap ring, the feet on the tool just walked down the incline of the bellville spring. So I drilled some holes on the legs of the tool and added some threaded rod to control where the legs could go. 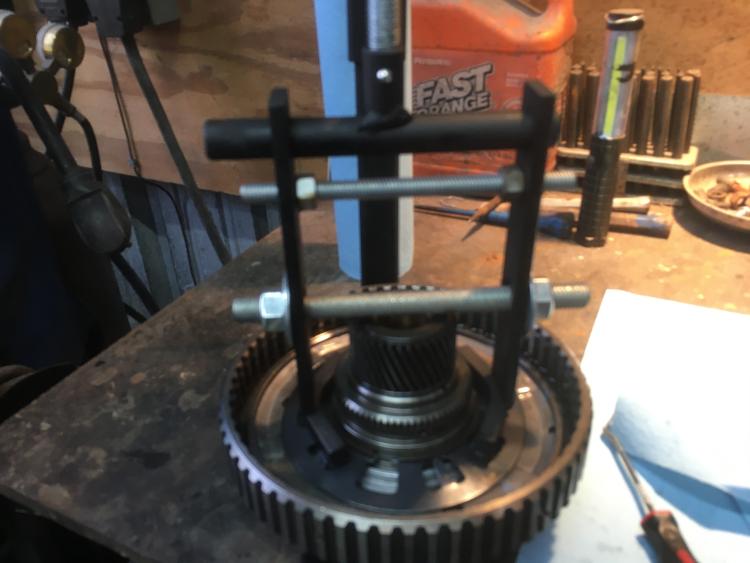 After this point, it was a matter of breaking apart the separate subcomponents and washing them in mineral spirits. I have a few more components to wash before I proceed with reassembly. After the case was empty, I sprayed it down with Gunk and took it to the car wash. I wasn't going for "clean enough to paint" or anything, just wanted to knock the major chunks off in preparation for reassembly. I will start that tomorrow.
81 F150 Flareside, Edelbrock Pro Flow4 FI, hydraulic roller 351W, E4OD, 4x4, BW1356
92 F150 RCLB 351W E40D BW1356 mostly stock |
|
|
Wow! Good work, impressive!
I don’t think I want to do that.
Dane
1986 F250HD SC XLT Lariat 4x4 460 C6-Sold 1992 Bronco XLT 4x4 351W E4OD 1998 GMC Sierra SLE K1500 350 4L60E Arizona |
|
Administrator
|
I'm with Dane. Impressive! But I don't want to do that. Man, having that many parts to put back together, correctly, would be a huge challenge. Keep up the good work!

Gary, AKA "Gary fellow": Profile
Dad's: '81 F150 Ranger XLT 4x4: Down for restomod: Full-roller "stroked 351M" w/Trick Flow heads & intake, EEC-V SEFI/E4OD/3.50 gears w/Kevlar clutches
|
|
|
In reply to this post by Pete Whitstone
Quick update - driveline is nearly back together. I only have to modify the pump (the part just under the torque converter and install it, then do the work in the valve body (pan) area.
So far only a few moments of major panic. One was on disassembly when I discovered a roller bearing broken apart and little ball bearings scattered around, and I didn't know where it had come from. I got that figured out and ordered a new bearing. Another was when I had put it almost all back together and realized that I had a thrust bearing left over, and wasn't sure where it went. I carefully reviewed the video and saw where it came from at disassembly. I am pretty sure the video omitted it on reassembly. Bet that has hosed up a few people. I have ordered a stand-alone controller for it, a Quick 2 from Baumann/US Shift. That might be another learning curve. I found out the stand-alone controller requires vehicle speed as an input, and I don't have a vehicle speed sensor anywhere, as I stayed with the 9 inch rather than swap in the 8.8 from the 95. I have a plan to add a reluctor wheel (anti-lock brake ring, or tone ring) to the pinion input on the differential. It will take a little machining but I think I can make it use the sensor that was stock on the 95 donor truck. I am pretty sure this transmission had never been apart before, and I gotta say, for a 26 year old unit, it was in amazing shape. All the seals were soft and pliable, all the other surfaces looked close to brand new. Ford really did a good job designing and building these things. I can't claim to completely understand how an A/T works, but I have a much better idea now, anyway.
81 F150 Flareside, Edelbrock Pro Flow4 FI, hydraulic roller 351W, E4OD, 4x4, BW1356
92 F150 RCLB 351W E40D BW1356 mostly stock |
|
Administrator
|
Well done! I'm sure glad you figured out about the bearings before it was too late.
On the speed sensor, can you use the input from the sensor in the speedo cable for the speed control?
Gary, AKA "Gary fellow": Profile
Dad's: '81 F150 Ranger XLT 4x4: Down for restomod: Full-roller "stroked 351M" w/Trick Flow heads & intake, EEC-V SEFI/E4OD/3.50 gears w/Kevlar clutches
|
|
|
I looked around a bit for something that would work off the speedometer cable, but didn't find anything I was sure would work. The speedo cable is somewhat of an unknown quantity right now anyway - the BW 1356 transfer case does not have a provision for a speedo cable. So I don't know if I will get an earlier BW 1356 tailshaft housing and a longer speedo cable, or if I will convert to an electronic speedometer. If I do convert, I am assuming I could take the signal off the stock VSS I will be installing on the diff pinion. Decisions, decisions. 
81 F150 Flareside, Edelbrock Pro Flow4 FI, hydraulic roller 351W, E4OD, 4x4, BW1356
92 F150 RCLB 351W E40D BW1356 mostly stock |
|
Administrator
|
Yep, decisions.
FYI, from 1980 thru 85 the speedo cable was in two pieces with the VSS under the brake booster. In 86 the VSS went into the tranny/t-case and there was a 1-piece speedo cable. I changed to the latter and got a more stable signal for the speed control. Apparently the speedo cable was twisting and releasing.
Gary, AKA "Gary fellow": Profile
Dad's: '81 F150 Ranger XLT 4x4: Down for restomod: Full-roller "stroked 351M" w/Trick Flow heads & intake, EEC-V SEFI/E4OD/3.50 gears w/Kevlar clutches
|
|
Administrator
|
Ok, how do you explain Darth having the two piece cable with the sensor near the floor penetration? Built 08/86
Bill AKA "LOBO" Profile
"Getting old is inevitable, growing up is optional" Darth Vader 1986 F350 460 converted to MAF/SEFI, E4OD 12X3 1/2 rear brakes, traction loc 3:55 gear, 160 amp 3G alternator Wife's 2011 Flex Limited Daily Driver 2009 Flex Limited with factory tow package Project car 1986 Chrysler LeBaron convertible 2.2L Turbo II, modified A413 |
|
Administrator
|
There is no explaining what parts are on Darth.
 Seriously, it looks like there was a difference in trucks with and without the "speed reducer". You can see that on Documentation/Driveline/Speedometer Gears, Cables, & Sensors and the Speedo Cables tab. The ones with speed reducer used the two-part cable through '86. But those w/o went to the 1-piece cable in '86. But, of course, that's what the MPC says. However, things were never as crisp in cutover. Many of the changes were made on a by-plant basis. And weren't all the crewcab DRW's made in Canada?
Gary, AKA "Gary fellow": Profile
Dad's: '81 F150 Ranger XLT 4x4: Down for restomod: Full-roller "stroked 351M" w/Trick Flow heads & intake, EEC-V SEFI/E4OD/3.50 gears w/Kevlar clutches
|
|
|
In reply to this post by Gary Lewis
What in the world was the VSS reading in that area of the vehicle? The speedo cable?
81 F150 Flareside, Edelbrock Pro Flow4 FI, hydraulic roller 351W, E4OD, 4x4, BW1356
92 F150 RCLB 351W E40D BW1356 mostly stock |
|
Administrator
|
In reply to this post by Gary Lewis
All crew cabs were built in Oakville Ontario as were the Flexes so all three of my Fords are imports.
Bill AKA "LOBO" Profile
"Getting old is inevitable, growing up is optional" Darth Vader 1986 F350 460 converted to MAF/SEFI, E4OD 12X3 1/2 rear brakes, traction loc 3:55 gear, 160 amp 3G alternator Wife's 2011 Flex Limited Daily Driver 2009 Flex Limited with factory tow package Project car 1986 Chrysler LeBaron convertible 2.2L Turbo II, modified A413 |
|
Administrator
|
The VSS plugs into the tranny or t-case with a driven gear on it, just like a cable. Then the cable plugs into it.
As for Canada, perhaps they were still using the leftover 2-piece cable?
Gary, AKA "Gary fellow": Profile
Dad's: '81 F150 Ranger XLT 4x4: Down for restomod: Full-roller "stroked 351M" w/Trick Flow heads & intake, EEC-V SEFI/E4OD/3.50 gears w/Kevlar clutches
|
|
|
I didn't know that. Wonder if I could assemble a solution from stock parts - I'll check that out, thanks for the info!
81 F150 Flareside, Edelbrock Pro Flow4 FI, hydraulic roller 351W, E4OD, 4x4, BW1356
92 F150 RCLB 351W E40D BW1356 mostly stock |
|
Administrator
|
I think you should be able to do so. My understanding is that the later VSS also fed the speed control, so at least it handled both inputs.
Gary, AKA "Gary fellow": Profile
Dad's: '81 F150 Ranger XLT 4x4: Down for restomod: Full-roller "stroked 351M" w/Trick Flow heads & intake, EEC-V SEFI/E4OD/3.50 gears w/Kevlar clutches
|
|
|
In reply to this post by Pete Whitstone
Trans is complete! I have about a 98.9% confidence I did everything right and it will work great, but it will be a few weeks before I can get it in the truck and find out.
I finished up the valve body modifications last night, here it is just before putting the pan on. 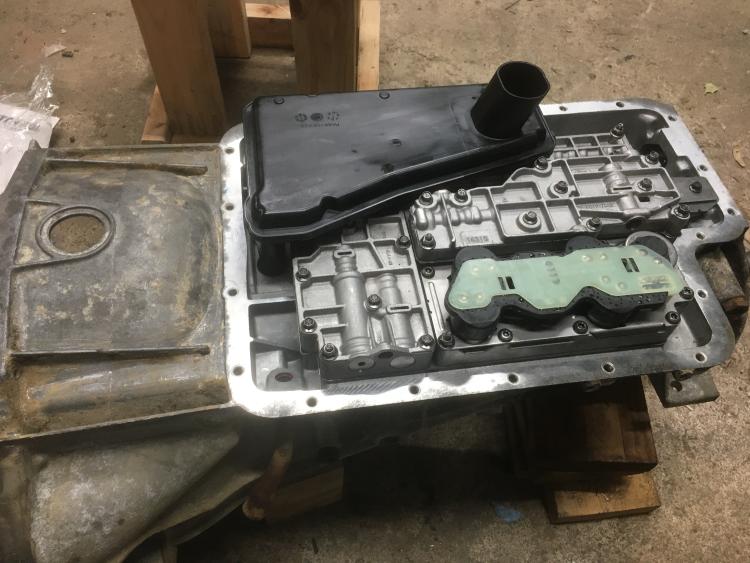 I spent a few minutes fixing the bullet hole in the pan before it went on. The donor truck had been used for a LOT of target practice, but the pan was the only damage to the parts I cared about. No further damage than the pan, and the bullet apparently disintegrated on impact, because I could only find 2 lumps of lead in the pan, and together they weighed maybe a gram. Anyhow, the pan is on and the trans is ready to be installed. After I tear out the C6 that's in the truck and change everything, of course. Here's the pile of consumable parts that were replaced during the rebuild. This isn't even the complete pile. 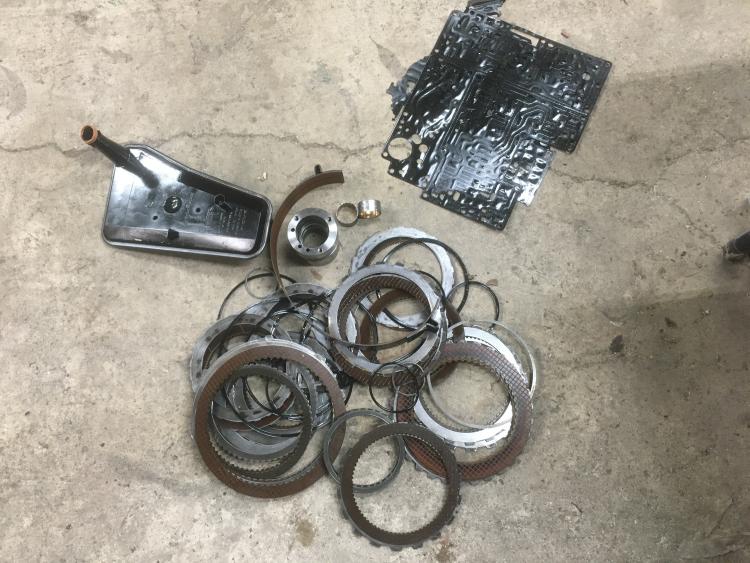 And in case anyone else is wanting to take this on, here is the link to the first of 16 videos that walked me through it. https://www.youtube.com/watch?v=0rCGSbHJObQ I watched all 16 before I picked up a wrench. The pace seems really slow, but when I was doing the actual rebuild I realized that's so you could work at that pace, without having to place the video on hold too much. Next up - remove the C6, move the engine back, remove the C6 crossmember, install the 4WD crossmember, change everything, rebuild the 9 inch... this shouldn't take long. Ha!
81 F150 Flareside, Edelbrock Pro Flow4 FI, hydraulic roller 351W, E4OD, 4x4, BW1356
92 F150 RCLB 351W E40D BW1356 mostly stock |
|
Administrator
|
One can certainly learn a lot on YouTube, but that's a huge undertaking and one that would make me a bit nervous! Looking forward to how this works out for you. Please keep us advised?
John
"Blackie" - 1986 F150 4x4 - Mildly warmed over 351W HO - Original owner |
|
Administrator
|
In reply to this post by Pete Whitstone
That is awesome!!! Well done!
Gary, AKA "Gary fellow": Profile
Dad's: '81 F150 Ranger XLT 4x4: Down for restomod: Full-roller "stroked 351M" w/Trick Flow heads & intake, EEC-V SEFI/E4OD/3.50 gears w/Kevlar clutches
|
|
|
In reply to this post by Pete Whitstone
Transmission got put in the truck yesterday. There was more than one time during the install when I said "this just doesn't fit!" This trans is SO much larger than the C6. Turns out it does fit, but just.
Before I could put the trans in, I had to get the engine in the right location. It had to move back about 3 inches and onto the V8 perches. That went pretty smooth and now it sits lower and further back.  Unfortunately that made it so the passenger side header would no longer fit, so for now it's back to the factory manifolds, but that's a problem for a different day. I was working alone and with no lift, so I had to make sure I could lift the trans up into place without incident. So first up was to build a cradle for it to sit on the jack. I flipped the trans up side down and used some spare 2x4s. 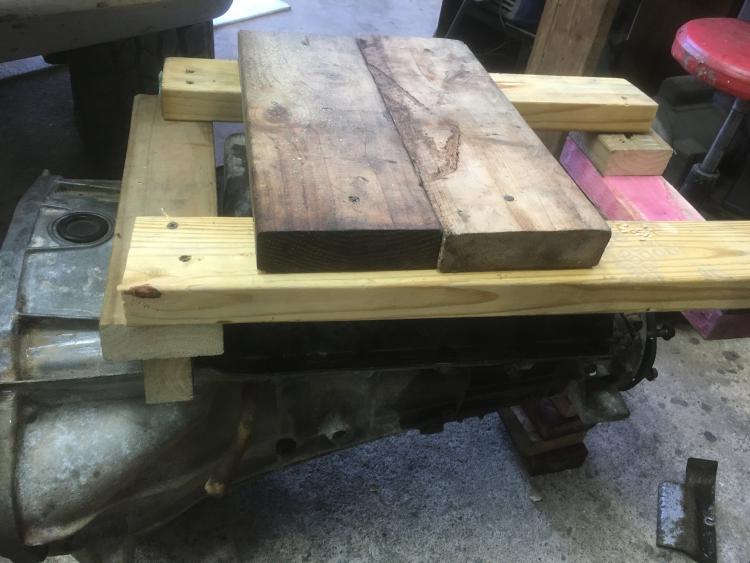 And the right side up view. 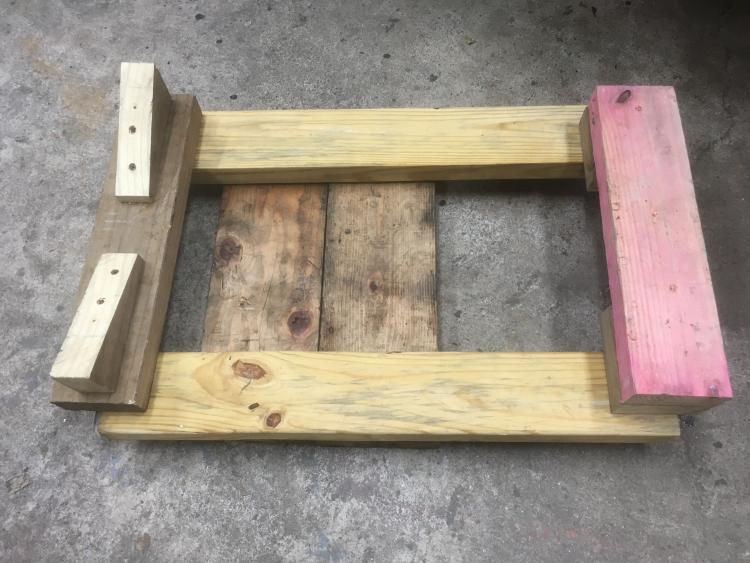 Wrestled the trans under the truck, which was sitting on its wheels. Got the torque converter in place, then got the trans onto the cradle. Now I had to get the cradle about 5 inches high to get the jack under it. Lifting one side, then the other, with a longer 2x4, I was able to stack some blocks under each side, high enough to get a jack rolled under. 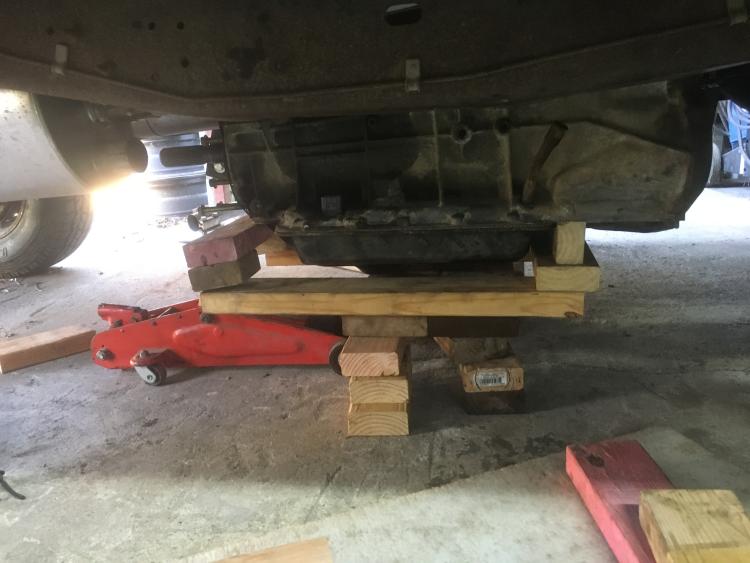 Keeping this whole thing stable while getting enough blocks under it until I could use something better was tricky. 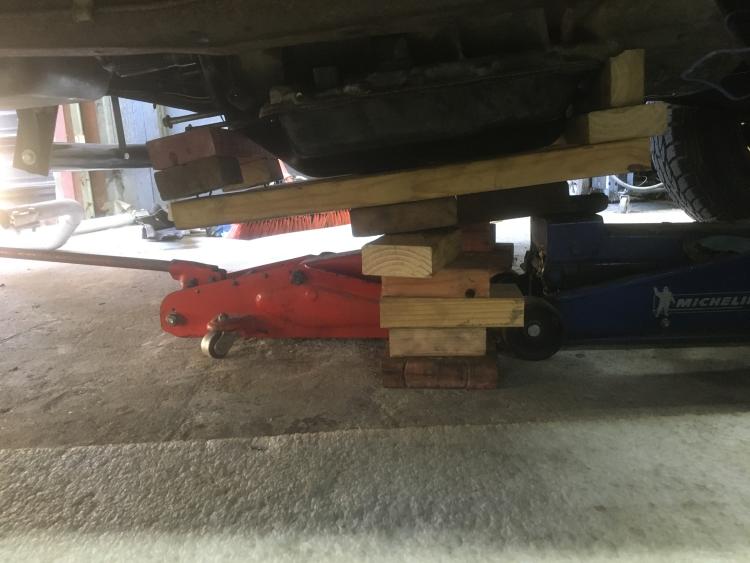 With the cradle high enough, I was able to bring in some RV jacks to keep things from going south.  With this arrangement, I could pick the cradle up just off the jacks, move it to where I needed, and let it back down onto the jacks. Or adjust the jacks up instead. Since I had a jack on each corner, I could control front to back and side to side tilt. The engine also needed some tilt adjustment, which was accomplished with a jack and a 2x4 up to the area between the harmonic damper and the pulleys. Getting the 4 torque converter to flexplate bolts lined up, then getting the trans bolts themselves lined up, was a major juggling act. I really hope the trans works flawlessly, because I really don't want to do this again. Once the trans bolts were in place and tightened, the last task of the evening was to make a flywheel locking tool out of some angle iron, and use it in the starter hole so I could tighten the 4 converter to flexplate bolts. The trans is still supported by the cradle, today I need to get the transfer case up and installed. I will probably use the same approach and build some type of cradle for it. Then I will need to get the 4WD cross-member installed. It does not appear the chassis has the holes drilled for that, so that will be its own fun. Man, I really need to get a lift.
81 F150 Flareside, Edelbrock Pro Flow4 FI, hydraulic roller 351W, E4OD, 4x4, BW1356
92 F150 RCLB 351W E40D BW1356 mostly stock |
| Edit this page |