Fuel Injection upgrade


|
Been looking at fittings again as I found out today that I can buy a hydraulic flare tool that can create male quick disconnects in metal hardlines. So I am thinking of taking the stainless steel 3/8" fuel line I found pre made at Inline Tube and I can flare both ends for quick disconnects then I can connect the corvette style fuel filter/pressure regulator directly to this hardline with the quick disconnect. Inlet side and return will have to be done via hose as the filter uses male quick disconnects.
I found two Russell push on EFI fittings that are black anodized straight fittings part number 611203 for -6 hose to 3/8" female quick connect and 611253 for -6 hose to 5/16" female quick connect. Only thing I can not find out about is if it would hurt to use this reuseable hose end on a non braided fuel hose. I really want to run the plain rubber Earl's Vapor Guard hose but not sure if the hose would work properly with these hose ends. I could still get the quick disconnects in the proper Earl's Vapor Guard hose ends which I believe I already have a set of. I just dont know if I will like the look since you have to put a hose clamp or a crimp on the hose to lock it to the hose end. Im thinking about using quick disconnect hoses at the fuel tank to a custom bent stainless steel hardline for 3/8" supply and 5/16" return. Then use another short quick disconnect hoses between the hardline and the filter then the only other quick disconnect would be between the hardline at the engine and the hardline on the frame. Im thinking this would not just look more factory like but would reduce the number of leak points for me.
"Old Blue" - '56 Fairlane Town Sedan - 292-4V, Ford-O-Matic transmission, 3.22:1
'63 Belair 2dr sdn - 283-4V, Powerglide transmission, 4.56:1 '78 Cougar XR7 - 351-2V, FMX transmission, 2.75:1 9inch "Bruno" - '82 F150 Flareside - 302-2V, C6 transmission, 2.75:1 9inch, 31x10.50-15 BFG KO2 |
|
Administrator
|
Two things. First, stainless isn't easily formed as it work-hardens easily. So you may have problems flaring it.
Second, why not just go the way the factory went and use the nylon line? That is what most manufacturers went with soon after the Bullnose era, and they work well. I bought rolls of the 3/8 and 5/16 and the connections as well as the tool to install them with and it worked nicely. I have an all-new factory system from a 90's truck under Big Blue.
Gary, AKA "Gary fellow": Profile
Dad's: '81 F150 Ranger XLT 4x4: Down for restomod: Full-roller "stroked 351M" w/Trick Flow heads & intake, EEC-V SEFI/E4OD/3.50 gears w/Kevlar clutches
|
|
Administrator
|
I wonder about the nickel-copper brake line?
It obviously can handle the pressure and vibration. The thick walls make it really easy to double flare. All of the propane plumbing around here is flared soft copper roll. If it were really dangerous would they allow people to run it through their house connected to a 1,000 gallon tank?
Jim,
Lil'Red is a '87 F250 HD, 4.10's, 1356 4x4, Zf-5, 3G, PMGR, Saginaw PS, desmogged with a Holley 80508 and Performer intake. Too much other stuff to mention. |
|
|
In reply to this post by Gary Lewis
Straight stainless steel sure but Ive never seen anything bad about annealed stainless steel as its annealed to have easy workability when it comes to flaring. The main point I want to go with stainless is to make it last longer than just simply running all rubber line. On the nylon line for making flex connections I need to check how well it works with ethanol blended fuels, the reading Ive done found that the Earls Vaporguard hose has a barrier that is to help prevent fuel vapors from seeping through the hose over time. The paperwork I came across on this hose presents that 12" of rubber fuel hose can lose up to 1 gallon of fuel over 1 year and their barrier hose actually prevents it. Their hose is also rated at 225 psi, if the nylon line would provide the same benefit I would seriously consider using it for my flex connections.
"Old Blue" - '56 Fairlane Town Sedan - 292-4V, Ford-O-Matic transmission, 3.22:1
'63 Belair 2dr sdn - 283-4V, Powerglide transmission, 4.56:1 '78 Cougar XR7 - 351-2V, FMX transmission, 2.75:1 9inch "Bruno" - '82 F150 Flareside - 302-2V, C6 transmission, 2.75:1 9inch, 31x10.50-15 BFG KO2 |
|
|
In reply to this post by ArdWrknTrk
For double flare sure, but for me I wont be doing double flare. The flare I want to do is the quick disconnect that is used on fuel systems especially on GM.
This is the Eastwood stock photo of their hydraulic flare tool showing what flares it can make the far left is the one I would be using which is the quick disconnect and I believe something like Annealed Stainless Steel would easily form this flare. 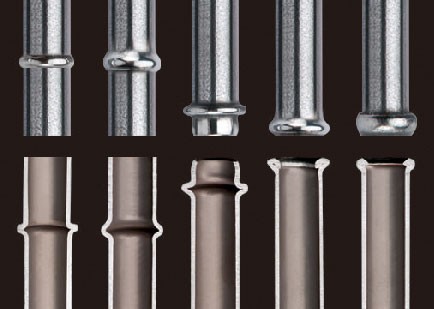 Only thing I am looking at is hose wise, I really want to run the Earls Vapor Guard hose that has the barrier liner that prevents fuel vapors from seeping through the hose itself over time. Problem is the hose ends for the Earls Vapor Guard has a unique hose barb to not tear the inside liner of the hose and it brings a question to me if one could use the reuseable hose ends with the threaded collar. I dont mind using the correct Vapor Guard hose ends its just that they dont make a vapor guard hose end with a quick disconnect end so I would have to have a quick disconnect with a -6AN end on it and then thread the -6AN hose end onto it which adds length as well as introduces a leak point that wouldnt be there with a Russell hose end for example that is made with the quick disconnect on the other end. Just one of the things I am seriously thinking about as my goal is to run metal hardline from the mechanical fuel pump end to where my fuel filter/regulator will be mounted. I also do plan on flaring annealed stainless steel to AN flare so I can make a hardline for my EFI without having to worry about using rubber hose. It also will allow me to custom bend the hardline around things such as my coil and distributor and dealer A/C compressor bracketry. This would leave me with two points for non metal lines one at the flex point between the engine and frame the other some where between the fuel tank and the fuel filter. I have some left over quick disconnects with -6 AN fittings as well as -6 AN fittings with Earls Vapor Guard barbs that I got from doing sniper installs at work. So I was going to go this route as it would save me money but the more I think about it the more I want to go above and beyond than just simply running all rubber line from one end to the other.
"Old Blue" - '56 Fairlane Town Sedan - 292-4V, Ford-O-Matic transmission, 3.22:1
'63 Belair 2dr sdn - 283-4V, Powerglide transmission, 4.56:1 '78 Cougar XR7 - 351-2V, FMX transmission, 2.75:1 9inch "Bruno" - '82 F150 Flareside - 302-2V, C6 transmission, 2.75:1 9inch, 31x10.50-15 BFG KO2 |
|
|
I wouldn’t feel bad about using rubber hose for the entire system, as long as you route everything right. It’s easy to cut though so you gotta make sure the hose isn’t touching the cab or anything like that with an edge. I used Earls VaporGuard with their fittings and Russell quick connect fittings from the tank (95 f150 EFI tank) to a GM LT1 fuel filter/regulator with Russell quick connect fittings. No leaks, good pressure, does good. I have had to reroute the lines a little to make sure they don’t get damaged. I drive a lot too, this is my daily and no problems.
Hard lines are preferable though, but if bad comes to worse you can use the rubber. It’ll just take time to route them right. When I get the time and money I’ll be converting to hard lines too most likely. Not advocating rubber over steel though. I wouldn’t hesitate to run it even with the extra fittings. Russell and Earls are pretty good quality
Jacob,
84 F150 base model, New 95 roller 351w with 5.0 ho roller cam, Summit Racing Max EFI 500, and other toys, MSD DIS, C6 trans, 9 inch rear 3.50, reg cab, long bed, 4x4. 33s, 2.5" Rough Country lift. |
|
Administrator
|
Only real advantage I see to metal is that you can use the clips that are already inside the frame rail.
Well, and it won't be able to move around. Now that Earls is a part of Holley I'm surprised they don't offer more fittings. It was a different story 50 years ago when they only sold military surplus.
Jim,
Lil'Red is a '87 F250 HD, 4.10's, 1356 4x4, Zf-5, 3G, PMGR, Saginaw PS, desmogged with a Holley 80508 and Performer intake. Too much other stuff to mention. |
|
Administrator
|
In reply to this post by Jacob84
My Chrysler Turbo system uses rubber from tank to body lines and from body lines to engine fuel rail. It is SAE J30R9 and these run 55 psi static and it goes to 70 psi at 15 psi boost.
Bill AKA "LOBO" Profile
"Getting old is inevitable, growing up is optional" Darth Vader 1986 F350 460 converted to MAF/SEFI, E4OD 12X3 1/2 rear brakes, traction loc 3:55 gear, 160 amp 3G alternator Wife's 2011 Flex Limited Daily Driver 2009 Flex Limited with factory tow package Project car 1986 Chrysler LeBaron convertible 2.2L Turbo II, modified A413 |
|
Administrator
|
In reply to this post by Rusty_S85
Eastwoods bubble flare section on the right is completely inaccurate.
Jim,
Lil'Red is a '87 F250 HD, 4.10's, 1356 4x4, Zf-5, 3G, PMGR, Saginaw PS, desmogged with a Holley 80508 and Performer intake. Too much other stuff to mention. |

|
|
In reply to this post by 85lebaront2
Well now I don’t feel so bad about just using rubber (Earls to be specific). I do want to route them a little cleaner though and safer. And I would also think Earls would offer more fittings.
I’m not the biggest fan of Holley buying out businesses.
Jacob,
84 F150 base model, New 95 roller 351w with 5.0 ho roller cam, Summit Racing Max EFI 500, and other toys, MSD DIS, C6 trans, 9 inch rear 3.50, reg cab, long bed, 4x4. 33s, 2.5" Rough Country lift. |
|
Administrator
|
It's not really Holley.
As I said in the other thread, an investment capital group now owns them, and what was Prestolite. It's never a good sign when beancounters and wall street wolves move in for the kill. Sometimes an infusion of capital is a good thing. Holley's been in and out of bankruptcy. But cutting corners, moving manufacturing off-shore, cutting corners for pennies, then gutting a company for its IP is usually what we see. And that's always a sad end for an American icon.
Jim,
Lil'Red is a '87 F250 HD, 4.10's, 1356 4x4, Zf-5, 3G, PMGR, Saginaw PS, desmogged with a Holley 80508 and Performer intake. Too much other stuff to mention. |
|
|
In reply to this post by Rusty_S85
Been off and on working on different aspects of my build and I have lately been back on the electrical aspect moving away from the 4wd conversion for the time being.
I was looking at the following fuse box for my auxiliary circuit as it has 10 relays and 15 fuses which is almost to my requirements.  Problem with this how ever is that I currently have a need of 9 relays which will work with this 10 relay box but it limits me on future expansion especially if I decide to go with a roll bar and add two more pairs of lights which would require one 30A relay per pair. Fuse wise I am currently seeing a need of 7 fuses which I would have enough for future expansion. I did find another box similar to the one posted above but this other box is larger and sports 16 relays and 24 fuses which is way too many for me as I dont think I would ever need 24 fuses and 16 relays would allow for future expansion but there is only so much I could fathom adding that isnt on my list currently. I could see using a key hot triggered relay to activate my sniper so the hand unit would see actual battery voltage at the battery and not battery voltage at the ignition switch. But I wont be keeping the hand unit plugged in so its a moot point.  After that one I continued my search and found more photos of the 10 relay 15 fuse box on a store page and found out that the individual relay blocks and 3 fuse blocks simply snap in the larger box as a semi modular system. I could rearrange the layout to my liking but I started thinking I could pull one of the three fuse blocks out and add another relay block giving my 11 relays and 12 fuses which would give me 2 relays for future upgrades and 5 fuses for future upgrades. I could also in theory pull two squares out and add two relays and have 12 relays and 9 fuses which would give me 3 relays and 2 fuses for future upgrades. But I think I would need more than just two fuses for future expansions as if I can ever get Dakota Digital to make the RTX Retro cluster for our trucks I will be using this box for providing fused power to the control box and add on modules. 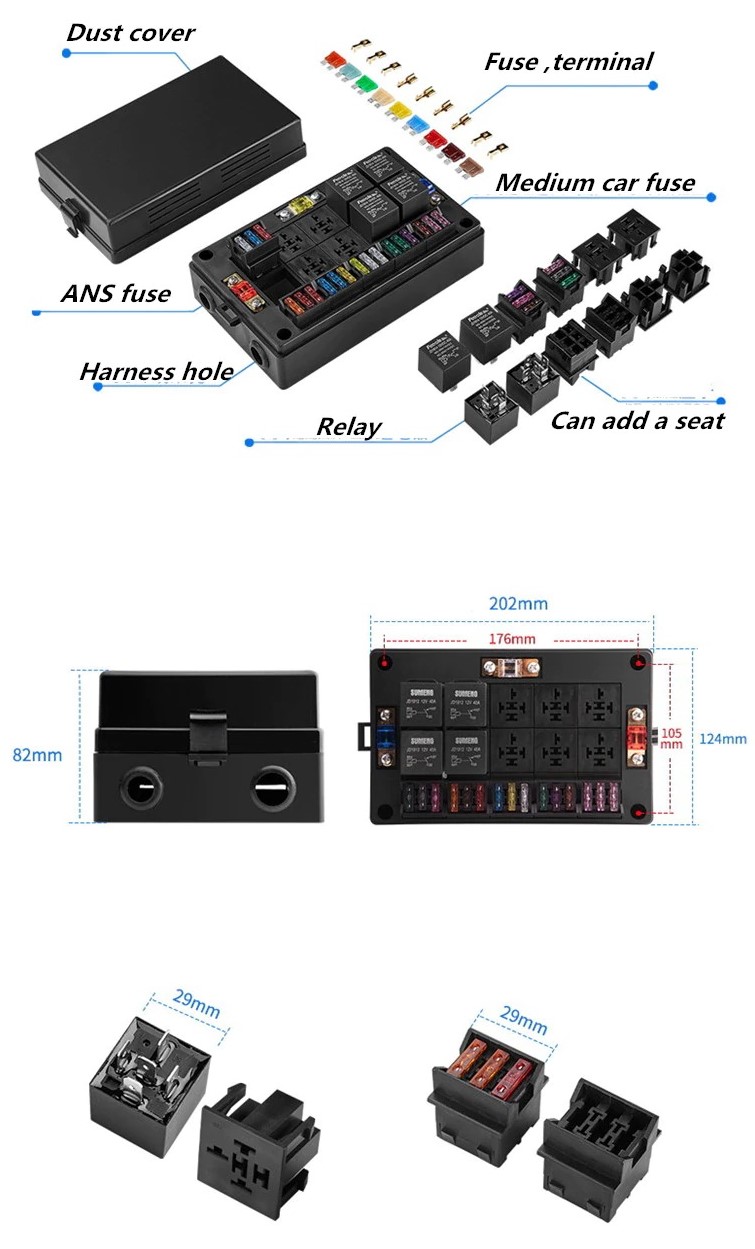 So while I put my 4wd planning on the back burner I am going to be opening up a new word pad document and start working on this new plan as I believe I can purchase two of these smaller boxes and get just what I need and still come out cheaper than the single oversized box. The single over sized box cheapest I found was $75 from china not including the shipping and handling. I can get these boxes from ebay for $35 a pop with free shipping. But I need to see if I could buy spare inserts though as that would probably be cheaper for me. I also need to get back on my electrical wiring as the wire list I created was from before I decided to go sniper so now I need to pick out more colors and gauges for my new add on circuits
"Old Blue" - '56 Fairlane Town Sedan - 292-4V, Ford-O-Matic transmission, 3.22:1
'63 Belair 2dr sdn - 283-4V, Powerglide transmission, 4.56:1 '78 Cougar XR7 - 351-2V, FMX transmission, 2.75:1 9inch "Bruno" - '82 F150 Flareside - 302-2V, C6 transmission, 2.75:1 9inch, 31x10.50-15 BFG KO2 |
|
Administrator
|
Rusty, those are some nice looking PDC modules! Good find. It is nice to see there is finally some nice aftermarket power handling stuff being made even if it is Chinese.
Bill AKA "LOBO" Profile
"Getting old is inevitable, growing up is optional" Darth Vader 1986 F350 460 converted to MAF/SEFI, E4OD 12X3 1/2 rear brakes, traction loc 3:55 gear, 160 amp 3G alternator Wife's 2011 Flex Limited Daily Driver 2009 Flex Limited with factory tow package Project car 1986 Chrysler LeBaron convertible 2.2L Turbo II, modified A413 |
|
Administrator
|
Those are interesting PDB's. I like the idea of being able to swap relays for fuses and vice versa.
Gary, AKA "Gary fellow": Profile
Dad's: '81 F150 Ranger XLT 4x4: Down for restomod: Full-roller "stroked 351M" w/Trick Flow heads & intake, EEC-V SEFI/E4OD/3.50 gears w/Kevlar clutches
|
|
|
In reply to this post by 85lebaront2
I am glad too, I made a little mistake the 10 relay one will work for me as the 9 relays I need was counting the two relays for two more pairs of halogen auxiliary lights. So I dont have to change anything around but I am looking for the seats that they mention to try and source them individually vs buying a whole second box. I would like to swap one of the fuse seats out for a relay. Only thing that would be nicer is if they had it more like the OE with a main power lug. But I was thinking of doing that with the ANS fuses which there are three of. I figure run a single 10ga wire into the box and attach it internally to one of the ANS fuses then have a jumper wire off that ANS fuse wire to another ANS fuse wire then I can run two ANS fuses and split my circuits up. Im thinking have my lighting circuits (headlights, driving lights, auxiliary lights) on one circuit then have EFI, AC Clutch, CB, CB amp on the second circuit. That way I can run smaller ANS fuses by splitting the load up and it isolates the EFI from the heavier draw circuit such as the lighting. But it does look nice and converting it from metric to inches it appears the 10 relay unit is the following dimensions. Height : 3.23" Length : 7.95" Width : 4.88" Length (mounting hole spacing) : 6.93" Width (mounting hole spacing) : 4.13" So the unit is roughly 3 1/4" tall, 8" long, and just over 4 3/4" wide. I have to cut a cardboard pattern out so I can see how it will fit where I plan to mount it on my truck but I think it will fit nicely on the passenger side plastic fender. My line of thought was to use clear plexiglass and seal it to the box with screws through the holes but I will then drill holes to match the existing holes in the plastic fender already and use a bolt with a nut to create studs to the plexiglass and then all one has to do is simply stick the bolts with a washer through the plastic fender and it will be held up slightly off the plastic fender. This is why I am looking at doing OE like connectors so the fuse/relay box can be unplugged and removed if I decide to add a circuit for example or have to repair a wire inside the box.
"Old Blue" - '56 Fairlane Town Sedan - 292-4V, Ford-O-Matic transmission, 3.22:1
'63 Belair 2dr sdn - 283-4V, Powerglide transmission, 4.56:1 '78 Cougar XR7 - 351-2V, FMX transmission, 2.75:1 9inch "Bruno" - '82 F150 Flareside - 302-2V, C6 transmission, 2.75:1 9inch, 31x10.50-15 BFG KO2 |
|
|
In reply to this post by Gary Lewis
Same here I found that very interesting as well. I just havent been able to locate those seats without purchasing a whole second box. But with the modular design like that, it means I can pull all the fuses and relays out and position them with the relays on one side making a square and put the fuses up at the top or rearrange them in any way. It also allows me to give up some fuse space in exchange for more relay space. Which I wont need much fuse space as ill be using the same fuse for many of the relays. Like my low beam/high beam relays two separate relays but they will both be powered by the same 15A fuse which cuts down on wiring and saves me a fuse slot. I wish there was a way I could cut down my headlight relay from two to just one for high/low but I cant come up with a way of doing it and having my headlight switch control it without using another relay to kill the low beam all time hot power which puts me back to dedicated relays for high and low. Im currently looking at ways on my diagram I drew up on how I could cut down my A/C fuses from two to one. Currently I have a AC clutch fuse which is a battery hot fused circuit directly to my AC shut down relay and then out from 87a pin to my clutch itself. But I have another fuse for my AC cutout that goes from a fuse to my AC shut down relay for pin 86 so the sniper can ground pin 85 breaking the 30-87a circuit shutting the clutch down. Im thinking I might be able to jumper it off the clutch relay to go to the shut down relay for power or I could use my dealer AC switch wire at the clutch which is jumpered from my A/C clutch relay and my A/C kick relay and jumper it to my A/C shut down relay since they are all on the trigger circuit it shouldnt draw more amps through the A/C switch than the compressor clutch itself was. But I havent decided on if I want to do that or stick with a dedicated battery hot fused circuit for my AC shut down relay.
"Old Blue" - '56 Fairlane Town Sedan - 292-4V, Ford-O-Matic transmission, 3.22:1
'63 Belair 2dr sdn - 283-4V, Powerglide transmission, 4.56:1 '78 Cougar XR7 - 351-2V, FMX transmission, 2.75:1 9inch "Bruno" - '82 F150 Flareside - 302-2V, C6 transmission, 2.75:1 9inch, 31x10.50-15 BFG KO2 |
|
Administrator
|
Rusty, just a little FYI, my Chrysler, using the 1990 wiring harness, has a low and a high beam relay, then separate fuses for each low or high beam circuit, that way a short will kill one portion only. This is the way a lot of Mercedes-Benz and Japanese imports are done. Since you are doing such a thorough upgrade, might be an idea and the present system, if I remember from Darth the headlight wires for the right side run across the inside of the cab then out to the headlights under the HVAC case.
Bill AKA "LOBO" Profile
"Getting old is inevitable, growing up is optional" Darth Vader 1986 F350 460 converted to MAF/SEFI, E4OD 12X3 1/2 rear brakes, traction loc 3:55 gear, 160 amp 3G alternator Wife's 2011 Flex Limited Daily Driver 2009 Flex Limited with factory tow package Project car 1986 Chrysler LeBaron convertible 2.2L Turbo II, modified A413 |
|
|
Correct the OE headlight wires run along the inside of the cab and exit on each side and run across the fender. Im partially leaning towards running the wiring across the core support to keep the wires on the short end. On the dual fuses I could do that, but I do have driving lights tied into the highbeam relay trigger so even if a single fuse on headlights low/high were to go out I would still have the driving lights which will have its own fuse as they are a pair of 100w apollo 6" driving lights. I wouldnt lose my lights completely in this case but it wouldnt be hard to add another fuse though for the highbeam I will have well over enough fuses at 15 fuses on the box I will probably end up going with and I only need 7 fuses currently. Fuses I have so far are as follows Fuse 1 : headlight 15A Fuse 2 : Driving Lights 25A Fuse 3 : CB 5A Fuse 4 : CB Amp 15A Fuse 5 : AC Cutout 15A Fuse 6 : AC Clutch 25A Fuse 7 : Fuel Pump 15A If I added in a high beam fuse that would bring me to 8 fuses on the box leaving me 7 fuses for future expansion. Wouldnt be hard to do it like this and it would help isolate the headlight circuit so I would have at least one circuit for driving if a fuse blows. For me what I am thinking of doing is using the right headlight connector as my trigger. I have a male headlight connector that will simply do like my current plug and play relay setup is, just plug into the OE harness and you have your high/low/ground for your relay triggers. I how ever wont be using the ground though I will be tying all the relay grounds together outside of a couple of the relays for the snipers as they apply a ground to trigger those relays.
"Old Blue" - '56 Fairlane Town Sedan - 292-4V, Ford-O-Matic transmission, 3.22:1
'63 Belair 2dr sdn - 283-4V, Powerglide transmission, 4.56:1 '78 Cougar XR7 - 351-2V, FMX transmission, 2.75:1 9inch "Bruno" - '82 F150 Flareside - 302-2V, C6 transmission, 2.75:1 9inch, 31x10.50-15 BFG KO2 |
|
Administrator
|
I used male connectors to plug into the harness on the right side to get the trigger signals and put the relays by the battery. Then I ran the wires over the radiator, zip tied to the support, to the left headlight. And the relays are powered by fuses in the PDB.
Gary, AKA "Gary fellow": Profile
Dad's: '81 F150 Ranger XLT 4x4: Down for restomod: Full-roller "stroked 351M" w/Trick Flow heads & intake, EEC-V SEFI/E4OD/3.50 gears w/Kevlar clutches
|
|
|
This post was updated on .
Thats how I have mine planned, I am taking the idea from the chinese relay kit I bought that I had to lengthen to make it route the way I wanted. This is how I found out that wiring used in the chinese kit was not 12 - 14 ga but was a extra thick insulation on a 18 - 20 ga wire which I felt was way too small to be honest for how long the wire actually is. So I bought and put up with my wiring that I am sourcing slowly for the project the plastic male adapter so I can plug into one of the OE headlight harnesses the other one in the kit will be assembled and plugged into the other circuit as a dummy just to protect the connector from corrosion. I also got a set of the ceramic H4 connectors for my connection at the H4 bulbs themselves.  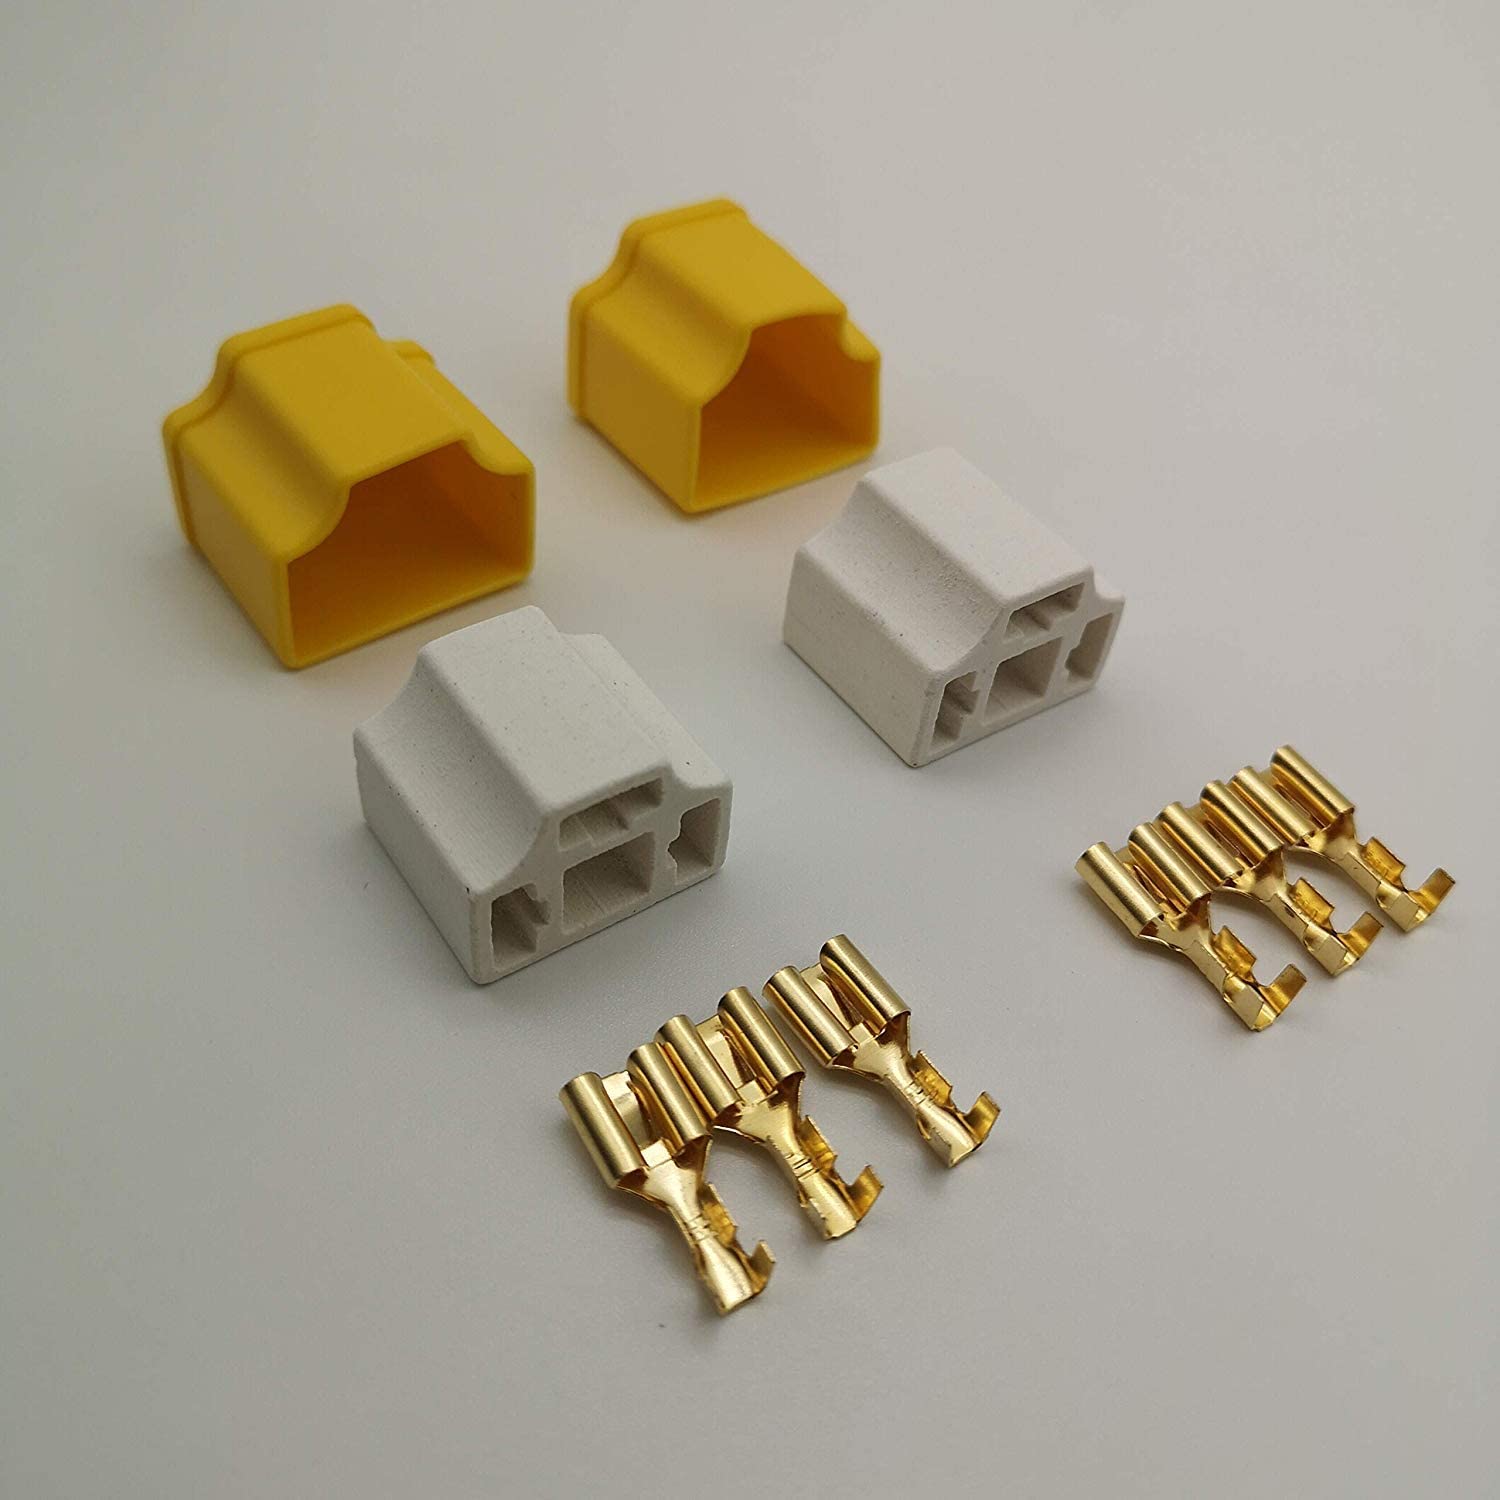 Aside from that, the last few days Ive been digging on the Bassani off road Y pipe in 3" size. I found a little out about them but still no real photos of the Y pipe itself. Everything I find with photos are from 10 years ago and the images are all broken now. But what I was able to find was photos of the Bassani headers which shows it uses a ball and socket flange very similar to what is on my Hedman shorty street headers so the Y pipe should fit my headers at least. Only questions that remain is if there is any fitment issues, if the Y pipe is or isnt closer to the oil pan where it crosses over under, if it fits too close to the transmission crossmember where the exhaust passes through and so on. What I am thinking how ever is run the Bassani 3" Y pipe which is stainless as it has no converter I did hear one state it has the air injection tube which if it does I am going to see how to go about removing it and plugging the hole. This route would require to a replacement converter hanger bracket to replace my cut off frame unit one then I can fabricate a bracket to weld onto the straight pipe. I will also have to source another Magnaflow round muffler as mine wont fit but they do offer a 3" in/out variant. Ill also have to still source a cheapie walker OE muffler to cut the OE muffler hanger bracket off so I can have it welded onto the Magnaflow muffler to utilize the OE hanger. For the tail pipe I found that Flowmaster has a diy kit in 3" for a tail pipe in aluminized steel for $117. I probably could just have an exhaust shop bend me up a stainless steel 3" tail pipe and provide the OE hanger from my 2" unit for them to weld onto the tail pipe to use the OE hanger at the rear. But it seems like my plan is some what coming together. Just hopeful going all 3" will not have a negative effect on such a small engine but everything I have read and came across states a single 3" is equal to dual 2 1/4" exhaust which I know many people with these trucks are running dual 2 1/4" exhaust with no problem on their 302s. All I know is I want some nice exhaust that I can put together with the exhaust band clamps they hold tight and they allow for disassembly and exhaust shops here they want to weld everything in place not use those band clamps that seal better than the old fashioned clamps. ~Update~ I forgot to add in the charts I came across. This is a compilation of a few different sources that all seem to state the same thing. From Dynomax 300-350 CID : 3" single exhaust = 250 - 300 HP / 3 1/2" single exhaust = 350 HP From Roadkill Customs 300-350 CID : 3" single exhaust = 250 - 300 HP / 3 1/2" single exhaust = 350 HP From TDotPerformance.ca's Redline 300-350 CID : 2 1/2" - 3" single exhaust = 200 - 350 HP It appears that a 3" single exhaust would not be big enough for my 306 if it produces closer to 400hp which it very well may. But like wise all these sites mentioned to size properly because a smaller diameter pipe will produce low to mid RPM torque while larger diameter pipes produce mid to high RPM torque. But still you have to take into account rpm range and displacement and thermal expansion. RoadKill Customs actually states the following Quick Exhaust System Math Easy way to estimate : Your intake system needs to flow 1.5 CFM per engine HP and your exhaust needs to flow 2.2 CFM per engine HP. Good way to estimate : Take engine RPM x CID, then divide by two. This is the intake volume. Use this same volume of air for the exhaust system, but then correct for thermal expansion (you need to know exhaust temps to figure things out). So using the quick exhaust system math and using my DD2000 peak hp of 382 @ 5,500 rpm which comes out to 573 CFM on the intake side and 840.4 CFM on the exhaust side. The closest I can get to 840 CFM would be 3" exhaust at 747 CFM (estimated) which is also listed as only being capable of handling 339HP for single exhaust. I would have to go to 3 1/4" pipe to get in the 800s and it would put me at 882 CFM and capable of supporting 401HP for single exhaust. But still I feel 3 1/4" pipe will be way too large and hurt my low rpm power which is what I need for street driving. 3" I feel may be too big for low/mid range power as well but it will hinder my high end how ever. 2 1/2" would really hinder with 509 CFM exhaust flow and only capable of supporting 232HP for single exhaust. For my goal of 300hp I would have to run 3" single exhaust as there is just no way around it even if I feel 3" is too big for a 306 CID engine.
"Old Blue" - '56 Fairlane Town Sedan - 292-4V, Ford-O-Matic transmission, 3.22:1
'63 Belair 2dr sdn - 283-4V, Powerglide transmission, 4.56:1 '78 Cougar XR7 - 351-2V, FMX transmission, 2.75:1 9inch "Bruno" - '82 F150 Flareside - 302-2V, C6 transmission, 2.75:1 9inch, 31x10.50-15 BFG KO2 |
| Edit this page |