"Rocky" - 1981 F250 Restoration


|
Got it started. In addition to a new battery I may replace the starter. Even with a jump box on it, when it's this cold (10F - not even the lowest I'll see) it seems to crank very poorly. The engine is fine - it starts instantly, to my constant surprise. Like crank-cr-boom. But that first crank sounds like I'm turning it with a breaker bar.
Ran well for 10 mins, enough to warm up. Heat works. Not well, the push pull on the mixer only goes partway into the defrost section. But it's fine, I run warm anyway. I still have a noticeable ticking from the top cover area of my transmission if I have the clutch let out in neutral. I'm hoping it's just not well lubed yet. Radio stopped working for some reason. No idea why. But I didn't mount it very well depth-wise so I need to pull it anyway, just dragging my feet. Waiting for warmer weather...
--
1981 F-250 Custom. 6.6L V8, 4 barrel Holley carb, ARA aftermarket A/C. |
Re: "Rocky" - 1981 F250 Restoration
|
Administrator
|
Progress!
 If you replace the starter I'd with with a PMGR. Lots better cranking ability - with less current. IIRC, the M-Block takes the same starter as a 460, but you need to check that out. But our page at Documentation/Interchange/Starter Interchange says the M-Blocks and 460's take E1TZ 11002-CX, so that seems to confirm it.
Gary, AKA "Gary fellow": Profile
Dad's: '81 F150 Ranger XLT 4x4: Down for restomod: Full-roller "stroked 351M" w/Trick Flow heads & intake, EEC-V SEFI/E4OD/3.50 gears w/Kevlar clutches
|
|
|
No joke I've been all over the other threads here and the docs and I'm still confused what to actually BUY. Same with the alternator.
Gary, have you ever considered a page, maybe somewhere under Documentation->Interchange or similar, that is just a member-added-to list of "I bought this Champion CC561B from Summit and it worked in my 1981 F-250 with a 6.6L 351M-400 V8. To mount it, I had to add two M6-1 Clip-On U-nut from Amazon (B00C3MUY9K) and two M6-1 x 22m Body Bolts (B0040CTU9G), which are also the right thread if you need to replace any of the other bolts." Like, a list of "this actual part worked for me" items?
--
1981 F-250 Custom. 6.6L V8, 4 barrel Holley carb, ARA aftermarket A/C. |
Re: "Rocky" - 1981 F250 Restoration
|
Administrator
|
That's a good suggestion. But it'll have to be in the forum part as not very many can edit the documentation side. Let me think about where to put that, but we need to do that.
 Oh yes, if I don't get it done by Sunday please remind me. Things are kind of busy right now. That's my excuse and I'm sticking with it. 
Gary, AKA "Gary fellow": Profile
Dad's: '81 F150 Ranger XLT 4x4: Down for restomod: Full-roller "stroked 351M" w/Trick Flow heads & intake, EEC-V SEFI/E4OD/3.50 gears w/Kevlar clutches
|
|
|
I mean, if you think a thread is the right answer then you don't need to do anything, right? I could just start it under Projects or something. I'd think you'd want to have a first or pinned post with rules and moderate it or something, but it shouldn't have to be a burden for you generally.
In that case I was thinking a good general rule would be "one part per post, one post per part." I mean, it would be really hard to search/read if it became a general discussion thread, but also it would be messy if people brain-dumped 14 "mods" in a single post. What I was thinking was maybe having the first post have a brief template people could copy/paste when making new posts like: Vehicle Year and Model: [e.g. 1981 F-250 4x2 Custom] Original Part: [e.g. Radiator] Replacement Part: [e.g. Champion CC561B] Price Paid: [e.g. $189.99] Source: [e.g. Summit Racing] Installation Notes: [e.g. Also requires 2x M6-1 nut plates and bolts to attach the fan shroud to the bottom lip. For a manual transmission, install 2x 1/4 NPT plugs in the transmission cooler ports with teflon tape or other sealant. Otherwise, this is a drop-in replacement.]
--
1981 F-250 Custom. 6.6L V8, 4 barrel Holley carb, ARA aftermarket A/C. |
Re: "Rocky" - 1981 F250 Restoration
|
Administrator
|
That's an interesting idea. Projects is currently set up so that anyone can lock their thread, so I could put up a folder in Projects and put your template in. But what would you suggest we call it?
Gary, AKA "Gary fellow": Profile
Dad's: '81 F150 Ranger XLT 4x4: Down for restomod: Full-roller "stroked 351M" w/Trick Flow heads & intake, EEC-V SEFI/E4OD/3.50 gears w/Kevlar clutches
|
|
|
Got a lot done today. First, I replaced my backup/reverse lamp sockets with that pair I found on eBay. They were a perfect fit, despite the odd description. Even the wire color coding was correct. Here you can see the before and after on the socket, a well as a one of those solder crimps I mentioned in another thread:
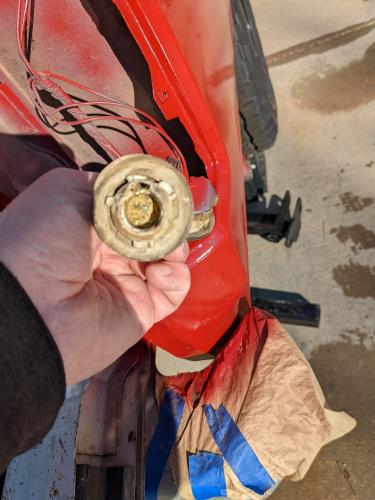 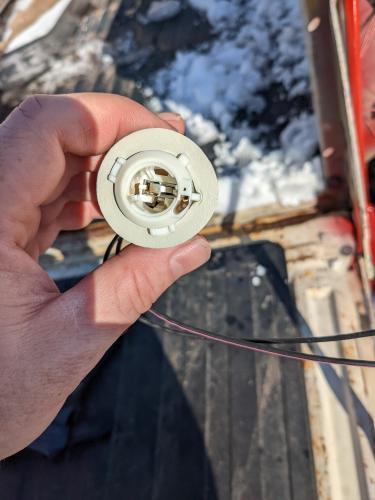 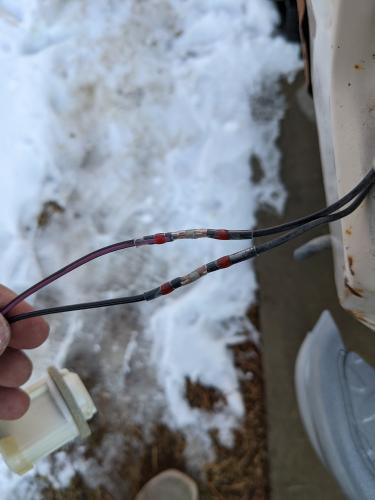 The solder crimps are super fast. Normally it's just clip, clip, strip, strip, stuff-both, heat-gun. But I suspect these lamp sockets were some kind of old stock being sold, because there was corrosion in the ends of the pigtails. One wire was almost totally black - I thought I hadn't stripped it fully. Easy fix with a bit of fine sandpaper and some patience (I roll the strands around between my fingers while rubbing sandpaper across from every direction). But it made a 60 second job into 3 minutes. The horror. Next I got my Torklift F2000 brackets installed. You can just see one peeking out below. That whole issue with the driver's side bracket interfering with the parking brake adjuster was a non-issue. I just used a grinder to trim the rear cable slot to give it a bit more clearance and it was good to go. I didn't get a great pic because the light was fading (I will tomorrow) but the passenger's side front bracket is easily visible here: 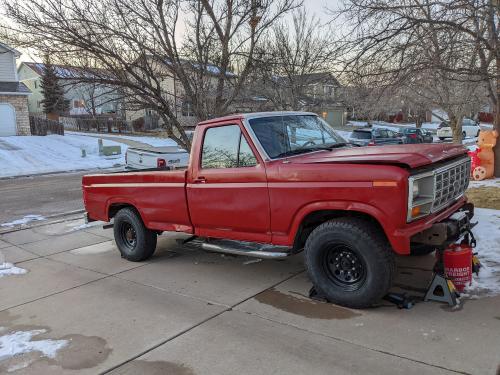 I love how subtle these are. If I'm not using them, the outer section is even removeable with just a pin. The rear ones are more challenging but I have a set designed to bolt onto the bumper I may use for now as a placeholder. They're nice brackets and still a lot stronger than the old J-hooks bolted to the thin bed body. I also figured the right side paint is "as good as I care" so I started pulling off the masking. It's not great but it's fine. Looks good in photos anyway. I decided not to bother with the white stripe, not because I'm not confident I can do it but because I'm running out of time. I have black plastic trim rails for the bed, chrome trim rings for the wheel wells, and rubber/chrome moulding for the side panels that should spruce it up plenty.
--
1981 F-250 Custom. 6.6L V8, 4 barrel Holley carb, ARA aftermarket A/C. |
Re: "Rocky" - 1981 F250 Restoration
|
Administrator
|
You are really making good progress. The sockets look great, and the solder crimps are a great deal when you are out on the driveway like that. Mine are due in on Monday and I'm anxious to try them.
As for the black wire, I've been known to do that trick with the sandpaper. But once I get them clean I hit them with a bit of rosin. Makes the joint flow much easier, even with rosin-core solder. And I like the brackets. Much nicer than what I had on my '72.
Gary, AKA "Gary fellow": Profile
Dad's: '81 F150 Ranger XLT 4x4: Down for restomod: Full-roller "stroked 351M" w/Trick Flow heads & intake, EEC-V SEFI/E4OD/3.50 gears w/Kevlar clutches
|
|
|
In reply to this post by taskswap
Nice! Looking good. I like the tie downs also, I think my rear ones mount to the trailer hitch.
And like I said, I haven’t used them with a camper but have used them several times to tie down loads. I ordered that solder connection kit also, went back and looked at it and thought for that price gotta get it.
Dane
1986 F250HD SC XLT Lariat 4x4 460 C6-Sold 1992 Bronco XLT 4x4 351W E4OD 1998 GMC Sierra SLE K1500 350 4L60E Arizona |
|
|
Thanks guys. Definitely coming along.
Today was sort of a short day (had a concert to go to tonight) but a very good one. I didn't so much get a lot done as I "finished" a bunch of things. Well sort of. Let's say I rushed some paint things - up close it looks pretty trashy but I have a reason to hustle now. A change of plans with my camper project, I lucked across a "perfect fit" listing on rvtrader and plan to make an offer on it tomorrow. So the new priority was "get the stupid thing minimally street-legal again" as fast as well. 1. Buffed the clearcoat on the right side. Frankly it needs to be wet-sanded, and maybe I'll do that some day. But today was not that day. 2. Installed some chrome trim I had lying around. Why not, it looks nice and took 5 minutes. 3. Set aside the Torklift rear brackets (my hitch is super sketchy, why waste time drilling it knowing I'll probably replace it?) and put on some bumper brackets I had lying around instead. I didn't get a great photo of these but they're really nice for something so cheap. And the bumper's stronger than the bed body... 4. Speaking of the bumper, I cut some bushing stock to fit the gap I had between my brackets and bumper and installed those. They worked pretty well. What I had on hand isn't quite "right" - if you're going to do this, you want to put the bolt "in shear" which means the portion of the bolt inside the bushing can't be threaded, and the bushing needs to be a close fit. But it'll do for now and it's better than nothing. If anybody cares, it was a 1.8" bushing with a 1/2"x3-1/2" bolt, nut, and lock washer. I'm a fan of metric but Tractor Supply didn't quite have what I wanted so I went SAE, it was easy. 5. Fixed my radio, which wasn't turning on. This was a ClassicCarStereos.com unit with a pair of ISO plugs on the back. Apparently one of the crimps wasn't very solid and the power wire had popped out of the plug, of all things. Gary will probably have a chuckle at this after my whole schpiel on how crimps are all you need and solder is overkill. Especially because the (temporary) fix until I can replace the whole plug was to pop out the pin (man, ISO pins are a PAIN to eject) and solder the wire to it! (I had no choice, I couldn't re-use the pin and it's a weird pin so I didn't have any replacements on hand...) 6. I had been mocking up my front winch mount (pic below, I think it'll work out great) but I needed to make the truck street legal in case I need to go get this camper. So I popped that out of the way and put the front bumper back on for now. 7. I drained the rear fuel tank, as much as I could. Simple siphon job really I just don't have a "single container" way to dispose of this old bad fuel so I had to round up every old gas can I've been dragging my feet getting rid of. Finally had a use for them! Good thing too - there was WAY more gas in there than I thought. I was figuring 5-10 gallons but it must have been nearly full because I think I took 15-16 out of there by the time I was done. What a pain. 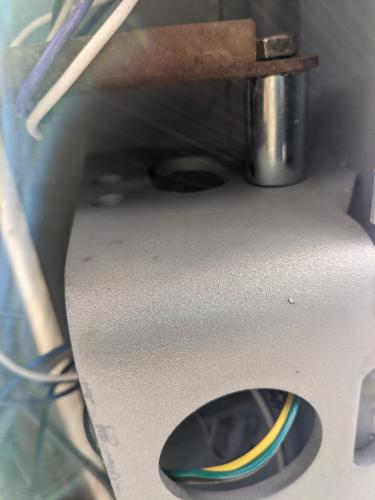 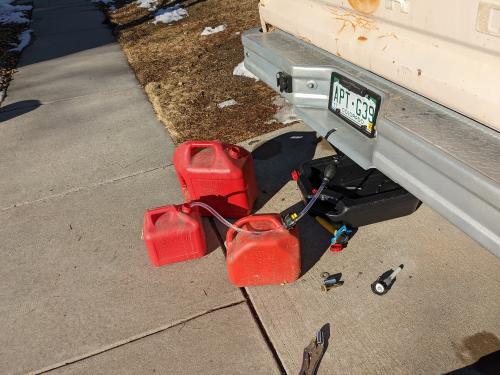 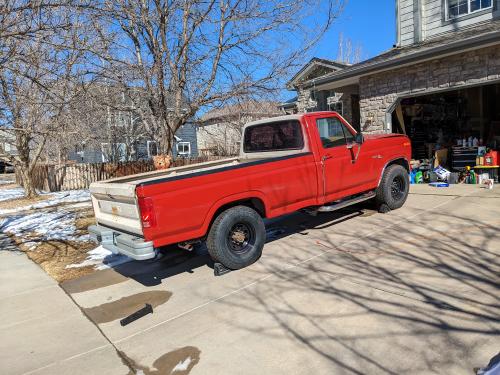 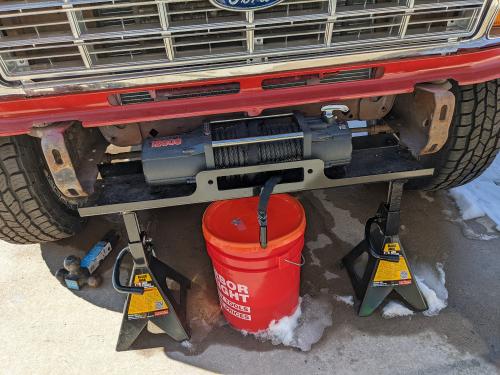 When all was said and done, time for a test drive! Here's me grinning like an idiot, my wife takes great photos: 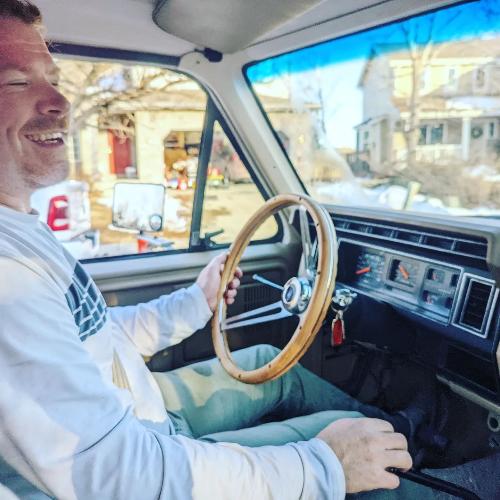 Major priorities this week: 1. I can't wait any longer, I have to do something about this parking brake. I've already adjusted it tighter and it's not helping. It's a problem because my driveway is angled. Think about it, without good brakes you can't pump the gas pedal while starting the engine. 2. Steering is super squirrely. It just wanders back and forth the whole time - not enough to require more than gentle corrections, but enough to require constant ones. Obviously an alignment is in my future but it's temping to also replace the tie rod ends while I'm messing with stuff. I have them on hand already, why not. 3. The high idle issue causes trouble on longer drives. Not only does it burn fuel, it also actually makes it harder to get it into 2nd, I suspect because even with the clutch in, the (probably partially stripped) synchros on 2nd have a harder job with the engine revving all the time. I haven't had time to do any diagnostics yet, I'll get into that this week.
--
1981 F-250 Custom. 6.6L V8, 4 barrel Holley carb, ARA aftermarket A/C. |
Re: "Rocky" - 1981 F250 Restoration
|
Administrator
|
That IS good progress! And if you get that camper you have good reason to hurry. (Hope you'll tell us more about the camper.)
And I love The Grin. But you had to bury the part about soldering, didn't you? I found it, and had a good laugh. Seriously though, I'm glad you found it and got it fixed, at least temporarily. On the wandering, replacing the tie rod ends may help. But you might want to have your wife turn the wheel back and forth just enough to take the slack out while you look to see where the slop is. In many cases there's as much in the steering box as in the tie rod ends. And if the box is worn it needs to be replaced as the adjustment on it shouldn't be touched - you'll go from loose and chasing it to tight and correcting it in 1/8 of a turn. As for replacing the box, I'm not high on what you get at the parts store. A rebuilt box still has a worn front bearing surface as only Red Head and Bluetop replace that. All others just measure it and say "good enough".
Gary, AKA "Gary fellow": Profile
Dad's: '81 F150 Ranger XLT 4x4: Down for restomod: Full-roller "stroked 351M" w/Trick Flow heads & intake, EEC-V SEFI/E4OD/3.50 gears w/Kevlar clutches
|
|
|
Yeah I was going to ask about that (steering) actually. I think I'm going to "live with it" for a week or two so I have a working truck if the camper deal works out (I also have a RAM that's our "hauler" but it's only a 6.5' bed with a rollback tonneau so it won't come close to carrying the camper we want, even one time). I'll play with "safe" things (things I can easily revert if they go south) like trying to fix the fast idle, changing my oil, etc. Once I either have the camper or it falls through, I'm just going to "go ham" on the whole steering system. I definitely agree with refurb'ing the steering box. I just figure I may as well replace everything else while I'm in there. I already bought the tie rod ends and couplers. Might as well get new bushings everywhere there are bushings... On that note, I've been reading some of the other threads and it seems Bluetop is a favorite so far?
--
1981 F-250 Custom. 6.6L V8, 4 barrel Holley carb, ARA aftermarket A/C. |
Re: "Rocky" - 1981 F250 Restoration
|
Administrator
|
Yes, Bluetop seems to be a fav.
And, I forgot to mention the bushings. I forget if yours is 4wd or not, but the F250's with 2wd should have radius arms and bushings at the back, and those go bad and certainly hurt the steering.
Gary, AKA "Gary fellow": Profile
Dad's: '81 F150 Ranger XLT 4x4: Down for restomod: Full-roller "stroked 351M" w/Trick Flow heads & intake, EEC-V SEFI/E4OD/3.50 gears w/Kevlar clutches
|
|
|
There must have been a story with this front-end because that was the ONLY part the p/o had replaced. You can just see one peeking out the back of the wheel well here: 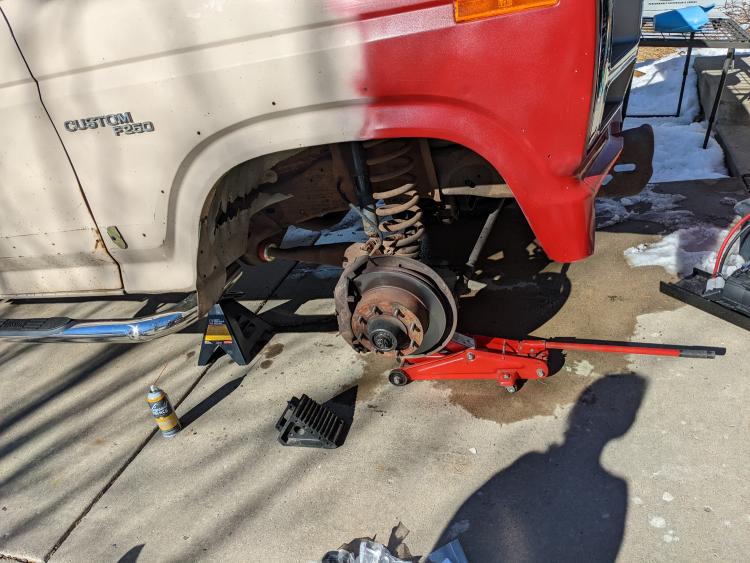 I know this was done VERY recently because the bushings are brand new, not even dirty. What baffles me given the cost of this stuff is while this was being done he didn't replace the shocks. They were totally gone. I can understand wanting to give the coil spring a few more years to save a buck (sorta) but you have everything apart to replace that bushing and you don't throw a new shock on? So weird. Bear in mind I bought this from a guy who himself bought it at auction. I figure HE was the one who did it, and probably at least one of the two bushings was totally gone so it wasn't even driveable. It has a brand new exhaust too - albeit a cheap one. I figure he was doing the bare minimum to get it sellable. Whatever. This year my plan for this truck is basically "if it's rubber or inexpensive, replace it". I'm just trying to triage the true priorities. A steering box is definitely in my future. But probably I'll wait until I don't need to drive the truck for awhile, and while I send that out for a rebuild I'll just put the whole truck up on blocks and rebuild the rear brakes at the same time. Since I have to take the axle out it's a big job, so I'm going to go whole-hog on it and replace a ton of stuff: springs, cylinder, fittings and soft lines, shoes, etc. I'd rather spend $50 extra for a "one and done".
--
1981 F-250 Custom. 6.6L V8, 4 barrel Holley carb, ARA aftermarket A/C. |
Re: "Rocky" - 1981 F250 Restoration
|
Administrator
|
I don't think there's any way to understand why people do what they do. Hard to understand, though, why you'd put a bad shock back on is hard to understand.
By the way, the paint job is cool! Oh, I mean "hot". It looks like your truck is going so fast the front is glowing red. 
Gary, AKA "Gary fellow": Profile
Dad's: '81 F150 Ranger XLT 4x4: Down for restomod: Full-roller "stroked 351M" w/Trick Flow heads & intake, EEC-V SEFI/E4OD/3.50 gears w/Kevlar clutches
|
|
|
In reply to this post by taskswap
OK, request-for-advice time again. I figured out my high idle, just haven't solved it yet. A few of you suggested this and it was true: the electric choke is not coming off. I pulled the air cleaner to access "stuff" and noticed the choke plate was partially open. I let it warm up and it stayed open. Shoved a screwdriver down into the pawl and the choke came off, boom, perfect idle. Revved the engine, boom, back on high idle/choke.
The data sheet for my Holley Street Warrior says "Connect the electric choke lead (supplied) to the positive terminal of the choke cap. The other end must be connected to a good ignition activated 12-volt source. Hookup of this wire is not optional." It's a timer-based device, not electronically controlled. You give it power in START/RUN and an element slowly heats over a few minutes to take off the fast idle cam. This is what the p/o had it hooked to: 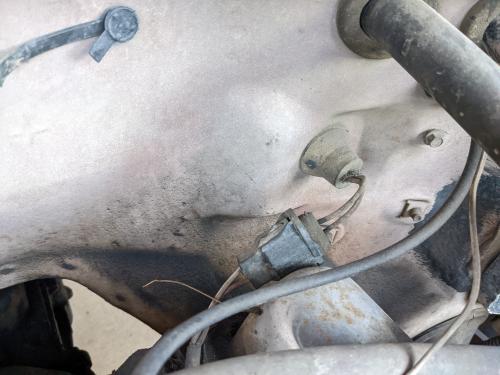 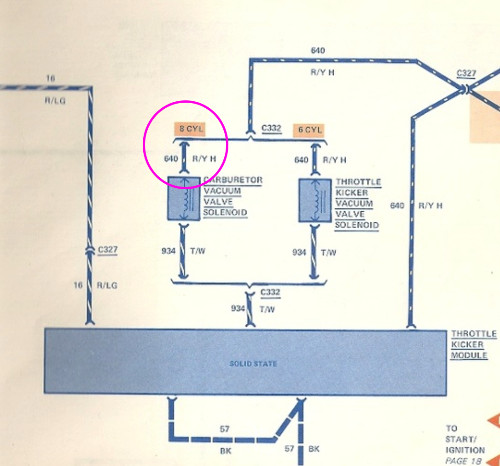 The tan/white wire was left just sitting there. I still don't totally understand the behavior of this throttle kicker but when I test it this wire doesn't have 12V on it. What's weird to me is it's the red/yellow-hash wire, which seems to go to a lot of places. I don't have my seat belt warning indicator hooked up right now (got new seatbelts and they didn't have a wire for it) but the EVTM says this also drives the tach and my tach is working. So I suppose there may be a break somewhere? Feeling silly now that I bothered to re-install the throttle kicker. I'm pretty sure it's not doing anything! What I'm thinking I should do is just take a direct (fused) feed right off the main solenoid. Any counter-suggestions?
--
1981 F-250 Custom. 6.6L V8, 4 barrel Holley carb, ARA aftermarket A/C. |
Re: "Rocky" - 1981 F250 Restoration
|
Administrator
|
The throttle kicker is strange. The write-up on how it works is below, and I don't think it will do what you need.
You can't come off the starter relay as it is hot all the time, or hot in Start only, depending on where you connect. But neither of those are what you want. I have installed a relay and pulled it in with either the stator terminal off the alternator. But you could use a source of switched power to pull the relay in. The advantage of the stator terminal is that it is only hot with the engine running where switched power is hot even if the engine isn't running but the key is on. 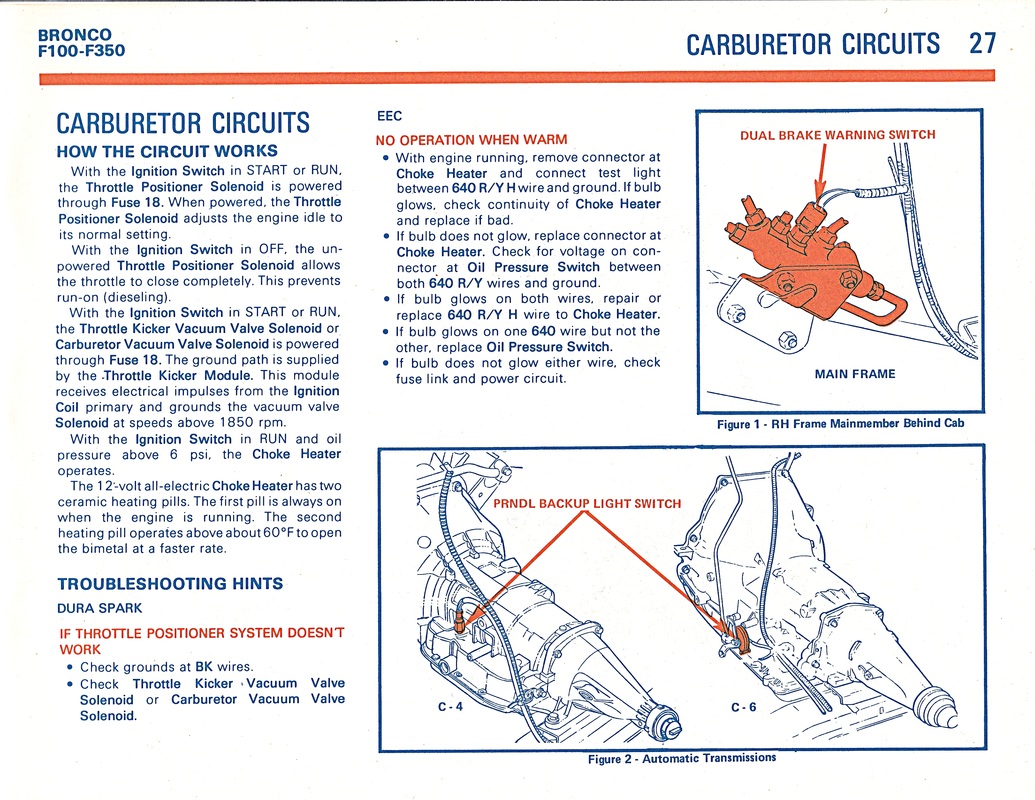
Gary, AKA "Gary fellow": Profile
Dad's: '81 F150 Ranger XLT 4x4: Down for restomod: Full-roller "stroked 351M" w/Trick Flow heads & intake, EEC-V SEFI/E4OD/3.50 gears w/Kevlar clutches
|
|
|
Thanks Gary. I'll try this tomorrow.
--
1981 F-250 Custom. 6.6L V8, 4 barrel Holley carb, ARA aftermarket A/C. |
|
|
So.... anybody remember a few pages ago in this thread when I mentioned this high idle and I said it was weird because I was almost sure it wasn't doing it when I first bought the truck?
That was foreshadowing. Anyway I fixed the high idle. The EVTM is sometimes the most useful resource and sometimes the most confusing. In particular, identifying mysterious connectors is very frustrating. Tracing out this circuit there's a connector C327 that pops up in a few spots. I can't find the illustration of it because although Ford seems to have provided one for every connector, they can pop up in weird places in the book. But anyway I started the the "obvious stuff" by replacing the fuse (which was still fine but corroding so why not, fuses are cheap), then I followed the mystery tan/red wire pair through the firewall. It comes out under the throttle kicker but doesn't connect to it. It goes to a 3-pin plug under the dash, I think this is C327. And in a shocking twist, mine was not connected. The SUPER weird thing is I have a specific photo of this in the pics I took while disassembling the dash to refurbish it. It was not connected in that photo either: 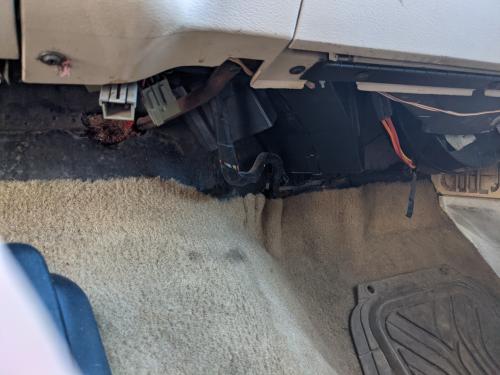 But it obviously should have been. As soon as I connected it, I had 12V at the choke, and after plugging that in my high idle came off. Actually it came off a little too soon - it's a cool but not freezing morning here (40F or so) and it stumbles badly until warmed up. I had to hold my foot on the pedal to get it past the jitters without dying. After reviewing the diagrams further it seems Ford's "California Version" of this engine actually has a named "choke heater" circuit, and it's normally wired to start with an oil pressure (6psi is specified) switch. I'm pretty sure I don't have that switch - this was aftermarket, not something broken. But it makes sense to me Ford would do that in an engine designed to use a choke heater because oil pressure would be a smart time to start that heater. Holley's book says this thing is designed to be fully heated in 2 minutes. I bet I spent at least a minute messing around and climbing back down off the engine before starting it, so I lost half my "choke time". An oil pressure switch would delay it even further. I'm not sure how hard something like this would be to install - I haven't poked around but I imagine if there isn't already a boss/port for such a switch, adding it would be beyond "driveway mechanic" category. I think earlier suggestions of manually controlling this with a switch would make sense. That would be an easy mod. Anyway if you like listening to engines: https://photos.app.goo.gl/y4wsqoCuP4KV1EK79 Speaking of mystery connectors, here's a set I can't seem to find in the books. There are three wires near the firewall on the driver's side that look like they plug together but they're disconnected and there's no way to match the three up that makes sense. In the books I see a camper relay module that might be related? But its connectors don't look quite right. Any thoughts what these might be? 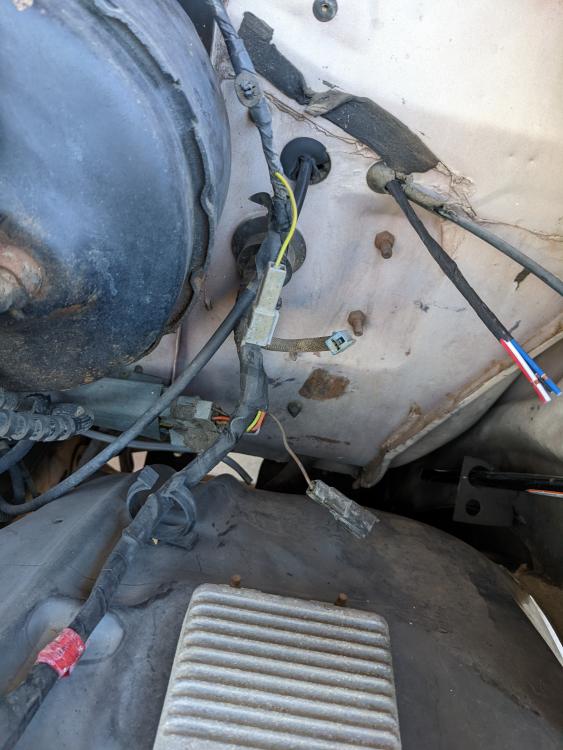
--
1981 F-250 Custom. 6.6L V8, 4 barrel Holley carb, ARA aftermarket A/C. |
Re: "Rocky" - 1981 F250 Restoration
|
Administrator
|
Glad you are getting things sorted.
On the oil pressure switch, the 460's use them in the fuel pump circuit. It'll certainly work. But it might be easier to wire up the relay I mentioned that is pulled in by the stator of the alternator. Obviously it would have the same results as an oil pressure switch. On the connectors under the hood, the yellow wire is Ckt 37 to either the marker light or aux battery relay. If not used it hangs in the breeze. And another one that hangs in that area is to the underhood light, and that wire will be LG/Y. 
Gary, AKA "Gary fellow": Profile
Dad's: '81 F150 Ranger XLT 4x4: Down for restomod: Full-roller "stroked 351M" w/Trick Flow heads & intake, EEC-V SEFI/E4OD/3.50 gears w/Kevlar clutches
|
| Edit this page |