"Rocky" - 1981 F250 Restoration


|
Thanks, I hope so.
Lots of trouble today. I reinstalled the axle shafts which went well enough, but I've lost ONE axle flange bolt. I'm sure it's somewhere but meanwhile looks like I need to find a replacement. I understand it's a 7/16-14 x 1-3/8 but I can't find one with a shoulder that isn't fully threaded. So that's a research project. Then I tried installing my master cylinder. The old one came out easily enough but I discovered my old MC has two 3/8-24 ports while the new one has a 3/8-24 for the rear and a 7/16-24 for the front  my lines came off cleanly and I didn't want to have to re-flare the end of the front line to change it. But the only adapter on Amazon wouldn't come for a week and I'm just fed up waiting for parts. I need this truck running. So I spent 2 hours driving to every auto parts store in town until I found the right adapter. I still don't think it's "right" because the male end is flat, not inverse-flare. I can't imagine it's sealing properly. So I ordered the proper one as well just to be safe. my lines came off cleanly and I didn't want to have to re-flare the end of the front line to change it. But the only adapter on Amazon wouldn't come for a week and I'm just fed up waiting for parts. I need this truck running. So I spent 2 hours driving to every auto parts store in town until I found the right adapter. I still don't think it's "right" because the male end is flat, not inverse-flare. I can't imagine it's sealing properly. So I ordered the proper one as well just to be safe.
I did bench-bleed the new MC although I don't know how well I did. I didn't seem to have ANY fittings that would match up and it didn't come with good plugs, which is kind of frustrating since this is a necessary step. It would have been $0.10 for them to include the plugs you need instead of just rubber caps. But anyway I was able to make do and got bubbles out of the bottom ports, I just don't know if I did it perfectly. Installing it was a chore too. This is the AC Delco "guaranteed to fit" part for my truck, but the casting is super rough. The bolt holes didn't line up! And what's frustrating is they were only like 1/16" out - not enough to work, but not enough to be "the wrong part" either. Fortunately it's cast iron which is pretty soft so I just dremeled a bit of clearance on both holes with a burr bit. But it was still an hour lost. Finally I went to bleed the system. This went... badly. I want to flush the ENTIRE system given how bad the original fluid was, so I bought plenty of fluid. But when I went to bleed the fronts I'm getting nothing through the ports. Totally clogged. I tried cleaning the bleeders but couldn't quite get them flowing. The rears flowed well enough - too well. I think the Dorman castings are pretty rough and don't make a good seal around the bleeders so they let air in the moment you crack them. I added a bit of thread tape to one and was able to get some flow but not the way it's supposed to. I threw in the towel when I ran out of time. Curiously, the parking brake and brakes in general seem to work fine although I know they're too dangerous to hit the road with, I'm certain there's air in there (as well as old fluid). But hey I guess it's something. Parts waiting on: - "Speed bleeders" - bought on a whim, why not try? - Proper adapter for MC 7/16" port - Master cylinder bleeder kit - might as well re-bleed it with a kit designed for the job - Bleeder covers - I don't even remember at this point Winter storm coming. Looks like I'm going to get stuck another few days again. And (this seems to be a regular thing) eTrailer let me down again. When I ordered the camper tie-downs so I could go get the new camper with the RAM, they predicted it would arrive Monday. Great. But I just got the shipment notice on it today so I guess that dog won't hunt.
--
1981 F-250 Custom. 6.6L V8, 4 barrel Holley carb, ARA aftermarket A/C. |
Re: "Rocky" - 1981 F250 Restoration
|
Administrator
|
You are really having "fun" with this project. Sorry!
On the master, I think you got one for an HD truck and yours isn't, or vice versa as that's about the difference in the bolt patterns. As for the bleeding, that's where the later master comes into play as you can put a cap on with a fitting and give the system 3-5 psi of pressure and go bleed the system. But I'm not sure that little bit of pressure would be enough to punch through the gunk in the system. Still, it would be worth a try.
Gary, AKA "Gary fellow": Profile
Dad's: '81 F150 Ranger XLT 4x4: Down for restomod: Full-roller "stroked 351M" w/Trick Flow heads & intake, EEC-V SEFI/E4OD/3.50 gears w/Kevlar clutches
|
|
|
You are being made to work hard and hard work will pay off. Keep at it!
1985.5 F-150 XL Explorer standard cab 5.0 EFI AOD 4x4
Daily Driver. We call her Eunice the Ute. 1982 Bronco XLT Lariat 351W AOD 4x4 Code name Esperanza, or Espy to her friends. Please see my Project thread for the blow by blow. 1984 F-350 XL Centurion crew cab 460 T19 4x4 "Eylza Dual-little" |
|
|
Thanks guys. The encouragement always helps.
On the "gunk" topic I think I'm going to try what I did when I first replaced the rear brake cylinders. Before even connecting the hoses to the cylinders, I hooked the vacuum right to the hose and pulled fluid through the line until it ran clear. That's really easy to do for the rear lines where the hard lines connect right to the cylinder because the plastic tube for the vacuum fits right over the flare fitting. I think it will be worth figuring out for the fronts anyway as well because I'm going to replace the lines too. In fact they just came this evening. My lines still work, but they're really cracked so I figured the end was near. When I'm installing the new line it'll give me an excuse to put some kind of fitting on the end to vacuum those as well. I think once I'm done the only brake system parts I won't have replaced are the drums (they seemed fine), rotors (so far I haven't noticed any wobble to suggest they're warped) and hard lines, plus the booster I'll start watching for. So at the very least I've cut out the vast majority of failure points, if nothing else...
--
1981 F-250 Custom. 6.6L V8, 4 barrel Holley carb, ARA aftermarket A/C. |
Re: "Rocky" - 1981 F250 Restoration
|
Administrator
|
Sounds like a good plan. And if you need to replace the rotors or drums you don’t have to get into the hydraulic system.
Gary, AKA "Gary fellow": Profile
Dad's: '81 F150 Ranger XLT 4x4: Down for restomod: Full-roller "stroked 351M" w/Trick Flow heads & intake, EEC-V SEFI/E4OD/3.50 gears w/Kevlar clutches
|
|
|
When I got my 150 and Bronco I went through the brakes as the first thing. New braided lines, new pads, shoes, rear slaves, springs. I didn’t need to mess with the MC or hard lines or front calipers.
It is time and money well spent. If you have the self adjusting rear widget, don’t forget to do some sharp braking in reverse to set it… ask me how I know!
1985.5 F-150 XL Explorer standard cab 5.0 EFI AOD 4x4
Daily Driver. We call her Eunice the Ute. 1982 Bronco XLT Lariat 351W AOD 4x4 Code name Esperanza, or Espy to her friends. Please see my Project thread for the blow by blow. 1984 F-350 XL Centurion crew cab 460 T19 4x4 "Eylza Dual-little" |
|
|
Thanks for the reminder on the adjusters. I still don't have the wheels on (it's on jack stands) so I did an initial run-in going in reverse and then braking, but you reminded me that when I checked them my driver's side feels set about right but passenger's side is still a little loose. I'll give it a few more clicks this weekend when the storm moves back out.
On hold again waiting for parts (and snow to go away).
--
1981 F-250 Custom. 6.6L V8, 4 barrel Holley carb, ARA aftermarket A/C. |
|
|
Had a lot of trouble bleeding the brakes, but did make small progress. None of the bleeders had caps so they were all hopelessly clogged - I couldn't even get good flow after clearing them out with paperclips or drill bits.
I replaced my rear cylinders so those came with new bleeders, but they were so roughly made that they'd suck air around the threads if I cracked it even a quarter turn. I just couldn't get a good reliable "bleed" out of them with a vacuum pump and didn't have a helper handy (kids are at school) to do it the normal way. And with the fronts passing nothing at all, I figured I'd give these "Speed Bleeders" they sell a try. Boy am I a fan! Easiest brake bleed I've ever done, just attach a hose to a waste catcher, crack a quarter turn, and pump the pedal like you're used to. I bled both rears until they ran clear and no air bubbles and the pedal firmed right up. I only did the rears so far because it's cold and wet out (snowstorm last night). I have the rear wheels off, so I can get to those bleeders easily just by kneeling. For the fronts, I either have to remove the wheels (too dangerous parked on a hill with the rear axle on jack stands) or crawl under (to cold and icy from last night's snowstorm). I'll do them tomorrow or Saturday. Typical Colorado. It was -5 today with wind chill. It'll be 55 on Saturday.
--
1981 F-250 Custom. 6.6L V8, 4 barrel Holley carb, ARA aftermarket A/C. |
Re: "Rocky" - 1981 F250 Restoration
|
Administrator
|
Progress!
 I haven't used speed bleeders, but at ~$15/pair from what I see online they'd be well worth it. However, you said your castings are quite rough. Did the speed bleeders not suck air around the threads? I see that they appear to have some form of thread sealer, so does that really work?
Gary, AKA "Gary fellow": Profile
Dad's: '81 F150 Ranger XLT 4x4: Down for restomod: Full-roller "stroked 351M" w/Trick Flow heads & intake, EEC-V SEFI/E4OD/3.50 gears w/Kevlar clutches
|
|
|
Actually it was the bleeders that were rough. The threads look like they were rolled around in sand or something. I'll try to get a good pic tomorrow. I did actually try the teflon tape trick but just couldn't get a good seal. I did not try grease or other things folks usually use. Mostly I was kind of already looking for an excuse to try something new, so... I've read reviews that say these speed bleeders don't have "enough" sealant but they were on older versions that did look in photos like they only had sealant on 3-4 threads. The ones I got, the sealant was more like 7-8 threads. That must do the trick because these seemed to work fine. But I think they would work even without sealant. Think about it, with normal bleeders if you want to go solo you usually use a vacuum pump - that's what I was doing. You draw like a 20-25psi vacuum on the bleeder then crack it. But now you have this huge vacuum right at the bleeder port so if there's even the tiniest leak around the threads, air is going to flow better than fluid and you get bubbles. With these speed bleeders you're back to the old brake pedal method, "pushing" the fluid down to the cylinder. The MC doesn't suck fluid back to it, mostly it's just the return springs pushing it back. Since there's no strong vacuum being developed, I think you'd need little to no sealant to keep air from getting back in. Whatever token amount is there is probably more than enough. For what it's worth while these do let you go solo I think it's still worth having an assistant if you can manage it. It's still easier than crack-step-hold-close-release-crack-step-hol.... over and over but with an assistant you can get a better look at the fluid flow so you know when the bubbles are out. Saves having to dump half a bottle of fluid "just to be sure"... BTW I did get new soft lines for the front-left/front-right/rear-center but decided not to replace them just yet. It was too cold today and I think my lines are end of life but not a "tomorrow" project. I got all the parts - new washers, bolts, clips, lines, etc, but I noticed especially on my rear center connector that the 3/8 flare fittings are in really bad shape. I'm worried about breaking one because I don't have the materials or tools right now to repair those. So probably I'll wait and order some new hard lines as well and replace all the lines at once. Until then these parts are small. I think I can just keep them in an "emergency repair kit" in the truck with those plus a (new, sealed) bottle of fluid. I'll keep a sharp eye on them for any signs of leaks over the next few months, and if I have to do a field repair I can manage it. I won't be driving the truck much, mostly just to a few shops for things like draining the R-12 from my A/C. I'll re-visit this in April or May once the weather warms up a bit more.
--
1981 F-250 Custom. 6.6L V8, 4 barrel Holley carb, ARA aftermarket A/C. |
Re: "Rocky" - 1981 F250 Restoration
|
Administrator
|
Oh! The bleeders were rough! I missed that.
But instead of tape I’d use thread sealant goo. It doesn’t set up nor peel off. Anyway, sounds like the bleeders work well. Good to know. And your plan seems good as well. 
Gary, AKA "Gary fellow": Profile
Dad's: '81 F150 Ranger XLT 4x4: Down for restomod: Full-roller "stroked 351M" w/Trick Flow heads & intake, EEC-V SEFI/E4OD/3.50 gears w/Kevlar clutches
|
|
|
Yeah, I never really got a good pic but the threads were very rough. Hard to explain. I didn't have any teflon paste on hand (my tube had cracked and dried out) and teflon tape didn't seem to help. But anyway the speed bleeders did well.
Had a win-some-lose-some day today. I managed to get some Torklift mounts on my RAM to carry the camper (hoping to pick it up this week). But Rocky is still not street-ready. First, I had thought I fixed my high idle by plugging in that wire under the dash, but all was not to be. I've run the truck a few more times over the past week or so and it was still idling high. I brought out my DMM and wasn't measuring 12V on that red wire anymore. There must be some mystery to what's going on, but I was kind of tired of dealing with it at this point. Having it idle at 2000rpm once warmed up makes it really hard to drive because the synchros are already pretty worn, so you need to come to a COMPLETE stop to get it in 2nd. Looking for a quick temporary fix, I just tossed an add-a-circuit fuse into the fuse block on a hot-in-START/RUN circuit (heater/AC), ran a wire out through the firewall and threw a FastON connector on the end. Plugged that into the choke heater and boom, problem solved for now. I didn't put a switch on it because this is a temporary solve but at least it idles at like 800rpm now. Next I tackled the brakes. Or I thought I did. I had my son help me bleed the system not because the speed bleeders don't work but just so I could watch the line until the air was out. Why waste more fluid than I have to. It seemed to go OK and we had a firm pedal (and I couldn't rotate either wheel by hand) by the end of it so I threw the wheels back on and got the truck back down off the jack stands. I wish I hadn't done that. My parking brake, the entire reason for pulling this all apart, still doesn't work. The regular brakes work fine but on even a moderate hill the truck rolls easily if only the parking brake is set. Researching forum posts here and elsewhere it seems like a common complaint about these Dorman brake cable replacements is that they aren't quite "right". As some others have posted, my left/right cables don't come out of their sleeves the same amount so the adjuster doesn't hang level. And perhaps they aren't moving enough to engage the brakes fully. I can definitely step on the pedal and get it to the second position, but no matter how much I set the adjuster it doesn't seem to hold anything. Sadly it seems like the only option is to pull the wheels, hubs, and drums back off again and look at the parking brake levers. I guess they're supposed to have a certain amount of travel, and a common complaint about these Dorman replacements is the springs/ends are too long so they don't travel the right amount. Anybody have any other ideas? I'll definitely do it if required but boy what a shame, I had them all lubed and sealed up... Anybody have a source for a cable replacement other than Dorman? That's all I could find and they don't seem "right". They enter the drums at a different angle and with a different attachment than stock, their ends are different left vs. right (despite their book saying this is the correct part), etc. It's hard not to assume they're the problem...
--
1981 F-250 Custom. 6.6L V8, 4 barrel Holley carb, ARA aftermarket A/C. |
|
|
Oh dont get me started on the Ebrake cables.
I dont remember who the first set came from or who made them but the spring was so long it hung down below the backing plate so there was no way the drums would go on. I cut the spring shorter just so I could get the drums on but I think they are still to long and coil bind as it dose not hold vary good. I got a second set again dont remember from who or made them and the spring also looked too long. I never took them out of the package. I just got a set from Rock Auto think Raybestos or Wagner and the springs look like they will work. I have not installed them yet so cant say for sure on the fit. I can check on who makes them tomorrow. Dave ----
Dave G.
81 F100 flare side 300 six / AA OD / NP435 / 2.75 gear http://cars.grantskingdom1.com/index.php/1980-Ford-F100?page=1 81 F100 style side 300 six/SROD parts truck -RIP http://cars.grantskingdom1.com/index.php/1981-Ford-F100 |
|
|
Yeah report back here if you have any input? I saw the Raybestos but between Rock Auto and others they wouldn't be here for another 10 days. I was able to get the AC Delco ones (188386 and 188387) should be delivered in the next 4-5 days so I figured I'd give those a try.
If I'm pulling off my drums, I'm taking out those Dorman cables either way. When I do I'll post measurements. Sadly I threw out my factory cables, the trash service was rolling up the street and I was stuffing every little bit I could into the cans. Wish I'd saved them for reference... If anybody still has their stock cables it might be a good number to know in the archives... (Total length of each cable plus length from end of brake-housing clip to end of spring...)
--
1981 F-250 Custom. 6.6L V8, 4 barrel Holley carb, ARA aftermarket A/C. |
|
|
I had nothing to go by on my truck so when I got the new cables I figured I was good to go ..... wrong!
On the length of the new cables I also think the inner part were to long as I had to take up (shorten) the front cable besides the spring. As I was typing this it just hit me I may have cables on the parts truck axle, thing is getting to it as it was pushed under the Gremlin and stuff piled around it Will see about going out to the garage, 25*f here after it being in the 70's, to see who the latest cable are made by and part numbers. I will also try and dig through my binds and find the 2nd set of cables, who made them and part numbers too. Dave ----
Dave G.
81 F100 flare side 300 six / AA OD / NP435 / 2.75 gear http://cars.grantskingdom1.com/index.php/1980-Ford-F100?page=1 81 F100 style side 300 six/SROD parts truck -RIP http://cars.grantskingdom1.com/index.php/1981-Ford-F100 |
|
|
This post was updated on .
Ok first the truck
81 F100 Flare side rear drum brakes size? large bolt pattern. The rear Ebrake cables I dont know who I got them from but the springs that push the arm back were way to long and could not get the drums on. 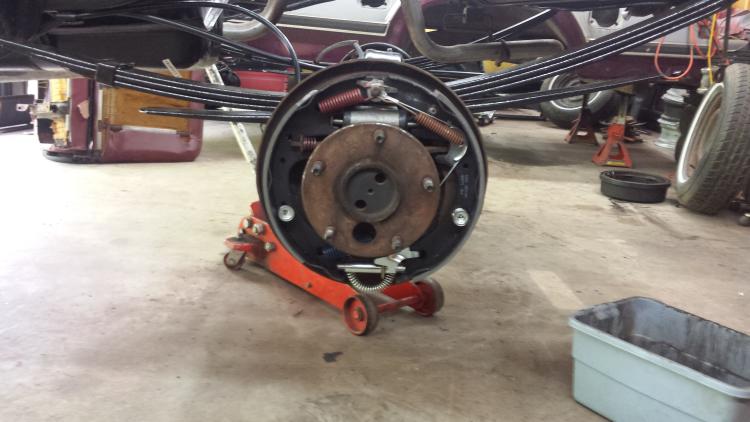 The cable set I just got from Rock Auto are Raybestos BC93343 & BC93232 and both have springs that measure 5.5" The other set I bought but thought the spring were also to long are Raybestos Note this is for the van not the F1xx truck see below BC93524 & BC93014 and both have springs that measure 6" I did not lay them out to get a length of inner & outer cables as they are still wire tied in the boxes and dont want to open up all the way just yet. I dnot know why the different part numbers as I am sure I ordered all cables for my truck based on what the web site had posted. The plan is to use the 5.5" springs cables and hope they work better than the spring cut ones I have on the truck now. Again I think I am getting coil bind as the pedal will not go any more but the truck can still be moved forward and if on a little hill backwards it will roll. For what its worth hope this helps others. Dave ----
Dave G.
81 F100 flare side 300 six / AA OD / NP435 / 2.75 gear http://cars.grantskingdom1.com/index.php/1980-Ford-F100?page=1 81 F100 style side 300 six/SROD parts truck -RIP http://cars.grantskingdom1.com/index.php/1981-Ford-F100 |
|
|
I did a little more digging on the cables I listed the part numbers for and happy I got the last set from Rock Auto as they were listed for my truck.
The cable set I just got from Rock Auto are Raybestos BC93343 cable lengths 60.380 / 47.625 80 to 91 F100 & F150 BC93232 cable lengths 93.250 / 80.432 80 to 83 F100 The other set I bought but thought the spring were also to long are Raybestos Note this is for the van not the F1xx trucks BC93524 cable lengths 54.440 / 38.125 80 to 91 E100 & E150 BC93014 cable lengths 66.880 / 51.000 80 to 91 E100 & E150 So I will need to mark the boxes that are in the parts bin for what they fit as I will forget if I have not already LOL Dont know how I got ones for a van? Dave ----
Dave G.
81 F100 flare side 300 six / AA OD / NP435 / 2.75 gear http://cars.grantskingdom1.com/index.php/1980-Ford-F100?page=1 81 F100 style side 300 six/SROD parts truck -RIP http://cars.grantskingdom1.com/index.php/1981-Ford-F100 |
|
|
Thanks for the detail! I'll post back on mine once the new ones arrive. I now have the Dorman, with the ACDelco on their way. That should give us data on several options.
Today was a progress-not-progress kinda day. I started by looking up more tuning options for the Holley Street Warrior now that I have a handle on the high idle not coming off. I made three more adjustments: I adjusted the choke itself to "come off later" (one notch), the high idle up a quarter turn, and the curb idle up a quarter turn. My emissions label calls for 1750 and 600 for these, respectively. I'm at 1600 and 700 so I may tweak it some more but you can only test it when the engine's cold so I figured I'll tweak it a bit more later this week. Typical Colorado - the one day I need it to be cold (bear in mind it was low-20s all last week) it was sunny and 63! I did a little more wet sanding and buffing on the passenger side. I'm not ready to post a pic yet but I'm pretty happy with how it's coming out. Honestly, if you don't want a showroom finish, I think you can go pretty far with rattle cans and the right wet/dry sandpaper, plus a decent polisher and the right compound. There are plenty of rough spots but only in places where I ran out of patience and energy. It was good enough to feel like progress, anyway. Next task was back to the brakes. I was pretty enthusiastic about the Speed Bleeders on the rear brakes but ran into a problem on the fronts. They aren't long enough. They bottomed out on the threads/nut before sealing against the inner sealing face so when I had my wife step on the pedal, brake fluid sprayed everywhere! And this was on a day I'd actually bothered to lay out my pig mat (LOVE that product btw) but it sprayed so far it missed the mat entirely. Sigh. Over to the bench with the old bleeders, I can't get stopped another few days. I worked on them for about 15 minutes with brake cleaner, tiny drill bits, picks, and dremel brass brushes (to clean up the threads) and was finally able to get them reasonably clean and passing air/fluid without blockage. If you don't have covers on your bleeders get some, they're worth it! After that I went around twice bleeding all the brakes the "old way". After about 1.5qts I finally felt like everything was running completely clear/clean and bubble-free, and we had a hard pedal so I topped off the MC and called that done. On a whim I decided to try the parking brake once more so I fired it up, reversed up off the chocks about a foot (I'm parked facing downhill in my driveway at the moment), applied it firmly and let it settle. Nope, rolls right back down. I'll table this until I get the new cables. When I first bought this truck, while I was replacing the wheels I inspected the front disc brakes pretty closely and everything seemed fine, but I didn't pull the calipers off. Given the circus that was the rear drums and bearings, I went ahead and ordered a bunch of front-wheel bearings, seals, and so on. I probably won't tear into there in the next few days, but it's definitely on the radar. Next major job is fixing leaks. I have an oil leak somewhere and while it's not massive (a few drops a day I would judge) it's a problem in an uptight suburban neighborhood with an HOA.  I've been using Chomp Pull it Out to deal with it so far (if you've never tried this stuff it's amazing) but that can't last forever. The big fear is a rear main seal but I don't think it's that, actually. There's noticeably wet/oily leakage around the rear (near the steering wheel) corner of my driver's side valve cover. I got new valve cover gaskets from LMC on the way but I'm also debating replacing the whole cover. It's an aftermarket Edelbrock which is fine but I would NOT put it past the previous owner to have thrown on some junkyard find, maybe without even cleaning it up. I would not be shocked at all if there was a ding or scratch back there. I've been using Chomp Pull it Out to deal with it so far (if you've never tried this stuff it's amazing) but that can't last forever. The big fear is a rear main seal but I don't think it's that, actually. There's noticeably wet/oily leakage around the rear (near the steering wheel) corner of my driver's side valve cover. I got new valve cover gaskets from LMC on the way but I'm also debating replacing the whole cover. It's an aftermarket Edelbrock which is fine but I would NOT put it past the previous owner to have thrown on some junkyard find, maybe without even cleaning it up. I would not be shocked at all if there was a ding or scratch back there.
--
1981 F-250 Custom. 6.6L V8, 4 barrel Holley carb, ARA aftermarket A/C. |
Re: "Rocky" - 1981 F250 Restoration
|
Administrator
|
Progress!!!! Loving it!
Yes, there are steps backward, but you are making more steps forward than backward, so it is progress. On the front discs, you can rebuild the calipers for next to nothing. The casting is usually fine and you just need a new piston and seals. That's it.
Gary, AKA "Gary fellow": Profile
Dad's: '81 F150 Ranger XLT 4x4: Down for restomod: Full-roller "stroked 351M" w/Trick Flow heads & intake, EEC-V SEFI/E4OD/3.50 gears w/Kevlar clutches
|
|
|
I'm considering it. For now I may hold off a little while. As near as I can tell this truck only ever HAD front brakes for the last N-thousand years of its life. For sure the rears were doing nothing, they were missing half their shoe linings and the wear marks suggested only a portion of what was left was doing anything at all.
So far the pattern with this truck has been "If it's old/original, it may need service/inspection. If it's been serviced, it was probably done wrong and needs a total rebuild." This should be a big week. The weather is warming up which makes for more "work on it" time, and I also will hopefully be picking up Bullwinkle: 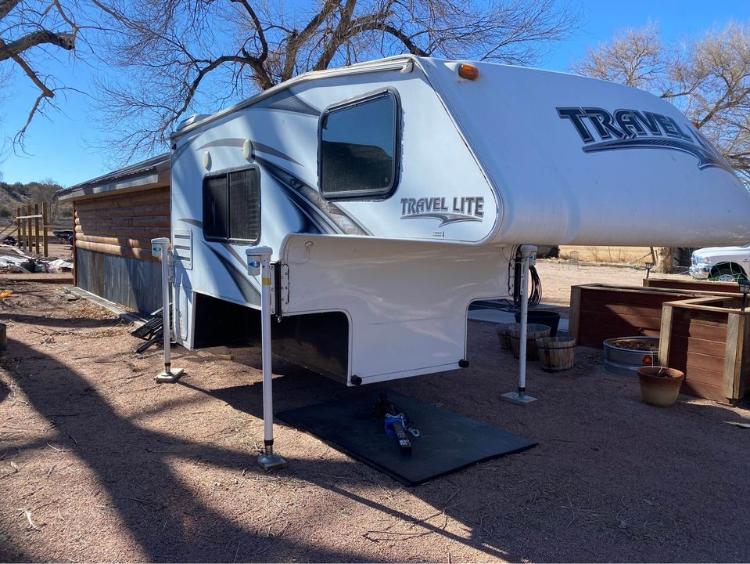 Since I got the mounts installed on the RAM (who I shall henceforth be calling Mr. Peabody), I'm going to use that to go pick the camper up (assuming the credit union gets all their stuff sorted out tomorrow). But long term, the camper will spend more time with Rocky than Mr. Peabody. As is appropriate...
--
1981 F-250 Custom. 6.6L V8, 4 barrel Holley carb, ARA aftermarket A/C. |
| Edit this page |