Installation Of A Pormido 998 Mirror/Camera System

Re: Installation Of A Pormido 998 Mirror/Camera System

Administrator
|
It would be interesting to document the badge/cameras that will fit the 82-86 grilles.
Gary, AKA "Gary fellow": Profile
Dad's: '81 F150 Ranger XLT 4x4: Down for restomod: Full-roller "stroked 351M" w/Trick Flow heads & intake, EEC-V SEFI/E4OD/3.50 gears w/Kevlar clutches
|
Re: Installation Of A Pormido 998 Mirror/Camera System
|
Administrator
|
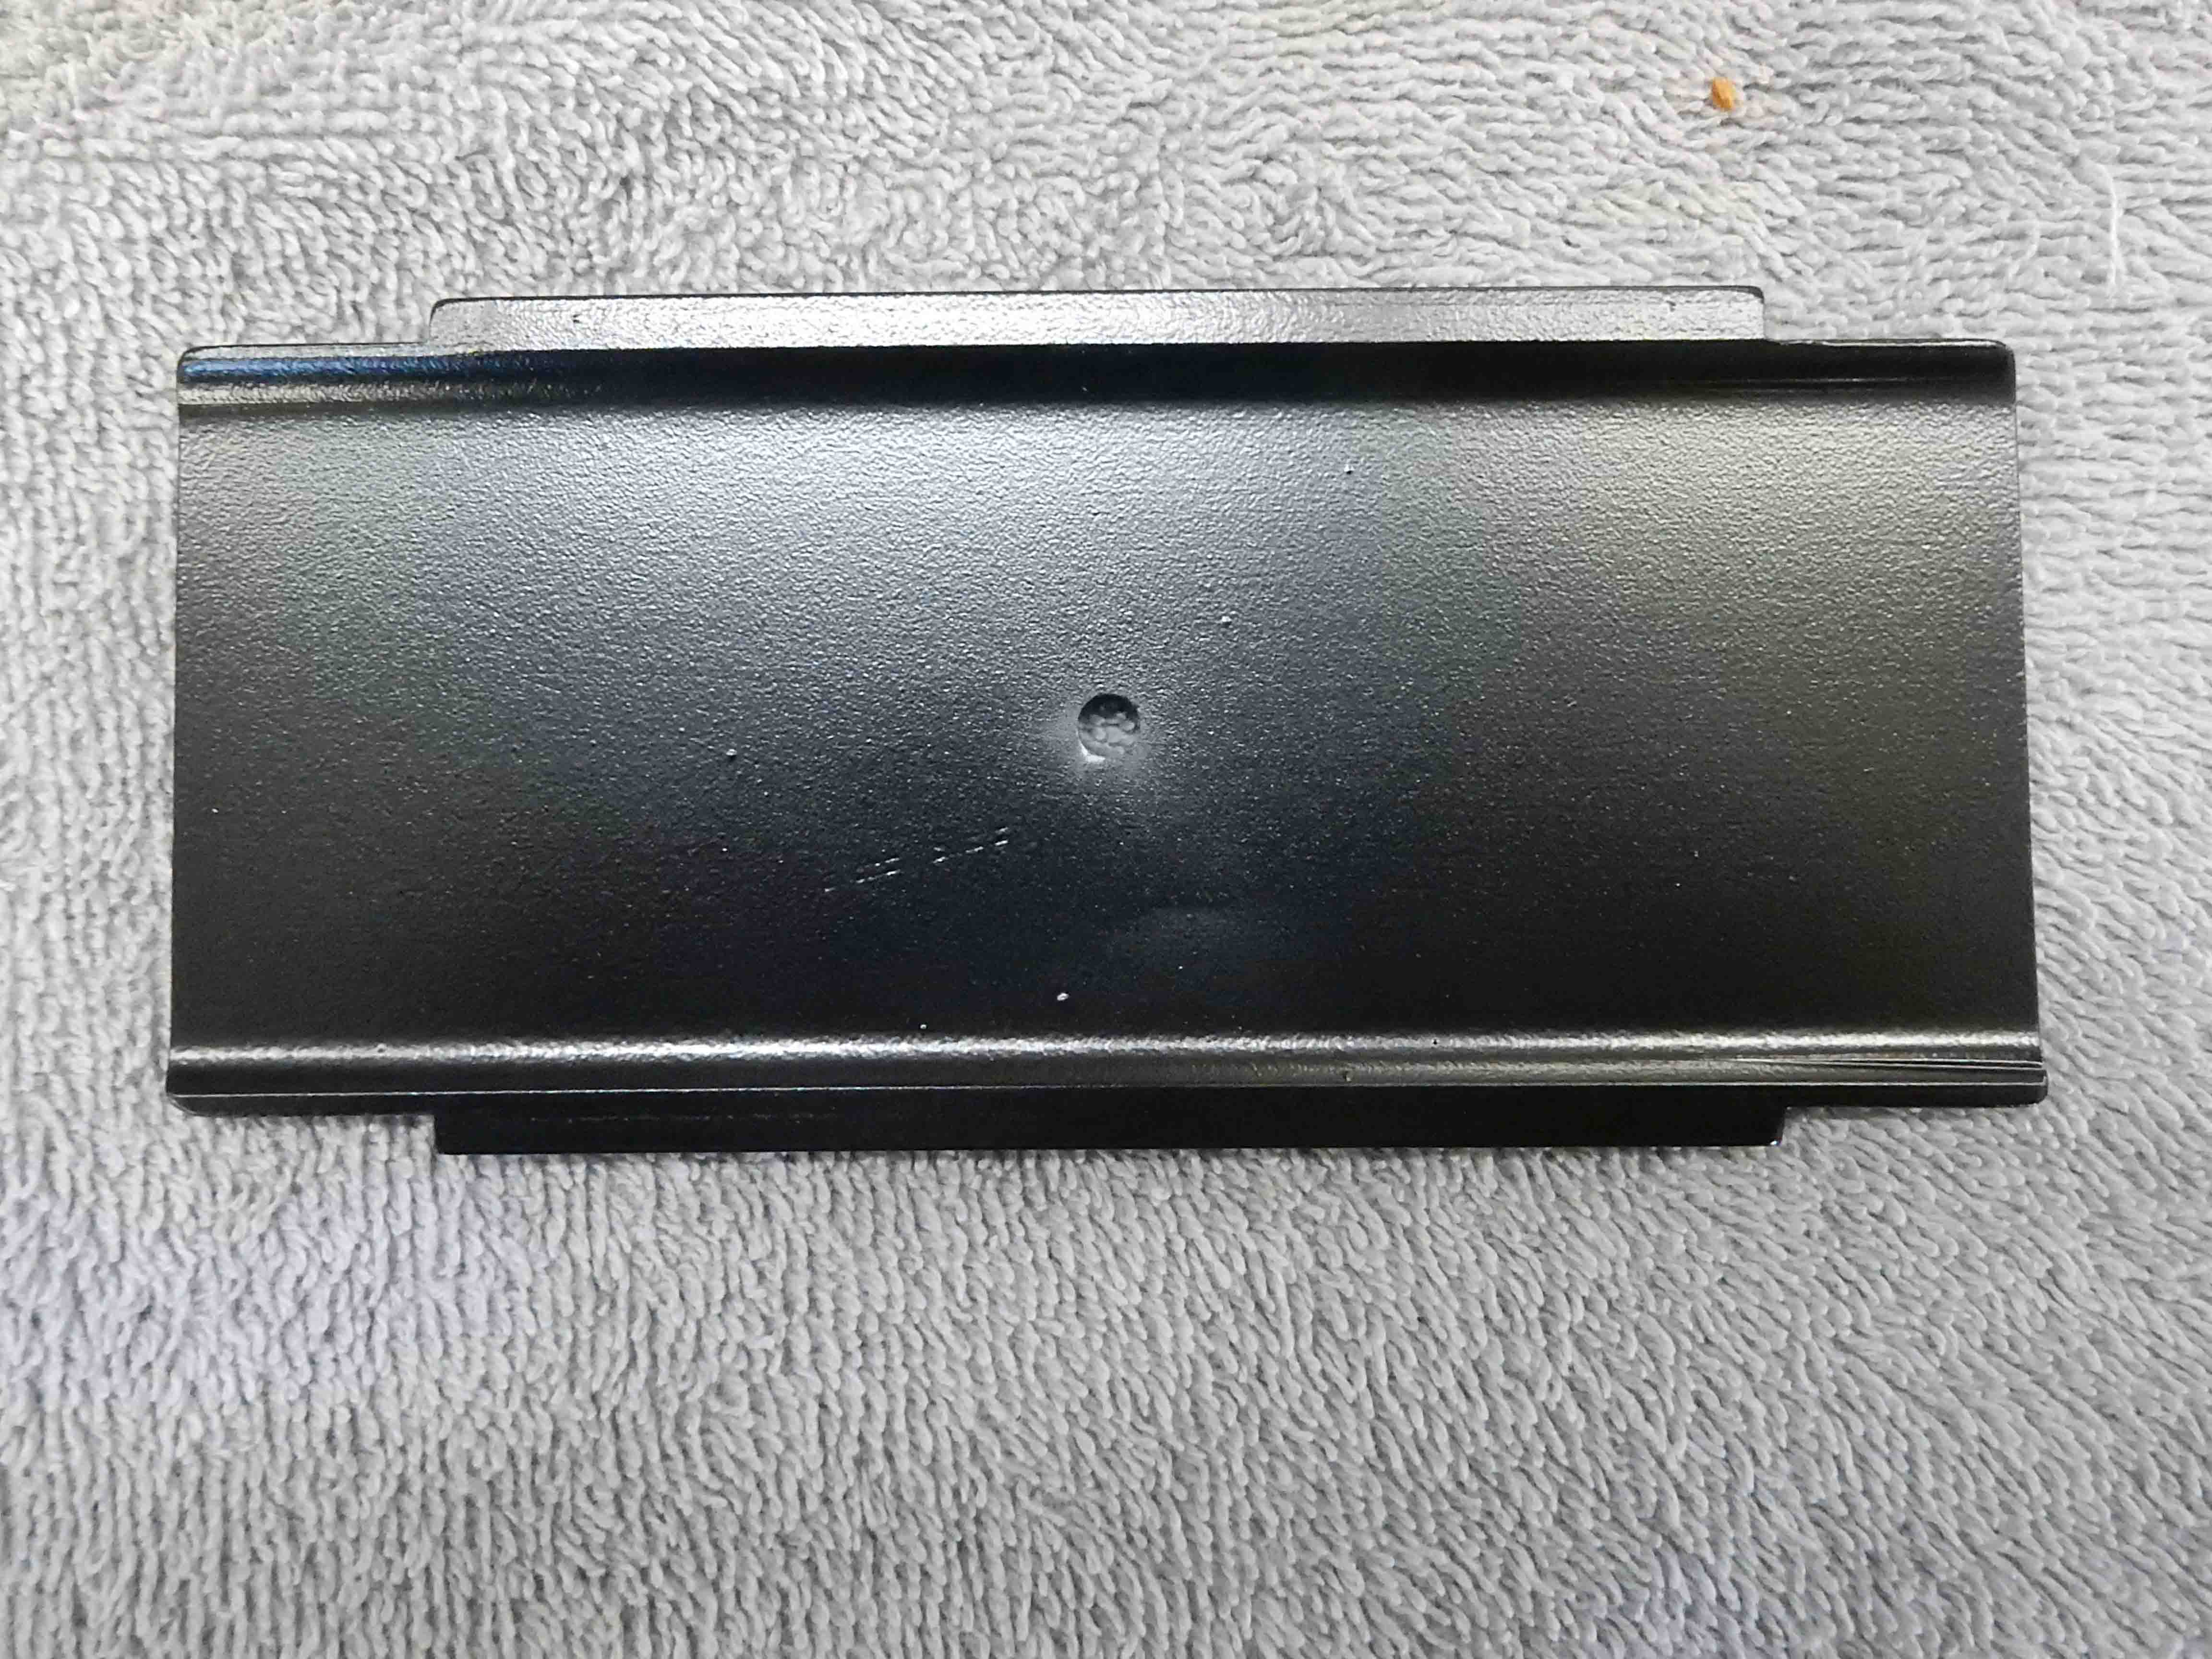
Making progress. Got the adapter plate powder coated today, and in satin black you can now see it:
 And here 'tis mounted on the mirror: 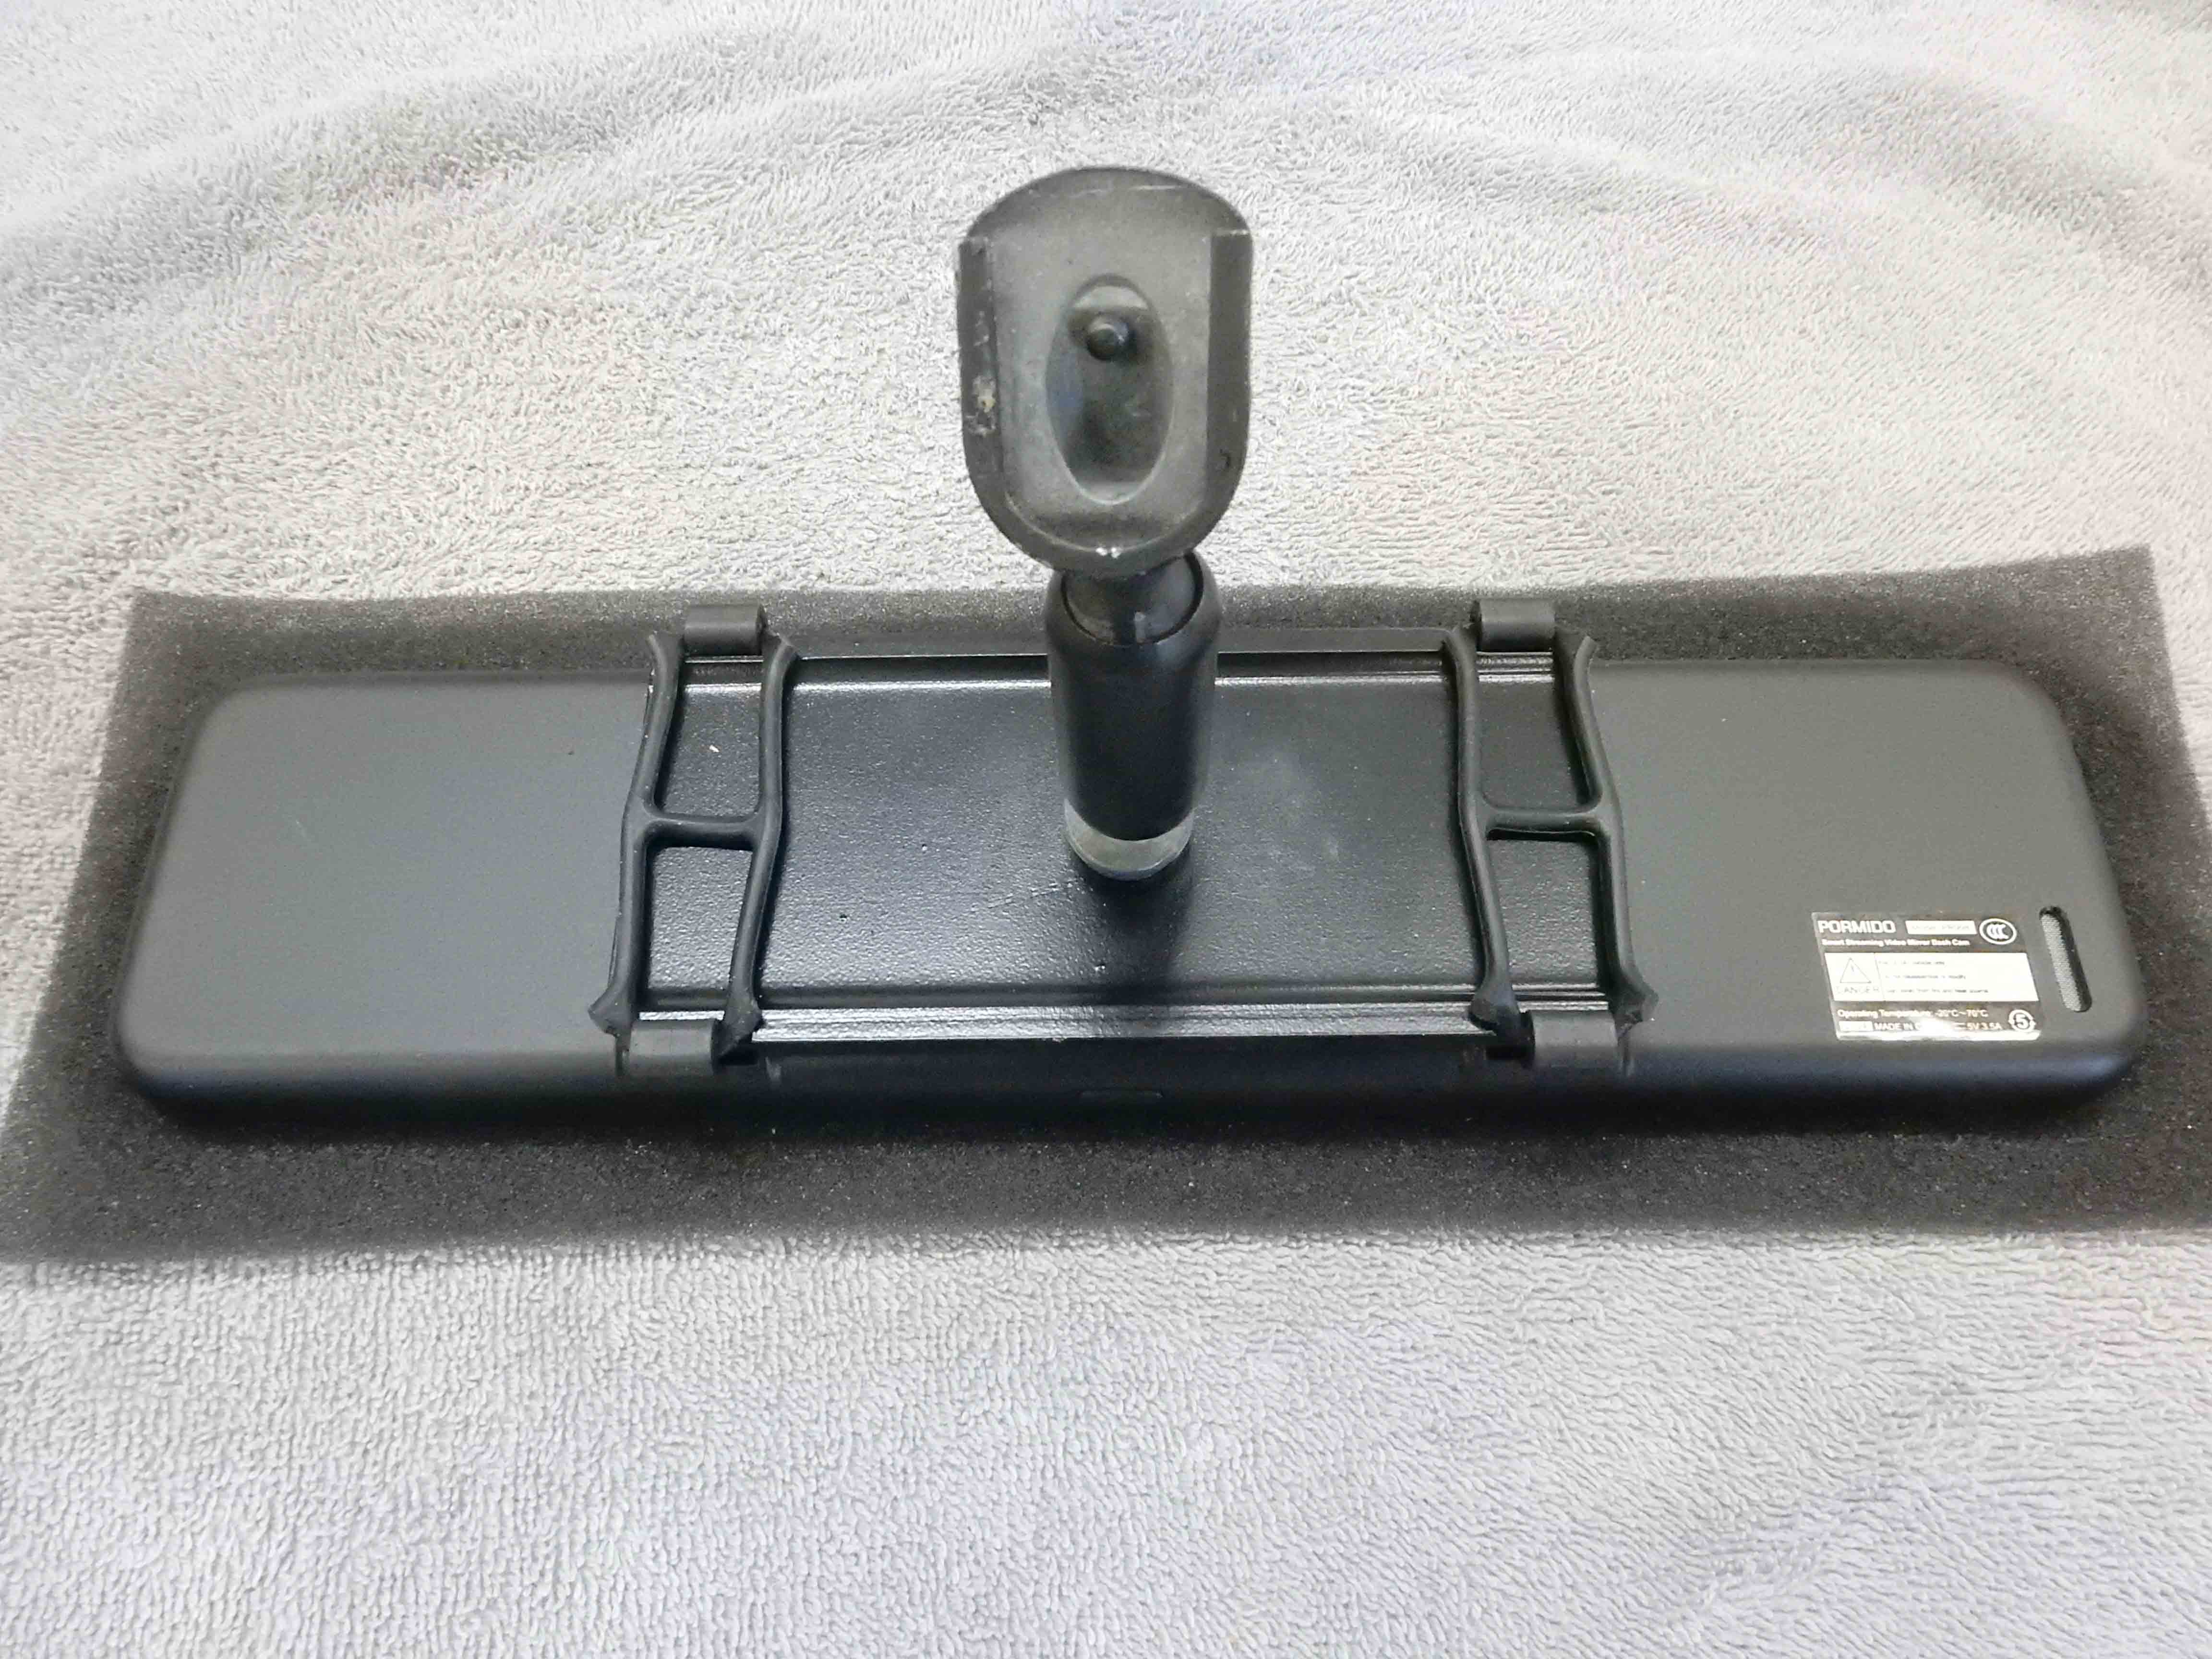 And a couple of shots of the mirror installed. But, there's a minor problem. If you scroll back up you'll see that I centered the hole for the arm to mount to. However, if you look at one of the Bullnose mirrors you'll see that the arm attaches toward the top of the mirror. So I really should drill a hole 1" higher and lower the mirror that much. You can see in the shot below that at this height the microphone for the hands-free is visible in the mirror, so lowering it 1" would help. 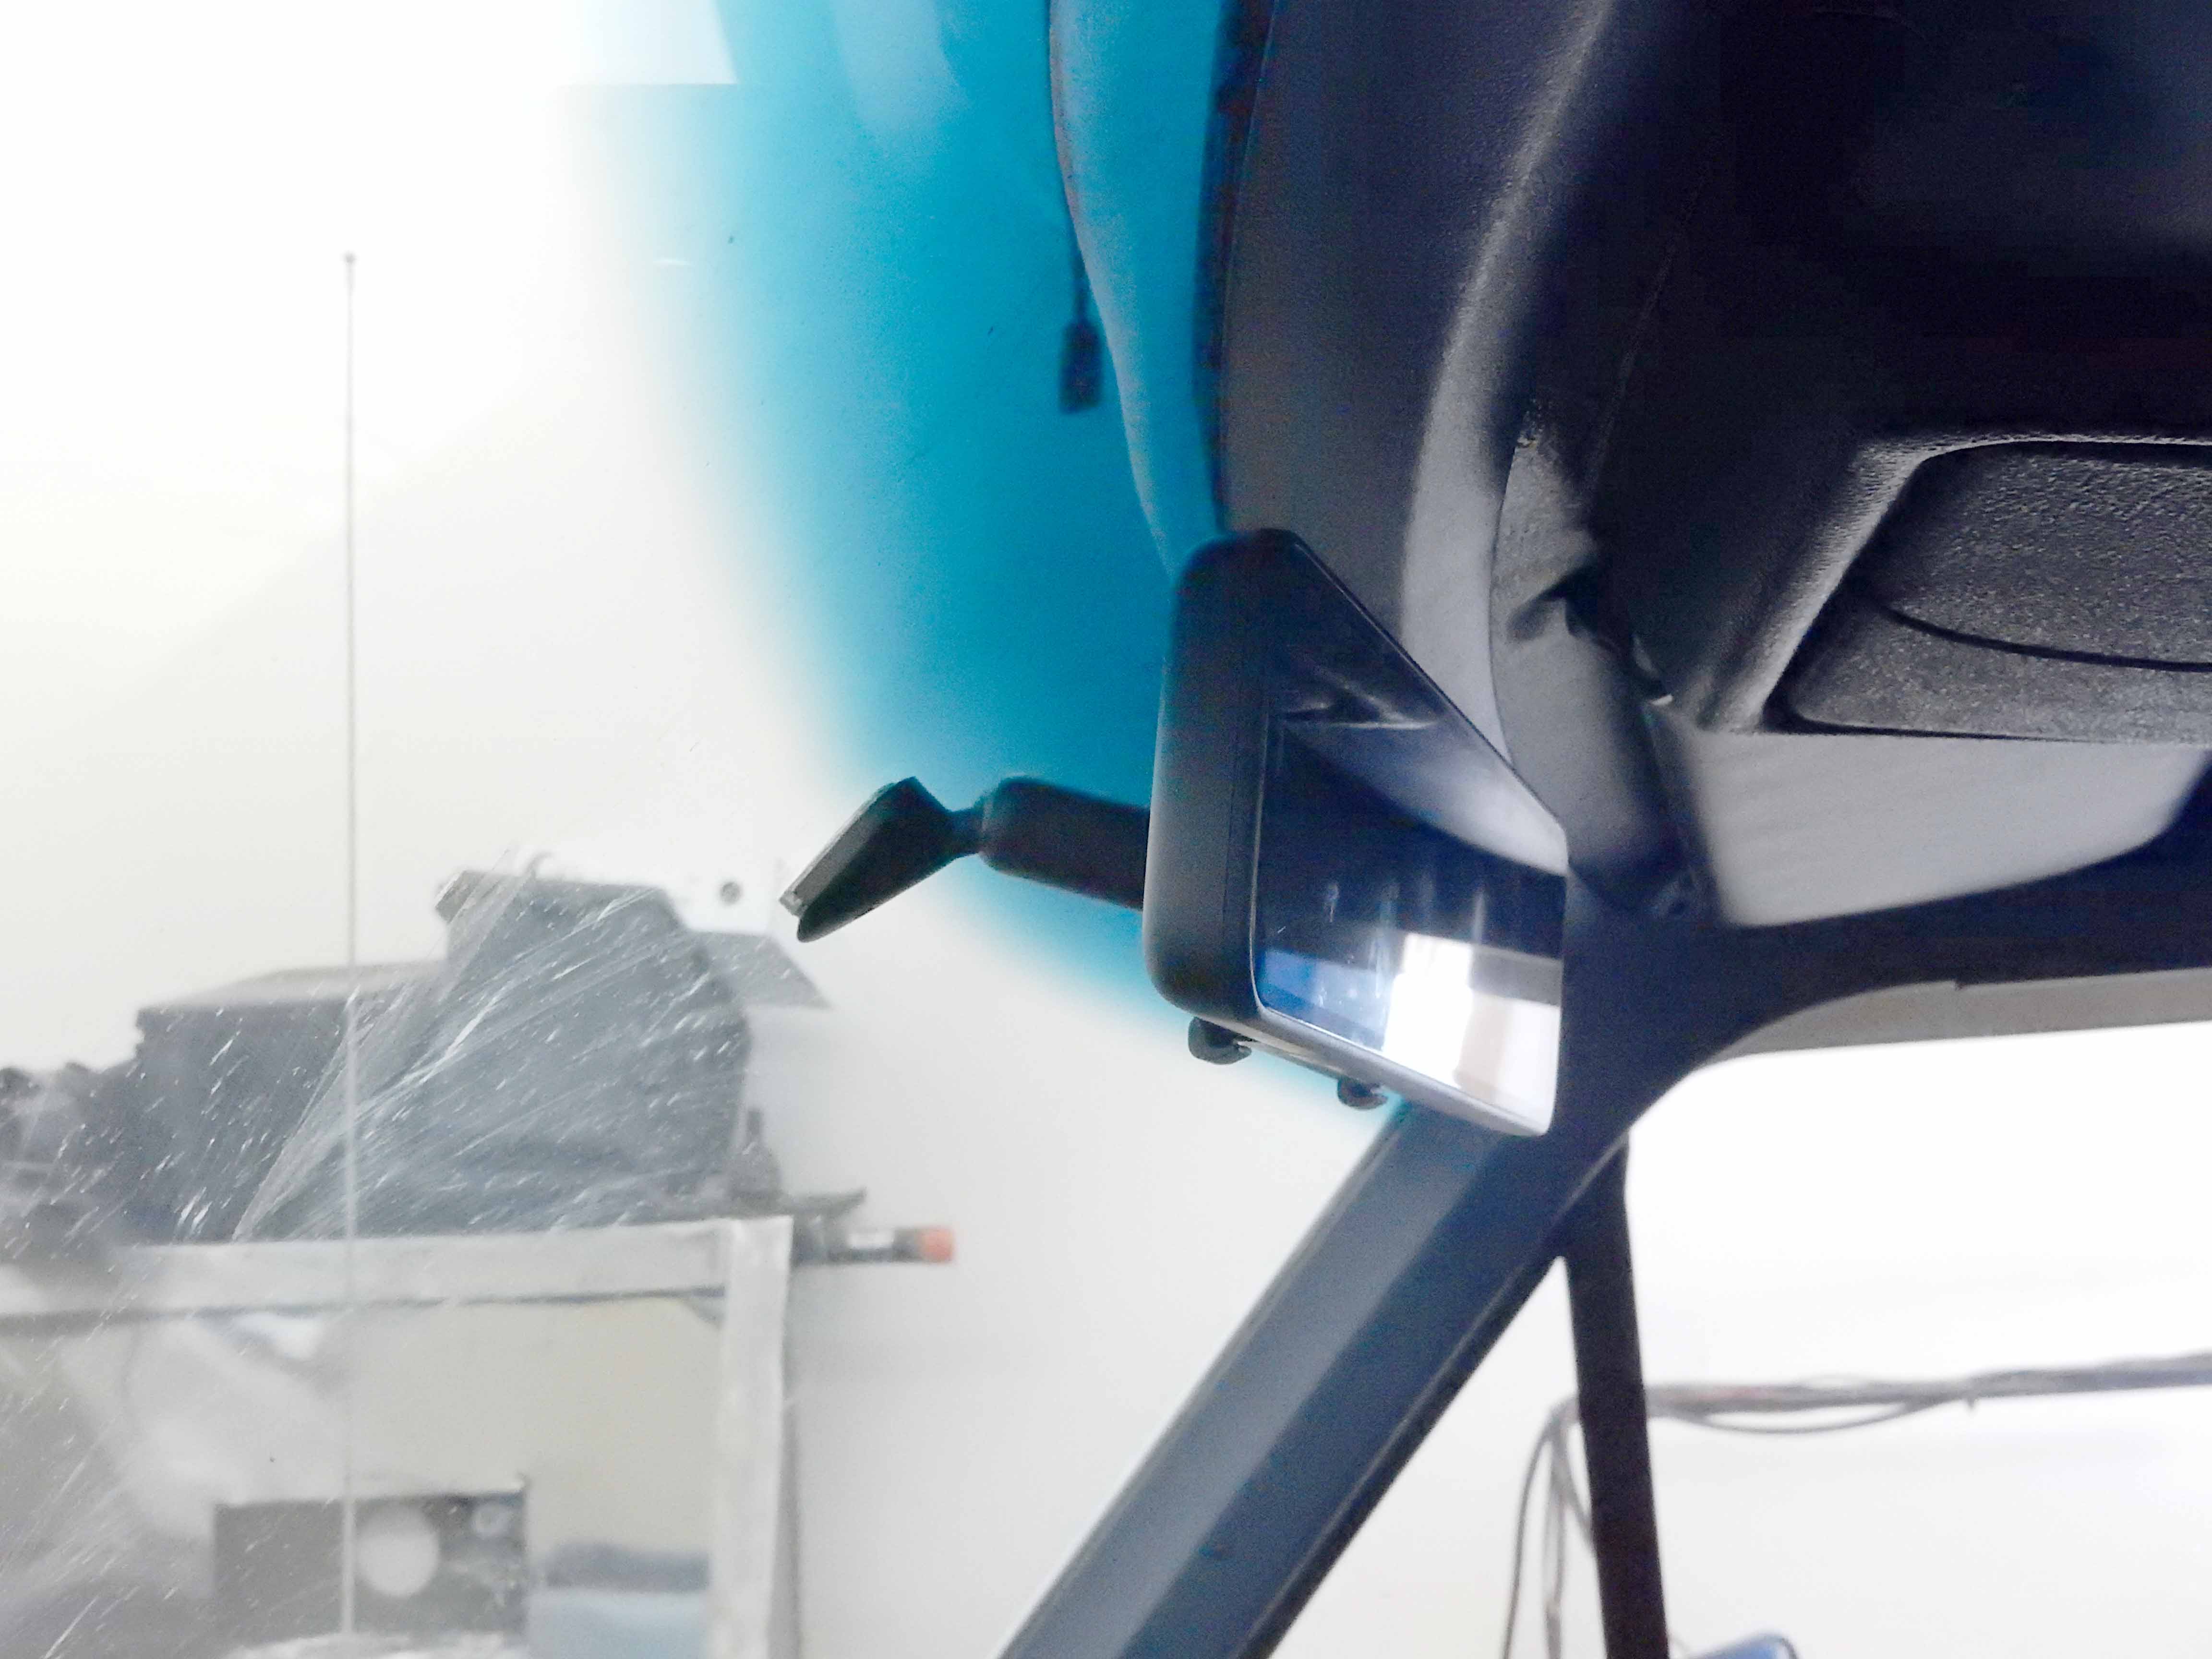 Once that was done I re-joined the pieces of the rear extension cable. Melissa, the tech at Pormido, doubted my ability to do this, so this is somewhat to show her that I can do it. Basically, I soldered each connection and used adhesive-lined heat shrink on it - except for the uninsulated drain wire. Then I slipped aluminum foil over the whole thing to provide a shield, which contacted the drain wire as a ground, and then a larger piece of adhesive-lined heat shrink over that. And the rear camera works perfectly. 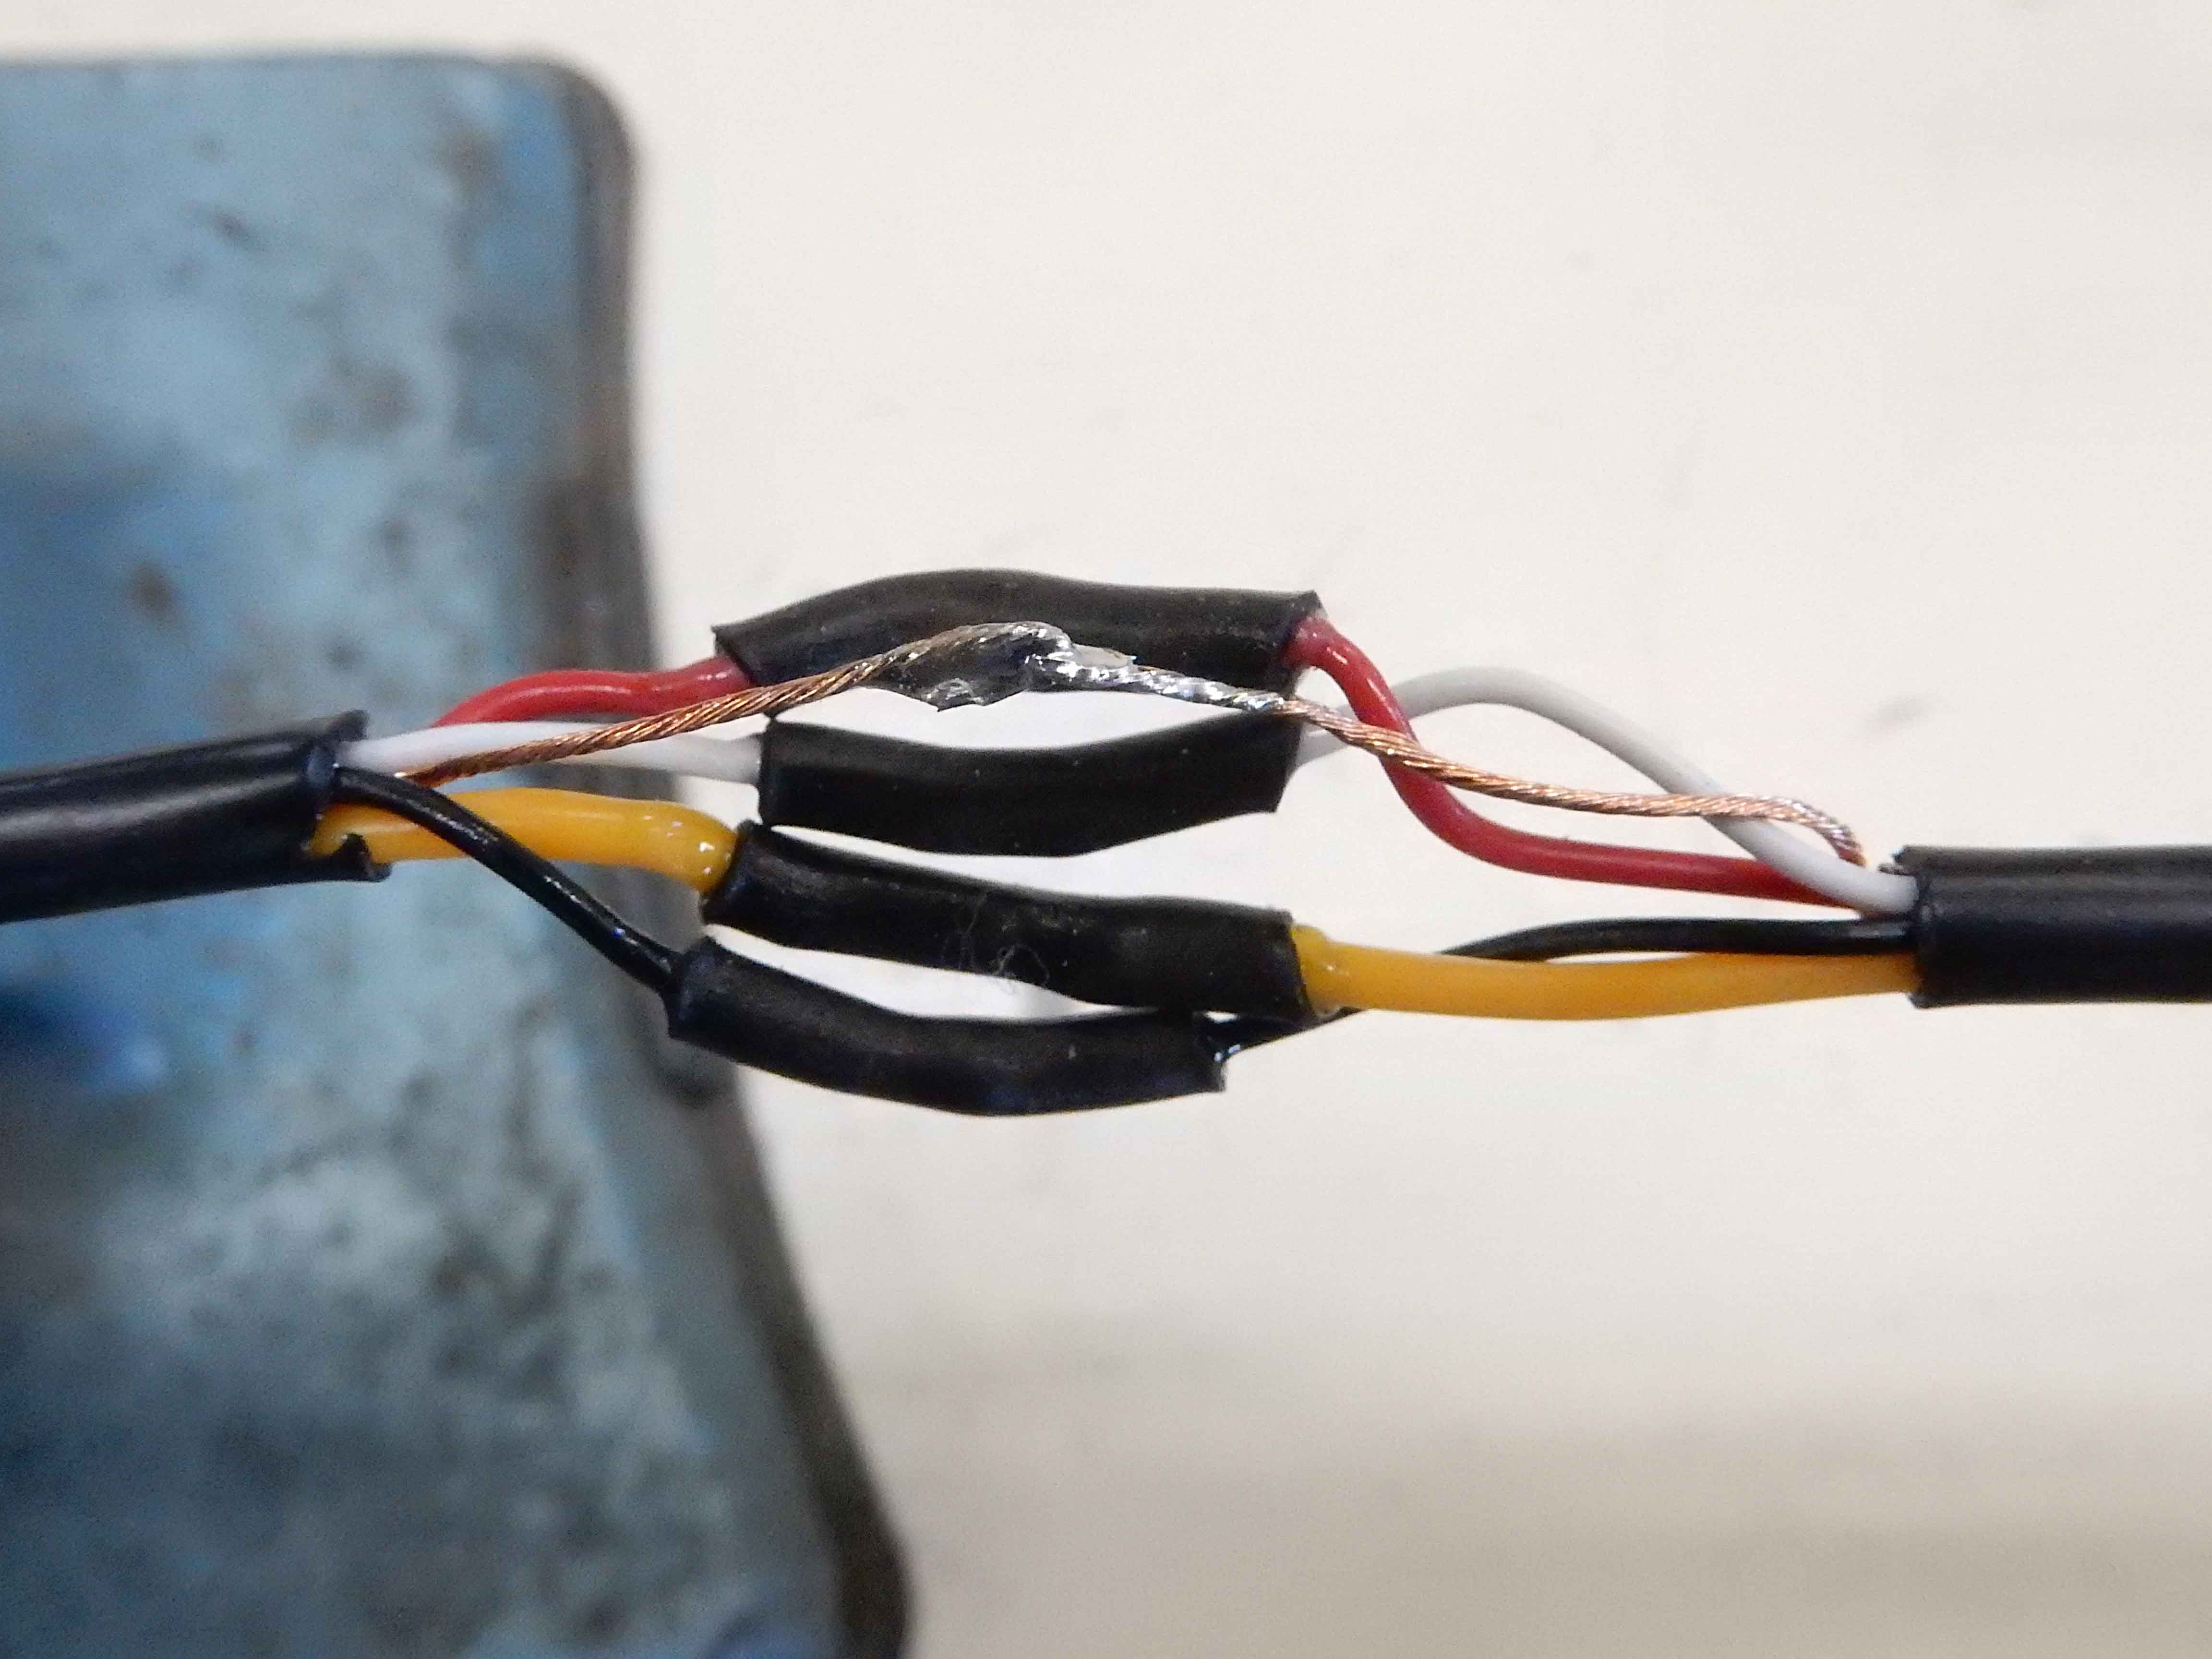 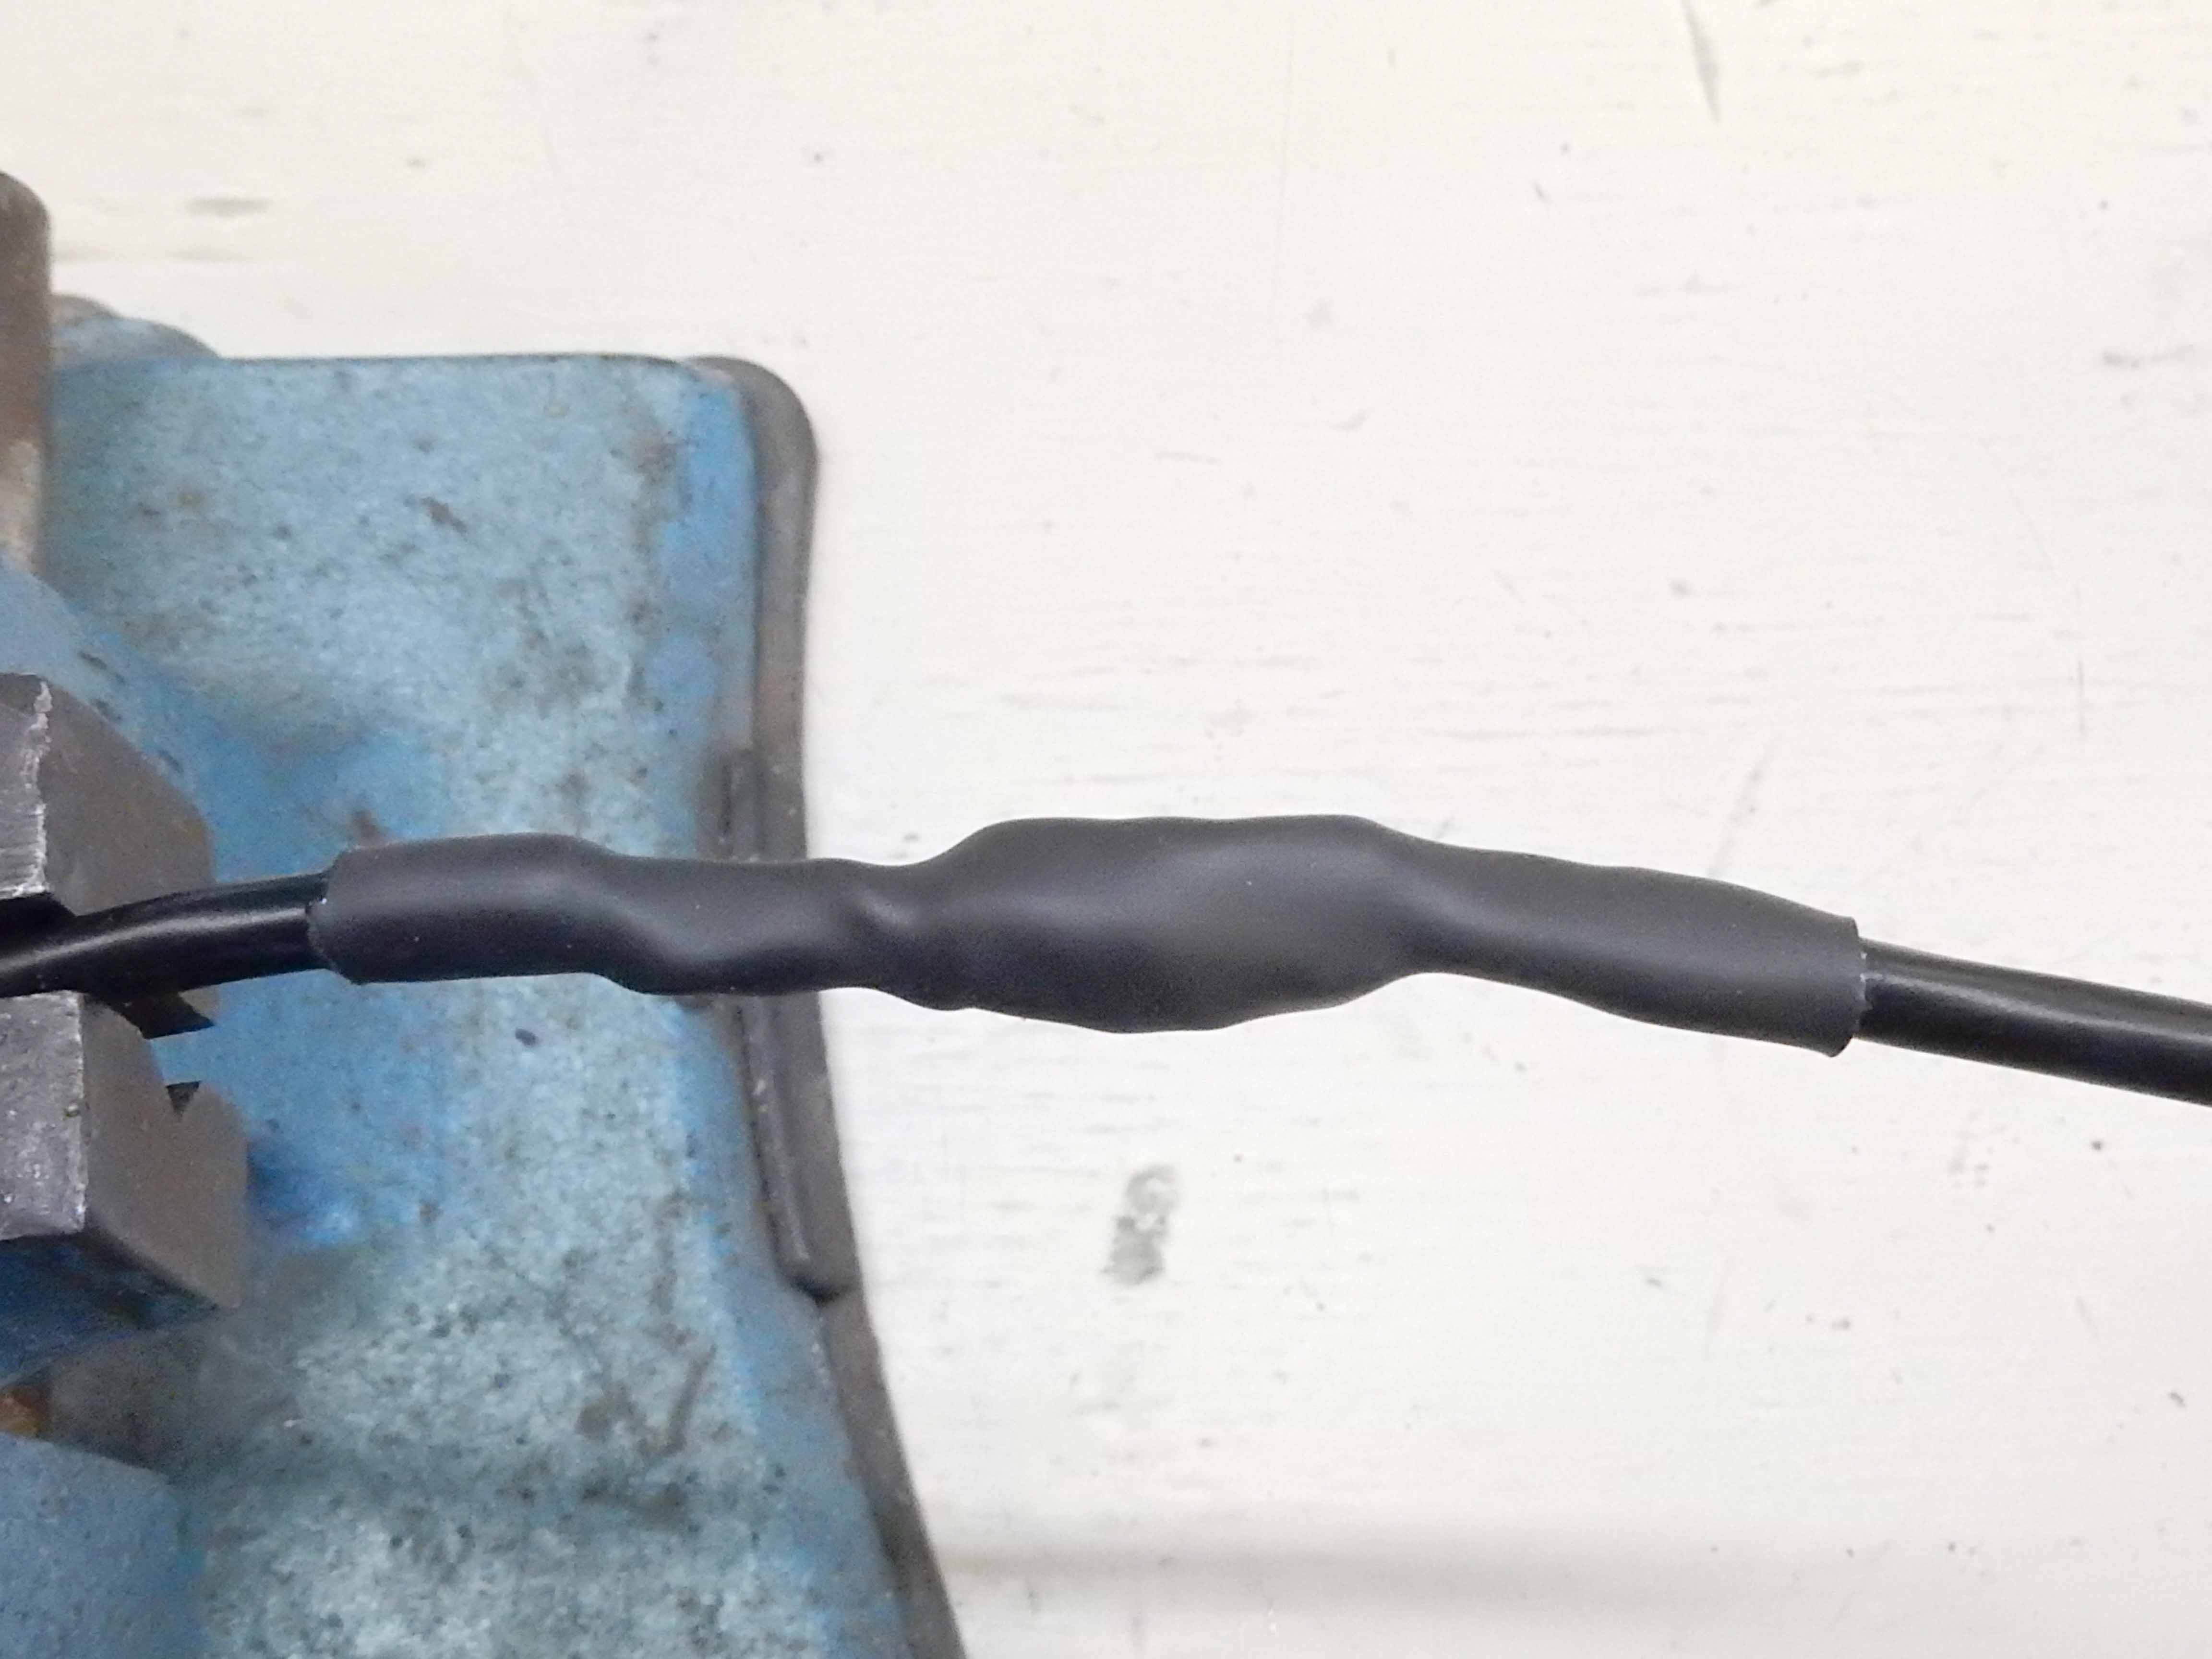 With that done I connected the two cameras and tested where I thought I want to put the rear camera. Here are two options that I like. In the one on the left you can see the camera angled down from under the step of the bumper. If I use that I'll probably make a wedge to mount the camera on and bolt it through the hole in the bumper. But the one on the right is my favorite so far as it is about twice as far above the trailer hitch as the other one, so should make connecting the trailer easier. However, note that the camera is angled down in both shots. It looks like 35 degrees down compared to the tag, and it takes that to be able to see the ball of the hitch. However, I'm open to other suggestions.  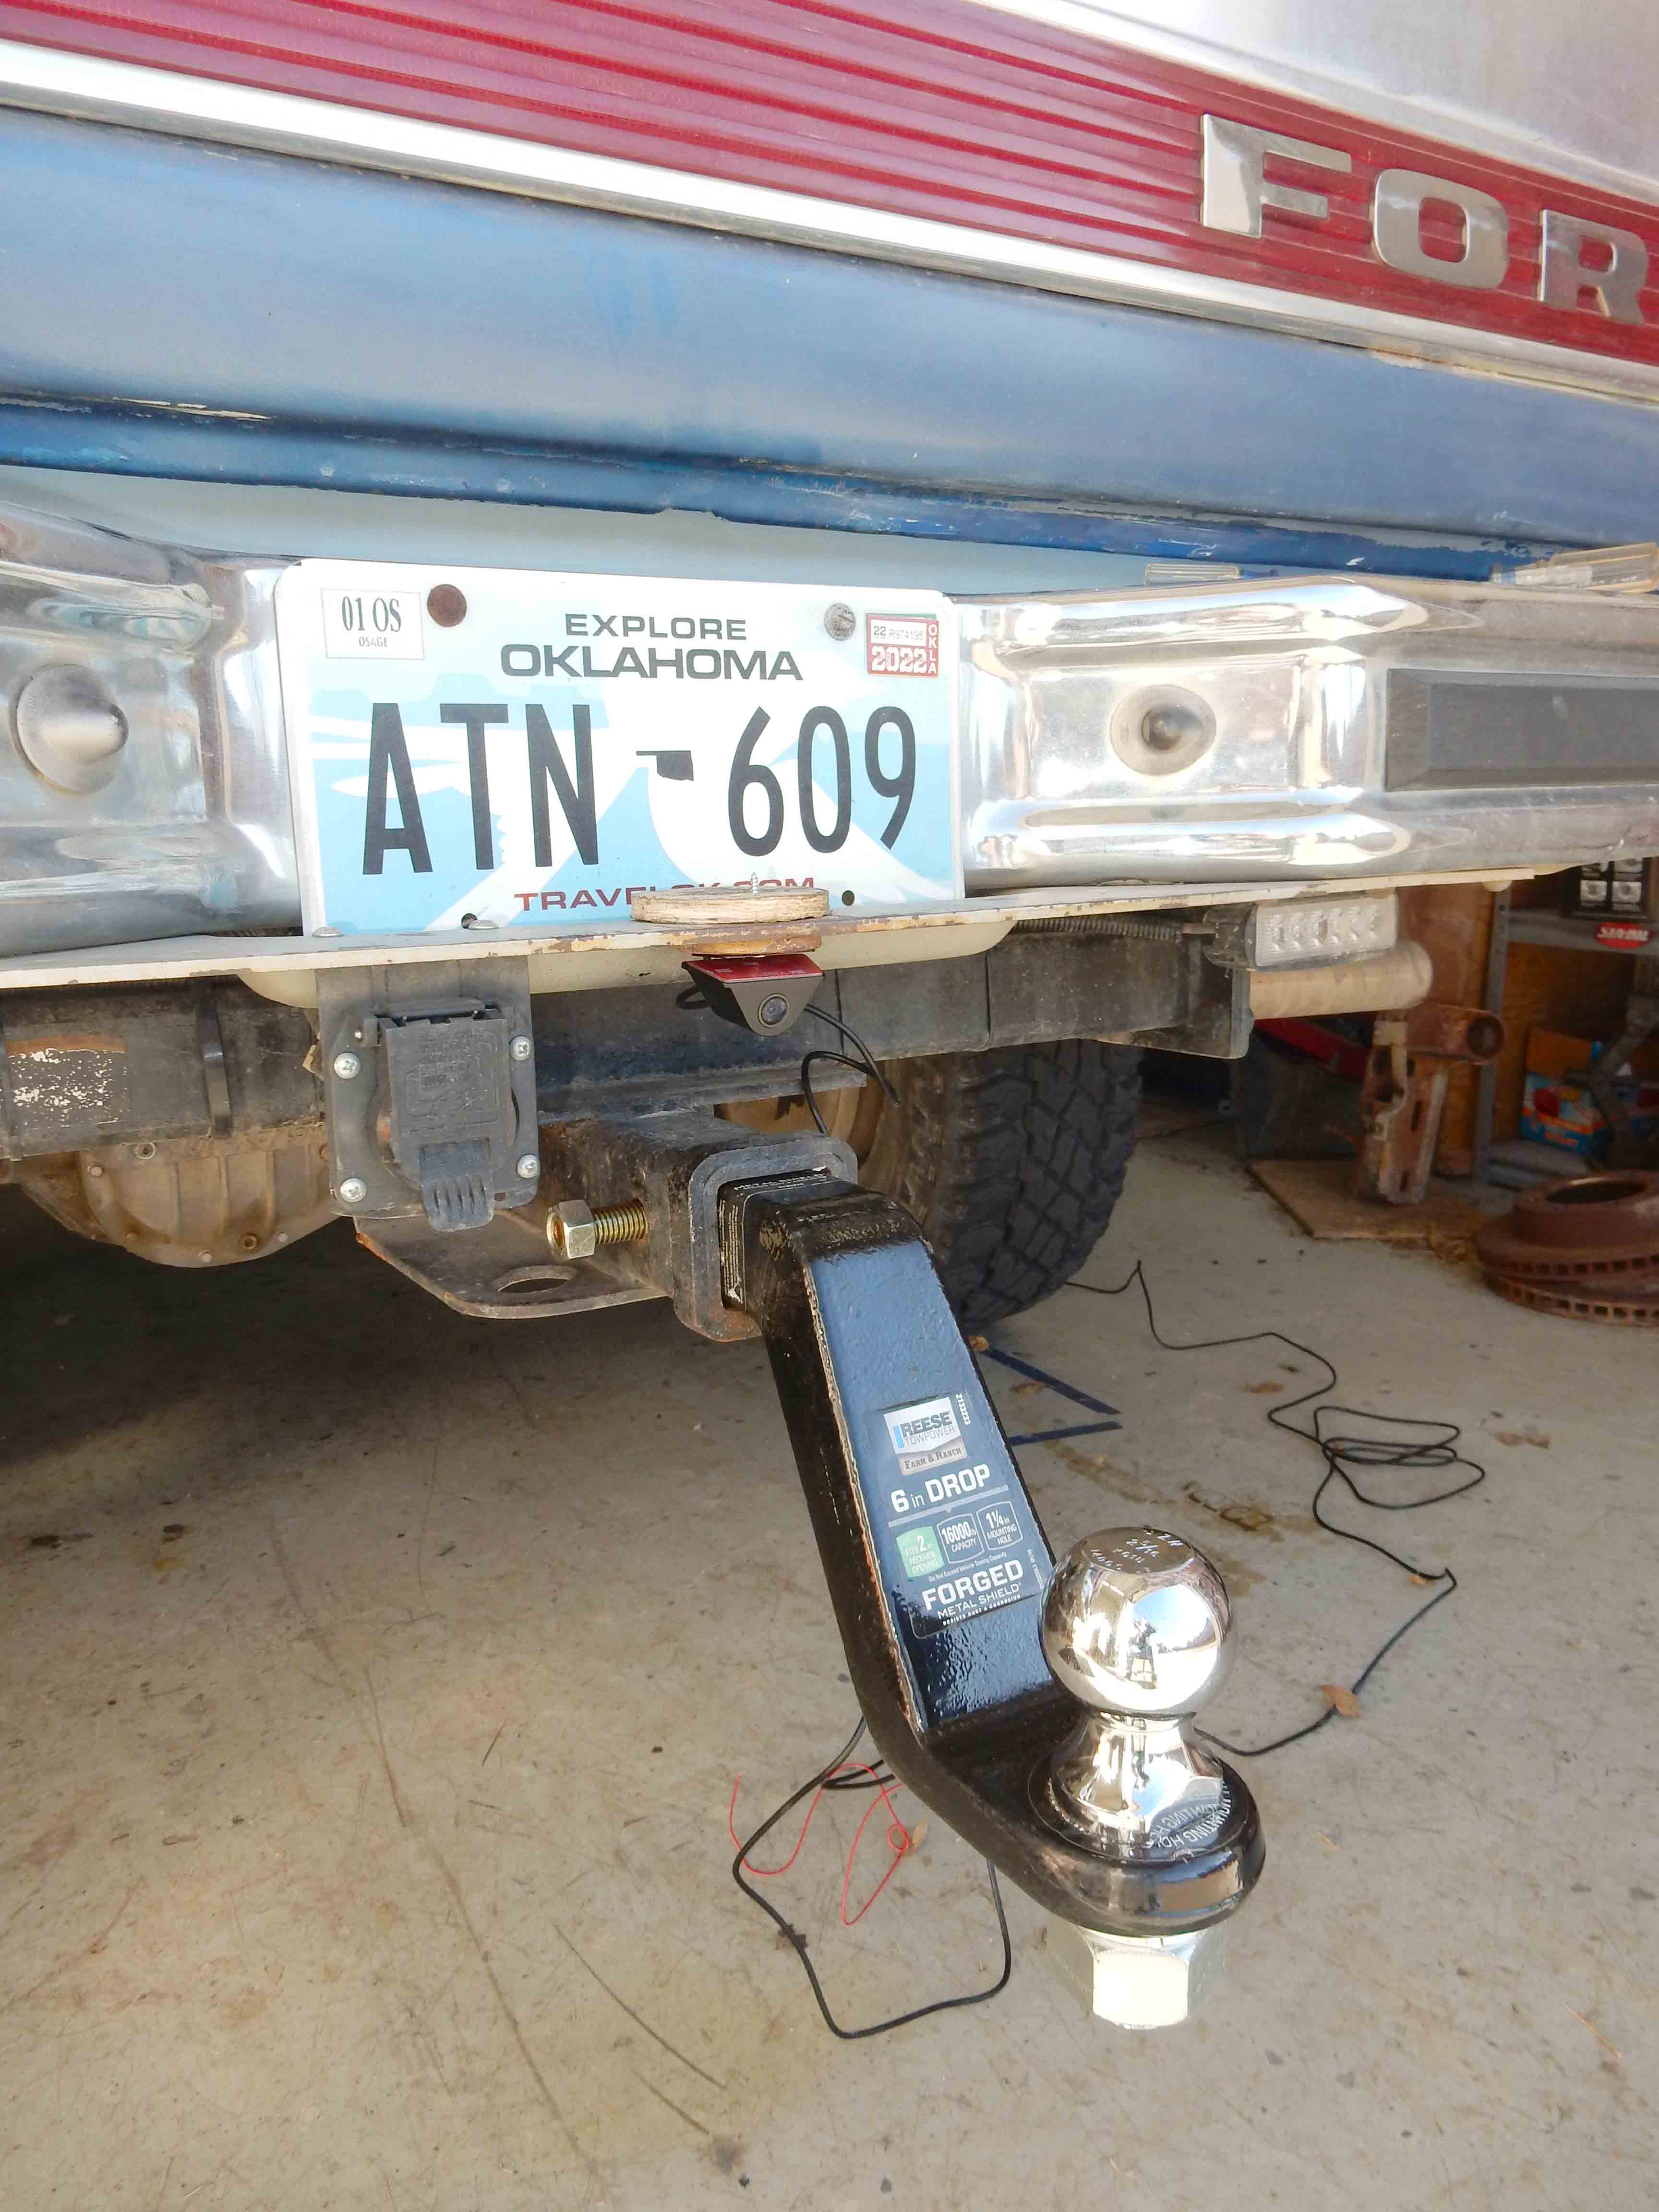  And last, here's a video showing how you can scroll up and down on the views. This is because the camera is probably in 16:9 format but the display is more like 16:4. So there's plenty of ability to scroll up or down. Once you've scrolled the view stays there unless you scroll again - except when you shift into Reverse, assuming you connect that wire to the backup lights. In that case a pair of lines appear on the screen to help you back. And you adjust the lines, as well as the view you want, up or down, in the setup screen for Reverse. This thing has bunches of bells and whistles!
Gary, AKA "Gary fellow": Profile
Dad's: '81 F150 Ranger XLT 4x4: Down for restomod: Full-roller "stroked 351M" w/Trick Flow heads & intake, EEC-V SEFI/E4OD/3.50 gears w/Kevlar clutches
|
Re: Installation Of A Pormido 998 Mirror/Camera System
|
Administrator
|
I want to document some measurements I've made.
First, there are two ways to power the unit. It comes with a power adapter that plugs into the cigar lighter, but if you power it that way on our trucks the unit will always be on since our cigar lighters are always hot. The other way is with the module that is in their "hardware kit", and this is the way I'm installing it. That unit turns the 12v into 5v for the mirror & has two power wires into the module. One is labeled B+ and goes to always-on power. The other is labeled ACC and goes to key-on power. And when you hit the ACC lead with power it takes about 4 seconds for the mirror to come on. When on and at max brightness I measured 888 ma draw on the B+ wire, and nothing on the ACC wire, but dialing the brightness down a bit brought it down to about 650 ma on the B+ wire. And when you kill power to the ACC wire the unit usually powers down in a few seconds. But, if the ACC wire isn't connected to a load the unit doesn't always power down - apparently because that is just a sense wire. When ACC is off and B+ is on the unit is watching for an impact. If one is detected the display will come on and it will record for whatever length of time you've set and lock that file so it can't be overwritten. And while the unit is on it'll pull the normal current, meaning ~650 ma. But when it is just monitoring it pulls 7 ma. In other words, not much at all. I think there's another mode where the thing is recording all the time you are parked, but I've not investigated that - yet. I don't see a need for that normally, but I can see that in some situations that might be helpful. As for the front camera, it looks to me like I need a box with at least these inside dimensions: 3" wide; 2" top/bottom; 1 1/2" front/rear. That would give me enough extra room to install a waterproof grommet and wrap the wire around the end of the camera and plug it in. And I'll have to slip the cable through that grommet before splicing the wire to the end with the connector. However, that begs the question of how to mount the camera. I'm thinking that it might be best to use their double-stick tape and attach it to the clear lid. That way I can take the lid off if I need to get to the camera.
Gary, AKA "Gary fellow": Profile
Dad's: '81 F150 Ranger XLT 4x4: Down for restomod: Full-roller "stroked 351M" w/Trick Flow heads & intake, EEC-V SEFI/E4OD/3.50 gears w/Kevlar clutches
|
Re: Installation Of A Pormido 998 Mirror/Camera System
|
Administrator
|
Ok, I'm looking for some help and inspiration on the installation of the front camera. Please see the questions at the bottom.
I've spent a lot of time looking at plastic boxes with clear lids and I think they'll look dorky. So I'm back to the Ford logo in the grille. Here's a shot of the camera in the back side of the grille - with gobs and gobs of room: 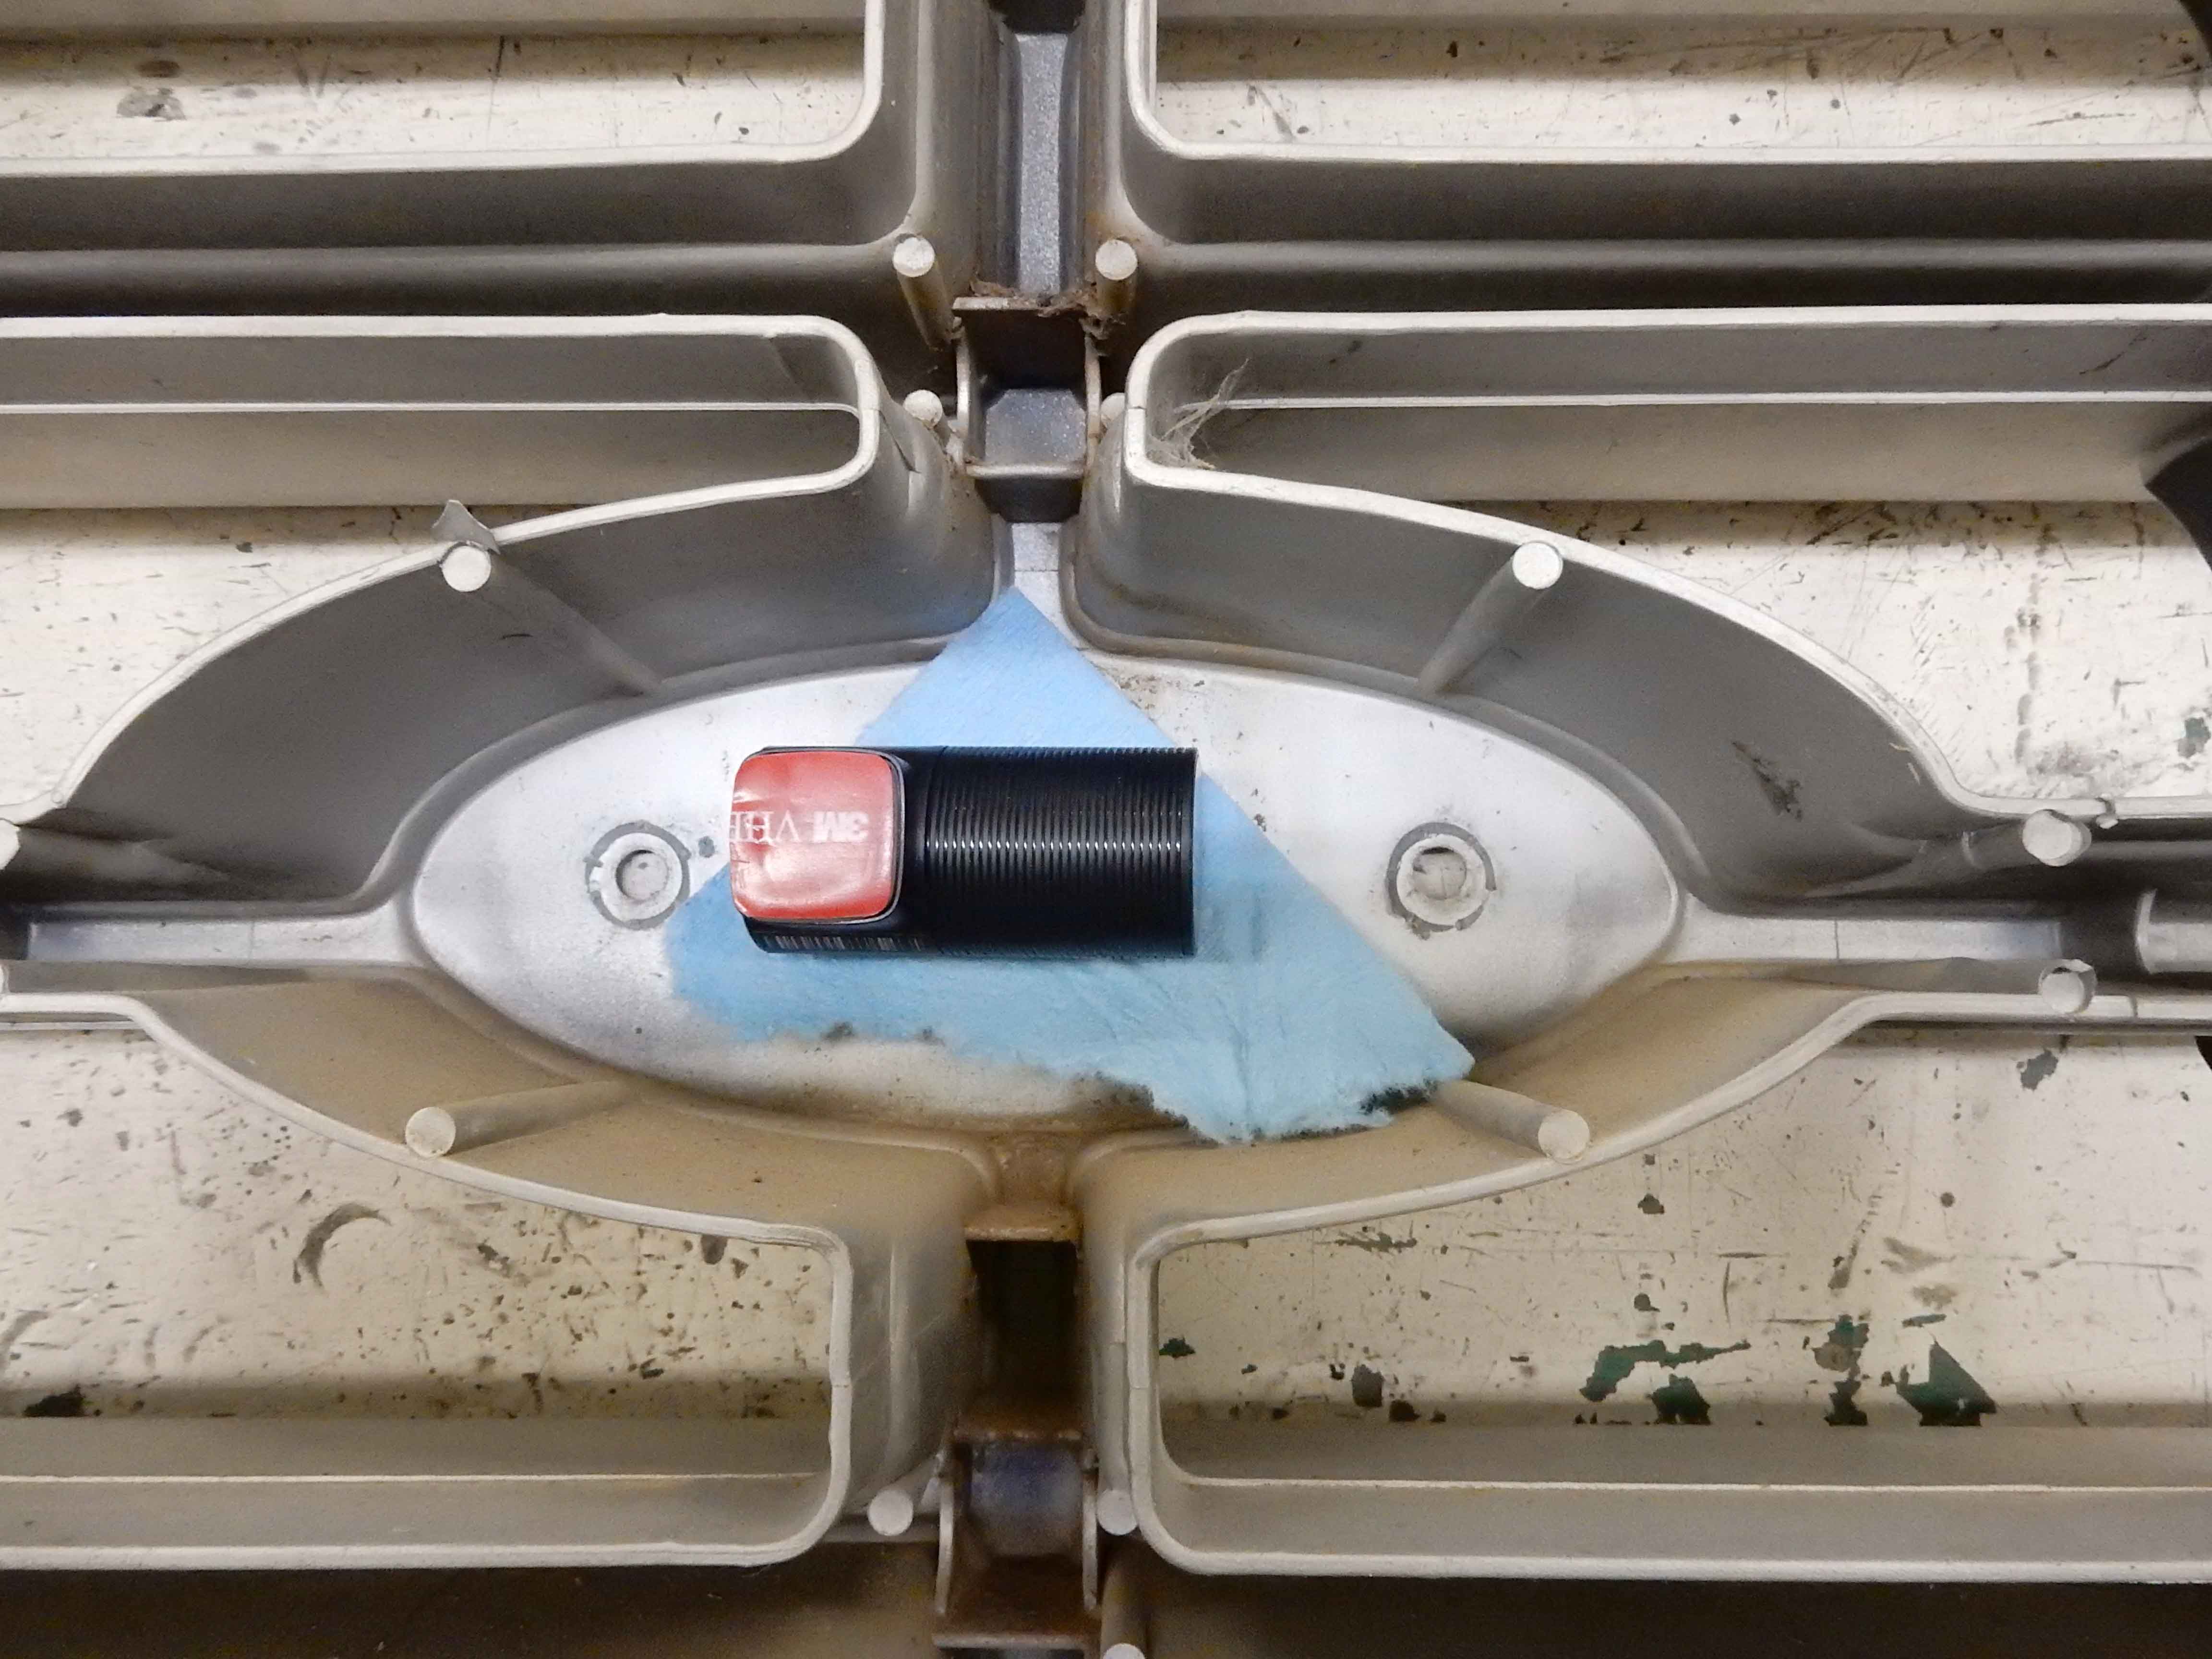 Looking at the emblems I have it looks like it might be possible to mount the emblem with the right and center stud and then drill the left stud out and place the camera there. It would be about where the circle is in this pic: 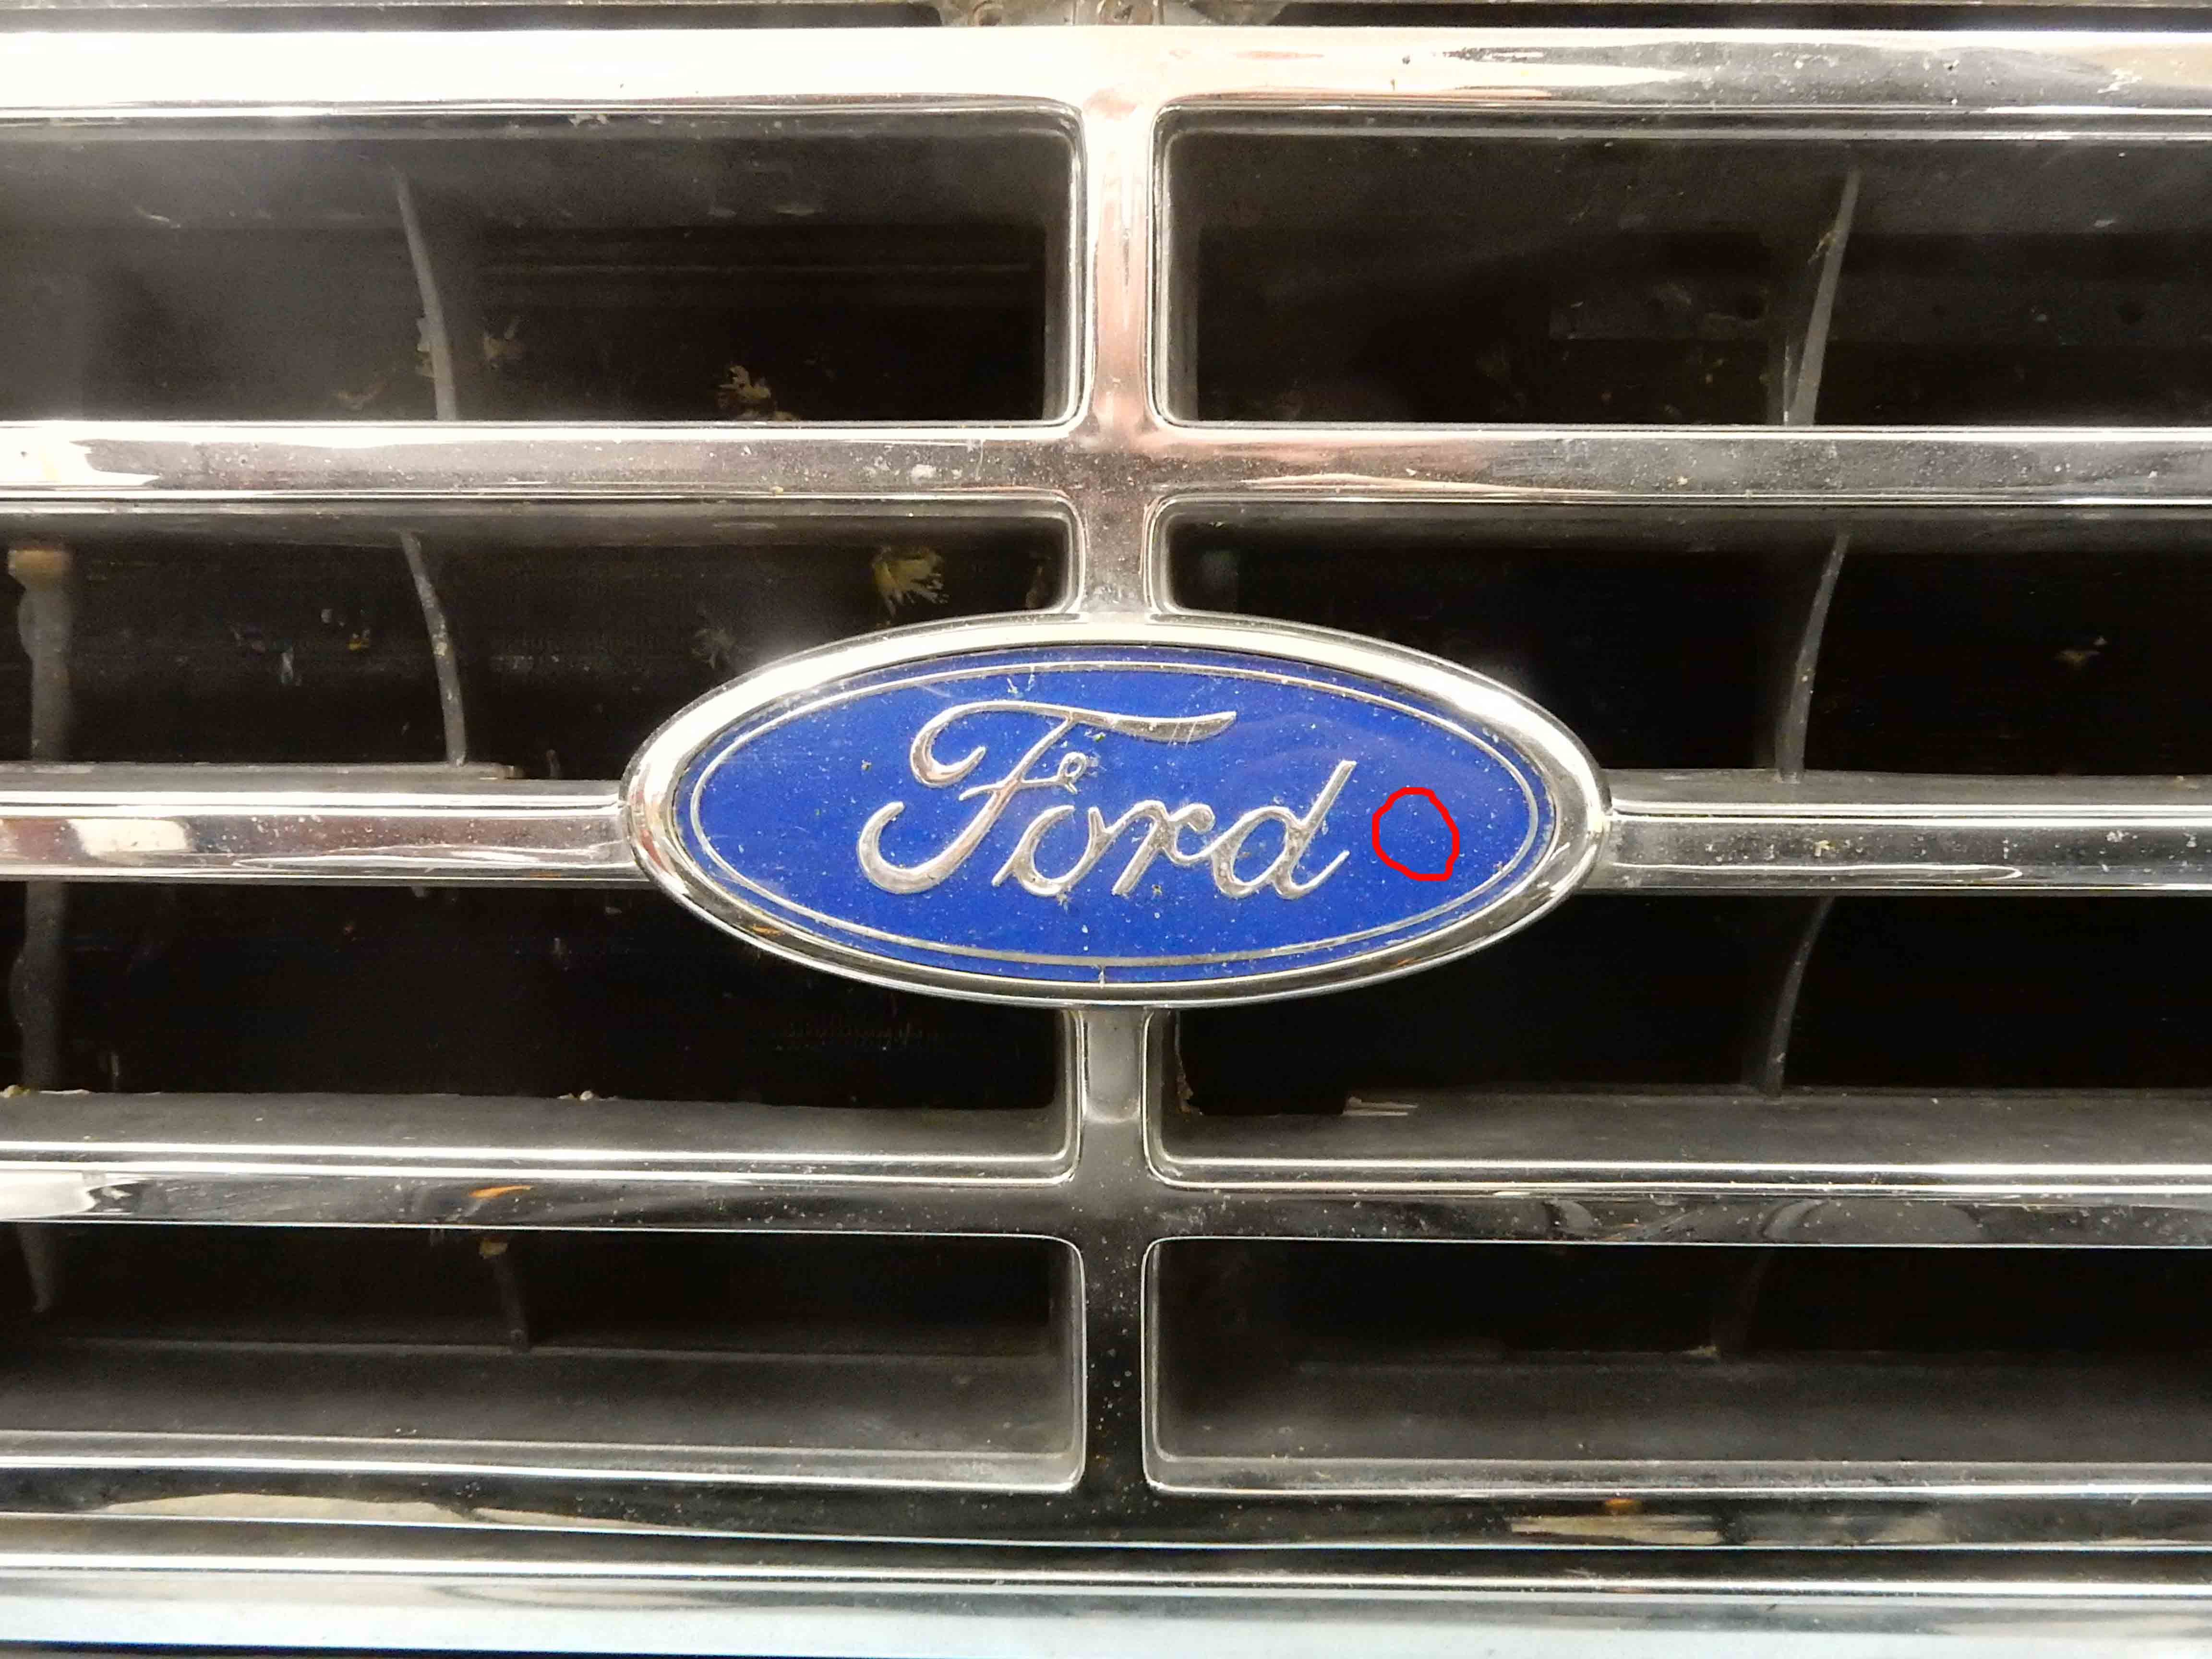 But what would be really slick is if the clear cover can be separated from the emblem so a hole could be drilled in the blue and the cover protect it. Does anyone have an old emblem that can be "worked on"? Or, does anyone know if the cover comes off?
Gary, AKA "Gary fellow": Profile
Dad's: '81 F150 Ranger XLT 4x4: Down for restomod: Full-roller "stroked 351M" w/Trick Flow heads & intake, EEC-V SEFI/E4OD/3.50 gears w/Kevlar clutches
|
|
|
That will be cool!
Even if you drilled it and went through, maybe you could glue some plastic in there for the camera. I don’t have an old one, wish I did.
Dane
1986 F250HD SC XLT Lariat 4x4 460 C6-Sold 1992 Bronco XLT 4x4 351W E4OD 1998 GMC Sierra SLE K1500 350 4L60E Arizona |
Re: Installation Of A Pormido 998 Mirror/Camera System
|
Administrator
|
Well, this might actually work. The oval that was on Big Blue is a later one, an E7 version, and it appears to be made of two parts - the chromed outer bezel and the blue oval, which has the blue backing and the chrome lettering stuck on the back of the plastic.
So I pried a bit at one end and the blue oval budged. I then pried and got it out, but it left a mark on the blue, as you'll see in a bit. Then I put the bezel on the mill table and milled off the stud. Then I drilled the stud out 3/8" as I found that a .260" washer on the lens just barely restricted the view, and the lens won't be right against the back of the bezel. Next I put a large pencil in the drill and put its eraser through the hole and "erased" the blue in a spot. You can see how it is starting to remove the blue in this shot. 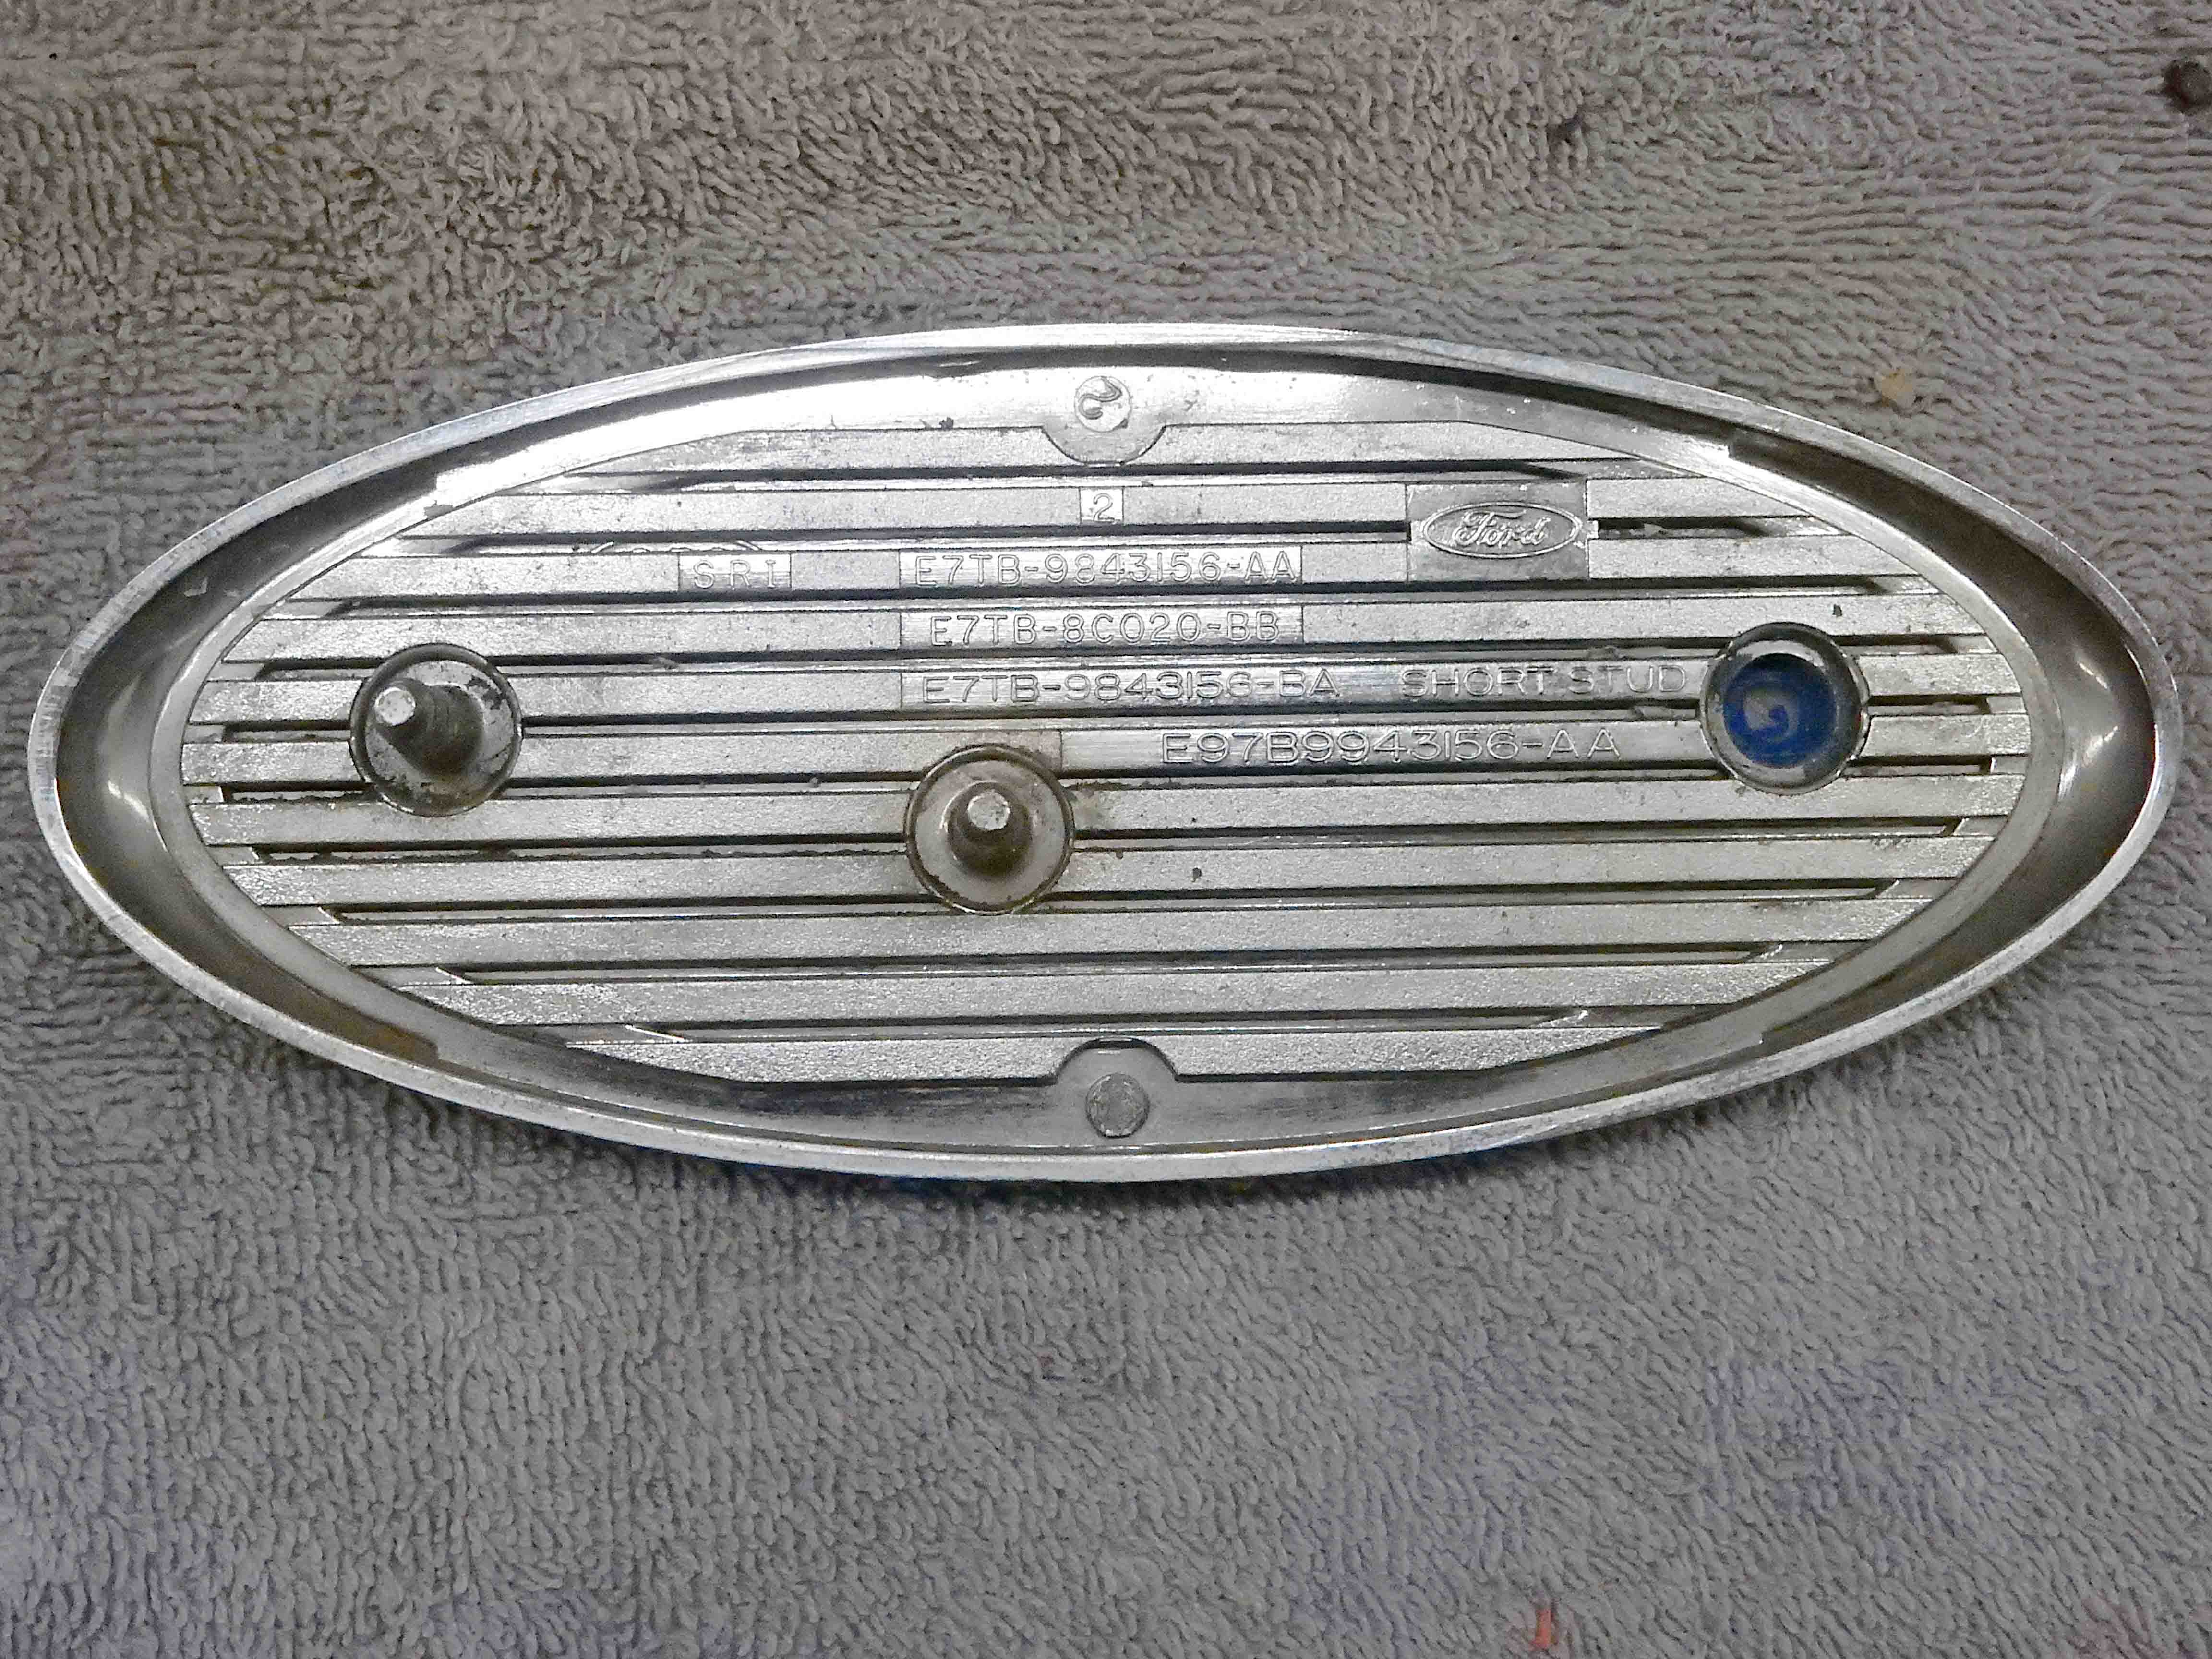 Here is the front side, with the blue partially gone on the left. And, you can see the spot of delamination on the right, but I think I can live with that if the rest of this works. Speaking of the rest, I'm thinking that I'll use a 3/8" dowel that is smooth on the end and reach through the hole with it and put polishing compound on it. Hopefully that will polish a nice round spot in the lens. But does someone have a better idea?  As for waterproofing, I think that when I glue the oval back into the bezel I'll make sure that there is RTV encircling the hole so water cannot get through. And I'll put RTV on the studs that go through the grille itself. And in the pic below the red dots indicate where I think I'll put studs as well as fill the channels with plastic that is epoxied in. Then I'll put the whole thing on the mill and make sure that the back edge is flat, and make a plate out of aluminum that will go against that edge, be held by the studs, and be sealed with RTV. But, lining up the camera is likely to be a challenge. In the back I found that the camera needs to be angled down at ~35 degrees to be able to capture the trailer hitch, which is 12" lower and 12" farther back than the camera will be. In front the ball will be 18" lower and 18" farther forward, so is at the same 45 degree angle from the camera. But the front camera has a 170 degree field of view and the rear camera only has a 150 degree view. So maybe the extra 10 degrees on top and bottom will let the camera see downward well enough? But I suspect that I'll have to make the hole through the grille and bezel much larger and angle the camera downward to make this work. Perhaps I should have tested that before I started down this path?  
Gary, AKA "Gary fellow": Profile
Dad's: '81 F150 Ranger XLT 4x4: Down for restomod: Full-roller "stroked 351M" w/Trick Flow heads & intake, EEC-V SEFI/E4OD/3.50 gears w/Kevlar clutches
|
|
|
“Perhaps I should have tested that before I started down this path?”
Nah!  That is looking good I like it. I really like the pencil eraser in the drill!
Dane
1986 F250HD SC XLT Lariat 4x4 460 C6-Sold 1992 Bronco XLT 4x4 351W E4OD 1998 GMC Sierra SLE K1500 350 4L60E Arizona |
Re: Installation Of A Pormido 998 Mirror/Camera System
|
Administrator
|
Yes, CHARGE!
The pencil eraser was a spur of the moment idea, and it seems to have worked. But it isn't "flat" and I want a crisp border at the edge of the "window". And that is why I'm planning on trying a piece of wooden dowel, polished on the end, and daubed with plastic polishing compound. Then, when I think it is ready I'll use the Dremel to polish the plastic more if needed. But, as I think about it, I might want to put a piece of felt on the end of the dowel, possibly held on with hot-melt glue. And then put the polish on the felt. 
Gary, AKA "Gary fellow": Profile
Dad's: '81 F150 Ranger XLT 4x4: Down for restomod: Full-roller "stroked 351M" w/Trick Flow heads & intake, EEC-V SEFI/E4OD/3.50 gears w/Kevlar clutches
|
Re: Installation Of A Pormido 998 Mirror/Camera System
|
|
In reply to this post by Gary Lewis
 She should take a look to couple of threads on this forum! About the rear cam position, I personnaly prefer a higher one. Ball mount can vary, depending the trailer height. If for any reason the ball mount has to be flat or in raised position, a lower positioned cam becomes at risk of being "puched" or damaged by a wrong connecting trailer move.
Jeff / 1984 F350 Crew Cab 4x4/5.8L w351 4V/ T18/ D50 4.10 front/ 8' bed.
Restored 2019-2022. Nicknamed «Big Brother 1984», due to its soooo-looong shape & nod to George Orwell's 1984 famous novel. |
Re: Installation Of A Pormido 998 Mirror/Camera System
|
|
About the front cam, I like this engineering project!
But I am wondering about the cam waterproofing. I understand all the "clear cover-blue emblem" sealing, but what about the cam residing behind the grill? How do you plan to create a waterproof "box" to protect the cam?
Jeff / 1984 F350 Crew Cab 4x4/5.8L w351 4V/ T18/ D50 4.10 front/ 8' bed.
Restored 2019-2022. Nicknamed «Big Brother 1984», due to its soooo-looong shape & nod to George Orwell's 1984 famous novel. |
Re: Installation Of A Pormido 998 Mirror/Camera System
|
Administrator
|
In reply to this post by BigBrother-84
Yes, Gary does tend to get into some technically-difficult projects, like a significant re-wire of Big Blue to bring the electrical system up to 90's standards with fuses and relays, and lots of grounds. And EFI waiting in the wings.
On the camera, I agree that height is good - to a point. Remember that I had to angle it down ~35 degrees when it was at the top of the license tag in order to be able to see the ball. And that angle is about as far down as I want to go or I'll start losing the view at the top. So I think placing it at the top of the license tag is going to be about the right height. As for the front camera, I think you missed the discussion about filling those channels in the grille with plastic and epoxy, adding studs to the back of the plastic, milling the top/back edge of the opening flat, and then sealing it with an aluminum plate and RTV. Or, as I think about it, maybe a gasket glued to the plate so it'll seal up against the raised edge of that cavity. But, there's a lot of work to be done 'twixt now and then to find out if it is even going to work. That's because I'm not sure that I can get the right angle of the camera with the clear opening in the oval. And since it is so hard to reach that area once the grille is installed in the truck, I'm going to mock it up on the work bench. I'll put the grille at the same angle it is on the truck, set up something to block the view like the bumper does, and put the draw bar in place. Then I can hold the camera in the cavity and see if it is going to work. My guess is that I'll not only have to drill out the stud hole in the grille but also the hole where the stud was in the bezel. And I suspect that I'll have to make the clear spot even bigger in order to be able to have a clear field of view for the camera. And that is assuming that I can get the clear spot clear enough that it doesn't distort the view. 
Gary, AKA "Gary fellow": Profile
Dad's: '81 F150 Ranger XLT 4x4: Down for restomod: Full-roller "stroked 351M" w/Trick Flow heads & intake, EEC-V SEFI/E4OD/3.50 gears w/Kevlar clutches
|
Re: Installation Of A Pormido 998 Mirror/Camera System
|
Administrator
|
Been thinking about this a bit. And I don't know how far I want to chase this dream of having the camera shoot through the Ford emblem. Or, maybe I should say have the "front" camera shoot through the emblem. That's because I'm thinking that I missed an opportunity...
I measured the rear camera's current draw at something like 275 ma on the red wire and 140 ma on the black wire. And that's obviously quite a bit more then the 260 ma on the red wire for the front camera, and it is likely why the guy that tried using a rear camera in front fried the mirror. But, what if I used a relay? Have the red wire from the mirror pull in a relay, and have the relay then supply all of the current to the red and black wires on the camera. Typically a Bosch relay takes ~200 ma to pull in. So the mirror could easily handle that, and the relay could easily supply power to the camera. Man, just having a waterproof front camera would make all of the difference in the world. Basically I'd be wiring now instead of testing. 
Gary, AKA "Gary fellow": Profile
Dad's: '81 F150 Ranger XLT 4x4: Down for restomod: Full-roller "stroked 351M" w/Trick Flow heads & intake, EEC-V SEFI/E4OD/3.50 gears w/Kevlar clutches
|
Re: Installation Of A Pormido 998 Mirror/Camera System
|
Administrator
|
Well, things are starting to become clear, so to speak.
 Basically, what is becoming clear is that I don't know how to polish a round spot on the back of the Ford oval. What I did was to glue a piece of felt on the end of a 3/8" dowel, chuck that in the mill, and use chrome polishing compound to take the blue off of back of the plastic. And as you can see below, the view through is anything but clear. In fact, when you look at the plastic at an angle you can see concentric grooves polished in it from imperfections in the "pad" - in spite of me having trued the end on the lathe. And given my doubts that shooting at an angle through a piece of plastic that isn't flat on the front will give a good image, I think I'm going to abandon this approach. Unless someone has a Better Idea - after all, it is a Ford. 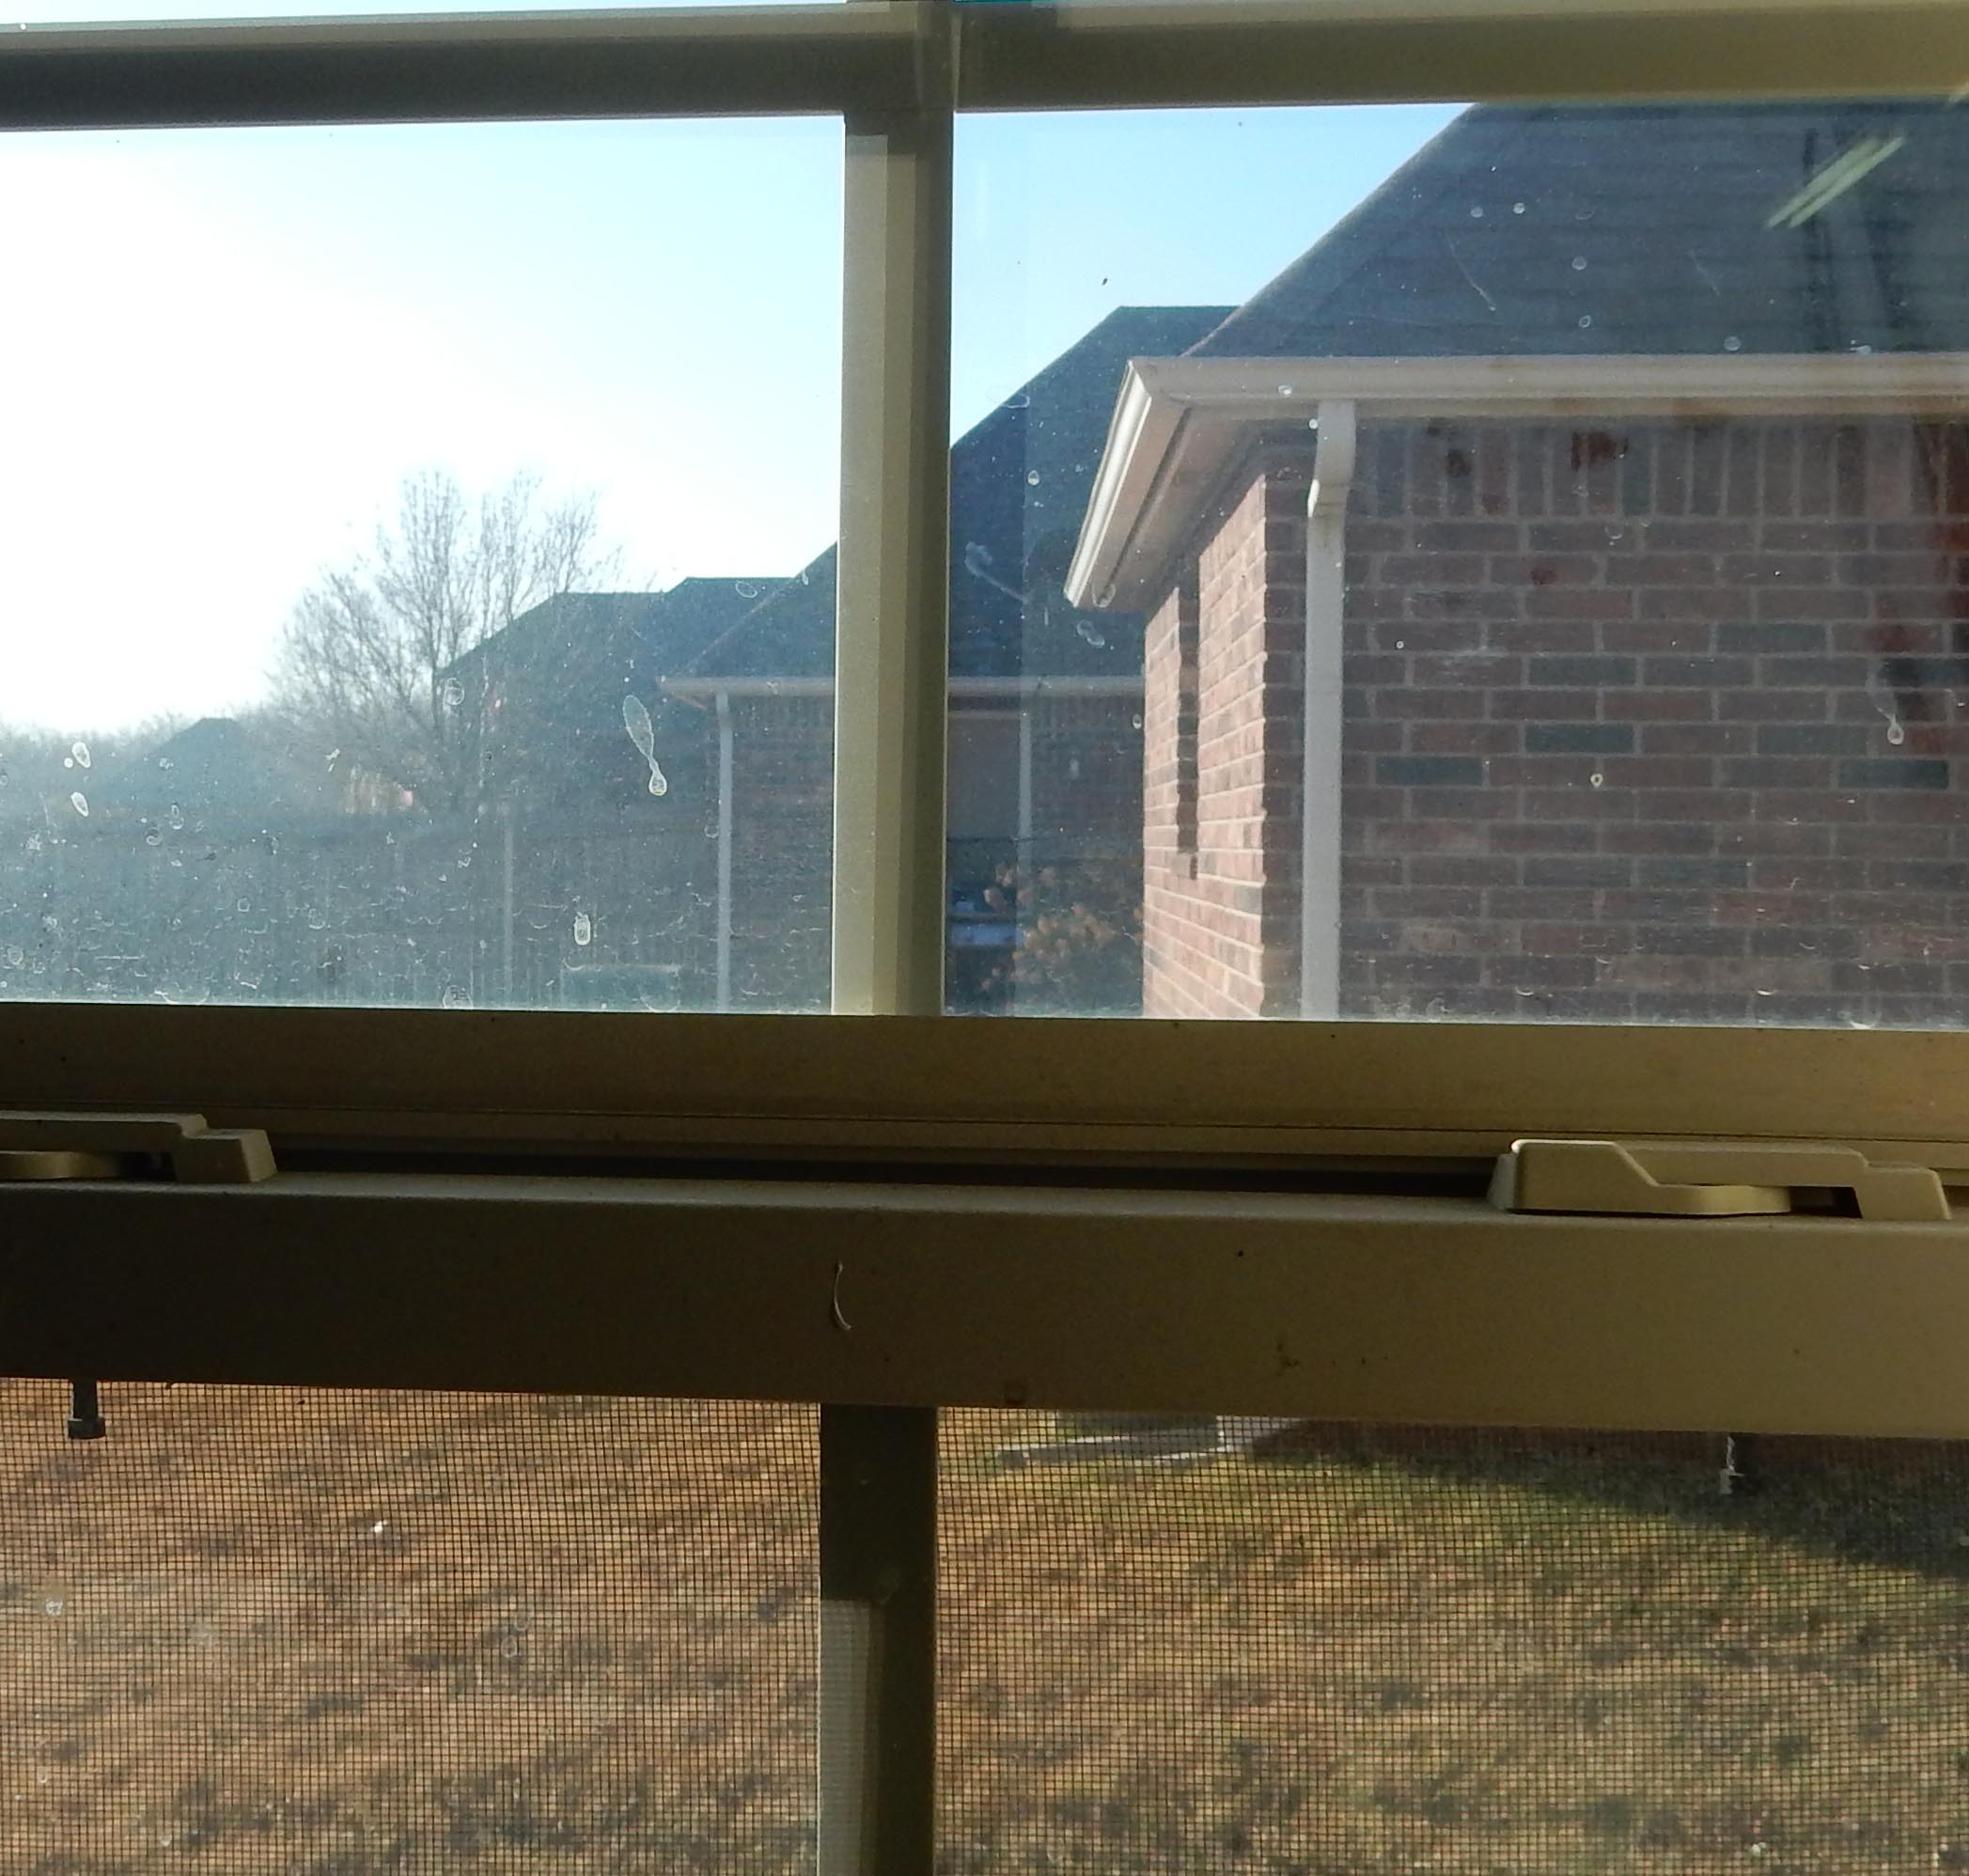 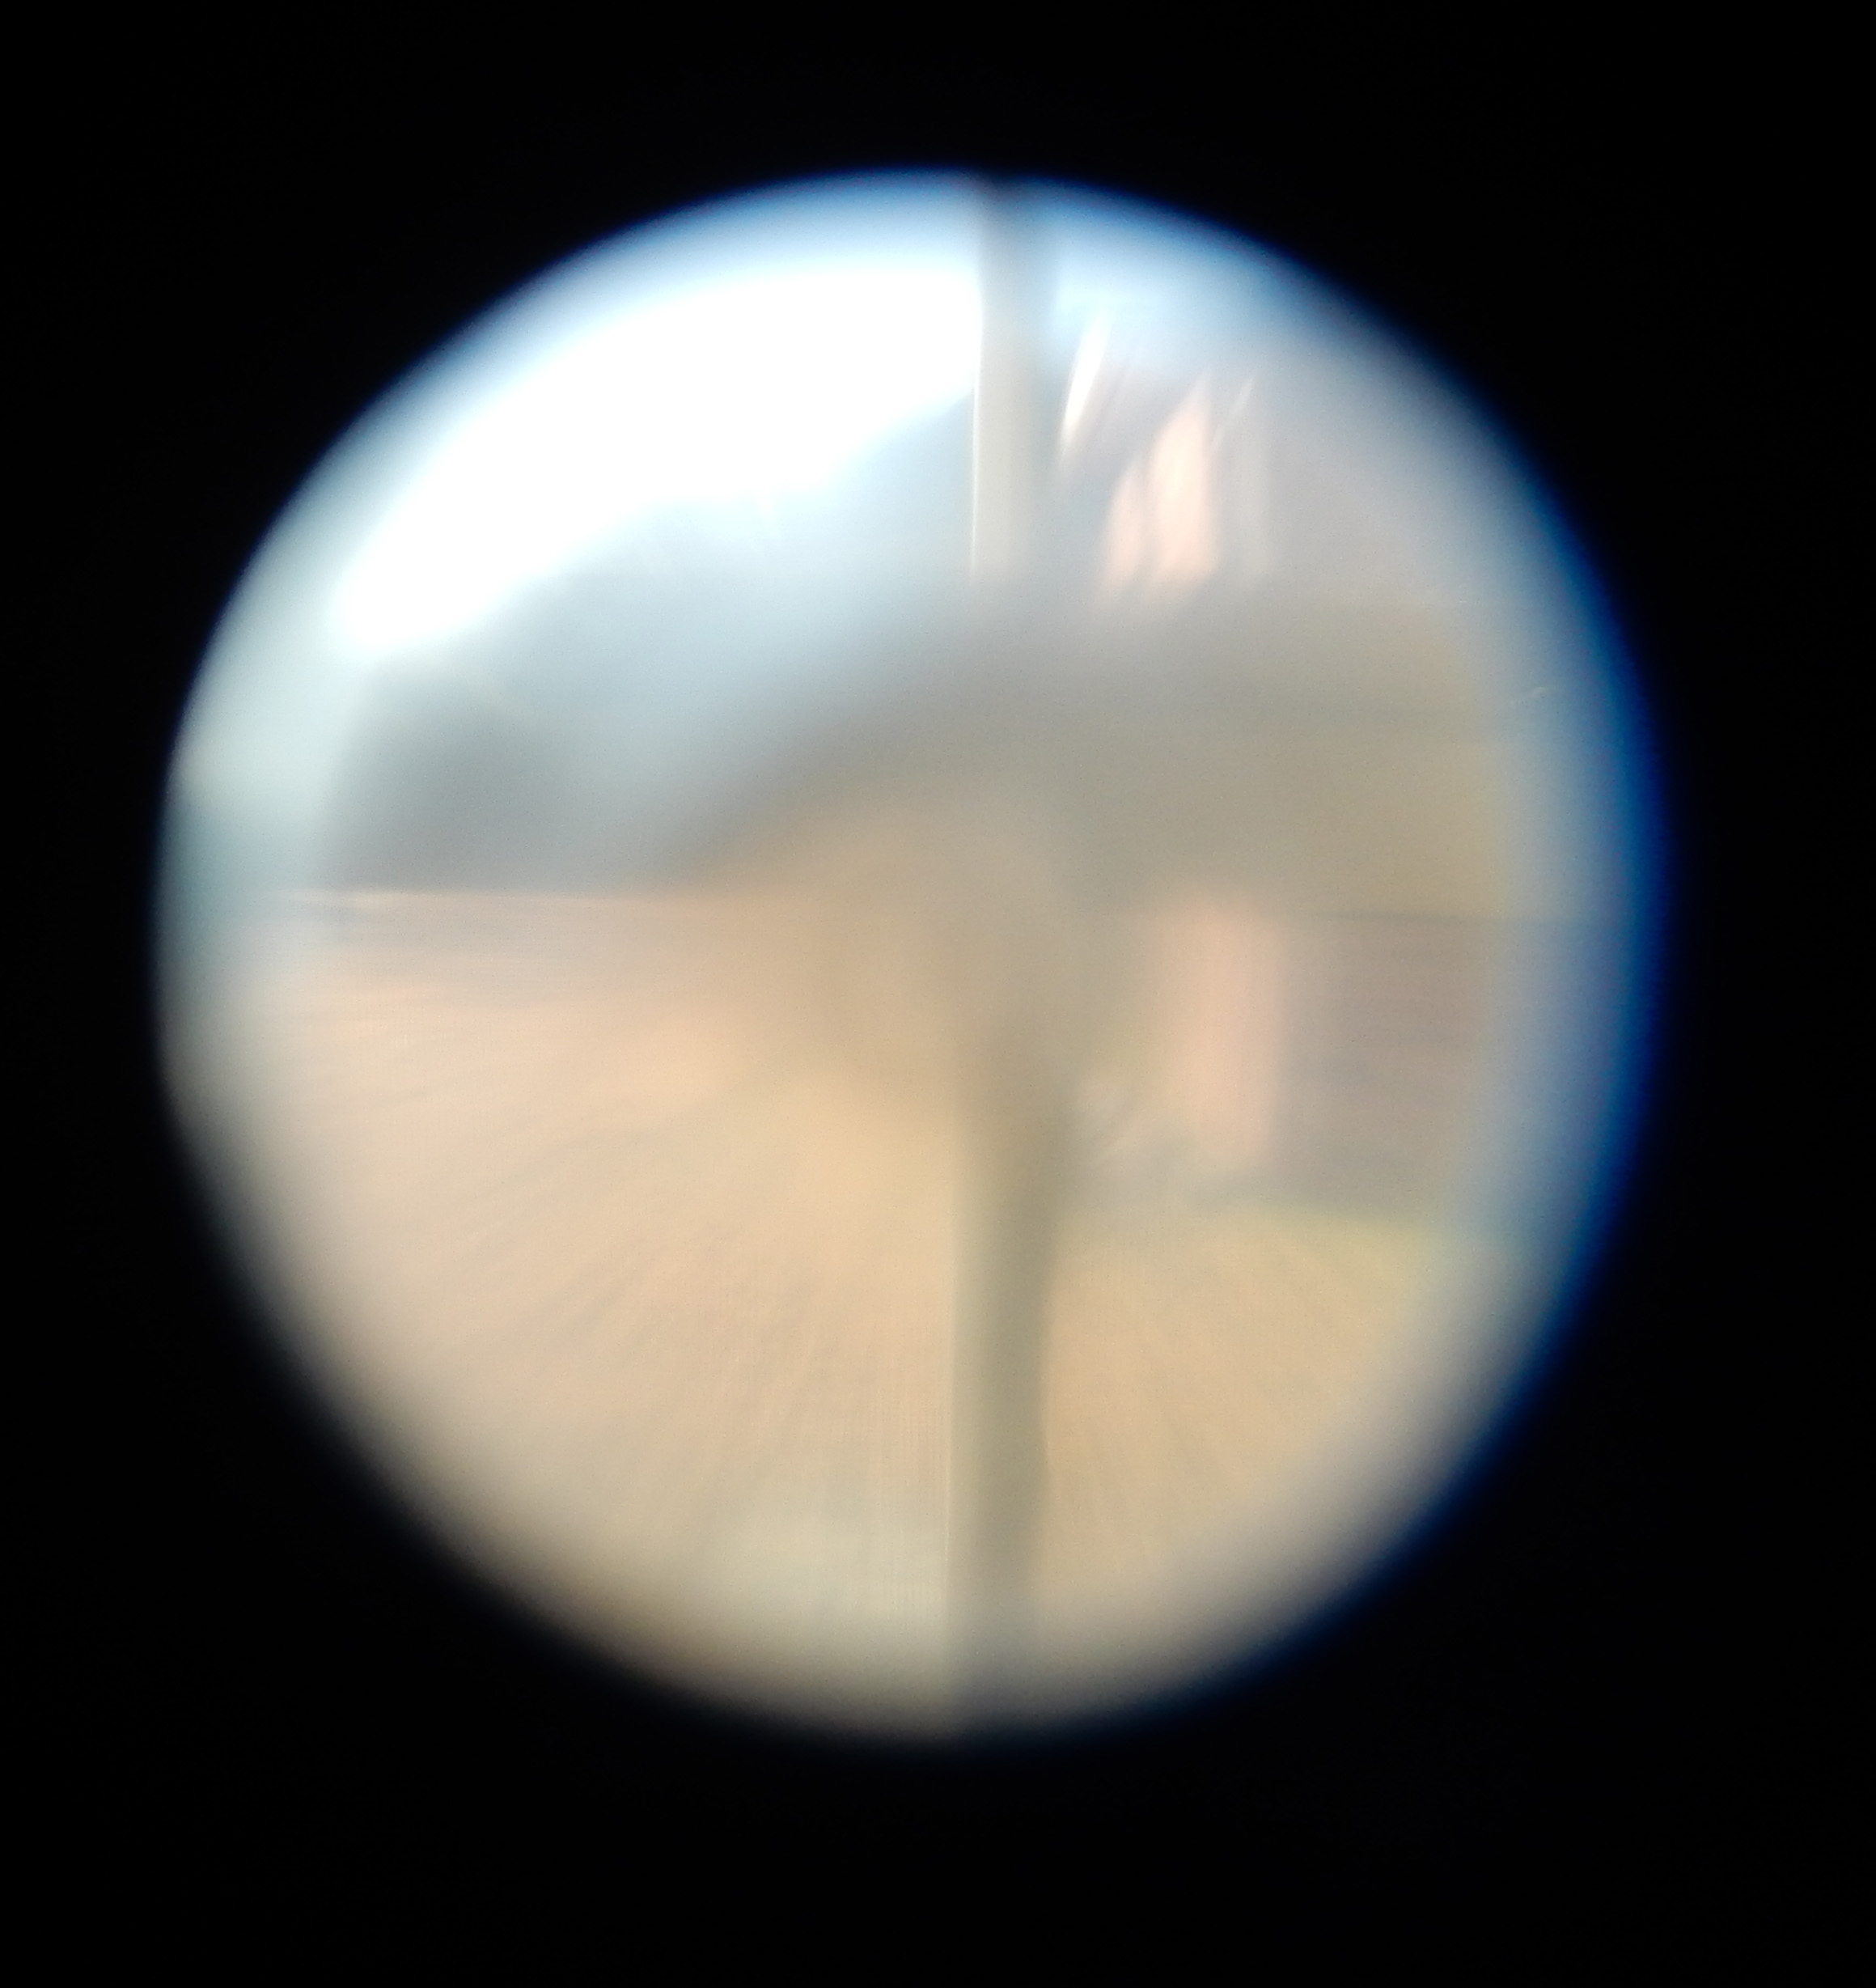 So, you might ask, what is the plan, Stan? And that is to see if I can use a waterproof rear camera in place of the front camera. You'll probably remember that I discovered that the front camera has 4 wires and the rear camera has 5 wires. And the extra wire carries power in addition to the red wire that carries power, like it does on the front camera. So, I'm going to install a relay, as shown in the diagram below. When the mirror supplies power to the red wire that will pull the relay in. And the relay will supply power to both the black and red wires. Plus, the relay will have a snubber diode so the back EMF of the coil doesn't blow up the mirror. Thoughts? Better ideas? 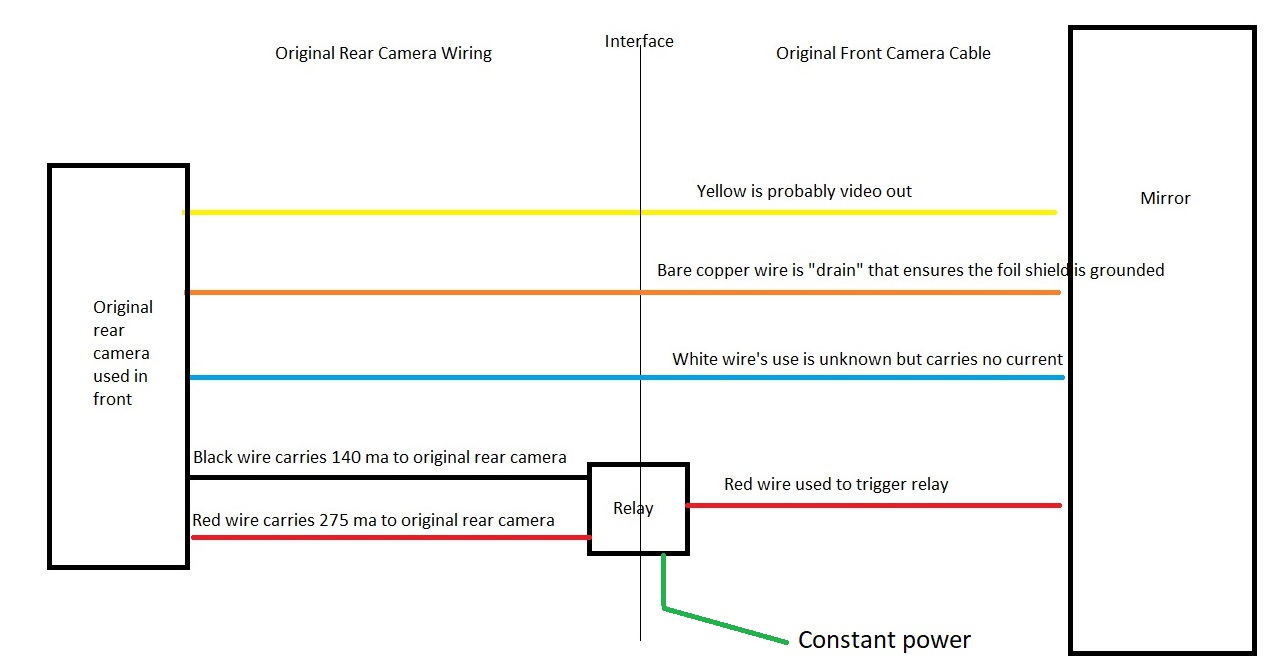 And I think this is where the camera will go. The reason for placing it on the bumper is because if it was on the grille it be obscured by the fog lights when trying to look down. 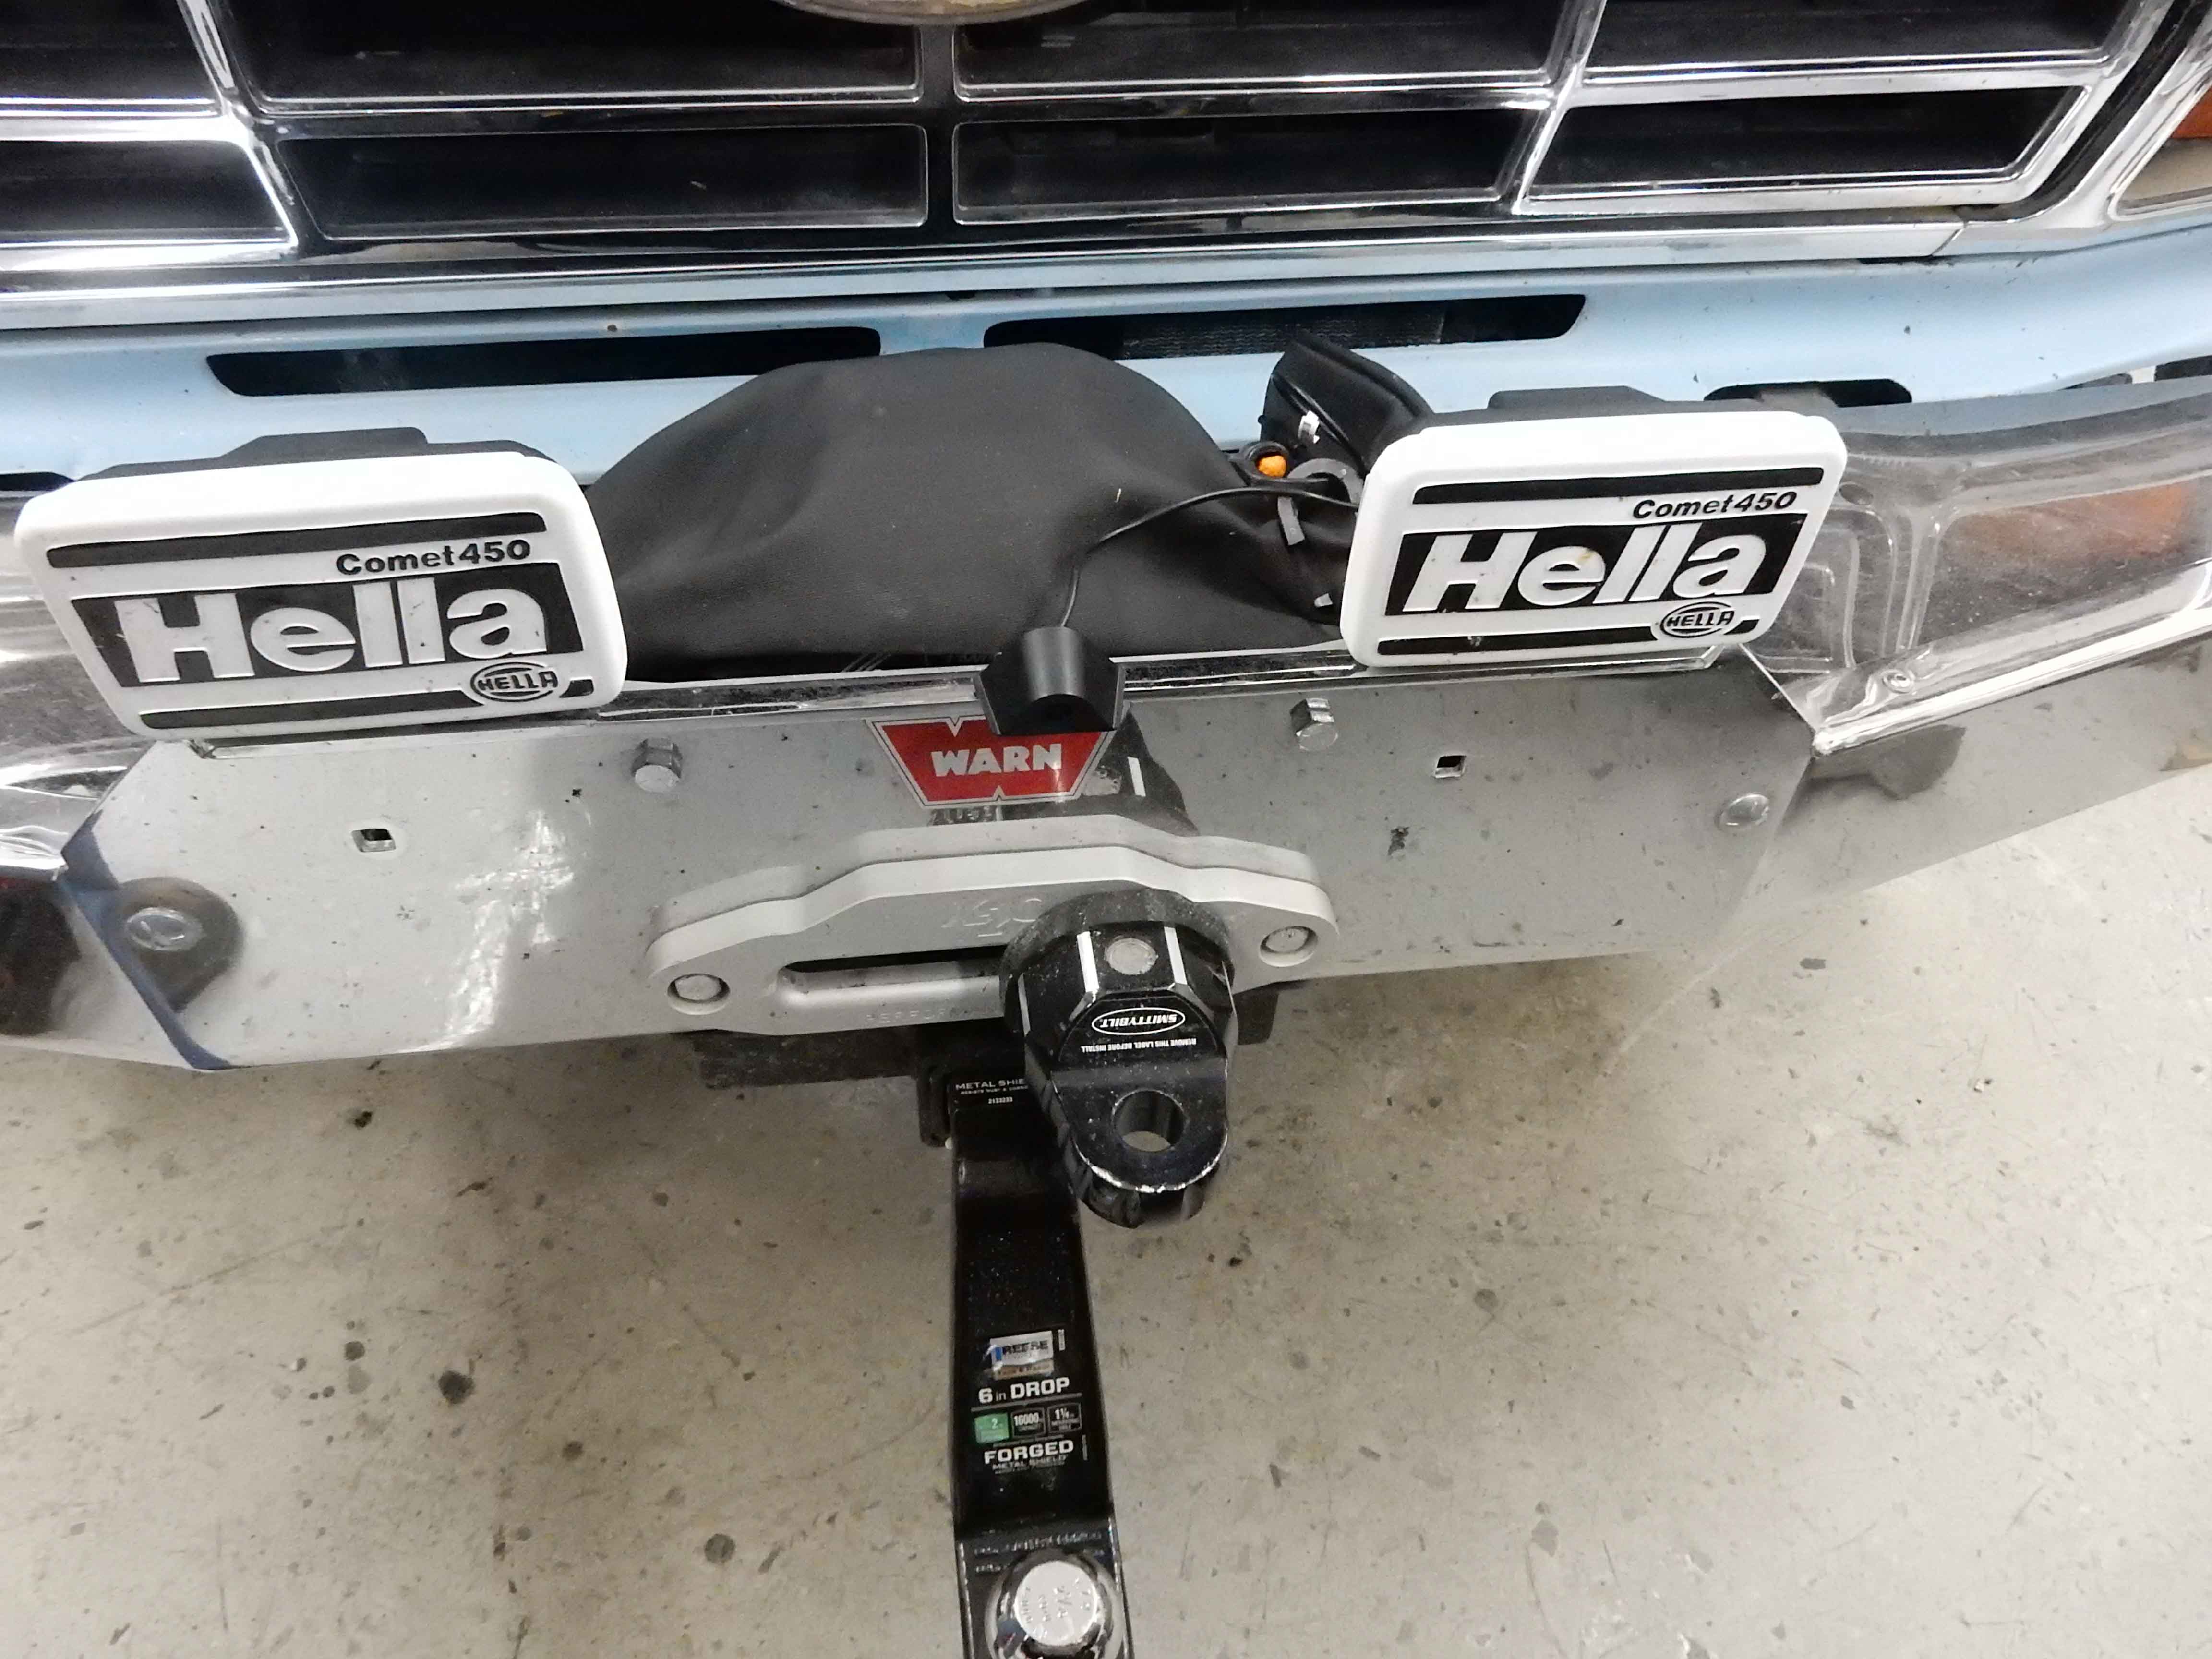
Gary, AKA "Gary fellow": Profile
Dad's: '81 F150 Ranger XLT 4x4: Down for restomod: Full-roller "stroked 351M" w/Trick Flow heads & intake, EEC-V SEFI/E4OD/3.50 gears w/Kevlar clutches
|
|
|
Sounds like a good plan. I like the relay.
That looks like a good spot. No matter where you put it, it will either never get hit by anything, or get hit right off the bat! Too bad the emblem didn’t work out.
Dane
1986 F250HD SC XLT Lariat 4x4 460 C6-Sold 1992 Bronco XLT 4x4 351W E4OD 1998 GMC Sierra SLE K1500 350 4L60E Arizona |
Re: Installation Of A Pormido 998 Mirror/Camera System
|
Administrator
|
If I had a piece of some rod that was dead flat on the end I might be able to use it to polish the emblem's "window" flat. I'll check tomorrow to see if I have a 3/8" drill bit that is dead flat and, if so, give it another go. But I'm doubting I do, and if I do I'm doubting it'll work to make it optically "flat".
So that leaves testing the relay approach. But I don't really need to add a relay just yet. Instead I can put the red and black wires of the rear camera to the battery and connect the rest of the wires to the front input. Assuming that the mirror doesn't need to sense something on the red wire that should work. If it does then I'll add the relay just to give it a load.
Gary, AKA "Gary fellow": Profile
Dad's: '81 F150 Ranger XLT 4x4: Down for restomod: Full-roller "stroked 351M" w/Trick Flow heads & intake, EEC-V SEFI/E4OD/3.50 gears w/Kevlar clutches
|
|
Administrator
|
Looks sharp! Really like that flat adaptor plate
 Relay sounds like the right move here. Maybe I missed it but is Pormido able to confirm that the black and red wires are always supposed to have/not have power at the same time? That's the only question mark I'd have on it. Placement is a tough call. I'd lean towards putting it inside one of the grill openings like was photoshopped but I understand that wouldn't get you the visibility you want directly in front. I do like the sliding oval idea 
Scott
'Camano' 1986 F250 Supercab XLT Lariat 460/C6 'Chanute' 1980 F350 C&C 400/NP 435 - Gin Pole But there ain't nothin' wrong with the radio |
Re: Installation Of A Pormido 998 Mirror/Camera System
|
Administrator
|
Thanks, Scott.
Pormido hasn't confirmed nor denied anything, except to say you can't use the rear camera in the front. But I didn't try the relay idea on them until yesterday and they are gone for the weekend. Perhaps in the morning I'll have an answer. But I've played with the power to the rear camera when it is plugged into the rear connector and both red and black have power all the time the mirror is turned on. Pull the power to either and the camera's view disappears. Add the power back and it comes back on. So I'm fairly sure the relay will work. As for placement, when I get the camera working I'll play with it in various places. But I need to remember that there's no option in the setup to turn the front camera's input over like there is for the rear camera. So I can't turn the camera upside down and let it hang from a crossmember of the grille. In order to mount it at a downward angle I'll probably have to make a wedge and mount the wedge to the grille and the camera to the wedge. Sliding oval? You mean the DB7 arrangement where the machine gun comes out?
Gary, AKA "Gary fellow": Profile
Dad's: '81 F150 Ranger XLT 4x4: Down for restomod: Full-roller "stroked 351M" w/Trick Flow heads & intake, EEC-V SEFI/E4OD/3.50 gears w/Kevlar clutches
|
|
|
In reply to this post by Gary Lewis
How would you feel about drilling an actual hole through the spot you just tried to polish? I'm wondering if you could epoxy or hot-melt a 1" acrylic disc behind there. You'd have a perfectly clear view then. You can get discs like this at hobby/craft stores and online (Amazon/Ebay). I use them for all kinds of things and it occurs to me they might help here? This may help or hurt, but thinking through Pormido telling you that you can't use the rear on the front made me think of another camera install I did on my camper. It had 5 wires that may line up with some of your mysteries. Three were what you already know, power, ground, and video. The other two were an additional power line and a "mirror" line. So the thing is, all these cameras follow basically the same signal standards, so don't take my advice as gospel but I bet you won't blow your mirror hooking it up. What made rear-view cameras special was two things: 1. They typically were "turned on" by going into reverse. This was not done by a signal from the driver's area, to minimize wiring requirements. Instead, they were hooked to the back-up light and when they start producing a video signal, THAT tells the mirror to start displaying the feed. Sort of an "auto on" feature. But a lot of these cameras, they didn't want to draw main power from that back-up light so they provided an extra "real power" input. The back-up light line was just sort of the "on switch". If you read reviews on things like this https://www.amazon.com/NATIKA-Backup-Camera-Waterproof-Reverse/dp/B07H852D49?th=1 you'll see comments like "current draw from camera turning on has blown 2 backup lamps" that plagued cheaper units that lacked this option. The other wire is "almost" certainly a "mirror" function, usually you'd tie it to +12V or GND (and I have no idea which) to "flip" the image on your camera. I wonder if this is why Pormido thinks you can't use the rear camera on the front - they might figure the image will be backwards. But if you have 5 wires you might have the ability to control this. The other thing it could be is an audio line. Lots of backup cameras are made generically, for lots of uses, then just bought in the 100,000 unit lot by integrators and "packaged" into a rearview camera... or a camper camera. So it might be a function you don't need on a car but it's just there... because... These are all guesses, but maybe some of it will help a little. :D
--
1981 F-250 Custom. 6.6L V8, 4 barrel Holley carb, ARA aftermarket A/C. |
Re: Installation Of A Pormido 998 Mirror/Camera System
|
Administrator
|
I think the clear disk might work, but I think the hole may need to be 1/2” in diameter and I don’t think that will look very good.
Which gets me back to the waterproof rear camera - man that would be a much easier and cleaner installation - if it works. And I think it will. And I’ll bet you are right on the “mirror” wire. It will surely be the white one as both front and rear can be reversed. But it will be tied to 5v or ground as the system never sees 12v. As for the backup circuit, the backup camera wiring can be connected there, and that does two things. First, it brings the rear view on the screen. Second, it puts guidelines on the screen. But it doesn’t power anything. The cameras are actually powered all the time the mirror is on as it always is recording their output. Anyway, thanks for the input!
Gary, AKA "Gary fellow": Profile
Dad's: '81 F150 Ranger XLT 4x4: Down for restomod: Full-roller "stroked 351M" w/Trick Flow heads & intake, EEC-V SEFI/E4OD/3.50 gears w/Kevlar clutches
|
Re: Installation Of A Pormido 998 Mirror/Camera System
|
Administrator
|
Well, we are on a roll!!!! Got this back from Melissa at Pormido:
Hi Gary,
|
| Edit this page |