Big Blue's Seat Platform


Administrator
|
Ok, more pics of measurement methods awa the measurements themselves:
Console: Height: 21 1/4" from door sillRear to storage unit: 3 15/16"Driver's Seat: Leg room to throttle: 38 1/4" to 2" ahead of seat backSeat bottom to door sill: 15 1//2" - 1 3/8" = 14 1/8"To lock bolt: 7 1/2" from 2" ahead of seat back/bottom jointFront axle to back of cab: 76" on Big Blue & 76 7/8" on Dad's. Spec's are 76.81". So it looks like Big Blue's front axle is 7/8" forward of factory.Front axle to 2" forward of seat back/bottom joint = 61 3/4" & specs are 61.26". So if you subtract the 7/8" of front axle offset then Big Blue's seat is at 60 7/8", which is 3/8" farther forward than spec.Top of window sill to seat bottom: 15 1/2 @ 2" forward of seat back/bottom joint.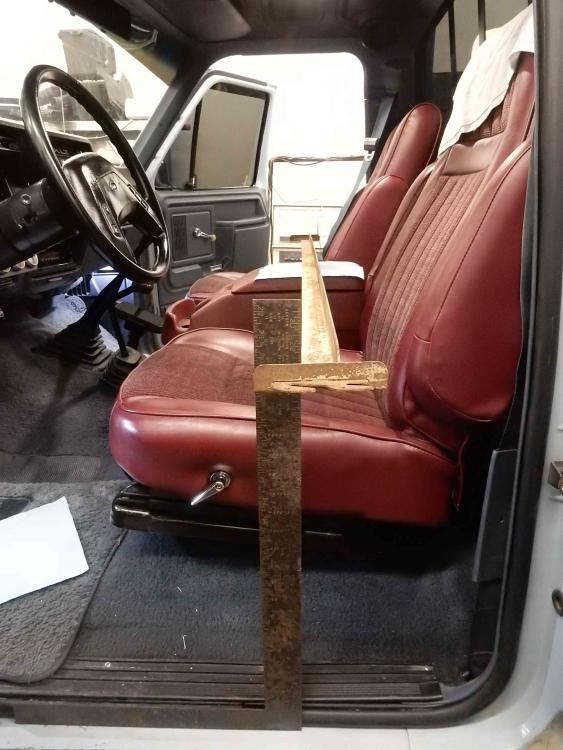 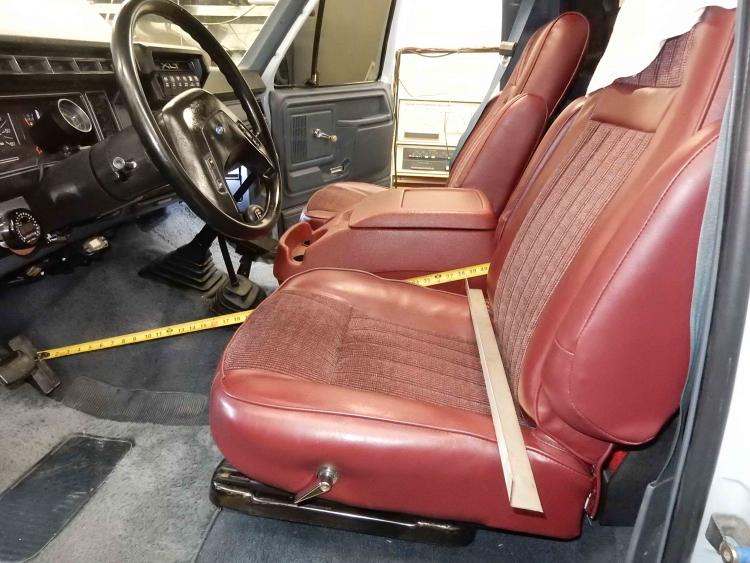 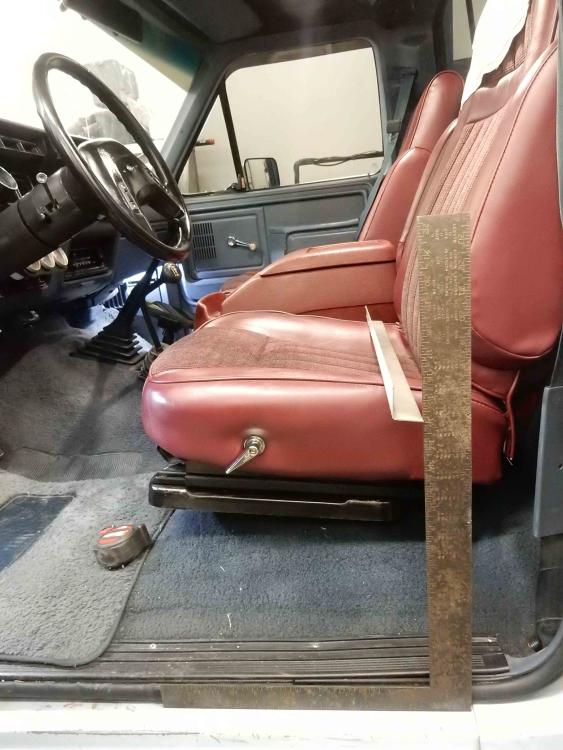 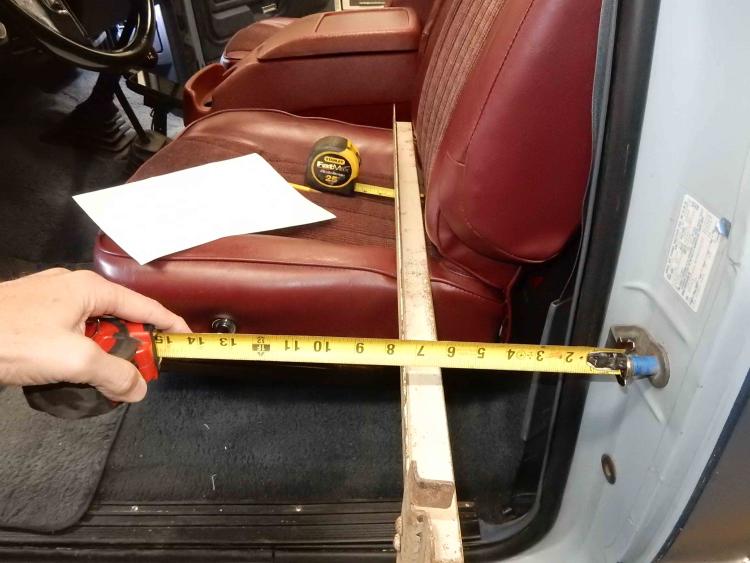 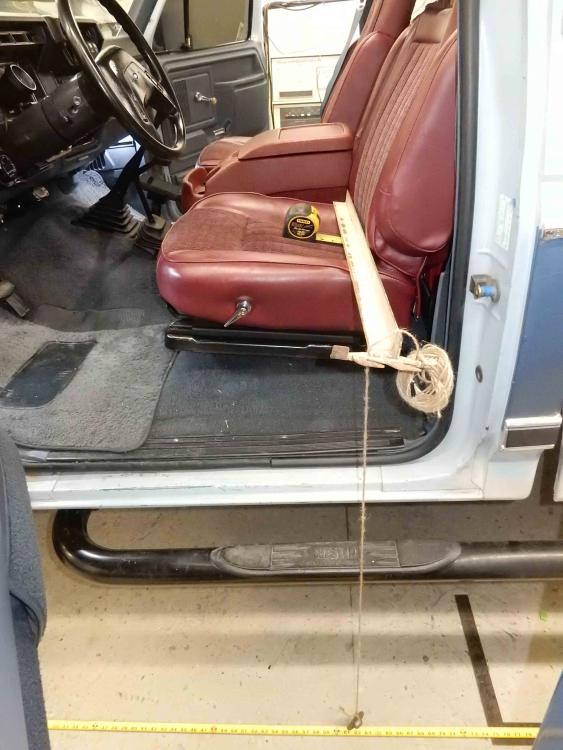 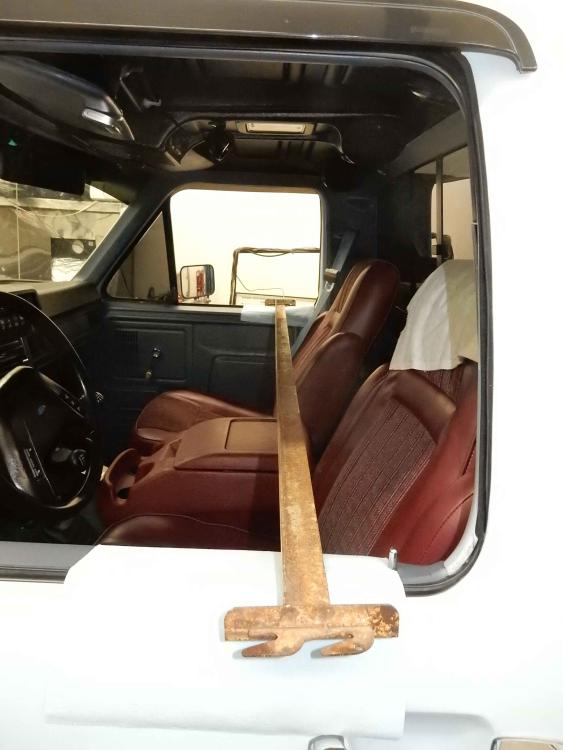
Gary, AKA "Gary fellow": Profile
Dad's: '81 F150 Ranger XLT 4x4: Down for restomod: Full-roller "stroked 351M" w/Trick Flow heads & intake, EEC-V SEFI/E4OD/3.50 gears w/Kevlar clutches
|
|
Administrator
|
I tried to draw my idea full scale, but I can't fit it in frame.
Jim,
Lil'Red is a '87 F250 HD, 4.10's, 1356 4x4, Zf-5, 3G, PMGR, Saginaw PS, desmogged with a Holley 80508 and Performer intake. Too much other stuff to mention. |
|
Administrator
|
Jim - The drawing helps but I've not "twigged" yet. (My Brit friends would say I'm as thick as two planks.) In the statement above, when you talk about "the angle" I think you mean the angle iron, not the 4-8 degree angle I'm trying to create. Right? But I get lost with the "angle the front, fold the bottom up" bit. Can you help me with that, please?
Gary, AKA "Gary fellow": Profile
Dad's: '81 F150 Ranger XLT 4x4: Down for restomod: Full-roller "stroked 351M" w/Trick Flow heads & intake, EEC-V SEFI/E4OD/3.50 gears w/Kevlar clutches
|
|
Administrator
|
Okay, let me get away from the word "angle" and use "stock" for the bedframe...
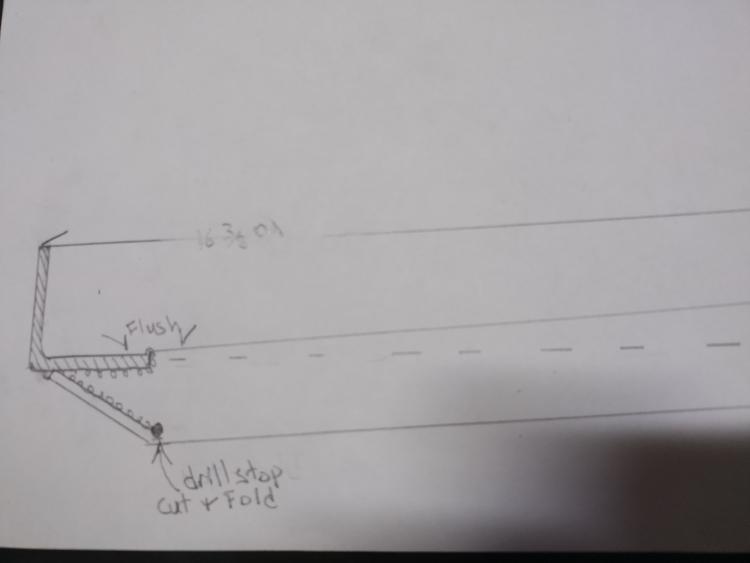
This section is just in front of the box tube 'spreader/track support' I envisioned If you look across my drawing(s)  you can see a dashed line that represents the upper face of the lower leg of the stock. you can see a dashed line that represents the upper face of the lower leg of the stock.
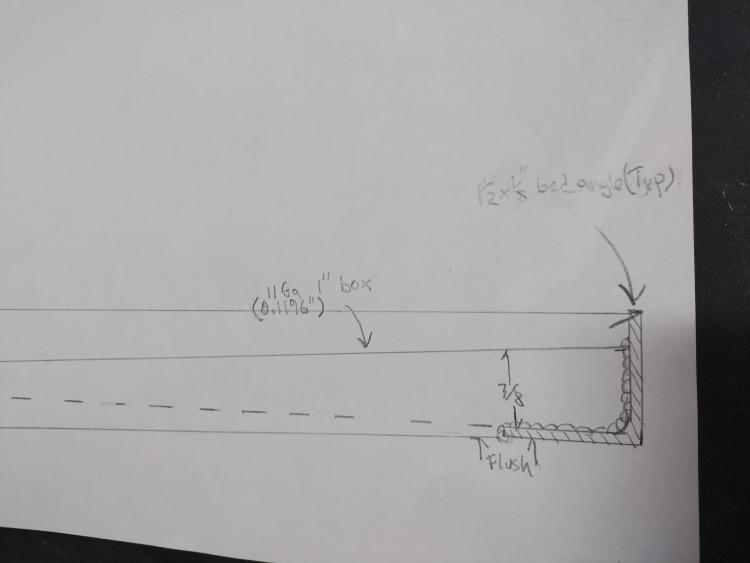
In the first photo, the top of the box is cut away so it is flush with the upper face of the horizontal leg of the stock. Because this tube sticks out below the seat frame, if I got crafty, I would drill a small hole through it horizontally and cut the sides off at an angle so I could fold the lower part up to the frame and weld it shut all around. This would keep it from snagging my hand, jump starter, gloves or whatever junk I keep stuffed under there. In the second photo, the bottom of the 11Ga. box is cut away 1 3/8" back so it is flush with the bottom of the 1/8 stock (making the difference 7/8") You therefore get your 7/8" over 16 1/2" ... or whatever you suggested equals the degrees you needed. That end butts the vertical leg and gets welded all around. Sorry I can be very confusing at times! Especially when my best laid plans go out the window. 😆
Jim,
Lil'Red is a '87 F250 HD, 4.10's, 1356 4x4, Zf-5, 3G, PMGR, Saginaw PS, desmogged with a Holley 80508 and Performer intake. Too much other stuff to mention. |
|
Administrator
|
Thanks for the further explanation. I think I have it. Part of the problem was me forgetting that I need to rock the seat forward and not backward, so I was looking at the drawings the wrong way 'round.
And I think I understand the folding as well, although I'm not sure whether it'll be easier to fold or to weld on a cap. But the point is to create smooth, closed pieces that don't grab or cut things. I think what I need to do is to create the frame/platform, bolt it in, and then set the seat in and play with spacers behind the rear of the track so I see what angle will work best, meaning bring the top of the seatback forward enough to allow the seat to go rearward as far as is possible. Here's my previous statement: But the seatback is 30" tall and tilting it forward 8 degrees would move the top of the seatback forward 4.2", and that's a lot. I think I'd be happy tilting it forward half that as it would allow the seat to go back about that far w/o the top of the seat hitting the rear window. So maybe I need a 7/8" spacer?So if I tilt it forward 4 degrees by raising the rear of the seat 7/8" the top of the seatback will go forward 2.1". And from memory I think the seatback is currently ~ 1 1/2" from the storage unit. So that would work out about right as it would let me move the seat rearward 1 1/2" and still have the top clear the window. And if I figure out how to do that in a way that prevents the seat from moving I could then sit in the seat and see how it feels before committing to that position. Ok, we leave in the morning for a trip to see the kids, so this will have to sit for quite a while until I can get back to it. But just to record how I had been thinking of doing it, I was thinking of cutting a 16 1/2" piece of 1" square tubing so it was wall thickness in front and full height in the rear, giving about the 7/8" delta. Then I was going to put it open-side down on the fore/aft piece of angle iron and weld it to the angle iron. That would give the smooth top surface of the wedge on which to set the track. And nuts welded inside the wedge would take the bolts coming through the tracks to hold them on. And if the cross pieces of angle iron are 16 1/2" apart the open ends of the wedge will be covered by the vertical flanges of the angle iron. It is clear to me what those words mean, but I've not yet drawn it up so doubt it'll be clear to y'all. But when I get back maybe I can see if it make sense in reality.
Gary, AKA "Gary fellow": Profile
Dad's: '81 F150 Ranger XLT 4x4: Down for restomod: Full-roller "stroked 351M" w/Trick Flow heads & intake, EEC-V SEFI/E4OD/3.50 gears w/Kevlar clutches
|
|
Administrator
|
Your CAD shows 16 3/8" overall, so 16 1/8 inside the frame if the stock is 1/8" thick...
I'm not clear on how "the open ends of the wedge will be covered by the vertical flanges of the angle iron" if the front of the wedge is only "wall thickness in front and full height in the rear" where is the front open end, and how is it covered by the vertical flange? Drive safe. Enjoy your kin and  This will all still be here when you get back. 
Jim,
Lil'Red is a '87 F250 HD, 4.10's, 1356 4x4, Zf-5, 3G, PMGR, Saginaw PS, desmogged with a Holley 80508 and Performer intake. Too much other stuff to mention. |
|
Administrator
|
Here's a quick and dirty drawing. The angle of the base has the vertical side going up, and the wedge nestles into the angle such that the open ends are protected.
By having the vertical part going up the seat can be as low as possible, and with the wedge the back will be pretty much where it is now. I hope. 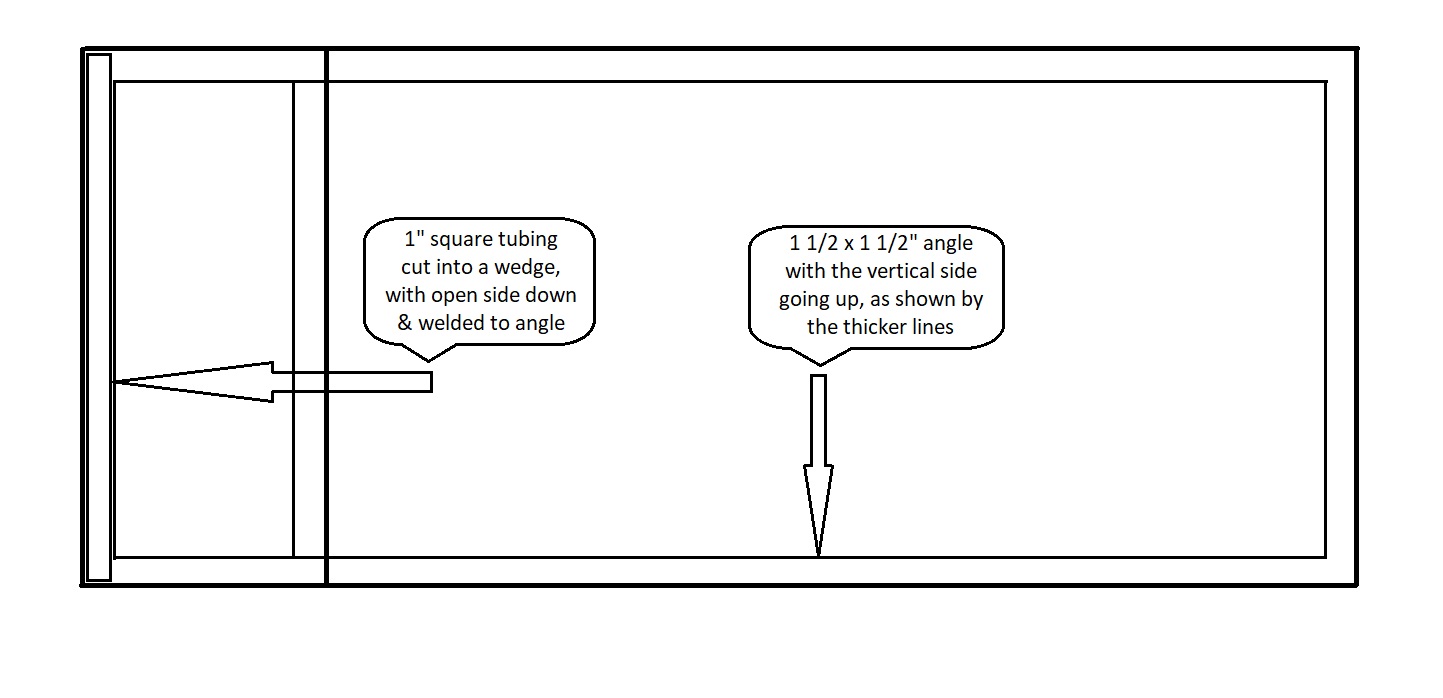
Gary, AKA "Gary fellow": Profile
Dad's: '81 F150 Ranger XLT 4x4: Down for restomod: Full-roller "stroked 351M" w/Trick Flow heads & intake, EEC-V SEFI/E4OD/3.50 gears w/Kevlar clutches
|
|
Administrator
|
Okay, we're back to a plan view, but you intend to lay a sliver of box tube inside a piece of 'stock' instead of replacing it.
I expect there is an inside radius in the stock and you will have to cut or grind a bunch of the outside leg of your wedge piece for it to sit flat. Interesting..... but it sure seems like bad access and a lot of work.
Jim,
Lil'Red is a '87 F250 HD, 4.10's, 1356 4x4, Zf-5, 3G, PMGR, Saginaw PS, desmogged with a Holley 80508 and Performer intake. Too much other stuff to mention. |
|
Administrator
|
You are right that the bed rails have a radius. But I'm not sure it'll be all that much work. My saw has the ability to cut angles, so I'm thinking I can cut two wedges out of one piece, and I can make one leg a bit shorter than the other.
As for access, presuming welding access, there's enough room on the 1 1/2" angle to space the wedge out 1/8" and weld right down that gap. And I can make the wedge 1/4" shorter than the distance the front and rear angles are apart, therefore giving 1/8" on either end to weld. But your questions raise enough concern that I'll proceed with caution. I don't want to get the whole frame made and then mess up on welding in the wedge. Maybe I should braze it in?
Gary, AKA "Gary fellow": Profile
Dad's: '81 F150 Ranger XLT 4x4: Down for restomod: Full-roller "stroked 351M" w/Trick Flow heads & intake, EEC-V SEFI/E4OD/3.50 gears w/Kevlar clutches
|
|
Administrator
|
Actually I was thinking about the challenge of attaching the tracks and where they will go when in the full forward position.
I have never worked with these captains chairs, and only have pictures like this one from above to go by.  If the wedge (and therefore attaching bolt) is right up against the inside of the stock's vertical flange, how do you reach it to install it? How do you even see it?  I wouldn't be concerned about welding v brazing. Torch brazing takes a lot of heat. Not as high heat as welding, but unless you are using a tig torch with silicon bronze rod it means big flames and lots of flux all over everything. You have to get the wedge and outer framerail glowing hot. You have to rinse that nasty flux out from under the wedge. I'd much rather make a neat mig weld quickly and be done with it. But then, I think I'd rather use the 1" box as the fore-aft structure and do away with the angle, like I tried to show above.
Jim,
Lil'Red is a '87 F250 HD, 4.10's, 1356 4x4, Zf-5, 3G, PMGR, Saginaw PS, desmogged with a Holley 80508 and Performer intake. Too much other stuff to mention. |
|
Administrator
|
Ok, three issues: access to bolts; welding vs brazing; and use of angle + box or just box.
On the bolts, they are not right at the end of the tracks, and you get to them by running the seat fore/aft, which allows a straight shot to them. And my plan has been to weld a nut on the underside of the U to take the bolt from the track. Obviously I need to see if the nut is too tall and will hit the angle, but I could drill the angle at that point. In fact, that would allow me to reach through with a socket and not have to weld the nut. As for brazing, good point. I probably don't have enough heat in my MAPP gas torch, but can easily weld the pieces. Now for the real question - angle & box or just box. And I have to admit I hadn't realized you were advocating just the box.  But I think I just twigged to what you've been saying. Now I understand that you were saying to cut the bottom of the box away at the rear where it sits on the rear crosspiece, and it was the raw end of that you were worried about finishing. Right? But I think I just twigged to what you've been saying. Now I understand that you were saying to cut the bottom of the box away at the rear where it sits on the rear crosspiece, and it was the raw end of that you were worried about finishing. Right?
If I have it right that then moves us back to how to fasten the tracks to the box. I could drill through and put the nuts on the bottom, but worry I might bend the box. I could drill the box so the nut could be put on the underside of the top surface. Or I could put a spacer in to prevent collapse. Thoughts?
Gary, AKA "Gary fellow": Profile
Dad's: '81 F150 Ranger XLT 4x4: Down for restomod: Full-roller "stroked 351M" w/Trick Flow heads & intake, EEC-V SEFI/E4OD/3.50 gears w/Kevlar clutches
|
|
Administrator
|
I said box because I have a piece of it right here and I knew that it would become 7/8" high (difference) if it was let into the top at one side and the bottom at the other.
It could be 1x1 1/2", 1x2", whatever you need to support your track. Ask welder Scott if he has any handy drops at his shop or ask your local steel shop/distributor. They are usually glad to get anything more than scrap $ for material that's underfoot and already paid for by another job. I probably wouldn't use nuts at all. Just drill and tap (or use a thread forming flange head screw like Ford would have) The tracks will rip off or the seat frame will tear long before the screws would pull out. I imagine you still need fore & aft stock (angle) to bolt to the floor.
Jim,
Lil'Red is a '87 F250 HD, 4.10's, 1356 4x4, Zf-5, 3G, PMGR, Saginaw PS, desmogged with a Holley 80508 and Performer intake. Too much other stuff to mention. |
|
Administrator
|
After 5 hours of driving with no stop, I'm ready for computing.
 On the screws/nuts, it just dawned on me that there needs to be room for the screw to come through, so I will have to drill a hole in the box or angle, whichever way I go. That being the case I can reach up in and put a nut on. Or use a nutsert. Or self-tapping. Good idea on asking WelderScott. I'll do that. And yes, I'll need the angle for cross pieces, but they bolt to the original bench seat mounts which in turn bolt to the floor.
Gary, AKA "Gary fellow": Profile
Dad's: '81 F150 Ranger XLT 4x4: Down for restomod: Full-roller "stroked 351M" w/Trick Flow heads & intake, EEC-V SEFI/E4OD/3.50 gears w/Kevlar clutches
|
|
Administrator
|
Right, I see how you need to attach this seat platform to the existing stays under the floor, but I'm not quite certain about how the Captain's seats interface with the 'pan' or what you've drawn in CAD. (I admit my ignorance)
Self tapping 'body' bolts are on the shelf at my local Ace Hardware. (I expect it's not a problem in "Podunk" either) Still not sure how wide the tracks are, or how they slide forward past the 1 1/2" upturned 'stock' at the front side of the 'seat platform'? Obviously you have holiday time to ruminate on this... 
Jim,
Lil'Red is a '87 F250 HD, 4.10's, 1356 4x4, Zf-5, 3G, PMGR, Saginaw PS, desmogged with a Holley 80508 and Performer intake. Too much other stuff to mention. |
|
Administrator
|
I think the tracks are 1" wide, and I know they fit nicely on the 1" square tubing I used last round for a riser.
On it I used nutserts, but will have to see what I can get in there this round. As for sliding past the upturned 1 1/2" stock front/rear, that has been a concern. My plan is to put the seats on the work table and mock everything up - especially to check out the clearance of the upturned stock. I think it'll work, but have to check that out. And yes, I can think about this for the next couple of weeks. Who knows what I'll think up while driving all those many hours back home?
Gary, AKA "Gary fellow": Profile
Dad's: '81 F150 Ranger XLT 4x4: Down for restomod: Full-roller "stroked 351M" w/Trick Flow heads & intake, EEC-V SEFI/E4OD/3.50 gears w/Kevlar clutches
|
|
Administrator
|
I don't think rearward is an issue, that's why you want to tilt it forward anyhow, isn't it?
But the 1.375 x3 barleycorns at the front made me wonder. Not a fan of nutserts because they do vibrate loose and I imagine could tear out under impact. 11ga. (.120) or 1/8 tube holds screws just fine.
Jim,
Lil'Red is a '87 F250 HD, 4.10's, 1356 4x4, Zf-5, 3G, PMGR, Saginaw PS, desmogged with a Holley 80508 and Performer intake. Too much other stuff to mention. |
|
Administrator
|
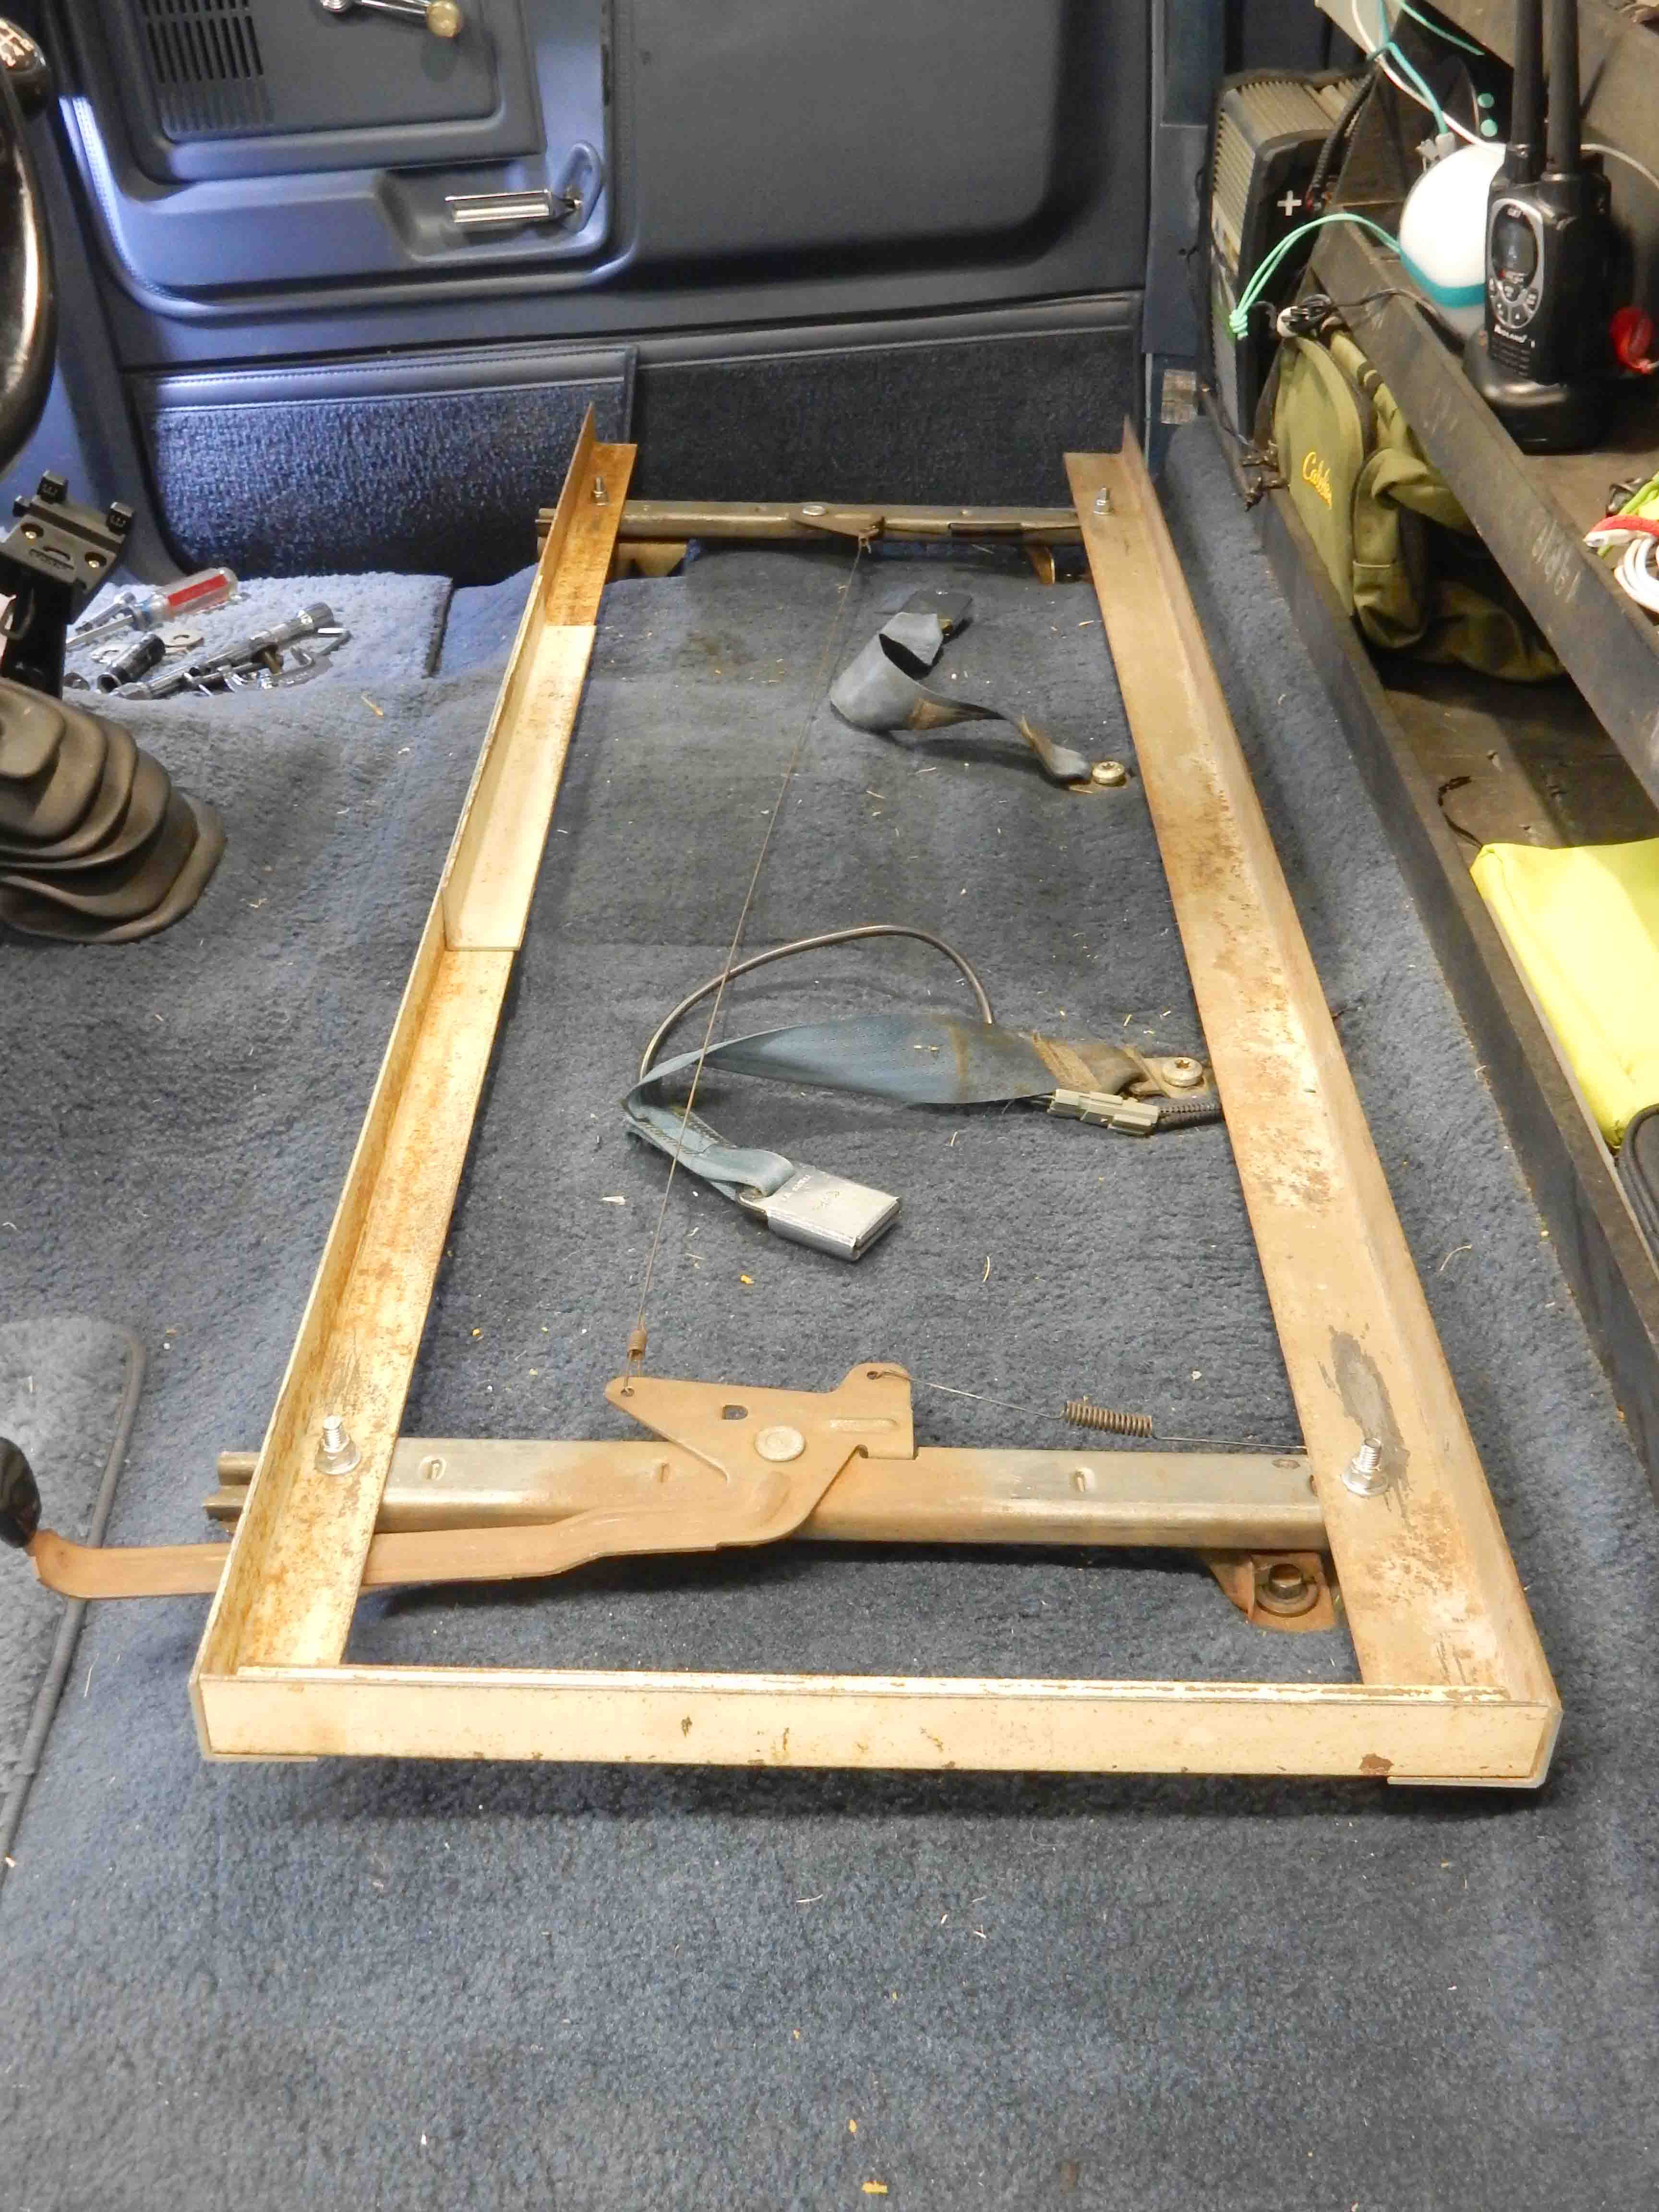
I've revived this project since my son is ill and we aren't going to the Ozarks this weekend. And Janey has a doctor's checkup next week, so we aren't going to do the trip to western OK for a fortnight, giving me time to make the new seat platform - I hope.
So I pulled everything out today - and discovered (remembered?) that the RR bolt holding the seat to the floor was stripped. So I ordered a helicoil set in 10mm x 1.5. Then I bolted the bench seat brackets in, cut the bed rails to 53", and clamped them in. But I realized that the upturned angle at the front and rear may hit the seat as it slides fore and aft on its tracks. The tracks come out 2 1/2" in front and 2" in back as they slide. So tomorrow I'm going to have to figure that out. One approach would be to not use the seat's track and just the base's adjustment. Another would be to raise the seat up enough to clear the angle. Perhaps there are more? Last, I'd taken lots of measurements on the seats, but needed some on the console. These two pics are to remind me that the position we like is 6" forward of the top shelf to the dip in the console lid, and the edge of the lid is half the width of my straightedge lower than the bottom edge of the top shelf. 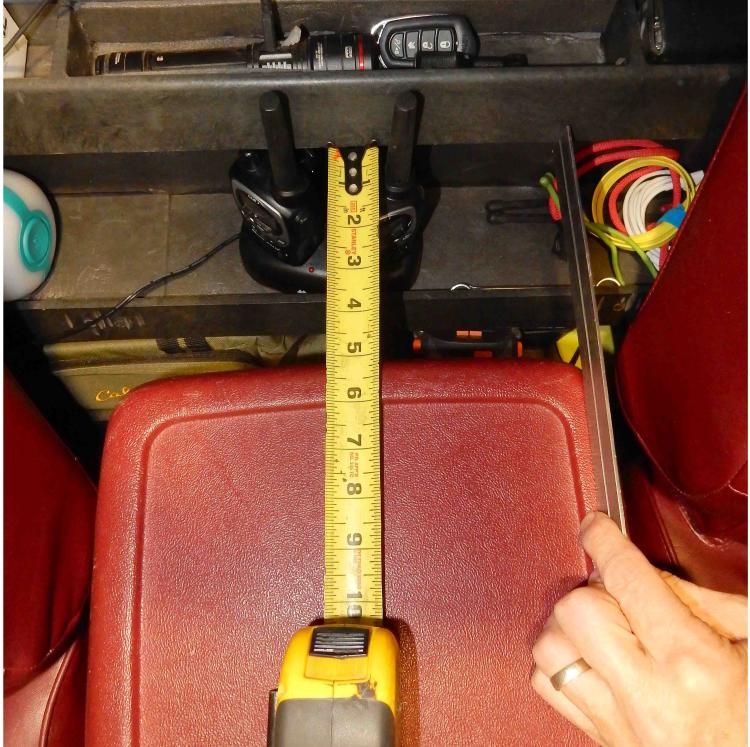 
Gary, AKA "Gary fellow": Profile
Dad's: '81 F150 Ranger XLT 4x4: Down for restomod: Full-roller "stroked 351M" w/Trick Flow heads & intake, EEC-V SEFI/E4OD/3.50 gears w/Kevlar clutches
|
|
Administrator
|
I remember questioning the sliders.
Are you committed to using bedframes? 11Ga 1x2 on the flat would flush out with your 1x1 track supports and still be plenty strong.
Jim,
Lil'Red is a '87 F250 HD, 4.10's, 1356 4x4, Zf-5, 3G, PMGR, Saginaw PS, desmogged with a Holley 80508 and Performer intake. Too much other stuff to mention. |
|
Administrator
|
No, I'm not committed to using bed rails. After I see what works and doesn't tomorrow I may well check out the 1 x 2 idea. Thanks.
I just wanted to check to see how it might all go together so started cutting things up today.
Gary, AKA "Gary fellow": Profile
Dad's: '81 F150 Ranger XLT 4x4: Down for restomod: Full-roller "stroked 351M" w/Trick Flow heads & intake, EEC-V SEFI/E4OD/3.50 gears w/Kevlar clutches
|
|
Administrator
|
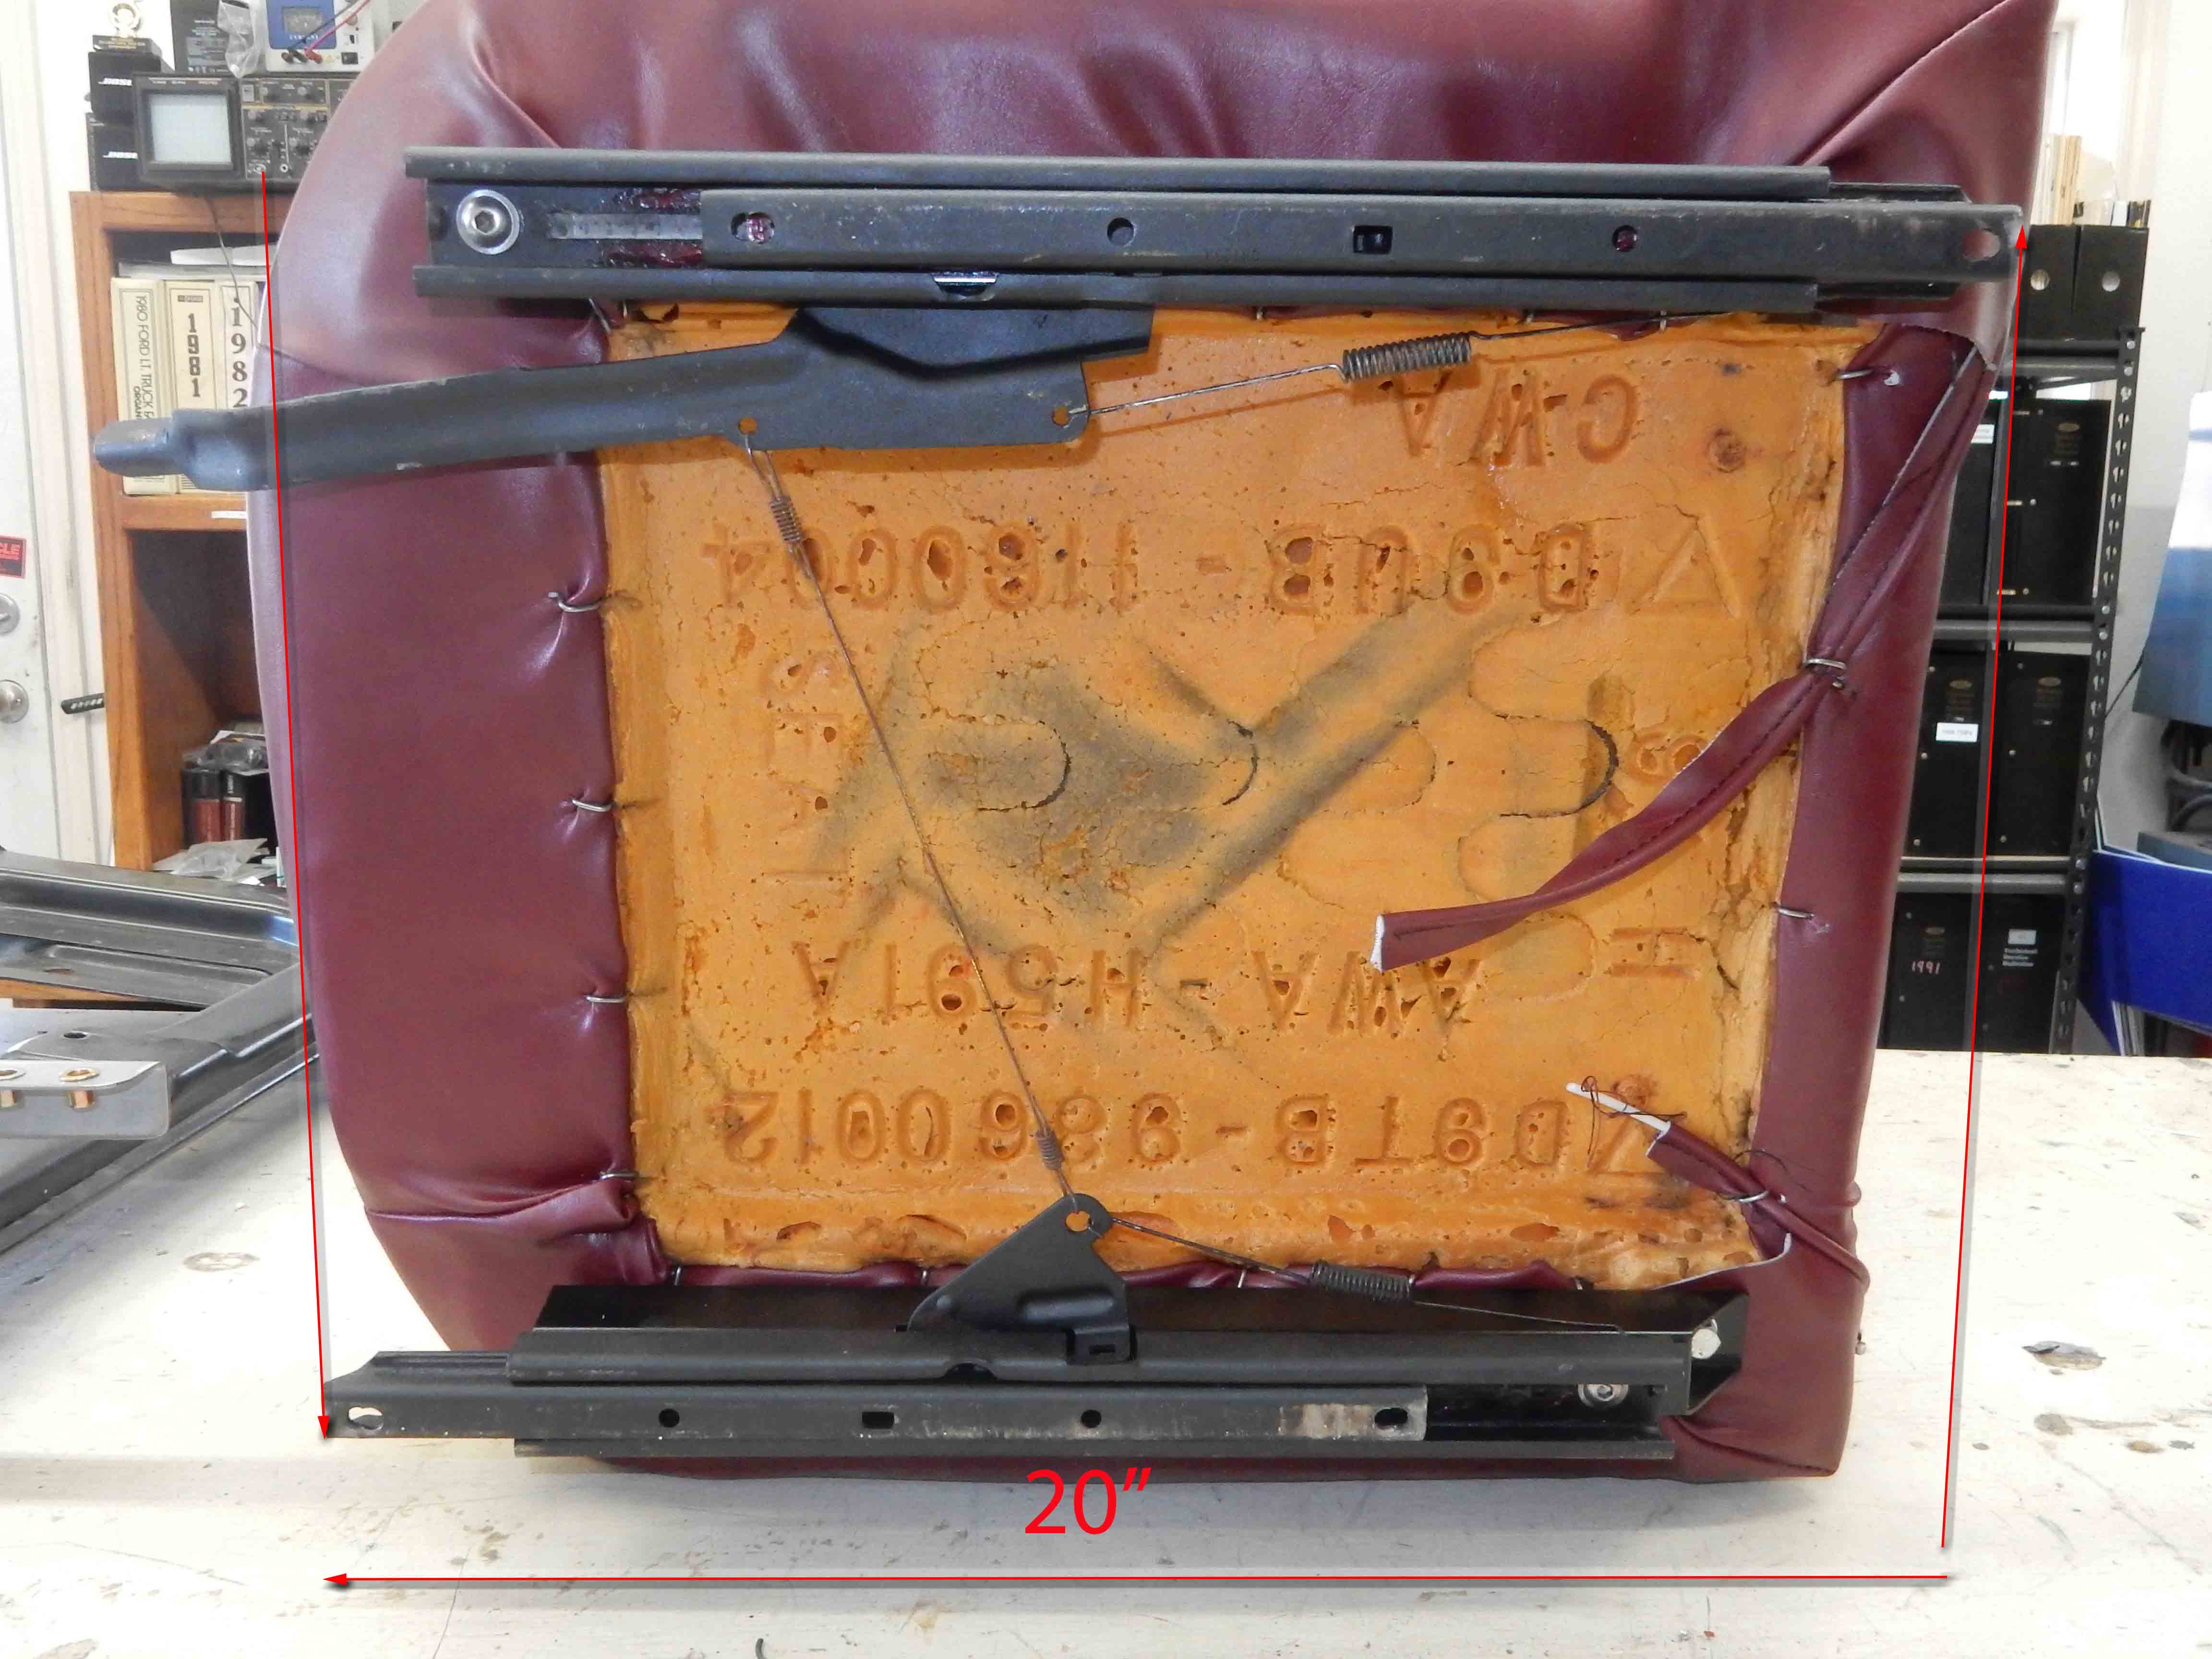
Well, I think I had an epiphany today. Basically it is that you cannot stuff 20" of "stuff" in a 17" space.
In the shot below you can see that with the tracks extended fore and aft it is 20" from the point where the tracks are all the way forward to where they are all the way back. And since it is only 17" between the front and rear uprights of the cross pieces there's no way it is going to fit. Further, it is only 1/4" from the bottom of the lower track to the bottom of the upper track. So it really doesn't matter how high the upright of the cross pieces is, it isn't going to work without some changes.
 I can only think of three ways to make it work, but perhaps y'all can think of more:
Gary, AKA "Gary fellow": Profile
Dad's: '81 F150 Ranger XLT 4x4: Down for restomod: Full-roller "stroked 351M" w/Trick Flow heads & intake, EEC-V SEFI/E4OD/3.50 gears w/Kevlar clutches
|
| Edit this page |