Big Blue's Seat Platform


Administrator
|
"you cannot stuff 20" of "stuff" in a 17" space."
There's a far less 'family friendly' turn of phrase that has come to my mind any number of times..... The whole of Big Blue is the epitome of this mindset. I asked originally about facing the angle to the floor, and considered how that would further limit fastener access. You seemed concerned about headroom and the rear window. (but you have the storage shelf back there) And then you brought up angling the seat forward 7/8" But of the three, I agree, option 3 is the best way forward. I also still think 1x2 box with the track support flush at the front and sitting on top at the rear would have solved all of this.
Jim,
Lil'Red is a '87 F250 HD, 4.10's, 1356 4x4, Zf-5, 3G, PMGR, Saginaw PS, desmogged with a Holley 80508 and Performer intake. Too much other stuff to mention. |
|
Administrator
|
I've drawn up what I think you mean and it might work. But before I ask questions let me 'splain what I have, with the drawing being an end view.
Black: That's the cross pieces of angle with a piece at the bottom tying them togetherRed: That's the wedge or 1x2 box, although its height at the rear is the same as the flange on the angleBlue: That's the bottom half of the seat's track, the part that gets bolted to the wedge or base, and it protrudes only about 3/16" past the upper part of the trackGreen: That's the upper part of the seat's track, the part that gets bolted to the seat and moves fore/aft, with the dashed line showing where it would go to the rearThe upper part of the track extends 2 1/2 forward of the lower part at full extension. And given that it is only 3/16" above the bottom of the lower track I'm not sure how far forward of the bottom of the track it can extend before hitting the plate on the bottom. Also, the back of the wedge has to be basically the same height as the flange on the rear angle as the upper track has to come back above it. So, am I understanding what you mean? 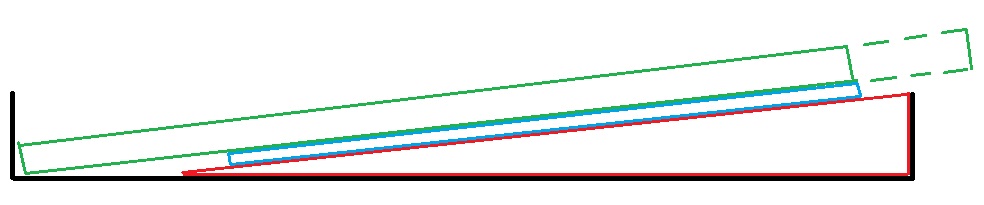
Gary, AKA "Gary fellow": Profile
Dad's: '81 F150 Ranger XLT 4x4: Down for restomod: Full-roller "stroked 351M" w/Trick Flow heads & intake, EEC-V SEFI/E4OD/3.50 gears w/Kevlar clutches
|
|
Administrator
|
Not really.
You're showing 1 1/2" of angle while you only want 7/8". I meant making a frame of 1x2 box (on the flat) and having your 1x1 box track supports coped over the front and rear. So the cut away 11Ga. Box would become 7/8 above the frame at the rear. I use bed frames for things like knocking together welding carts and shelf brackets. When I care, i go for sections without sharp corners.
Jim,
Lil'Red is a '87 F250 HD, 4.10's, 1356 4x4, Zf-5, 3G, PMGR, Saginaw PS, desmogged with a Holley 80508 and Performer intake. Too much other stuff to mention. |
|
Administrator
|
Oh! I obviously misunderstood. Let me think through that idea.

Gary, AKA "Gary fellow": Profile
Dad's: '81 F150 Ranger XLT 4x4: Down for restomod: Full-roller "stroked 351M" w/Trick Flow heads & intake, EEC-V SEFI/E4OD/3.50 gears w/Kevlar clutches
|
|
Administrator
|
I know I can be confusing at times.
I try to use a proper vocabulary and break things out in paragraphs (double return, no tab on my phone) so my thoughts are not some big stream of consciousness wall of text. But I also know that sometimes I'm thick as a brick and can't grasp what someone else is trying to explain. Sorry... 
Jim,
Lil'Red is a '87 F250 HD, 4.10's, 1356 4x4, Zf-5, 3G, PMGR, Saginaw PS, desmogged with a Holley 80508 and Performer intake. Too much other stuff to mention. |
|
Administrator
|
Don't be sorry. I appreciate your input and your efforts to make it clear to me. But I miss the obvious frequently, so it isn't your fault.
In this case, while I like the idea of making a very neat base using tubing, I want to figure out what will work first. To me it is a very complex issue with angles and movement of two adjustment mechanisms at the same time. So I'm probably going to do it fairly quick and dirty to figure out what I like and then I can see about how to make it better, neater, and cleaner. So tomorrow I'm going to flip the angles over and see how much needs to be trimmed. And after I get the base figured out I'll bolt the bucket seat brackets to the base and raise the rear with spacers between the bench seat brackets and the floor. That will let me test the seat angle and adjust if I think I need to do so. Once I have it figured out then I can see about making it pretty. And easier to install. For instance, I need to improve the way I have the cross pieces bolted to the bench seat mounts. I'm using flanged-head 5/16" screws with Torx heads and my Torx bit is so long that I have to pull the bench seat mounts off the floor in order to tighten those screws. But it takes a special screw head to go in there w/o hitting the rollers in the mounts. Maybe I just need a Torx "Allen" wrench? Or a Torx bit w/o a socket? Anyway, there's a lot of tweaking that needs to be done to make this "right", and I want to get something going so I can then improve it.
Gary, AKA "Gary fellow": Profile
Dad's: '81 F150 Ranger XLT 4x4: Down for restomod: Full-roller "stroked 351M" w/Trick Flow heads & intake, EEC-V SEFI/E4OD/3.50 gears w/Kevlar clutches
|
|
Administrator
|
Well, another epiphany - when you put the flange down it runs into the bench seat base when you try to slide back.
 When did I have that epiphany? After I'd already trimmed the front cross piece to clear the carpet. 
So I turned the flanges back up, although part of the front flange is cut out, and tacked in two pieces of angle to create a flat mounting surface, as shown on the left. I'm not sure how much flex that is going to introduce, but at least I have something on which I can put the seat for measurements. And on the right is the seat sitting on the base w/o tracks or spacers. The angle gauge shows it angled back at 13 degrees, which is 3 degrees less than with the other base. So I need to see if the top of the seatback hits the window, but I'm sure it will. And the seat is at 13 3/8" above the door threshold, which is 7/8" lower than with the factory seat base and the tracks. Speaking of the tracks, I'm wondering if I should dispense with the tracks on the buckets and just use the tracks on the base. There's actually more travel in the bench tracks than the bucket tracks, so I wouldn't be losing anything. And while that means both seats would adjust at the same time, that's exactly what the bench seat did and it wasn't a problem. It sure would simplify things. Thoughts, please? 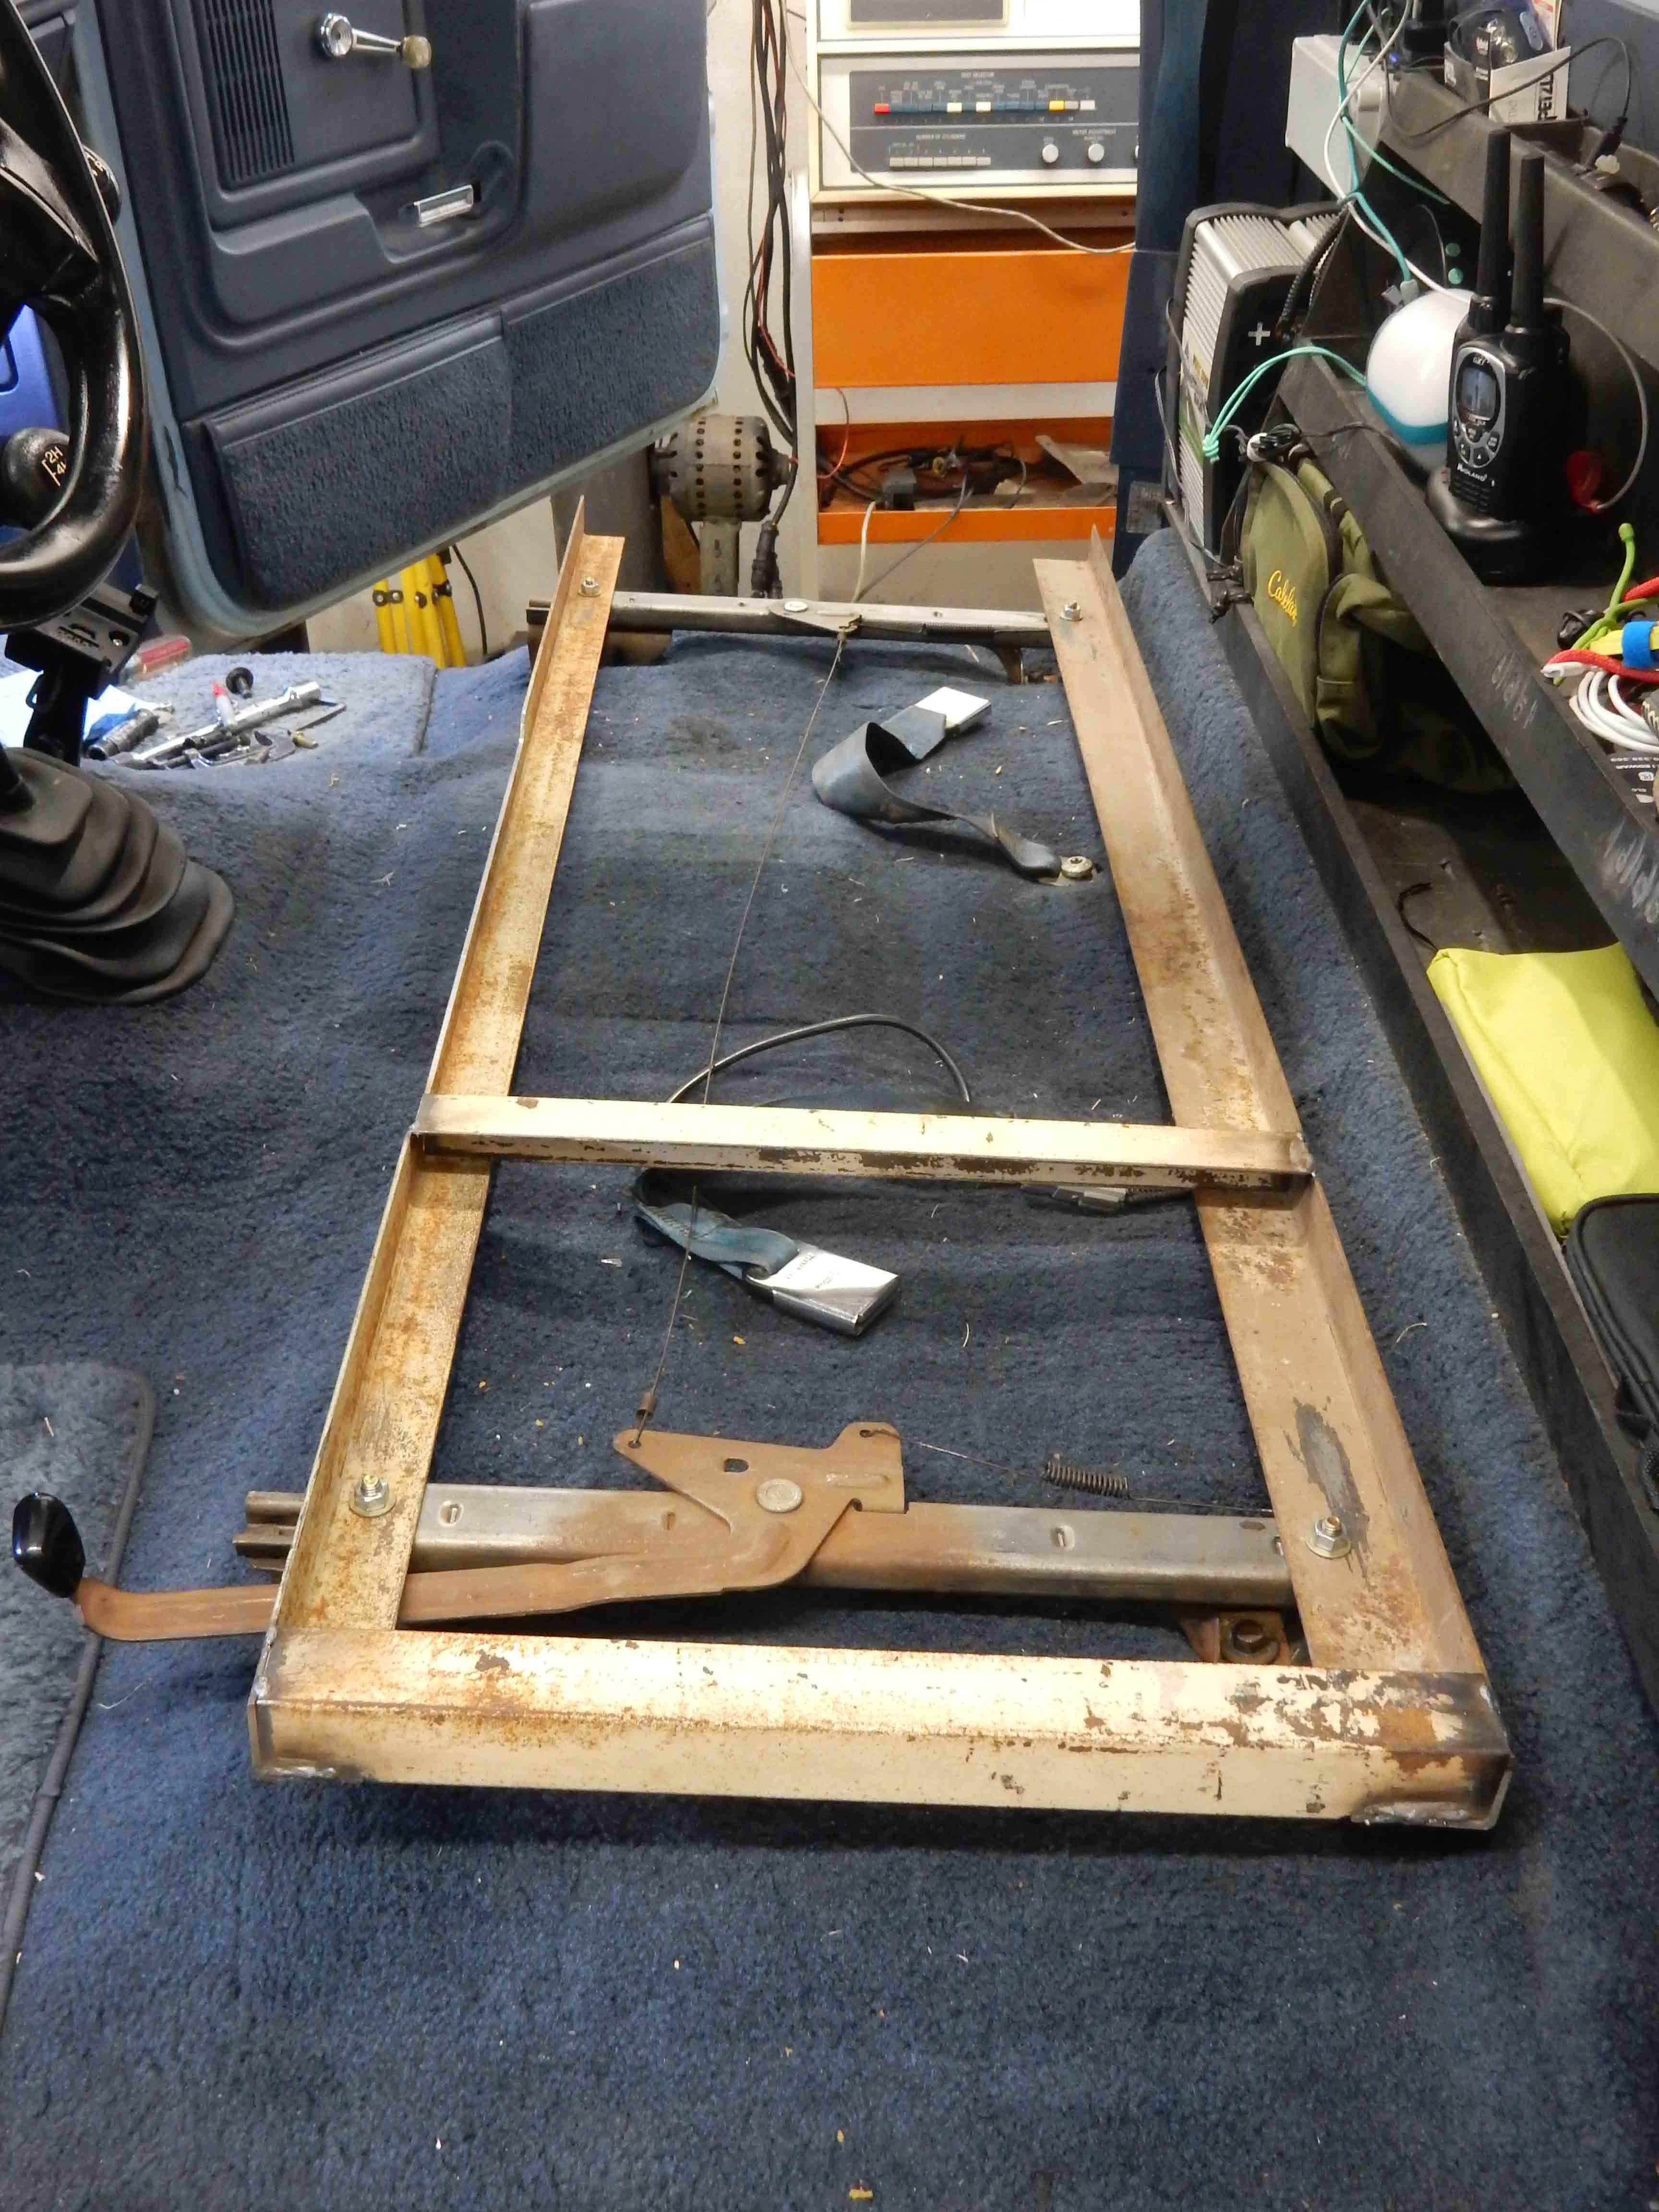 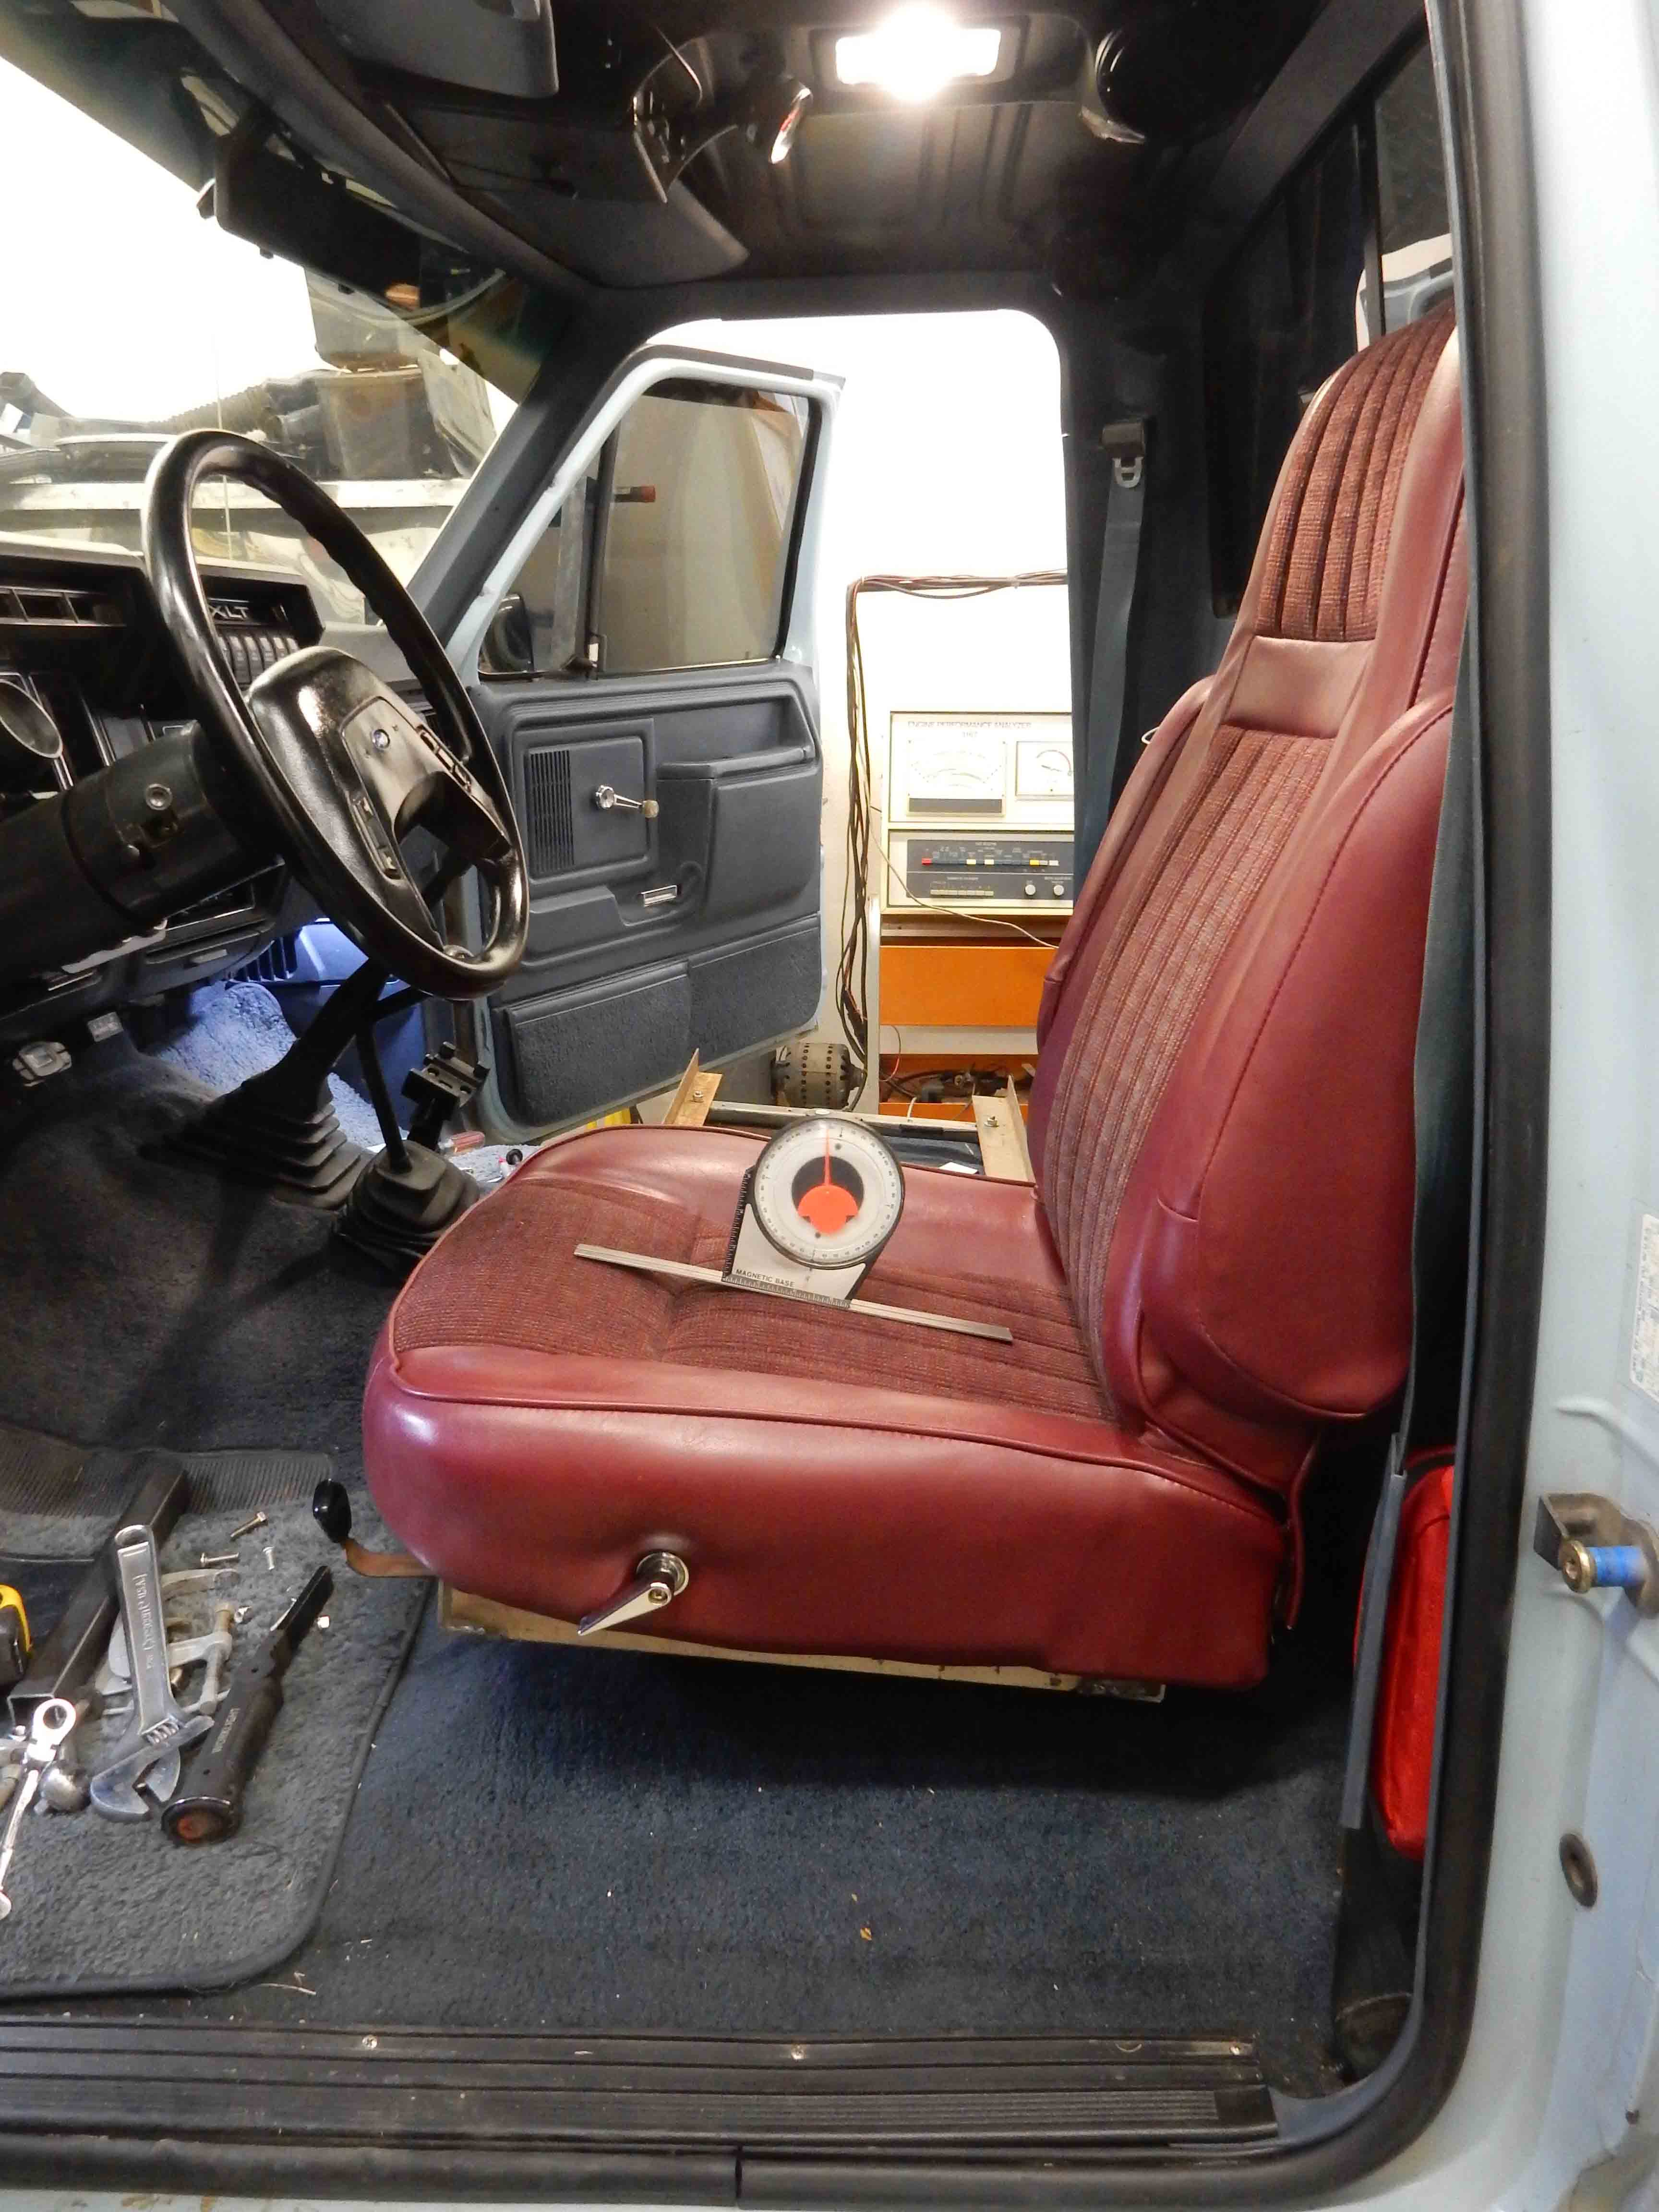
Gary, AKA "Gary fellow": Profile
Dad's: '81 F150 Ranger XLT 4x4: Down for restomod: Full-roller "stroked 351M" w/Trick Flow heads & intake, EEC-V SEFI/E4OD/3.50 gears w/Kevlar clutches
|
|
Administrator
|
Personally I think the nice thing about buckets is that each can be adjusted independently.
I also don't know how you intend to add the 9° or 7/8" or whatever... wedge to get the seating angle you seem to want. But I'm out of thoughts and ideas. I would have moved on to the swing gate to make better use of secure storage, clearing the spare and fuel out of the bed.
Jim,
Lil'Red is a '87 F250 HD, 4.10's, 1356 4x4, Zf-5, 3G, PMGR, Saginaw PS, desmogged with a Holley 80508 and Performer intake. Too much other stuff to mention. |
|
Administrator
|
I do like the individual adjustability, but I'm not coming up with a good plan for that and the height and angle I want at the same time. That's because the tracks add close to 1" of height by themselves, and then there's the angle.
However, that reminds me that there is another approach I forgotten about. Part of the problem is that the bolt pattern for the top of the tracks is different than the bolt pattern for the seats. Ford put a spacer in there and that spacer has the right spacing on the bottom for the tracks and on the top for the seat. However that spacer raises the front of the seat, which is not what I want to do and the spacer can't be turned around as it has cutouts for the mechanism and those cutouts don't work the other way 'round. But I have drilled a hole in two of the tracks that lets them be bolted directly to the seat w/o the spacer. And while placing a bolt in that hole takes ~1" of travel out of the tracks because the roller hits the bolt head, there is still 4" of travel left. So I could bolt them in with those tracks and go from 5" of travel now to 10" of travel, with 6" being in the bench tracks and 4" in the bucket tracks. But that will raise the seat by ~1", and when I raise the rear to change the angle I don't think I'd like the height. Given that I think I'll drill the angle to bolt the seat in w/o tracks and see what I think. I can always drill and put the tracks in later. As for the spare tire carrier, I lost a lot of sleep over that Tuesday night after our son called and we mutually postponed the trip. I really want to build that bumper/spare tire carrier, but after looking at drawing at length on Wednesday morning I came to the conclusion that doing so is going to have the truck out of service for quite a while as I want to attach things to it bit by bit, then tack welding them and pull the collection off for welding. And with the addition of the air bag gauge and the rear camera I need to think about where and how to mount them. But we have several things that we want to do with the truck this spring. In a couple of weeks we are headed to western OK to check out the Sugar Creek Loop. Then on March 25th we are considering going to eastern OK for a car show that a neighbor invited us to. And then at the end of April we hope to head to NM to meet our son and he and I'll take the truck overlanding. So there are only a few weeks between outings and I came to the conclusion there isn't time to do the bumper. But there is time to do the seat base before the Sugar Creek Loop trip, and then I'm hoping to get the front camera and put on before the NM trip. However, then there's SUMMER!
Gary, AKA "Gary fellow": Profile
Dad's: '81 F150 Ranger XLT 4x4: Down for restomod: Full-roller "stroked 351M" w/Trick Flow heads & intake, EEC-V SEFI/E4OD/3.50 gears w/Kevlar clutches
|
|
Administrator
|
What Pormido say about the new front camera is promising.
Hopefully those promises are delivered. I was under the impression that you were going to cut bumper brackets out of plate and work off that. I must not understand what's difficult about getting the bumper to width and tacking it in place before pulling off to weld it out. Aren't the gate and latch drawn up and scaled? It seems none of that requires the truck. But that was also so far back that you intended to use the bumper as an air reserve....
Jim,
Lil'Red is a '87 F250 HD, 4.10's, 1356 4x4, Zf-5, 3G, PMGR, Saginaw PS, desmogged with a Holley 80508 and Performer intake. Too much other stuff to mention. |
|
Administrator
|
Yes, I hope Pormido comes through, but I think they will. That will help a lot.
And yes, I have 1" thick plates that are already cut to be both the brackets that bolt to the frame as well as tow eyes. But they go through the 5" rectangular tube bumper and then are welded to it front and rear. So I want to pull the bumper off, along with all of the braces, trailer hitch, rear camera, and air fitting and gauge, put the plates in place, mark them for the bolt holes, and then pull them and drill them. Then I'll bolt them on and measure, measure, and measure before using the plasma cutter on the 5" tube. But speaking of cutting the tube, there's also the trailer hitch that goes through the bumper and ties to a cross piece that is also welded to the attachment plates/tow eyes. So I want to have the tube/bumper on the truck so I can ensure it all fits before welding. But I don't want to be doing a lot of welding next to the gas tank, so I want to pull things off to do that - after they are tacked in place. In addition, there are other holes that go into that tubing and given its thickness I'd like to do the drilling or milling on the mill. One set of those is the holes for the pivot for the swing arm, which needs to be very precise. But that isn't possible if things are already welded to the tube, so I want to think through things step-by-step. Scott/WelderScott seems to think we could knock the welding out in a day if everything is ready. And by that I mean the plates/tow eyes are drilled, the tube is cut, the cross piece and its fishplates are cut and ready. Then I think he could come over and do the main welding, which may take more welder than I have given the thickness of the metals involved. That's why I came to the conclusion, after a lot of thought, that right now is not the time since I want to use the truck several times this spring.
Gary, AKA "Gary fellow": Profile
Dad's: '81 F150 Ranger XLT 4x4: Down for restomod: Full-roller "stroked 351M" w/Trick Flow heads & intake, EEC-V SEFI/E4OD/3.50 gears w/Kevlar clutches
|
|
Administrator
|
I remembered that the plates passed through the bumper becoming tow eyes but forgot about how the trailer hitch had to fit through as well.
 You should ask Scott if he has a mag-drill and the proper Rotabroach for your pivot. Sticking a 6' piece of 5" box up on the mill is going to be a challenge I wouldn't take on willingly. (Maybe ask Brandon, or even rent one for a day. I don't have a mill so I would probably use the mag drill to bore the plates as well) How many amps and what's the duty cycle of your welder? 1" is a big heatsink and I would definitely pull out my O/A and a rosebud for a bunch of preheat before I got into it. You can also use a deep penetration rod for your root, which would help even if you're going to cap with 7018.
Jim,
Lil'Red is a '87 F250 HD, 4.10's, 1356 4x4, Zf-5, 3G, PMGR, Saginaw PS, desmogged with a Holley 80508 and Performer intake. Too much other stuff to mention. |
|
Administrator
|
You are right that getting a 6' piece of 5" tubing on the mill is an issue, but for the pivot it shouldn't be too bad since it is on an end. Getting to the middle is much harder.
I'll ask about a Rotabroach. However I do have a boring attachment, so if I can get it close with a drill bit I should be able to do it with that. Drilling the plates shouldn't be a problem as I have drill bits of all sizes and I think I'm only going out to either 5/8 or 3/4 where it goes through the frame. And the holes in the tow eye ends are already there. My welder is just a 110v 20A unit, so I seriously doubt it'll do it. But in the past Scott has brought over his own, like to do the engine crossmember, so he may have a heavier one to use. And I don't have an O/A setup. My brother got Dad's unit since I've not had a need for one, but I might could borrow it. Still, I'm going to rely on Scott.
Gary, AKA "Gary fellow": Profile
Dad's: '81 F150 Ranger XLT 4x4: Down for restomod: Full-roller "stroked 351M" w/Trick Flow heads & intake, EEC-V SEFI/E4OD/3.50 gears w/Kevlar clutches
|
|
Administrator
|
No epiphanies today, but I did make some progress. I got the passenger-side fore/aft seat angles cut and temp welded in. And with that I could bolt the platform in, position the seats both fore/aft as well as the angle, and mark where they should go.
Turns out that eight G8 1/2" washers gives 3/4" of lift to the back of the bench seat bases, and that makes the seat bottom angle 10 degrees rearward instead of the 16 degrees I originally had. That is enough to get the seat farther back w/o the top hitting the rear window. And the seat base is 1/2" lower than it was originally, in spite of the 3/4" lift. (NB: I originally said the seat was 14" above the door sill, but I was measuring on the inside of the framing square, not the outside. So it was really 15 1/2" and now it is 15".) But that's with 1 1/2" angle, so if I used 1" x 1 1/2" square tubing I might have room to put the tracks in. And a 3/4" wedge could replace the washers, although they work nicely. However, I'm still working out the fasteners issues. Today I found that it is next to impossible to reach up underneath the angle and put the 5/16" bolts through it into the seat bottom. Part of that is lack of room to work, part of that is because there's upholstery that the bolts have to go through and it moves, and part of it is that it is way too easy to cross-thread the bolts, and that could be a serious problem. My first attempt was to cut the heads off of bolts and use them as guide pins to align the seat, and that did get the seat on the angle. But it didn't really solve the problem of getting the bolts in. So I ended up cutting eight pieces of 5/16" all-thread 1 1/2" long, slathering them with blue Loctite, and running them in the seat base with 7/8" sticking out. They'll be all set up tomorrow so I can then install the seats if I want. But I still have to cut and weld in some angle for mounting the console, so I need to take some measurements and then pull everything out to add the mounts for the console. And while I have it out for that I'll go ahead and finish the rest of the welding. Meanwhile the helicoil should come in and I can fix the threads for the RR, which will be easier with everything out. The thing isn't pretty, but I think it'll work. And once I've gotten to try it out I'll know if I like the height and angle as well as the lack of adjustments on the seats themselves. Then I can make a nice, neat one - if I want to. Here are some pics. First, the platform: 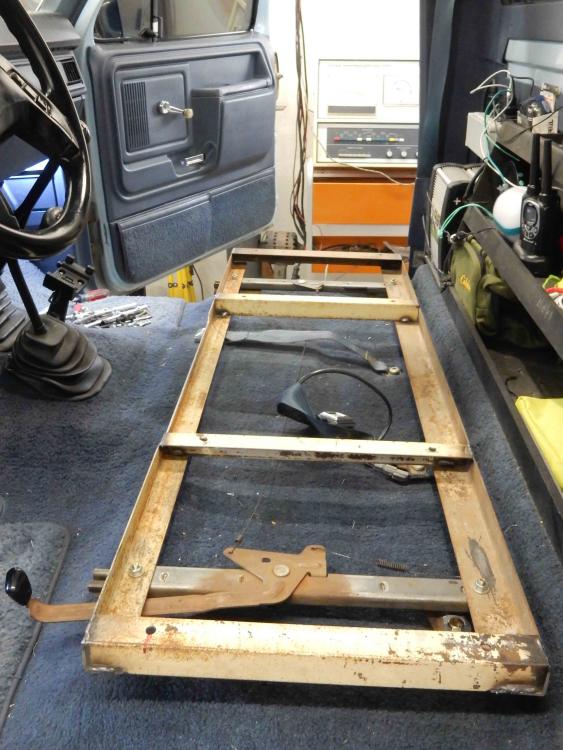 Then a shot of the seat w/o tracks and tilted back 10 degrees: 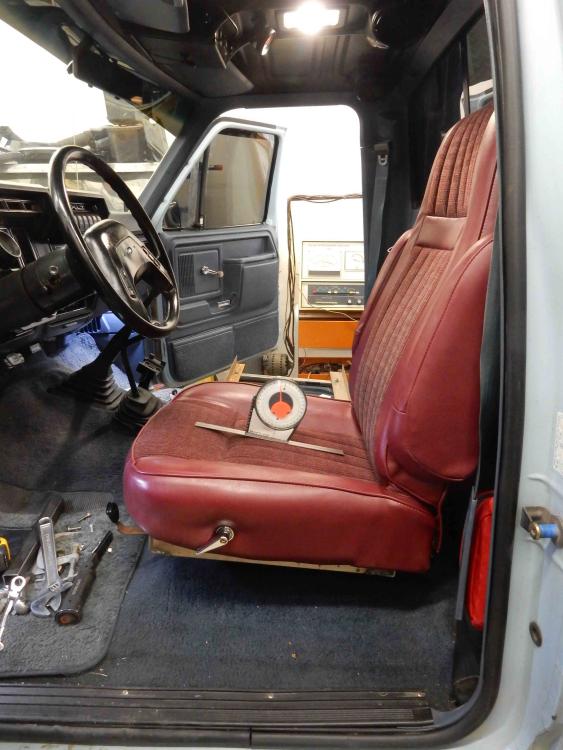 And last, the washers and a HD washer to spread the load although I'll need a longer bolt so I can get a lockwasher in there: 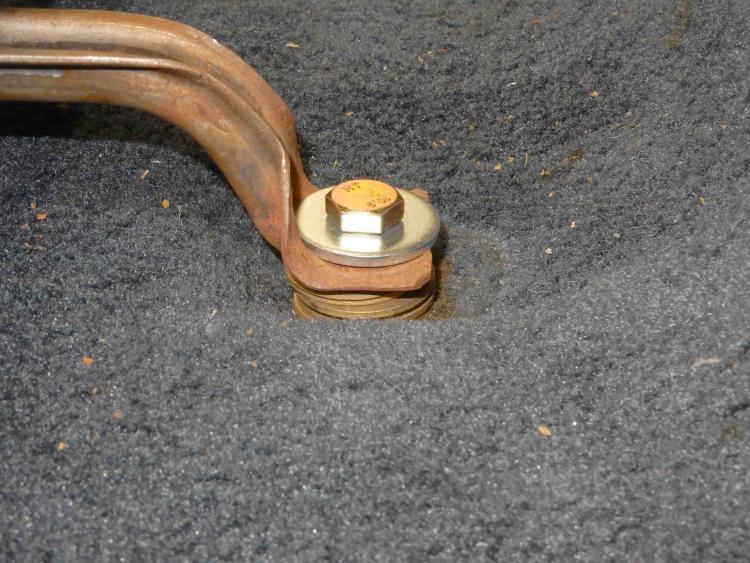
Gary, AKA "Gary fellow": Profile
Dad's: '81 F150 Ranger XLT 4x4: Down for restomod: Full-roller "stroked 351M" w/Trick Flow heads & intake, EEC-V SEFI/E4OD/3.50 gears w/Kevlar clutches
|
|
Administrator
|
Got the seats bolted in with the help of the studs. I think the driver's seat is just where I want it as the back doesn't hit the window, although I won't know for sure I like it there until I drive it. But the passenger's seatback does hit the window, which appears to be a difference in the seat itself as it is bolted in at the same fore/aft position as the driver's seat. So I may move it up 1" by drilling new holes.
However, if we think we wouldn't mind the seats being 1" higher I could bolt the tracks to them and then I'd have 4" of adjustability for each seat. We will have to see, but they are currently 1/2" lower than they were, so maybe. 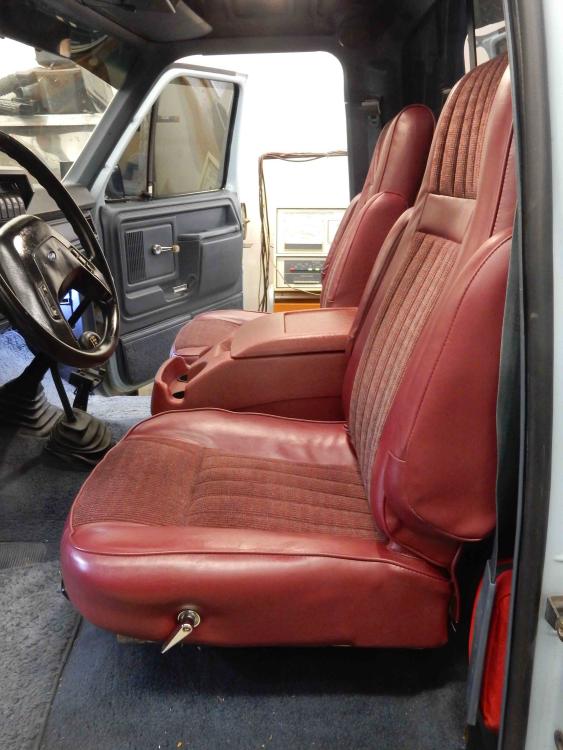 And in the pic above I have the console in essentially the right position, although it is 1" lower than it previously was. But then the seats are 1/2" lower than they were, so maybe the console is right where it should be? Again, we won't know until we drive it. But I have some more welding to do in order to get the console bolted in as it is just resting on 2x4's in that picture. And the plan is to run angle side-to-side as is shown below and mount the console to them. But the reason for running them that way instead of the planned fore/aft is that they'll provide additional support for the platform, and I think that's important since I cut the piece out in the front.  Anyway, that's the plan for tomorrow. And while I'm doing that welding I'll finish the welding on the other parts of the platform and then we'll be ready for a test drive some time this week. 
Gary, AKA "Gary fellow": Profile
Dad's: '81 F150 Ranger XLT 4x4: Down for restomod: Full-roller "stroked 351M" w/Trick Flow heads & intake, EEC-V SEFI/E4OD/3.50 gears w/Kevlar clutches
|
|
|
I see that I wasn't the only one welding something out of angle iron this weekend. I'm working on a holder for my welder though, rather than a seat bracket.
I hope you're able to find a setup you're comfortable with. Seems like you've been playing with seats for a long time now. |
|
Administrator
|
Well, I've been off and on with the seats. I worked on the seats a long time ago on Dad's truck, then bolted that setup in Big Blue, then realized that I don't really like the way they fit and that I need a second base anyway since these go back in Dad's truck. So I started this thread to track my thoughts while I had company and couldn't work on it, and now that I have time I'm making something happen.
And while angle isn't the prettiest thing to use, it works and I have what looks like just enough of it to get the job done. I really want to get it done this time to see how I like it, and can tweak it a bit to make it "right". Then, when I have that nailed down I might make a prettier one. For Dad's truck?
Gary, AKA "Gary fellow": Profile
Dad's: '81 F150 Ranger XLT 4x4: Down for restomod: Full-roller "stroked 351M" w/Trick Flow heads & intake, EEC-V SEFI/E4OD/3.50 gears w/Kevlar clutches
|
|
|
In reply to this post by Gary Lewis
Progressing!
Hoping the drive test will be comfortable! Very strange. Designers seem to have lot of fun in complicating things. 
Jeff / 1984 F350 Crew Cab 4x4/5.8L w351 4V/ T18/ D50 4.10 front/ 8' bed.
Restored 2019-2022. Nicknamed «Big Brother 1984», due to its soooo-looong shape & nod to George Orwell's 1984 famous novel. |
|
Administrator
|
Minor change of plans. The neighbors across the street awakened us at 1 AM as their house was on fire. Had been hit by lightning and it burned to the ground. But they and their dog got out - with the clothes on their backs.
So today has been a bit of a blur and who knows what tomorrow will be. I’ll get back to the truck when things slow down.
Gary, AKA "Gary fellow": Profile
Dad's: '81 F150 Ranger XLT 4x4: Down for restomod: Full-roller "stroked 351M" w/Trick Flow heads & intake, EEC-V SEFI/E4OD/3.50 gears w/Kevlar clutches
|
|
|
Working on a truck seat vs helping your neighbors in the middle of the night as their house burns down. In what world are those about the same and described as "a minor change in plans"???
Glad to hear they got out OK. And wishing them the best as they try to recover from a terrible situation!
Bob
Sorry, no '80 - '86 Ford trucks "Oswald": 1997 F-250HD crew cab short box, 460, E4OD, 4.10 gears "Pluto": 1971 Bronco, 302, NV3550 5 speed, Atlas 4.3:1 transfer case, 33" tires "the motorhome": 2015 E-450-based 28' class C motorhome, 6.8L V-10 "the Dodge": 2007 Dodge 2500, 6.7L Cummins |
| Edit this page |