1980 F350 4X4 C6 Project
|
Administrator
|
Man, that was a hard question to answer. But the answer is on Page 11 of the page at Documentation/Driveline/Axles & Differentials. Then click the Front Axles & Differentials tab and then the Instructions followed by the Dana 44 tab. Then, once it loads, scroll down to Page 11 where you'll find this:

Gary, AKA "Gary fellow": Profile
Dad's: '81 F150 Ranger XLT 4x4: Down for restomod: Full-roller "stroked 351M" w/Trick Flow heads & intake, EEC-V SEFI/E4OD/3.50 gears w/Kevlar clutches
|
|
Well they definitely updated the book between 1980 and what ever year is on the site. I was looking in essentially the same chapter but mine does not give a torque spec. I also noticed the last bit of step 11 in the screen shot and that prompted me to go look at the link. This has raised a few more questions:
1. In step 9 it says "install a new seal with the seal lip directed away from the spindle" (not in my book). I reinstalled mine the way it came apart but I am not sure if the PO had it together correctly. Mine was the opposite of this screengrab from a video on Youtube (from an OBS truck). 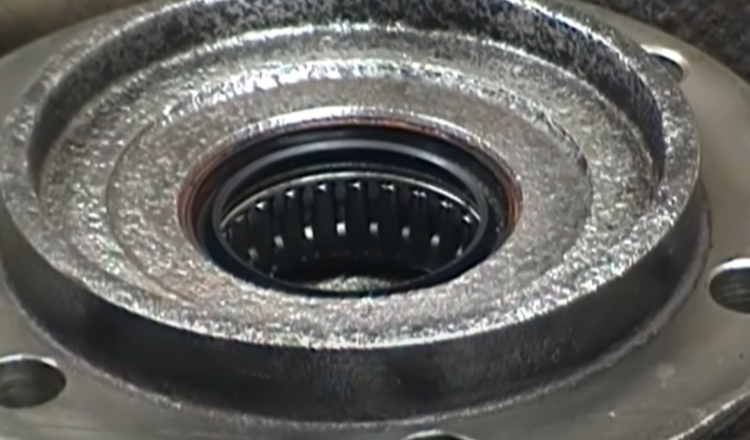 So which way is correct? 2. In step 11 it says "Install the right hand shaft assembly into the slip yolk, giving special attention that the wide tooth space in the slip yolk spline is aligned with the wide tooth on the axel shaft spline" (also not in my book). I did not try to index my axel shaft in any special way but it slid in "easy" by hand. No pounding. Did I get lucky and line it up correctly? Would it have gone together any other way? My front axel is a Dana 50 and not a 44. I know they are very similar so should I pull it back apart and check for a wide tooth on the spline?
Carl
1980 F-350 4X4; 400 C6; Dana 61 rear, Dana 50 TTB front 1984 F-250 4X4; 6.9L T19; Dana 70 rear, Dana 44 TTB front |
|
Administrator
|
I think I'd go with how the lip on the seal was before - assuming it was working.
And if the shaft went in then I wouldn't take it out again to check. It is either lined up on the wide tooth or doesn't have one. So, it must be in correctly.
Gary, AKA "Gary fellow": Profile
Dad's: '81 F150 Ranger XLT 4x4: Down for restomod: Full-roller "stroked 351M" w/Trick Flow heads & intake, EEC-V SEFI/E4OD/3.50 gears w/Kevlar clutches
|
|
After reading more of the front drive axel documentation and researching the anatomy of a seal I decided to take the spindle back off and do a few things differently. I flipped the seal around and added grease to a few areas. This isn’t the first time I have found something the PO has put together incorrectly so I wanted to change it while I had the chance.
I have a question about cleaning the hub and bearings before reinstallation. Is there an economical way to clean these items? There are the usual suspects - brake clean, gallon of carb cleaner, parts washer at a shop but what have others done on the cheap to clean bearings and the hub. Lots of grease!!
Carl
1980 F-350 4X4; 400 C6; Dana 61 rear, Dana 50 TTB front 1984 F-250 4X4; 6.9L T19; Dana 70 rear, Dana 44 TTB front |
|
Administrator
|
A bucket of diesel and a chip brush?
It's not a parts washer and you're left with another mess to dispose of. A much younger me would have done it in a drain pan of gasoline, back when gas was $0.75 a gallon and still had lead.
Jim,
Lil'Red is a '87 F250 HD, 4.10's, 1356 4x4, Zf-5, 3G, PMGR, Saginaw PS, desmogged with a Holley 80508 and Performer intake. Too much other stuff to mention. |
|
Administrator
|
If we are just talking about cleaning up a relatively clean part, I use brake cleaner and spray it on a paper towel and wipe the part off with that. But if the part is really dirty I fire up the Simple Green parts washer, which heats the SG to something like 130F, has filters to take the dirt and yuk out, and a pump to recirculate the stuff. Anything in between I might spray brake cleaner on the part in a big paint bucket and then figure out how to dispose of that, which typically goes into the oil drain as the people who take used oil don't seem to care.
Gary, AKA "Gary fellow": Profile
Dad's: '81 F150 Ranger XLT 4x4: Down for restomod: Full-roller "stroked 351M" w/Trick Flow heads & intake, EEC-V SEFI/E4OD/3.50 gears w/Kevlar clutches
|
|
Well, fall has been pretty busy here with kids activities and such. Finally have time to look into a few things on the truck.
I’m still researching my rear suspension and would appreciate some feedback on observations I have made. 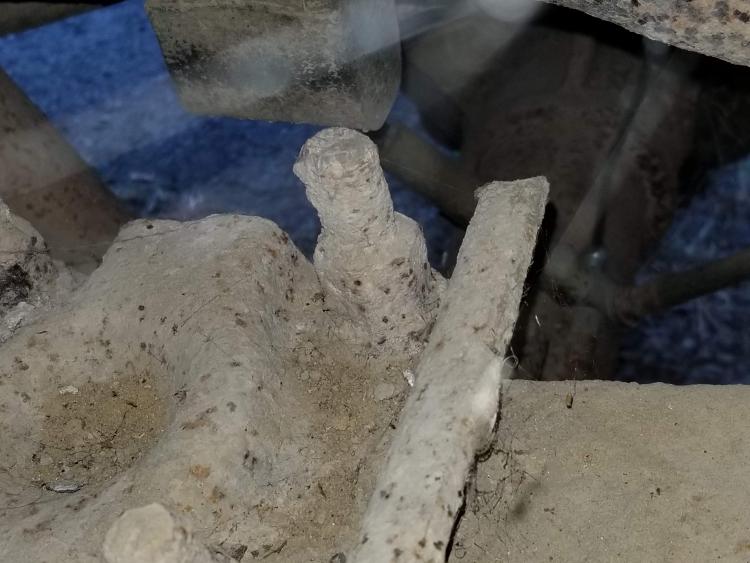 I know it is a bit hard to see but there are 2 nuts on the rear U bolts. Would it be normal for the factory to use a jam nut? 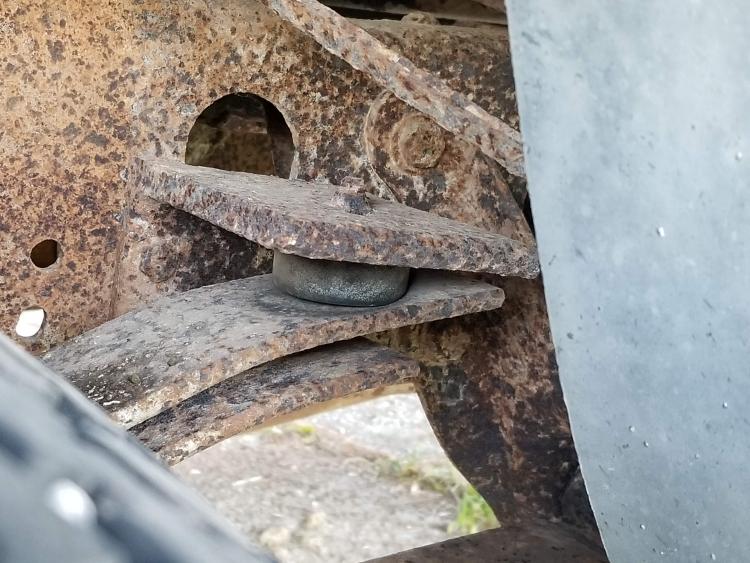 Would it be normal for the helper spring to be resting on the overload pad with an empty bed? My next thoughts…are the regular springs wore out that bad allowing the suspension to sag to the helpers or are there too many helper springs? There are 4 helper springs on the truck and I can’t find that combination in the master parts catalogue at all. They are 3” wide for reference. I also can’t find that overload spring pad anywhere. It is a circle roughly 5/8 thick. 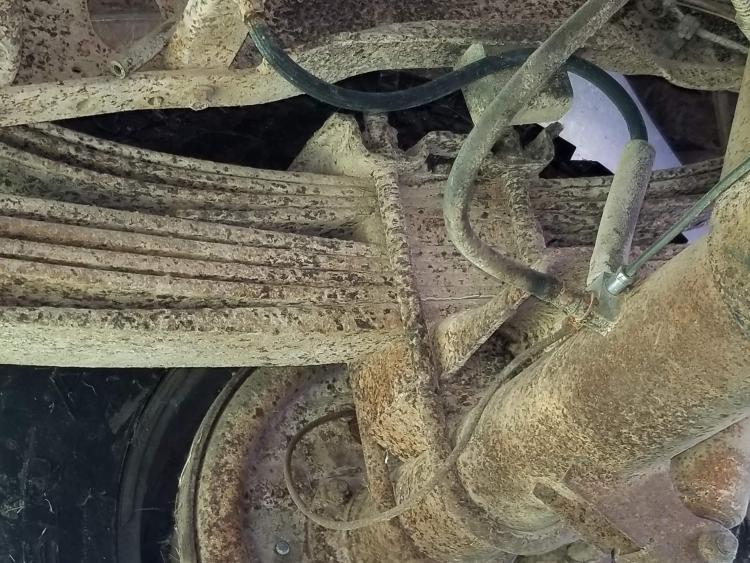 I’m thinking about taking one side apart and seeing if I can locate any kind of engineering number on the helper springs to help identify what I have. The “patina” on all the parts matches very well so if a change was made, it was made long ago. My 1980 onion really makes me cry!
Carl
1980 F-350 4X4; 400 C6; Dana 61 rear, Dana 50 TTB front 1984 F-250 4X4; 6.9L T19; Dana 70 rear, Dana 44 TTB front |
|
Administrator
|
I don't think Ford used jam nuts. I think someone installed a helper spring pack on top of the original 5-leaf pack.
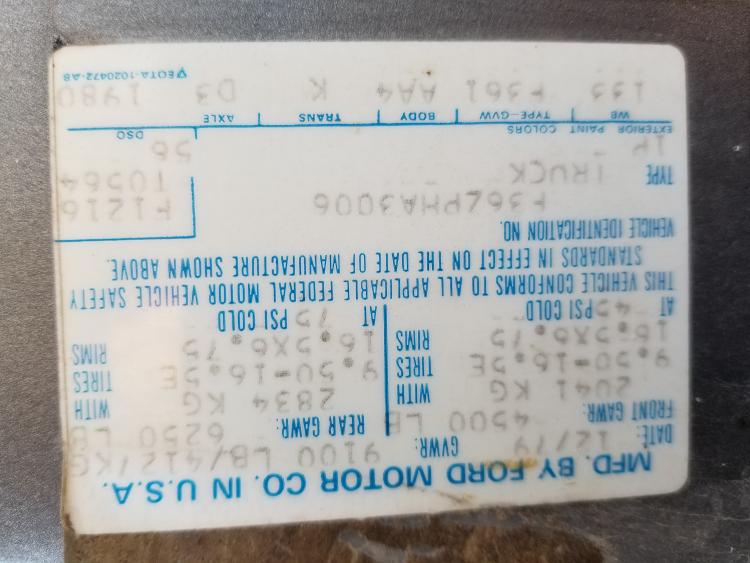
It is a pity that you have a 1980 truck as the certification label then didn't record the springs installed on the truck. But it should show the GVWR as well as the front and rear GAWR, so we should be able to determine what springs it came with if you give us those numbers. And, you may find #'s on the leaves themselves when you disassemble a pack. And at least you can measure each leaf and that may help us nail down what you have. I'll bet that the setup you have rides very rough. I know when I had a 7-leaf pack on Big Blue it would rattle your teeth on bumps. So that 9-leaf pack has to be almost inflexible unless you have a serious load on. Last, you need to soak those nuts and the u-bolts with penetrating oil for a day or two before tryin to take them off.
Gary, AKA "Gary fellow": Profile
Dad's: '81 F150 Ranger XLT 4x4: Down for restomod: Full-roller "stroked 351M" w/Trick Flow heads & intake, EEC-V SEFI/E4OD/3.50 gears w/Kevlar clutches
|
|
I think I will need to cut the U bolts. I started to clean things up and discovered that at least 2 of the nuts have degraded to the point that there is little to no flat spots left. The nut is nearly round!
 Another shot from further out. 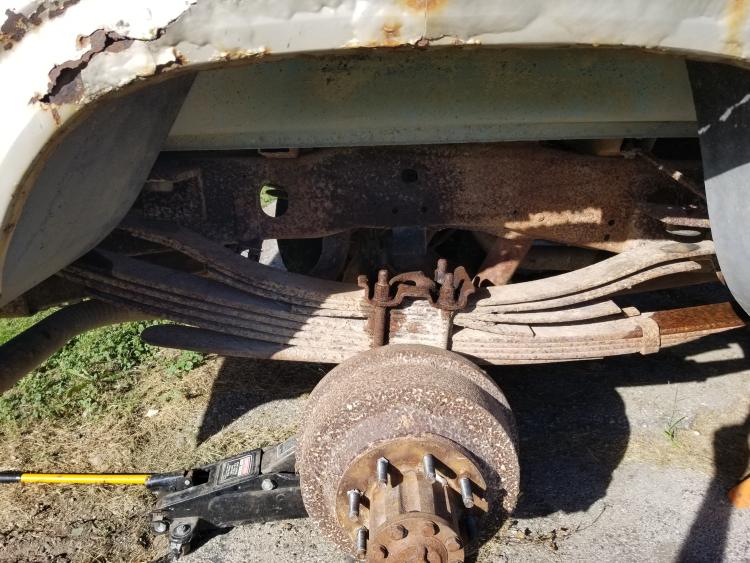
Carl
1980 F-350 4X4; 400 C6; Dana 61 rear, Dana 50 TTB front 1984 F-250 4X4; 6.9L T19; Dana 70 rear, Dana 44 TTB front |
|
In reply to this post by Gary Lewis
Here is another photo of the door sticker. Looks like 9100 GVWR with a 4500 front GAWR and 6250 rear GAWR. The GVW type is F361.
Carl
1980 F-350 4X4; 400 C6; Dana 61 rear, Dana 50 TTB front 1984 F-250 4X4; 6.9L T19; Dana 70 rear, Dana 44 TTB front |
|
Administrator
|
In reply to this post by Atlas75
Yep, it looks like you'll have to cut them. They should be torqued to almost 200 lb-ft, IIRC, and that's not something you back off with vise grips.
Let me do some research on the GAWR vs springs.... 
Gary, AKA "Gary fellow": Profile
Dad's: '81 F150 Ranger XLT 4x4: Down for restomod: Full-roller "stroked 351M" w/Trick Flow heads & intake, EEC-V SEFI/E4OD/3.50 gears w/Kevlar clutches
|
|
Administrator
|
In reply to this post by Atlas75
Well, this is interesting and confusing. From what I see in the rear spring charts there wasn't a GVWR of 9100 in 1980 for an F350 4x4 with a 133" wheelbase. (It is a regular cab?) But the F361 does decode to a GVWR of 9100.
 But when you get the springs apart you should find the ID#'s shown here: Documentation/Suspension & Steering/Rear Springs.  
Gary, AKA "Gary fellow": Profile
Dad's: '81 F150 Ranger XLT 4x4: Down for restomod: Full-roller "stroked 351M" w/Trick Flow heads & intake, EEC-V SEFI/E4OD/3.50 gears w/Kevlar clutches
|
|
In reply to this post by Gary Lewis
I forgot I requested this photo of AmericanSavage's truck for comparison. His was made roughly a month before mine and he also has an F350 with a 9100 lb GVWR. I think I'm convinced that what I have is an aftermarket setup and even the overload brackets were changed.
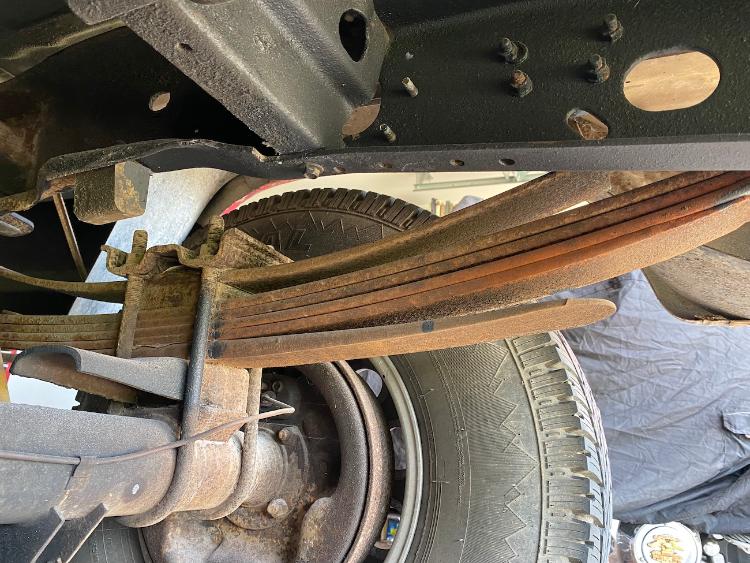 Now I get to figure out what to do about it because you are right Gary, the ride is rough.
Carl
1980 F-350 4X4; 400 C6; Dana 61 rear, Dana 50 TTB front 1984 F-250 4X4; 6.9L T19; Dana 70 rear, Dana 44 TTB front |
|
On the U blot nuts I have never seen 2 stacked on each other but you normally see the nuts for U bolts are twice as tall making it look like 2 nuts.
Can you see a lock washer under the nut? If so then it is a tall nut not uncommon for U bolts. As for riding ruff what will the truck be used for? If just riding around then yes pull a leaf or 3 out butif you will have any kind of weight on the bed they need to stay. OR Pull the leaves and install air bags for when you carry weight. Dave ----
Dave G.
81 F100 flare side 300 six / AA OD / NP435 / 2.75 gear http://cars.grantskingdom1.com/index.php/1980-Ford-F100?page=1 81 F100 style side 300 six/SROD parts truck -RIP http://cars.grantskingdom1.com/index.php/1981-Ford-F100 |
|
In reply to this post by Atlas75
Bringing this part of your thread back to life, was going through you thread last night, your making great progress!
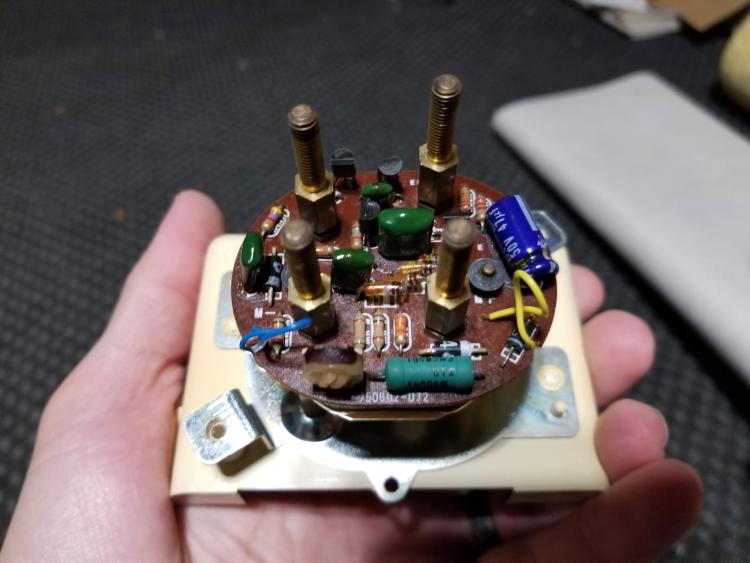
I bet you can get the tachometer working again. I went through this same process on my rig recently and discovered the problem with the tach was the internal ground inside of the instrument. Was frustrating to see it work, and then quit. Under the plastic cover, the post marked as a ground has to touch the solder on the circuit board. On mine there was two push-on (hat style) hold downs that I was able to tighten down. While there I added some solder between the post and the circuit board for insurance to ensure connectivity. I believe the nuts holding the plastic cover on actually was backing the ground away when I tightened them. I didn't go very tight with the nuts on reassembly, just snugged them up. Wish I had taken photos of all this, but it should be pretty evident once you open it up.
Chuck
1981 flareside 4x4, C6, 351M |
|
Thank you for the insight. I have suspected this could be the issue but have not had time to remove the cluster and investigate. Sounds straight forward. Maybe I’ll take a look this weekend.
Carl
1980 F-350 4X4; 400 C6; Dana 61 rear, Dana 50 TTB front 1984 F-250 4X4; 6.9L T19; Dana 70 rear, Dana 44 TTB front |
|
Well, I was able to pull the cluster out today and take a look at the tach. I cleaned up the connections and studied the posts where they meet the circuit board. While I don’t see any cracks in the solder indicating a failure, I know they can be hard to detect. Tomorrow I will hook up the tach outside of the cluster and see if it works that way. If it does, I will reassemble the cluster and reinstall…and cross my fingers!
 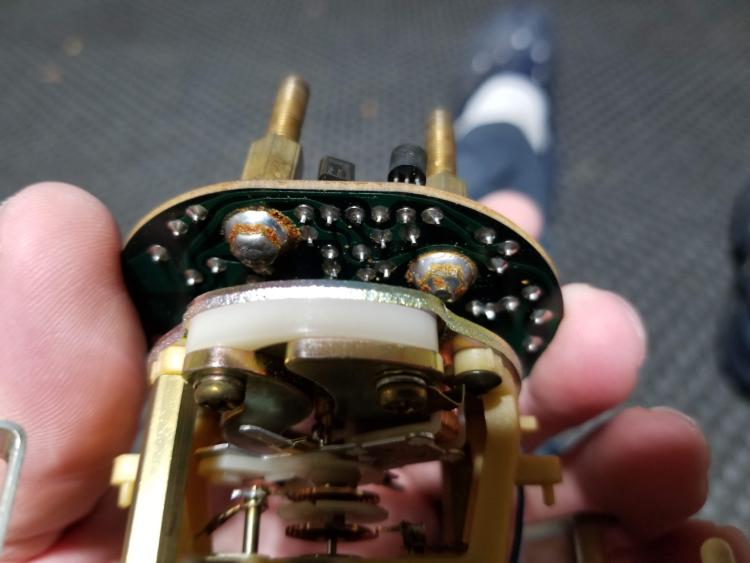
Carl
1980 F-350 4X4; 400 C6; Dana 61 rear, Dana 50 TTB front 1984 F-250 4X4; 6.9L T19; Dana 70 rear, Dana 44 TTB front |
|
Administrator
|
While you have it out use a Q-Tip and rubbing alcohol to clean the brown stuff off the circuit board. Several people have said that makes a difference.
Gary, AKA "Gary fellow": Profile
Dad's: '81 F150 Ranger XLT 4x4: Down for restomod: Full-roller "stroked 351M" w/Trick Flow heads & intake, EEC-V SEFI/E4OD/3.50 gears w/Kevlar clutches
|
|
In reply to this post by Atlas75
Pay close attention to the ground connection, if you look at this while apart, notice that the brass stud that serves as the ground connection needs to touch the solder on the instrument under the circuit board. The push on "hats?" that hold the two halves together were loose on mine as well, I used a very small socket to push them down tight.
My theory is that when I put the cover back on and tightened down the nuts, it was backing the brass away and breaking the ground. I also added solder to ensure it was connected, but that was probably not necessary. Good luck with it, I bet you get it working!
Chuck
1981 flareside 4x4, C6, 351M |
|
So far, no luck on the tach. Can’t get it to work. Is there a way to test the coil signal coming to the tach? I’m curious if it is receiving a good signal. I know it’s getting something because my test light will illuminate but I don’t know if it is a good signal.
Carl
1980 F-350 4X4; 400 C6; Dana 61 rear, Dana 50 TTB front 1984 F-250 4X4; 6.9L T19; Dana 70 rear, Dana 44 TTB front |
| Edit this page |

