The Camano Experience


|
That is pretty cool
 But do I under stand it right this is for a trailer light connection? If so what do you do when the puller is down for the count and you use something else, Uhaul, to pull the trailer? You now don't have any lights, trailer brakes you can kind of do with out if you have to. The standard is a 7 flat blade M / FM connection. Just saying Dave ----
Dave G.
81 F100 flare side 300 six / AA OD / NP435 / 2.75 gear http://cars.grantskingdom1.com/index.php/1980-Ford-F100?page=1 81 F100 style side 300 six/SROD parts truck -RIP http://cars.grantskingdom1.com/index.php/1981-Ford-F100 |
|
Administrator
|
Hey Dave,
Thanks! Good question. This is actually to connect the 7way receptacle harness to the truck up on the rear crossmember. The truck has the factory trailer wiring and when I got it the 7way harness was connected to the truck wiring via 7 bullet connectors. I am making the assumption that the termination of the factory wiring ended in a Ford connector(s) (perhaps 1105, 1951, and another??) but I've never seen one that hasn't been cut up to confirm that. Either way, I personally don't care for a cluster of individual connectors which is what this is meant to solve. I already reduced it to two but like I mentioned it's a bulky solution.
Scott
'Camano' 1986 F250 Supercab XLT Lariat 460/C6 'Chanute' 1980 F350 C&C 400/NP 435 - Gin Pole But there ain't nothin' wrong with the radio |
|
|
I am a little slow on the up take here
 So this will be a tee type thing to fit between the trucks tail light harness & the main frame rail harness that the trailer harness will tie into? One of my trucks had the tee that fits between the tail light & frame harness and I used it, cutting the flat 4 off, to wire up my 7 port blade plug connection. I did have to pull wires for trailer brakes & power to charge a battery on the trailer, I just followed the frame harness. I still need to mount & wire in the brake controller, wires are in the cab but did not have the plug for the control at the time  It is still cool you can make that Dave ----
Dave G.
81 F100 flare side 300 six / AA OD / NP435 / 2.75 gear http://cars.grantskingdom1.com/index.php/1980-Ford-F100?page=1 81 F100 style side 300 six/SROD parts truck -RIP http://cars.grantskingdom1.com/index.php/1981-Ford-F100 |
|
Administrator
|
Dave - first, let's ignore the connector I made. The factory trailer package is a lot like those Hoppy jumpers that plug in between the connectors at the rear frame cross member. Another comparison would be like how the speed control ties in between existing connectors.
I could be wrong with the connector specifics here since because mine was cut already and just going off the evtm but... By way of this add-on jumper you get a 3 terminal connector for left turn, right turn, and running lights. The latter actually goes back up front to a relay and then back to the rear. There is also a 2 terminal connector for ground and backup lamps. Then there is another 3 terminal connector for +12v, brakes, and trailer lamps (don't ask what this one does) So normally there would be a 7 way connector harness with the mating connectors on it. All of the connectors on mine were cut off and terminated in bullet connectors. Enter the 8 gang male connector and (because they don't make one) the printed female. Speaking of - the petg came in so I printed one and swapped the new connectors in this evening. 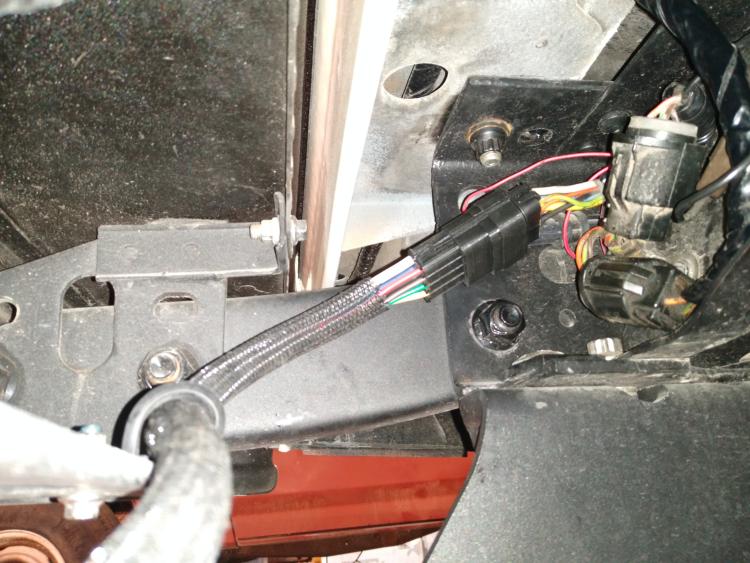
Scott
'Camano' 1986 F250 Supercab XLT Lariat 460/C6 'Chanute' 1980 F350 C&C 400/NP 435 - Gin Pole But there ain't nothin' wrong with the radio |
|
Administrator
|
In reply to this post by kramttocs
The downside to having a few nice days between cold ones is that you start projects that you then freeze your fingers off trying to finish...
Camano has been down since Christmas day when we loaded up to head to my parents. About a mile down the road I noticed a couple drops and some light spitting coming from above the passenger floor board. With A/C, where do the heater cores normally drip from? Path of least resistance obviously but I ask because mine is up near the firewall on the right side of the unit by a pressed rivet(?) holding the two pieces of the hvac casing together (not the removable cover). It's bubbling out there and either dripping or getting scattered by the fan and speckling the kick panel. Just not where I expected it to come out. Have a new unit on order so will swap that out when it arrives. At the same time I am going to change out the worm gear clamps with some spring ones. Am hoping the single wire ones work but ordered the other style also. What does everyone use for their heater hose clamps? 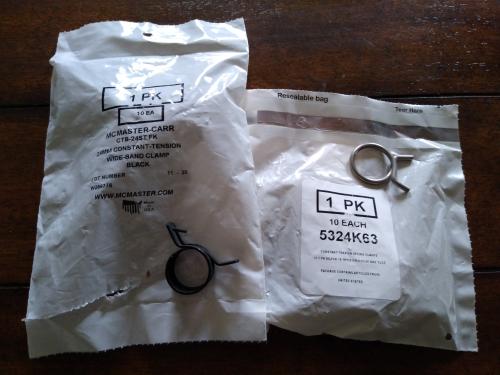 Since it was down anyways, figured it was a good time to do some carb work. During the summer I had some restarting issues that appeared to be due to the fuel in the bowls getting too hot so I ordered a Holley heat shield to try out. In this photo it is on top of the 1" spacer for a test fit but it goes under it.  Since I've been taking care of a few things on Chanute I decided to swap carbs. Moving the 600cfm Quickfuel I had on Camano to Chanute and picking up a 750cfm Quickfuel for Camano. I've only fired it up once (due to the heater core leak) but after checking the temp between the heat shield and the bowl there was a very noticeable difference. This was by touch only as my temp gun wouldn't get a good fix on the shiny bowl. Looking forward to seeing if it makes a difference. Right now I have: Carb Thin 4 hole gasket 1" 4 hole swirl phenolic spacer Thin open gasket Open heat shield (1/16 inch) Thick open rubber spacer/gasket (1/4 inch) Dual plane intake I hesitated at having the open pieces interrupting the flow so if it gives me fits but the shield seems to work I think Mr. Gasket makes a 4 hole shield. It should only impact me at idle right? During the single short run I only checked the float level and didn't touch anything else yet. Sounded good to the ear but interested in thoughts on this combo. In addition to the carb I am swapping out the passenger side ssVEC unit to an 004 model like on the driver side. Chanute now has the 001 model for the headlights and conversion to electric choke. Admittedly a bit of a pain since I have to rewire the headlight circuit due to needing to move those wires to a further away connector on the ssVEC. Going to change to ceramic sockets during this process. The whole reason for this ssVEC change is the driving lights. With the 001 they were wired on their own independent relay which was fine except when meeting vehicles on the road and having to dim both the headlights and turn off the driving lights. With the 004 model I am planning to wire them like the diagram below so that they are off when low beams are on but still not tied to the hi beams. They have covers on them so I don't want them automatically turning on with the hi beams. Any concerns with this? I could rewire the DL trigger to provide ground and use 87a off the low beam relay to be 86 on the DL relay but that would require wiring in another fuse and not sure it's necessary. 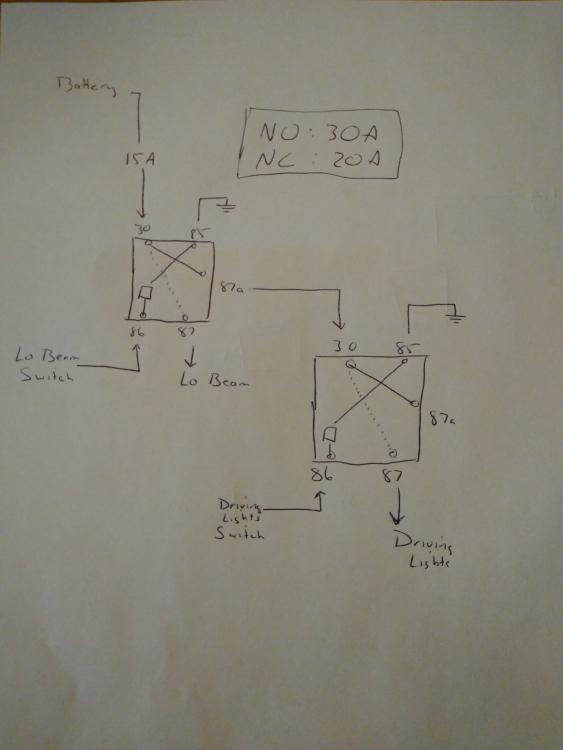
Whole bunch of stuff thrown out there at once so to recap  : :
1. With A/C, where do the heater cores normally drip from? 2. What does everyone use for their heater hose clamps? 3. Thoughts on carb spacer setup? 4. Thoughts on chaining the relay?
Scott
'Camano' 1986 F250 Supercab XLT Lariat 460/C6 'Chanute' 1980 F350 C&C 400/NP 435 - Gin Pole But there ain't nothin' wrong with the radio |
|
Administrator
|
1) if it's dripping inside the cab you need a new heater core.
2) I'm using regular worm drive hose clamps. 3) I don't have any heat shield. Just a spacer with a thin 4 hole gasket on top and a thick insulator underneath. 4) My foglamp relay is powered from 87A of my high beam relay, so it goes out when the high beams are on. It has a trigger that is powered from the parking light circuit, at the headlamp warning chime. Fog/driving lamps can be on with markers or low beams but go out when the high beams come on. That's just me. But it is how I want them to function.
Jim,
Lil'Red is a '87 F250 HD, 4.10's, 1356 4x4, Zf-5, 3G, PMGR, Saginaw PS, desmogged with a Holley 80508 and Performer intake. Too much other stuff to mention. |
|
Administrator
|
Thanks Jim
Scott
'Camano' 1986 F250 Supercab XLT Lariat 460/C6 'Chanute' 1980 F350 C&C 400/NP 435 - Gin Pole But there ain't nothin' wrong with the radio |
|
Administrator
|
In reply to this post by kramttocs
Scott - I'm also using the worm gear hose clamps. I like the look of the others, but I've also had some leaks with them, so have gone to the old standby.
On the driving lights, I don't see a problem with how you are wiring it, but will confess that I didn't follow through to check out the alternate as I didn't see a need. As for the carb, I'm not using a spacer or a shield. Not at all saying you shouldn't either, but I am saying that I don't have any experience there. Sorry.
Gary, AKA "Gary fellow": Profile
Dad's: '81 F150 Ranger XLT 4x4: Down for restomod: Full-roller "stroked 351M" w/Trick Flow heads & intake, EEC-V SEFI/E4OD/3.50 gears w/Kevlar clutches
|
|
Administrator
|
Just adding for my own reference:
Backup circuit: Purple/Orange (before switch) - 20awg LH Turn/Stop: Light Green/Orange - 18awg RH Turn/Stop: Orange/Light Blue- 18awg
Scott
'Camano' 1986 F250 Supercab XLT Lariat 460/C6 'Chanute' 1980 F350 C&C 400/NP 435 - Gin Pole But there ain't nothin' wrong with the radio |
|
|
I have been switching to a silicone hose clamp. They don't have any worm gear grooves to cut the hose. Like these Gates ones.
https://www.oreillyauto.com/detail/b/gates-3728/belts-hoses-16454/hoses-25069/hose-clamp-17485/b2cc3b7032ec/gates-7-8-inch-to-1-1-8-inch-hose-clamp/32312/4330928?q=32312&pos=0
Bruce aka Moose--1978 F250 LWB Flareside, Dana 60's w/ 4:10's, 460, c6
|
|
Administrator
|
I like those!
Gary, AKA "Gary fellow": Profile
Dad's: '81 F150 Ranger XLT 4x4: Down for restomod: Full-roller "stroked 351M" w/Trick Flow heads & intake, EEC-V SEFI/E4OD/3.50 gears w/Kevlar clutches
|
|
|
Those are slick!
Dane
1986 F250HD SC XLT Lariat 4x4 460 C6-Sold 1992 Bronco XLT 4x4 351W E4OD 1998 GMC Sierra SLE K1500 350 4L60E Arizona |
|
Administrator
|
In reply to this post by Bruce moose4x4
Thanks a lot Bruce! I like that style. I've bookmarked those in case the spring style doesn't work out.
As for progress- My new heater core came in as well as the Thermocure. I am still waiting on the 90 degree radiator drain adapter/petcock. The petcock that came with my (knockoff) Champion radiator makes an absolute mess and since I will be flushing it a number of times to remove the rust, I don't want to deal with trying to hold a hose up to it each time. 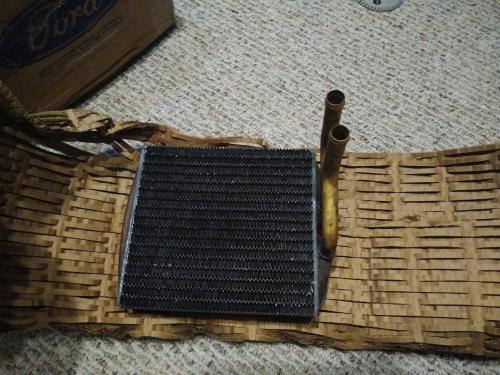 Additionally, my aux backup lights came in. 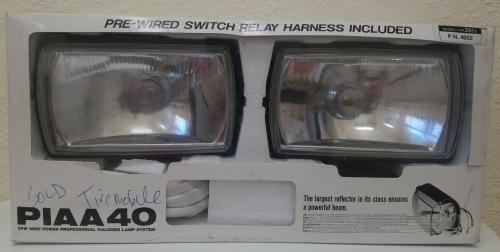 These are driving lights vs fog lights but looks played into it a lot and PIAA didn't make Series 40 Fog lights in this style. Front series 40 driving lights that came with the truck: 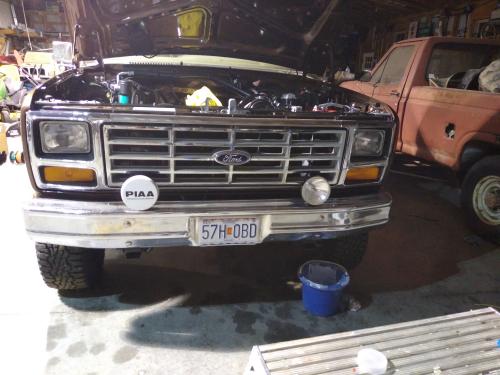 Rear series 40 driving lights: 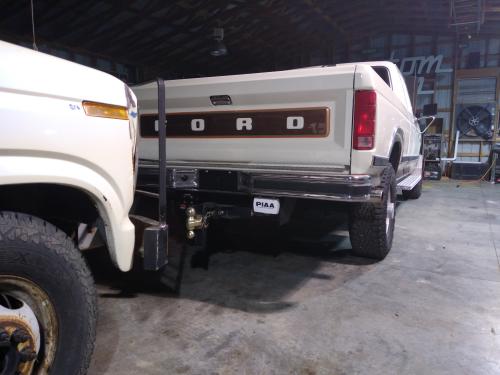 The plan is to mount them in existing holes in the bumper "step" piece. They are mostly protected by the hitch and aren't inline with the tires so rock damage should be minimal but will have to keep an eye on them for awhile. 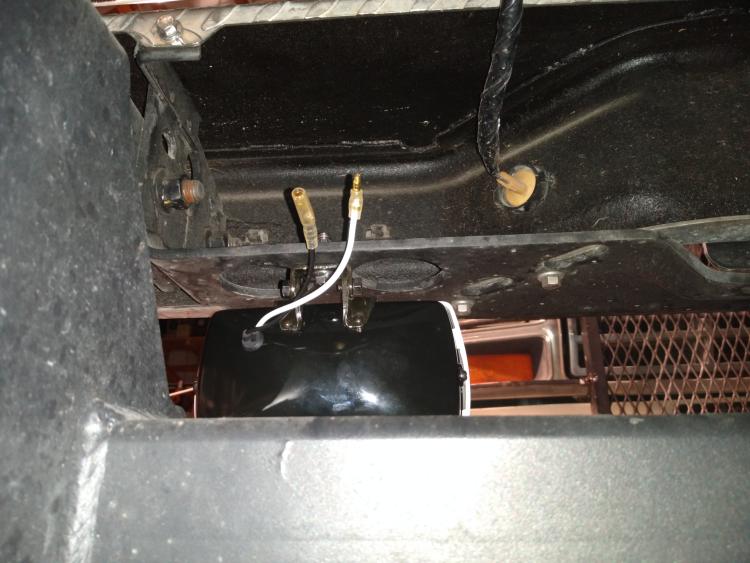 A lot of my time lately has been rewiring my relay boxes so once I cleanup my diagrams I'll post those changes.
Scott
'Camano' 1986 F250 Supercab XLT Lariat 460/C6 'Chanute' 1980 F350 C&C 400/NP 435 - Gin Pole But there ain't nothin' wrong with the radio |
|
|
Curious to hear how the Thermocure works out, and I'm curious about that 90* petcock...is it like this? https://www.cjponyparts.com/radiator-drain-petcock-f-100-1948-1979/p/HW4035/?gclid=Cj0KCQiAmL-ABhDFARIsAKywVacCvI3Tod3cETOYOvWFISMnanX640uNYMFL7EGQlKdQ_tpYOYgQkPwaAil7EALw_wcB I need to drain/flush my 300 at least once, probably a couple times.
1994 F150 4x2 Flareside. 5.0 w/MAF, 4R70W, stock.
1984 F150 4X2 Flareside. Mild 302 w/ 5spd. Sold. 1980 F150 4X4 Flareside. 300i6 w/ 5spd. Sold in 2021. 1980 F100 4X2 Flareside. 351w/2bbl w/NP435. Sold in 1995 |
|
Administrator
|
You are wise to at least be checking the tightness of the petcock. I had a drip I couldn't find and it was that they'd not screwed the petcock in tightly on the Champion radiator.
But I do like the 90 degree one, and if I didn't have the system full I'd probably change. Makes a whole lot of sense. I hope the Thermocure takes care of the rust, and that it is the cause of your problem. How do you know your radiator is a Champion knockoff? Those lights will make a huge difference. Backing up in the dark will be sooooo much easier!
Gary, AKA "Gary fellow": Profile
Dad's: '81 F150 Ranger XLT 4x4: Down for restomod: Full-roller "stroked 351M" w/Trick Flow heads & intake, EEC-V SEFI/E4OD/3.50 gears w/Kevlar clutches
|
|
Administrator
|
In reply to this post by Rembrant
A lot like that. I ordered this one: https://www.amazon.com/gp/product/B01BYLXUI2?ref=ppx_pt2_dt_b_prod_image
I didn't come across the ponyparts one the other day or no doubt would have gone with that design. Thinking about it now though - if I was keeping a hose on there but tucked away, I'd opt for the barb. Since I plan on only putting the hose on when draining, the smooth may be easier to take on/off. Probably 6 one way, half dozen the other. The thermocure seemed to be highly reviewed so figured worth a shot. I'll need to check the forecast and plan out some drives. Maybe unbranded is a better term for the radiator. I just didn't want to call it a Champion when it came in a generic box. I've looked at their 'knockoff vs original' page and the only difference is the cap so I really do think they came from the same factory but again, didn't want to misrepresent. Looking forward to seeing the lights in action. Hooked them up to a battery on the workbench and they definitely have a far out focused beam. Would have much rather had the fogs but since I am only planning to use them when a need arises, any extra light will be better than none. Have you already identified which lights you are going with for yours? I've been tossing up wiring ideas that change daily so you should prioritize that project on BB 
Scott
'Camano' 1986 F250 Supercab XLT Lariat 460/C6 'Chanute' 1980 F350 C&C 400/NP 435 - Gin Pole But there ain't nothin' wrong with the radio |
|
Administrator
|
This post was updated on .
Adding this for my own reference since it was discussed in another thread and I found the info for my voltmeter conversion:
14.8 @ 3/4 setting. ~13.5 @ 1/2 and 12 @ 1/4 so probably about 12.7 @ 3/8. Alt output as tested by Powermaster = 98 idle. 157 at speed.
Scott
'Camano' 1986 F250 Supercab XLT Lariat 460/C6 'Chanute' 1980 F350 C&C 400/NP 435 - Gin Pole But there ain't nothin' wrong with the radio |
|
Administrator
|
Got a few little things taken care of this weekend.
Removed the heater core and replaced with the new one. I haven't tested the old one yet but I am not convinced it was leaking from the core and am thinking it was self-inflicted . After I had reinstalled the old one during the rebuild process, I felt like the tubes coming through the firewall were a little too close to the metal opening. To add some protection I wrapped the tubes a couple times with some of that silicone repair tape. Since it was already installed, I didn't really get the wrap as far in as I'd like. I am thinking that the hose clamp was a little on the edge of the tape and coolant was working its way under the tape and inside the cab where it was showing itself.
I went ahead and installed the new core and some of the tape again (before installing) but got it right at the edge of the firewall so there is no way the clamps could end up on it. We shall see. It's bypassed right now until I do a few coolant flushes. Next was the GVOD 4wd lockout (ground) wire. I had made a jumper in the blue 4wd indicator light wire at the connector beneath the brake booster and that worked fine but was a bit cluttered. Removed the dash, pulled the 4wd indicator light from the cluster and crimped/soldered a wire to the ground leg of the light. Added a factory connector to the end (CG60, CG59) and ran it to the GVOD module. 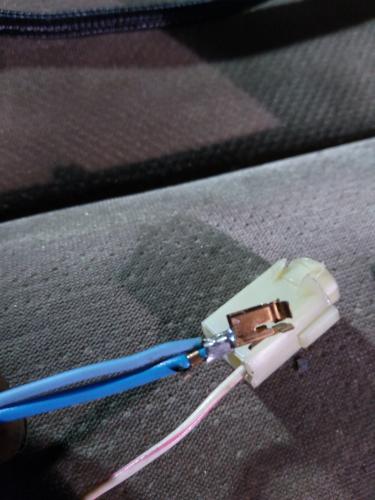 Recently Gary and Bill discussed how the trailer wiring works in later years vs 80-86. Taking a cue from that and since I had some spare relays in the driver side box, I decided to use two of them for the trailer turn/stop instead of just splicing into the truck wiring at the rear crossmembers. "Splicing" meaning that even with the trailer tow package like my truck has, Ford still just tied in back there. Hooked the triggers up and will run dedicated load wires to the back when I run the aux backup light wire. I crimped the trigger wires on top of the appropriate terminals in C305B near the steering column. Secure but removable without a trace if desired. Here are the wiring diagrams I am using for the ssVEC boxes. Had to make do with some of the Objects but it works for my needs. Driver side: 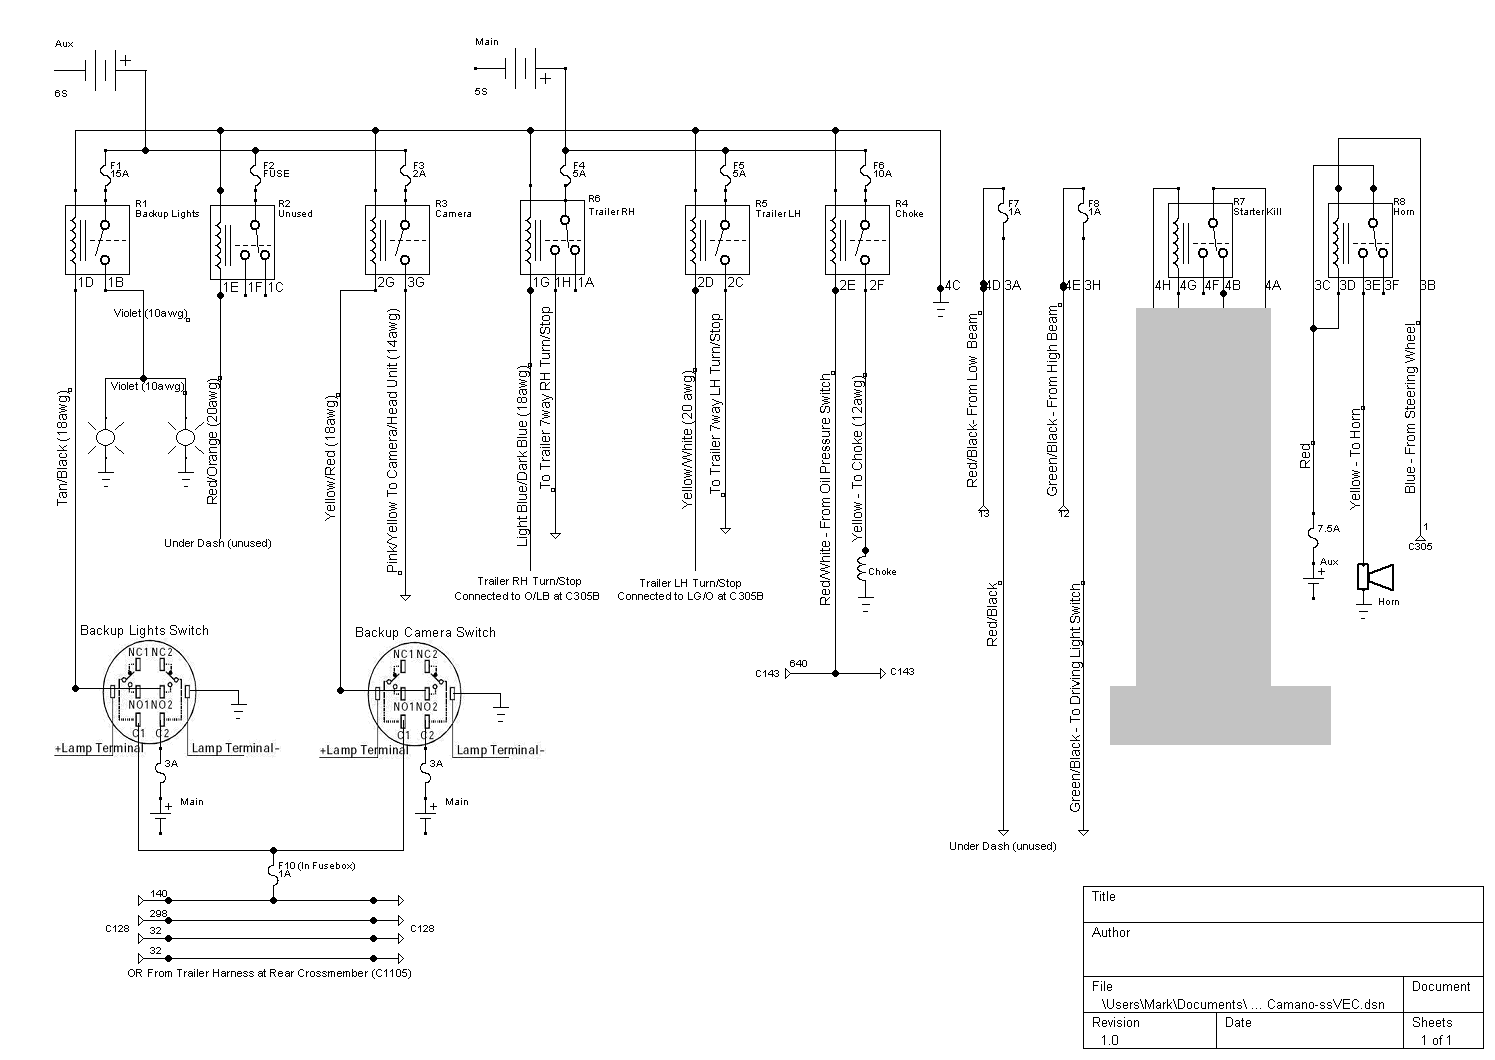 I greyed out the starter kill since while nothing new it hasn't been discussed if we should make something like that for our trucks easily visible. Passenger: 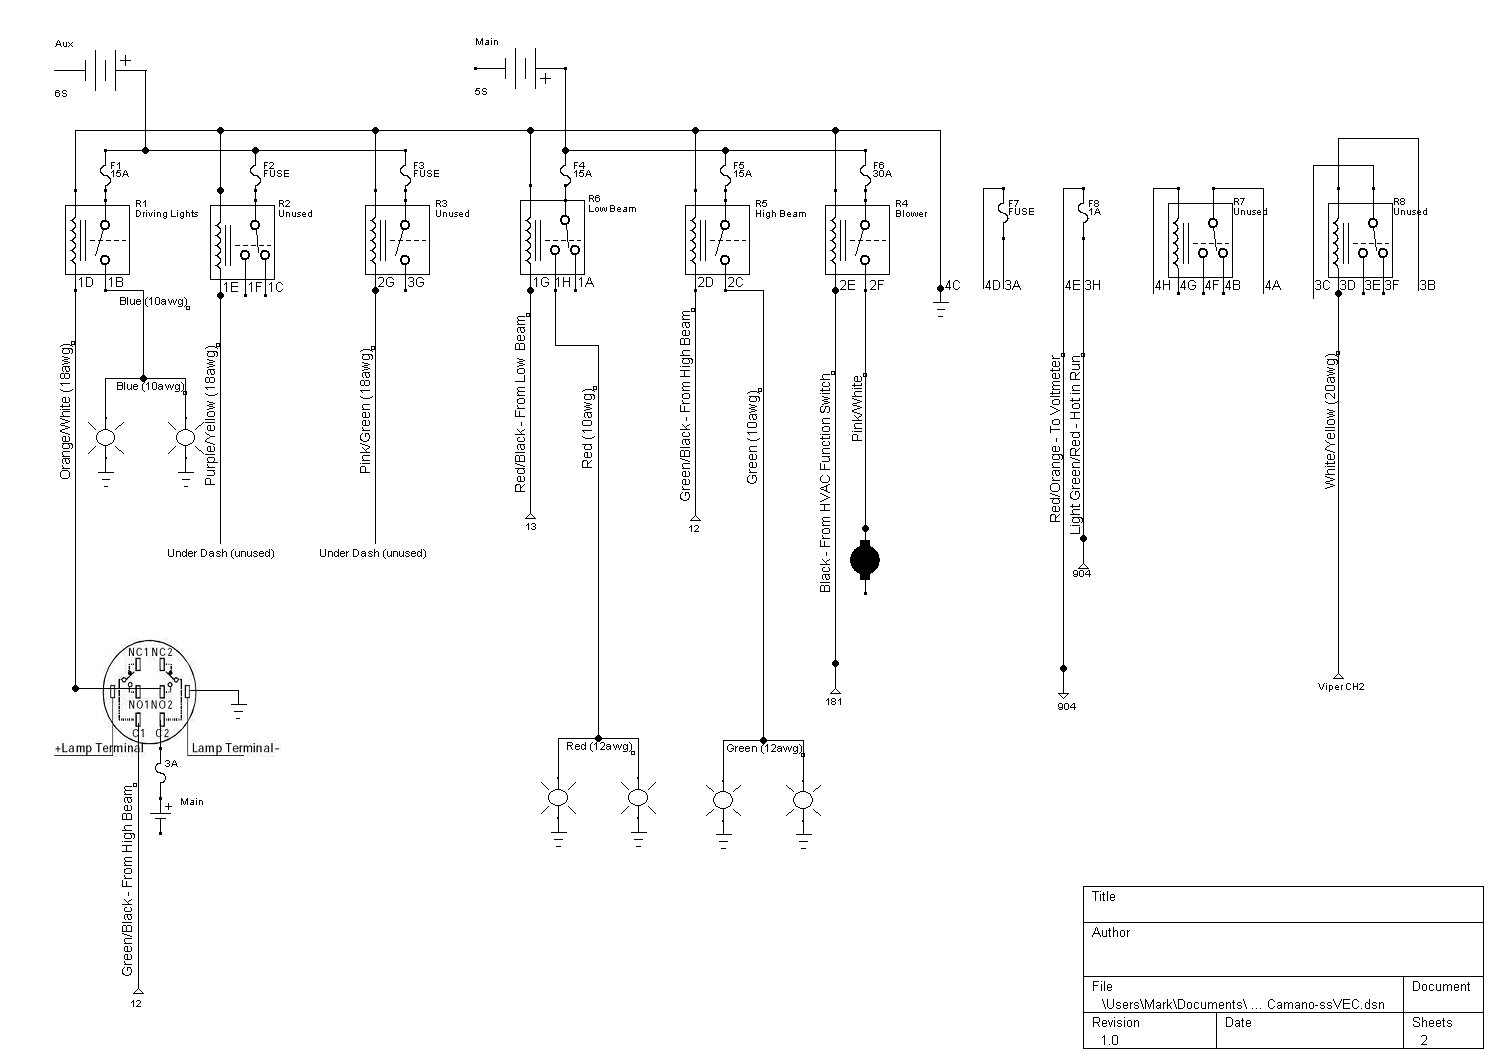
Scott
'Camano' 1986 F250 Supercab XLT Lariat 460/C6 'Chanute' 1980 F350 C&C 400/NP 435 - Gin Pole But there ain't nothin' wrong with the radio |
|
Administrator
|
Scott - You've done what I just did yesterday, which is to make the aux battery required. I meant to mention that on BB's thread, but forgot.
Yesterday when I was setting up the aux power relay, meaning the old aux battery relay, I realized that the two fuse links on it are for the trailer lights and trailer power. And while it used to be that the relay had the main battery connected on one side and the aux battery on the other, it no longer does. So, if the aux battery is dead or if it is removed, until the CH smart isolator closes the things counting on the aux battery won't function. And I think that's now the case on your truck. Right?
Gary, AKA "Gary fellow": Profile
Dad's: '81 F150 Ranger XLT 4x4: Down for restomod: Full-roller "stroked 351M" w/Trick Flow heads & intake, EEC-V SEFI/E4OD/3.50 gears w/Kevlar clutches
|
|
Administrator
|
You are correct and good eye. As with BB, I also have the trailer lights and trailer charge fuse links on the aux battery side of the isolator.
I've tried to make it so that in an emergency if I lose the aux battery and/or somehow lose the isolator, the truck will still function safely. So things like the headlights, blower, trailer brake power, trailer flashers and choke work off the main battery.
Scott
'Camano' 1986 F250 Supercab XLT Lariat 460/C6 'Chanute' 1980 F350 C&C 400/NP 435 - Gin Pole But there ain't nothin' wrong with the radio |
| Edit this page |