The Camano Experience

classic Classic list List threaded Threaded
624 messages Options
1 ... 567891011 ... 32
Reply | Threaded
Open this post in threaded view
|

Re: The Camano Experience

Danny G
Did your truck have the clearance lights factory or did you add them? As far as the antenna goes. Being in the roof is 1 sheet of metal to the outside world. Being on the firewall? still a sheet of metal to the outside world plus a whole bunch of other things. Am I not understanding where your secondary mounting location is? Because to me the only change is to inside the cab obstruction which honestly should not make a difference. You should be able to mount that thing on the outside of your roof and still have solid connection in the vehicle. An alternative option would be in your B Pillar, easy access, can route the wire down the rocker.
1986 F-150|Standard Cab|4x2|300Six|C6Transmission w/3.08 rear|Name:TBD
2021 Ranger XLT Super Crew
Reply | Threaded
Open this post in threaded view
|

Re: The Camano Experience

ArdWrknTrk
Administrator
Under his dash rug is clear through the windshield to the whole world....
 Jim,
Lil'Red is a '87 F250 HD, 4.10's, 1356 4x4, Zf-5, 3G, PMGR, Saginaw PS, desmogged with a Holley 80508 and Performer intake.
Too much other stuff to mention.
Reply | Threaded
Open this post in threaded view
|

Re: The Camano Experience

Danny G
ArdWrknTrk wrote
Under his dash rug is clear through the windshield to the whole world....
LOL I saw rug and was thinking footbox/firewall.
1986 F-150|Standard Cab|4x2|300Six|C6Transmission w/3.08 rear|Name:TBD
2021 Ranger XLT Super Crew
Reply | Threaded
Open this post in threaded view
|

Re: The Camano Experience

kramttocs
Administrator
In reply to this post by Danny G
ArdWrknTrk wrote
That'll sure make it easy to be 'on the ball', when hitching a light trailer.
But be careful you don't overshoot.
Haha for sure. I might need to stock up on them.

TheScatch wrote
My inlaws had a shop, had a deep single bay, then a large 3 story bay (for boats) then next to that was a massive work area half covered with a loft. The uncovered half.... wood stove. used to get up early in the AM and get a fire cranking in that bad boy. Right now I have a dinky 1 car and am looking for ways to heat it up, need to pull the drywall down and put some R-13 in then blow in some insulation in the roof. I have a window ac unit for the summer, and a 4 inch vent through the wall I was thinking of using for a vent or maybe a vent-less wall mounted propane unit. If we ended up staying long term or I was at my "forever" home I would probably put in a mini split with heat and air.
Those mini splits would be nice. I would really like the wood stove approach - the downside is that it doesn't work well for squeezing in a couple hours at night without having to have it run for hours before that. They definitely put out some good heat though and cheap to fuel around here at least.

The vent-less units are convenient but I just kept reading about the moisture they introduce.
Scott
'Camano' 1986 F250 Supercab XLT Lariat 460/C6
'Chanute' 1980 F350 C&C 400/NP 435 - Gin Pole

But there ain't nothin' wrong with the radio
Reply | Threaded
Open this post in threaded view
|

Re: The Camano Experience

kramttocs
Administrator
In reply to this post by Danny G
I guess on the dash isn't the first thing one thinks of when they see 'carpet'

In the end I don't think the wifi one matters a ton. The gps was the more important one in getting it outside the vehicle. I may just leave the wifi one zip tied up behind the dash next to the unit.

The truck didn't originally have cab lights but I've always been a fan of them. I would definitely recommend the rivet nuts if adding them new. Makes them nice to install. The wiring was really easy with the super cab as there is access to the wiring for each light. So I could put each light in and then connect them all together inside the cab, tucking the harness up in the 'shelf' when done. I used a factory harness and spliced the new light socket pigtails in.

In addition to the rivet nuts I'd set them back a little ways further than factory. Not much but enough to help them lay flat.
Scott
'Camano' 1986 F250 Supercab XLT Lariat 460/C6
'Chanute' 1980 F350 C&C 400/NP 435 - Gin Pole

But there ain't nothin' wrong with the radio
Reply | Threaded
Open this post in threaded view
|

Re: The Camano Experience

Gary Lewis
Administrator
In reply to this post by kramttocs
I sorta kinda understand how you are planning to do the double-din rack.  But you lost me on the bezel.  So I'll await the pics and explanations since it'll be some time before I get to a point where I might want to do do this.  IOW, that won't be part of "transformation" on BB, and can come in a later "upgrade" phase.

On your wifi antenna, you could run it down the top of the transmission tunnel under the carpet.  Would work great for in the cab, but maybe not for connecting to your home wifi.
Gary, AKA "Gary fellow": Profile

Dad's: '81 F150 Ranger XLT 4x4: Down for restomod: Full-roller "stroked 351M" w/Trick Flow heads & intake, EEC-V SEFI/E4OD/3.50 gears w/Kevlar clutches
Blue: 2015 F150 Platinum 4x4 SuperCrew wearing Blue Jeans & sporting a 3.5L EB & Max Tow
Big Blue: 1985 F250HD 4x4: 460/ZF5/3.55's, D60 w/Ox locker & 10.25 Sterling/Trutrac, Blue Top & Borgeson, & EEC-V MAF/SEFI

Reply | Threaded
Open this post in threaded view
|

Re: The Camano Experience

FuzzFace2
In reply to this post by Danny G
I use a 75,000 to 125,000 BTU propane heater to heat my un-insolated garage and it is not small.
I can fit 1 car & 2 pick up's in the bay area and still have to work on 1 truck.

It is this unit I have https://www.northerntool.com/shop/tools/product_200178724_200178724
The other day it was 30* outside, 32* in the garage, ran the heater for an hour and it was in the 40's and that was go enough to start working in.
Dave ----
Dave G.
81 F100 flare side 300 six / AA OD / NP435 / 2.75 gear
http://cars.grantskingdom1.com/index.php/1980-Ford-F100?page=1
81 F100 style side 300 six/SROD parts truck -RIP
http://cars.grantskingdom1.com/index.php/1981-Ford-F100
Reply | Threaded
Open this post in threaded view
|

Re: The Camano Experience

kramttocs
Administrator
Have you noticed any condensation? That seems to be the only complaint I see with those or else I'd be all for that route.
Scott
'Camano' 1986 F250 Supercab XLT Lariat 460/C6
'Chanute' 1980 F350 C&C 400/NP 435 - Gin Pole

But there ain't nothin' wrong with the radio
Reply | Threaded
Open this post in threaded view
|

Re: The Camano Experience

Gary Lewis
Administrator
Condensation was the problem I had with one. I rusted a lot of things before I figured out what was happening.
Gary, AKA "Gary fellow": Profile

Dad's: '81 F150 Ranger XLT 4x4: Down for restomod: Full-roller "stroked 351M" w/Trick Flow heads & intake, EEC-V SEFI/E4OD/3.50 gears w/Kevlar clutches
Blue: 2015 F150 Platinum 4x4 SuperCrew wearing Blue Jeans & sporting a 3.5L EB & Max Tow
Big Blue: 1985 F250HD 4x4: 460/ZF5/3.55's, D60 w/Ox locker & 10.25 Sterling/Trutrac, Blue Top & Borgeson, & EEC-V MAF/SEFI

Reply | Threaded
Open this post in threaded view
|

Re: The Camano Experience

ArdWrknTrk
Administrator
One pound of propane burned creates 1.6 pounds of water.
It adds up fast, and causes lots of condensation on cold objects.

http://www.irv2.com/forums/f93/engineering-help-water-from-propane-104216.html

At 8.35 pounds per gallon that means 20# of propane creates 3.832 gallons of water.

That's a lot of moisture for the air to support, and of course, as soon as you turn that heater off and the room starts to cool that water IS going to have to go somewhere, because the atmosphere can't hold it.
 Jim,
Lil'Red is a '87 F250 HD, 4.10's, 1356 4x4, Zf-5, 3G, PMGR, Saginaw PS, desmogged with a Holley 80508 and Performer intake.
Too much other stuff to mention.
Reply | Threaded
Open this post in threaded view
|

Re: The Camano Experience

kramttocs
Administrator
Wow, didn't realize just how much it was.
Scott
'Camano' 1986 F250 Supercab XLT Lariat 460/C6
'Chanute' 1980 F350 C&C 400/NP 435 - Gin Pole

But there ain't nothin' wrong with the radio
Reply | Threaded
Open this post in threaded view
|

Re: The Camano Experience

FuzzFace2
I must be lucky as I have not had any issues with condensation.
It could be that most of the time it is also warming up outside, no insulation in the garage and the sun beating on the roof to help heat the inside up and not air tight may let the water vapor out?
Dave ----
Dave G.
81 F100 flare side 300 six / AA OD / NP435 / 2.75 gear
http://cars.grantskingdom1.com/index.php/1980-Ford-F100?page=1
81 F100 style side 300 six/SROD parts truck -RIP
http://cars.grantskingdom1.com/index.php/1981-Ford-F100
Reply | Threaded
Open this post in threaded view
|

Re: The Camano Experience

ArdWrknTrk
Administrator
I guess?

But anything cold (steel and cast iron tend to stay cold because of their mass) and below the dew point will have condensation.
Then as the warmth starts to leave, the dew point goes *up* because colder air has less room for moisture.

 Jim,
Lil'Red is a '87 F250 HD, 4.10's, 1356 4x4, Zf-5, 3G, PMGR, Saginaw PS, desmogged with a Holley 80508 and Performer intake.
Too much other stuff to mention.
Reply | Threaded
Open this post in threaded view
|

Re: The Camano Experience

kramttocs
Administrator
My wife and kids were out shopping today and the weather was nice so spent most of it working on the truck.
Got the power windows/locks harness installed across the dash and in both doors. It didn't have them originally although one of the previous owners had installed that add on set the essentially cranks the window for you.
Wanted to get some more wiring done but ran into a snag with some terminals (posted in the tools section in TheScatch's thread ) so instead finished up the roof insulation and some other odds and ends.
Seems likes the odds and ends are never ending.

Since it required making a little bit of a mess I went ahead and cut out the dash for the headunit. Really happy with how it came out. It required very minimal cutting - just a portion of the lower lip cut flush.

This was after already flattening the dash support bar earlier this year while it was out.


This was inside the metal shop but GPS seemed good enough considering.


Then I got distracted...


Back to the terminals - anyone know the part number for the blade style ones? For example the one used for the cab lights - the single plug down on the driver side kick panel.


Scott
'Camano' 1986 F250 Supercab XLT Lariat 460/C6
'Chanute' 1980 F350 C&C 400/NP 435 - Gin Pole

But there ain't nothin' wrong with the radio
Reply | Threaded
Open this post in threaded view
|

Re: The Camano Experience

Gary Lewis
Administrator
 Cool!  Really glad the double-DIN works, although I’m not sure it’ll be compatible with my F600 faceplate.  I really want to see all it took.

Don’t know the terminal #, but may be able to look later. Hopefully someone else knows.

And, I didn’t realize that your head unit has internet access. Great!
Gary, AKA "Gary fellow": Profile

Dad's: '81 F150 Ranger XLT 4x4: Down for restomod: Full-roller "stroked 351M" w/Trick Flow heads & intake, EEC-V SEFI/E4OD/3.50 gears w/Kevlar clutches
Blue: 2015 F150 Platinum 4x4 SuperCrew wearing Blue Jeans & sporting a 3.5L EB & Max Tow
Big Blue: 1985 F250HD 4x4: 460/ZF5/3.55's, D60 w/Ox locker & 10.25 Sterling/Trutrac, Blue Top & Borgeson, & EEC-V MAF/SEFI

Reply | Threaded
Open this post in threaded view
|

Re: The Camano Experience

kramttocs
Administrator
Thanks Gary - appreciate it!

Scrounged up some photos from this summer so hopefully this helps. I would really like to know how others have done it. I've seen a few photos of double dins in these trucks but I think the only details on an install I ever recall seeing was one where they cut through the a/c duct. That was a bit more intrusive of a change than I was willing to make (although some may say the same of my changes).

This could all be done with the dash in the truck using a flexible rotary attachment and some [a lot of] patience but definitely easier with the dash out.

Going to repeat some of what I've posted in the previous posts but makes sense to have it all together.

First off, ignore my floral shop couch . One of those pieces of furniture that has been passed around from family member to family member.

The factory radio sits on/clips to a hump in the metal framework of the dash.


Between this hump at the bottom and the a/c duct at the top, there isn't enough room for a double din unit. Since going up wasn't an option, the hump had to go.

I drilled out the rivets on either side and removed the short humped section


I don't have any photos of this but using the 3 drilled out holes on either end, I screwed the piece to a board and traced around the ends for good measure.
The two ends are in the same plane - or close enough for this to work.
I then cut the hump in half and flattened both ends.
Screwed them back to the board and marked the overlap. Unscrewed and cut off the overlap (half from each side).
Next I welded them together and ground it down.
After blasting and painting the support structure I bolted the now flat piece back in using button head bolts and threadlocker.


Once the dash was back installed in the truck I measured equal distances from both edges using the width of the double din cage and cut the bottom two holes that the factory radio mounted to as well as the lip between them so that it was a flat 'shelf'. I used a coping saw and a file.


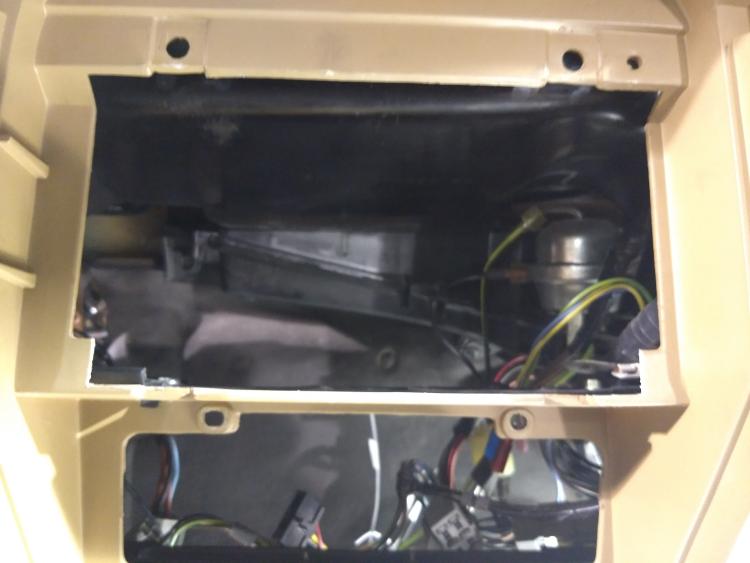
This allowed the cage to slide it. Once in though it hit part of the rolled edge of the support on the drivers side. There is about 3/8" where the rolled edge of the mating section to the now flat piece extends further to the passenger side. This corner is what I had to remove with the dremel and file.
I also had to use the dremel to remove a little off the top of the button head bolt that is inline with that corner. This has been done in the photo above.

Now the cage can slide in and rest on the flat support. The plan once I get everything lined up is to drill two holes in the support and the cage and rivet them together. I would recommend drilling the holes in the support piece earlier in the process. I didn't because I wasn't sure how I would secure the cage and didn't want extra holes for no reason but after seeing it I am thinking riveting makes the most sense.

Once the cage was in there I test fit the head unit. The cage I bought (and they all may) had two pieces that you bolt onto the sides of the head unit with a number of slots allowing you to adjust how far in or out the head unit locks into the cage. With it all the way in, which is too far for a finished install, there is plenty of room behind it to hook up the cables.


Once I get the truck back together and running I will work on cutting the factory bezel and seeing what is needed for a trim piece to make it look professional.


Scott
'Camano' 1986 F250 Supercab XLT Lariat 460/C6
'Chanute' 1980 F350 C&C 400/NP 435 - Gin Pole

But there ain't nothin' wrong with the radio
Reply | Threaded
Open this post in threaded view
|

Re: The Camano Experience

Frank Wyatt
Nice job. Looks very well thought out and professional.
1981 F 150 Custom 300 ci with a fully rebuilt 1968 240 head Carter YFA T-18 3.25 9" rear 2WD
dual gas tanks
1990 Lincoln Town Car 5.0 AOD
Home town Mc Kenzie, TN
Reply | Threaded
Open this post in threaded view
|

Re: The Camano Experience

kramttocs
Administrator
Thanks! Hopefully the bezel part pans out.
Scott
'Camano' 1986 F250 Supercab XLT Lariat 460/C6
'Chanute' 1980 F350 C&C 400/NP 435 - Gin Pole

But there ain't nothin' wrong with the radio
Reply | Threaded
Open this post in threaded view
|

Re: The Camano Experience

ArdWrknTrk
Administrator
This post was updated on .
In reply to this post by kramttocs
kramttocs wrote
First off, ignore my floral shop couch . One of those pieces of furniture that has been passed around from family member to family member.
.

Well, now we know who the unknown soldier racked out on his basement sofa is, IRL.  
kramttocs wrote
After blasting and painting the support structure I bolted the now flat piece back in using button head bolts and threadlocker
 You have to be careful using anerobics around most plastics.
One of their less pleasant qualities is the fact that they insinuate themselves between the polymer molecules and cause embrittlement.
Plastics craze, crumble and self destruct when threaded fasteners wipe their load as they are going in.

Putting the thread lock in the chassis hole, or using a screw with the dried (preapplied, blue or red dot) will help minimize this.

Very well thought out, and a nice clean install BTW!  
 Jim,
Lil'Red is a '87 F250 HD, 4.10's, 1356 4x4, Zf-5, 3G, PMGR, Saginaw PS, desmogged with a Holley 80508 and Performer intake.
Too much other stuff to mention.
Reply | Threaded
Open this post in threaded view
|

Re: The Camano Experience

FuzzFace2
Jim,
I think the thread lock is in / thru metal and think has a nut / bolt set up?
If not a flat head sheet metal screw into the metal frame would work too I think.


On the part you removed, cut, flatten and welded why not use sheet metal cut & drilled to fit as that's what it sounded like you did?

Looks good
Dave ----
Dave G.
81 F100 flare side 300 six / AA OD / NP435 / 2.75 gear
http://cars.grantskingdom1.com/index.php/1980-Ford-F100?page=1
81 F100 style side 300 six/SROD parts truck -RIP
http://cars.grantskingdom1.com/index.php/1981-Ford-F100
1 ... 567891011 ... 32