Big Blue's Bucket Seats

classic Classic list List threaded Threaded
162 messages Options
1234 ... 9
Reply | Threaded
Open this post in threaded view
|

Big Blue's Bucket Seats

Gary Lewis
Administrator
You may remember that Chad/Little Beefy gave me a pair of low-back bucket seats. I took them to a guy to have them rebuilt and upholstered about a week ago, and realized today that he may call next week and have them ready. So I'd better get busy painting the trim that goes on them as well as the center console.

Given that, today I started on the little trim pieces that cover the hinges. So I looked up the SEM instructions for prep and painting:

4 STEPS TO PROFESSIONAL RESULTS
  1. CLEAN: Clean the area with SEM Soap and a gray scuff pad. Scrub thoroughly, paying close attention to textured or recessed areas. Rinse with water or wipe away residue with damp cloth and let dry.
  2. RE-CLEAN: Clean with Plastic & Leather Prep or Zero VOC Surface Cleaner using a clean, lint-free towel and wiping in one direction. If contamination still exists after cleaning, water will bead on the surface. Repeat until beading no longer occurs.

    Tech tip: Wiping in one direction will remove contaminants from the surface, rather than smearing contaminants around.
  3. PREP: To promote adhesion on plastics, such as ABS, PVC or other similar plastics, apply a medium wet coat of Sand Free. While still wet, apply a light coat of Color Coat. (Avoid applying the first coat of Color Coat too heavily or sagging could occur.) As Sand Free evaporates, Color Coat is drawn into the surface, resulting in excellent adhesion.

    To promote adhesion on plastics, such as TPO, EPDM, PP or other similar thermoplastics, use Plastic Adhesion Promoter or XXX Adhesion Promoter. Apply one light coat, let flash for 5 minutes, and then apply one full wet coat. Allow this coat to flash 10-15 minutes, but no longer than 30 minutes before topcoating.

    Tech tip: If the type of plastic is unknown, place a drop of acetone on the back of the plastic and rub it with your finger. If the plastic smears and melts, use Sand Free. If acetone does not have an effect on the plastic, use Plastic Adhesion Promoter or XXX Adhesion Promoter.
  4. APPLY: Apply Color Coat. View the TDS, Color Coat How-To Video, or our Refinishing Auto Plastic & Vinyl Procedures (RAP-1) training manual for more detailed instruction.

I started on Step 1 but didn't get very far as the "bad" plastic wouldn't come off with the gray scuff pad. So I tried a Nylon brush, and then Go Jo, but no go. So I resorted to a stainless steel wire brush as shown in the 2nd pic below. That, and Dawn, got the "bad" plastic off, as you can see in the comparison below, with the untouched one on top and the scrubbed one on the bottom.

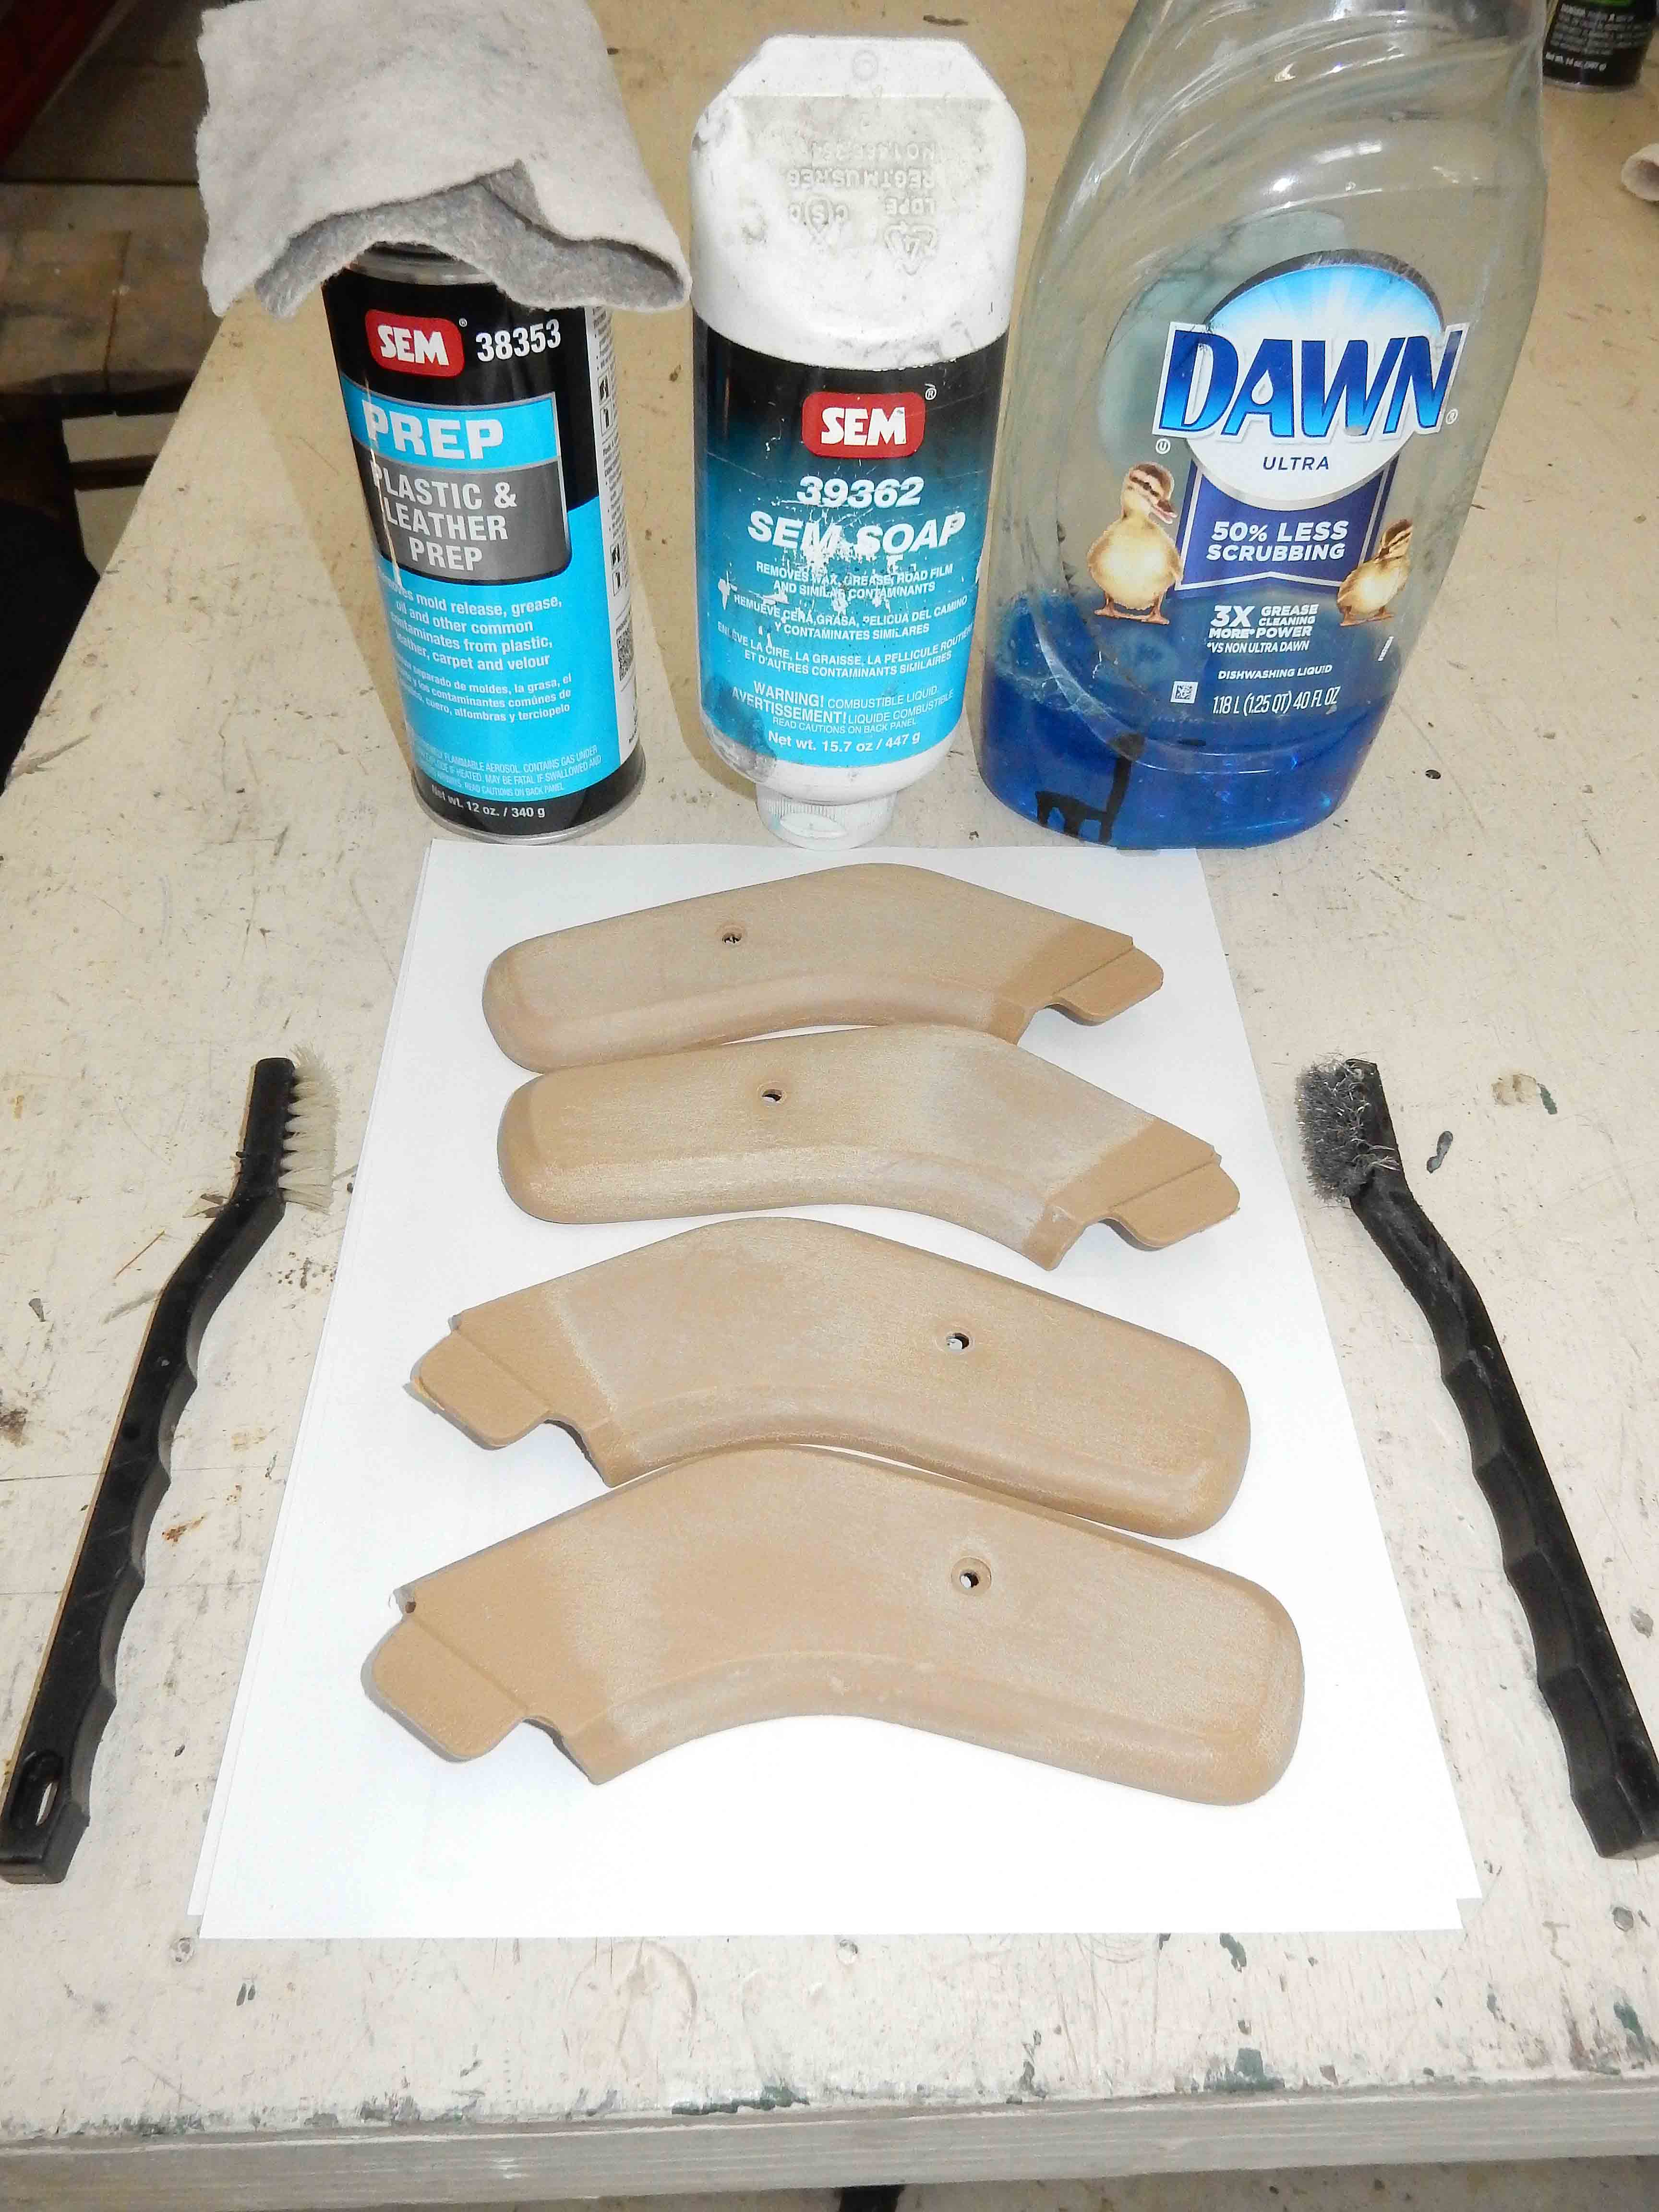
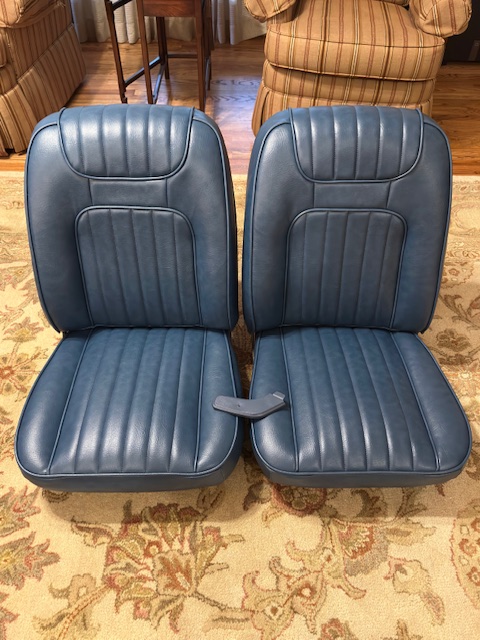
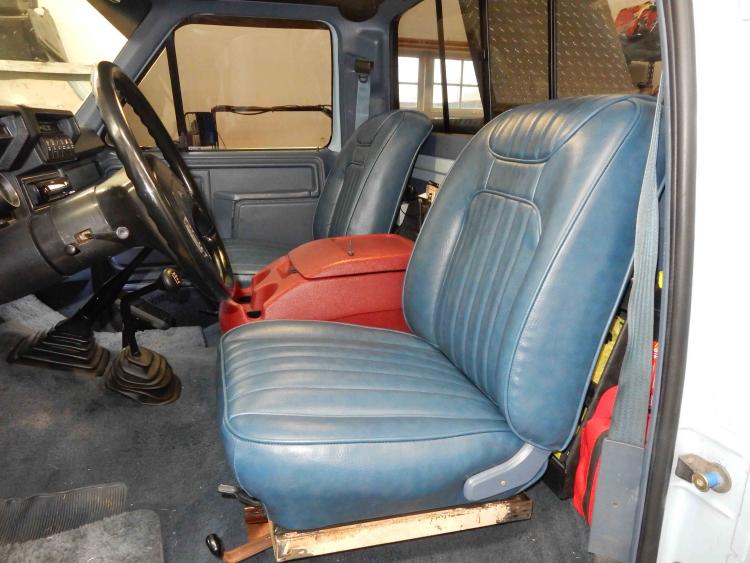
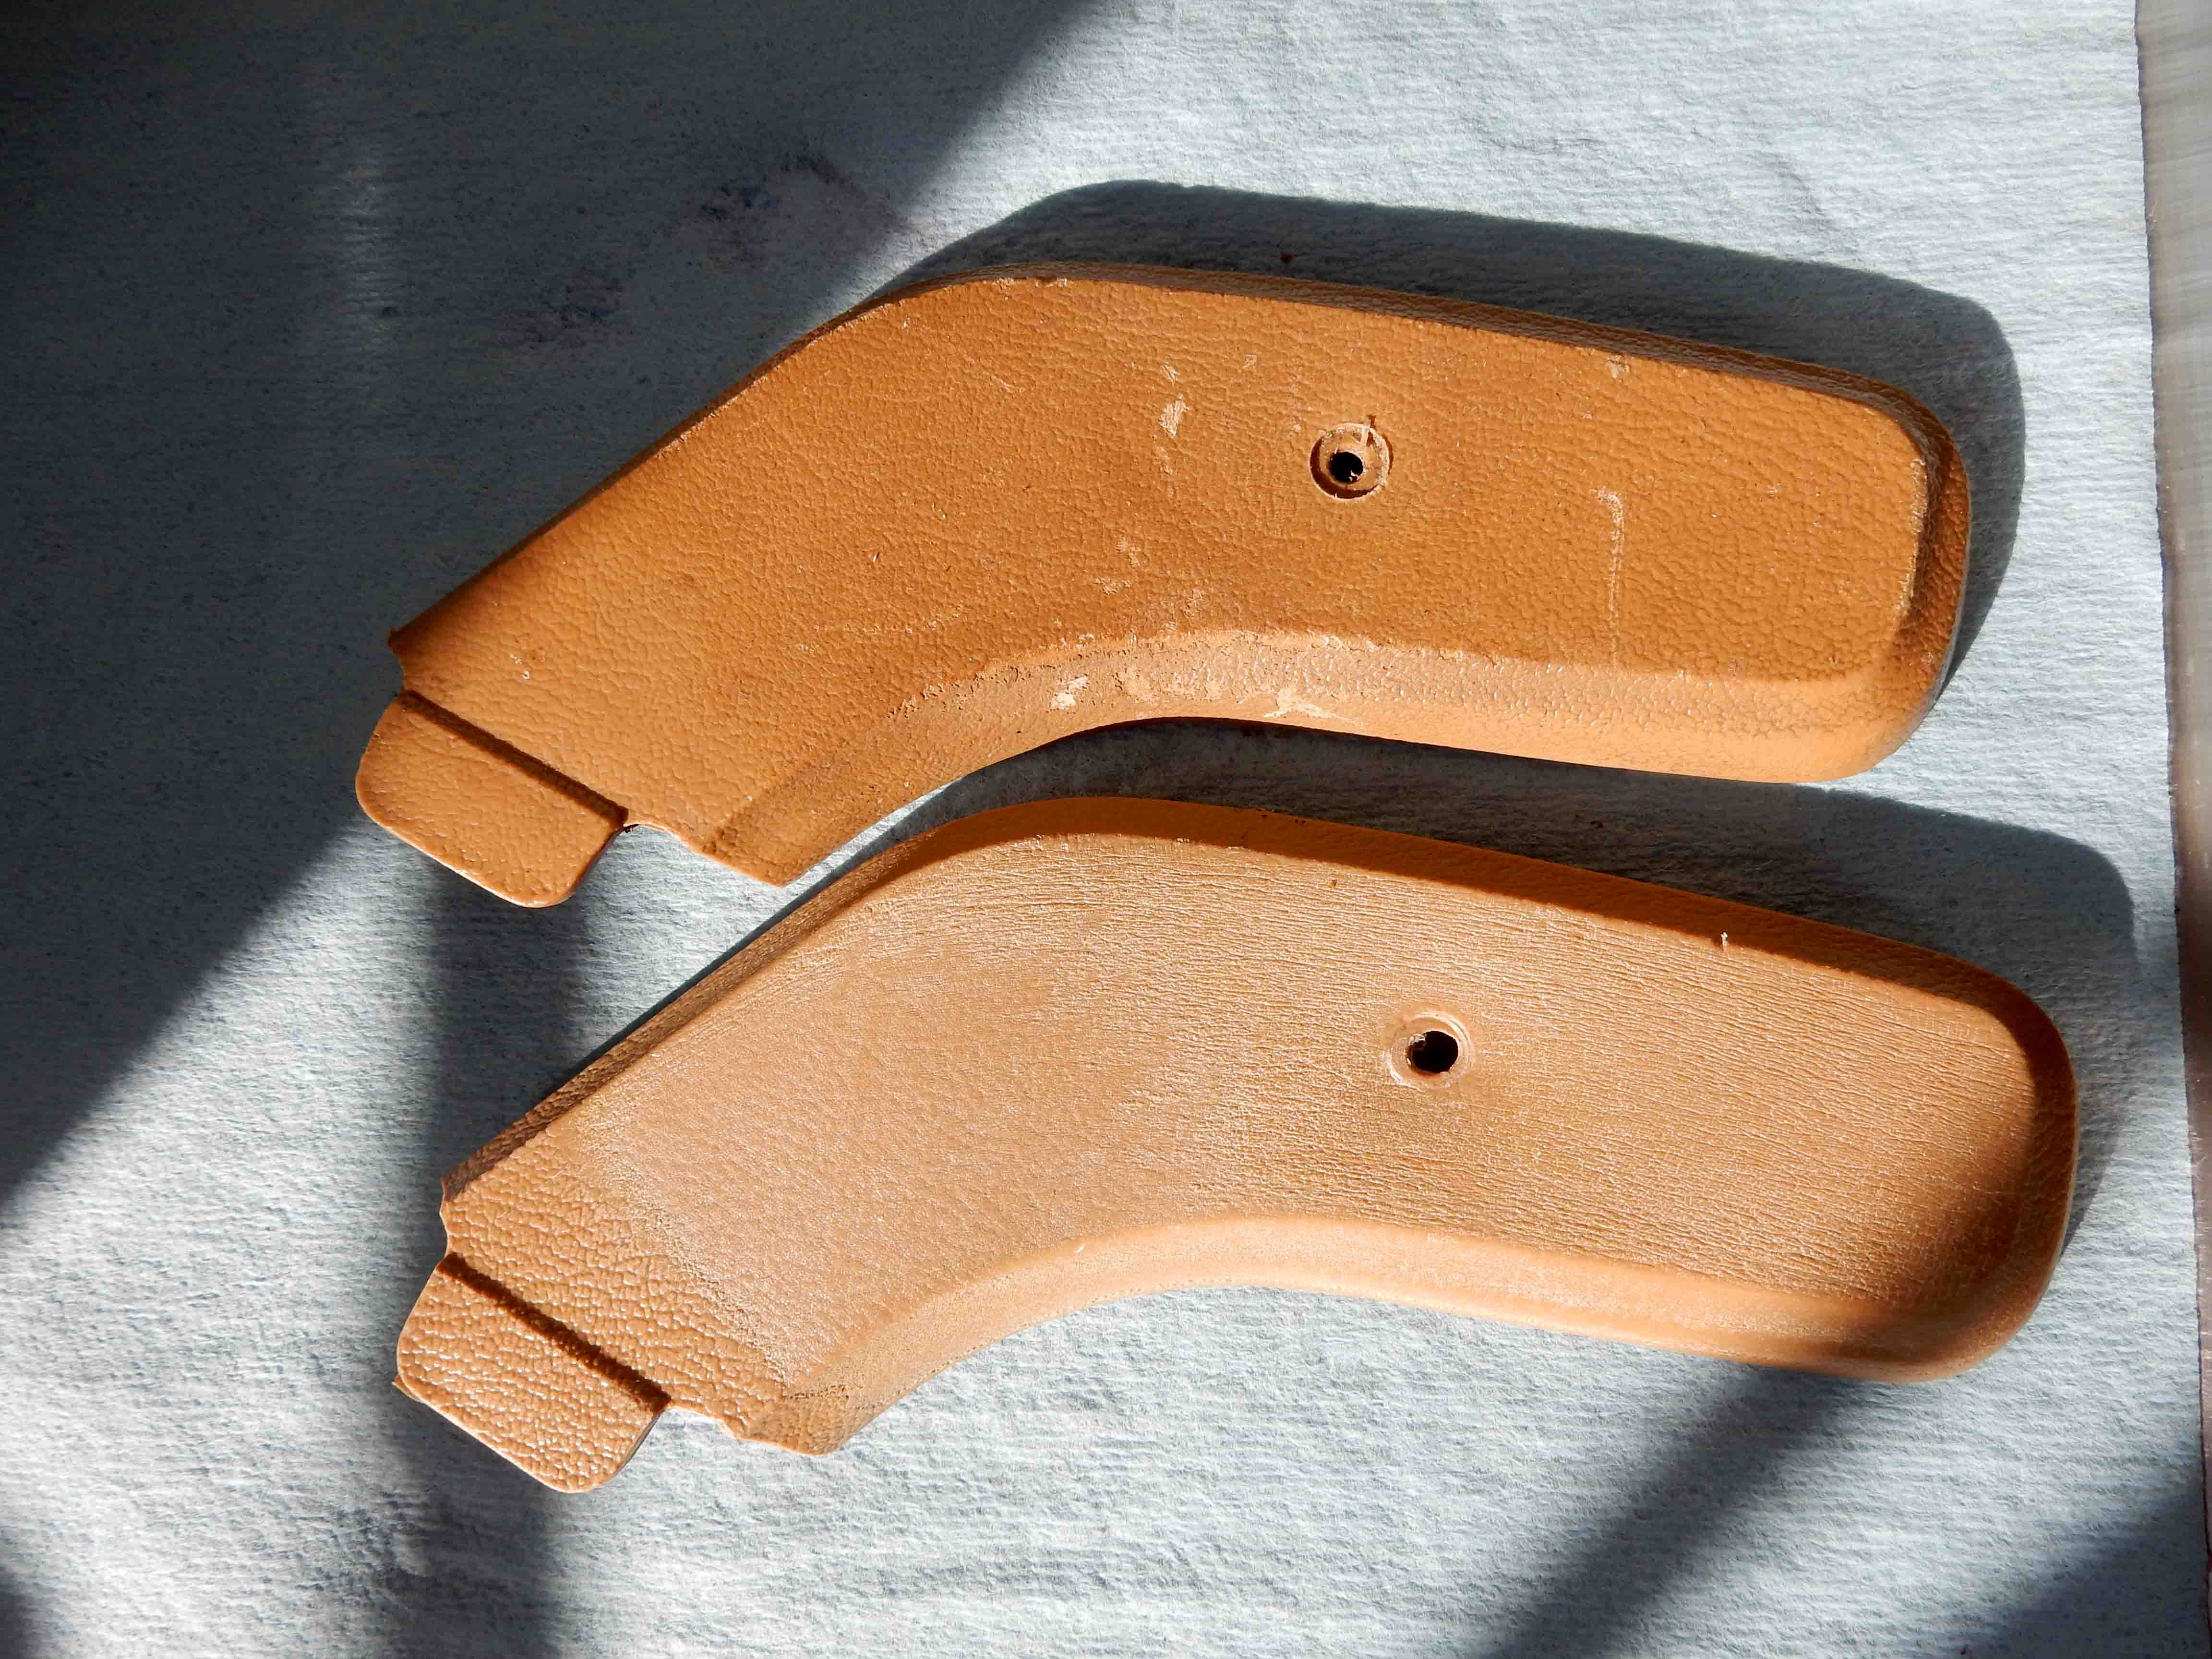
I then cleaned all four of the pieces using Dawn & the stainless steel brush, then used the SEM Soap and the gray scrub pad. Then I moved on to Step 2, and pre-cleaned with SEM Plastic & Leather Cleaner.

Tomorrow I plan to pick up on Step 3 and hope to get them finished. I'll let y'all know how that goes.

Gary, AKA "Gary fellow": Profile

Dad's: '81 F150 Ranger XLT 4x4: Down for restomod: Full-roller "stroked 351M" w/Trick Flow heads & intake, EEC-V SEFI/E4OD/3.50 gears w/Kevlar clutches
Blue: 2015 F150 Platinum 4x4 SuperCrew wearing Blue Jeans & sporting a 3.5L EB & Max Tow
Big Blue: 1985 F250HD 4x4: 460/ZF5/3.55's, D60 w/Ox locker & 10.25 Sterling/Trutrac, Blue Top & Borgeson, & EEC-V MAF/SEFI

Reply | Threaded
Open this post in threaded view
|

Re: Big Blue's Bucket Seats

viven44
Look forward to the results! This would work on much of the interior trim.
Vivek

- 'Big Blue 2WD' - 1984 F350 RWD 460/C6
- 1978 Bronco with the heart of a 1986 F250 Bullnose - under restoration
- "Bonded Bronco" -1985 Bronco - 302 4-speed fuel injected, Hibernating future project
Reply | Threaded
Open this post in threaded view
|

Re: Big Blue's Bucket Seats

Gary Lewis
Administrator
Yes, it would.  And I've redone most of the trim on BB, as you can see here.
Gary, AKA "Gary fellow": Profile

Dad's: '81 F150 Ranger XLT 4x4: Down for restomod: Full-roller "stroked 351M" w/Trick Flow heads & intake, EEC-V SEFI/E4OD/3.50 gears w/Kevlar clutches
Blue: 2015 F150 Platinum 4x4 SuperCrew wearing Blue Jeans & sporting a 3.5L EB & Max Tow
Big Blue: 1985 F250HD 4x4: 460/ZF5/3.55's, D60 w/Ox locker & 10.25 Sterling/Trutrac, Blue Top & Borgeson, & EEC-V MAF/SEFI

Reply | Threaded
Open this post in threaded view
|

Re: Big Blue's Bucket Seats

viven44
Very well done. Like-new results. Didn't realize the SEM color coat was a flexible coating, sounds like Plasti Dip.
Vivek

- 'Big Blue 2WD' - 1984 F350 RWD 460/C6
- 1978 Bronco with the heart of a 1986 F250 Bullnose - under restoration
- "Bonded Bronco" -1985 Bronco - 302 4-speed fuel injected, Hibernating future project
Reply | Threaded
Open this post in threaded view
|

Re: Big Blue's Bucket Seats

Gary Lewis
Administrator
Thanks, but it isn't really like Plasti Dip as it doesn't build up on the item.  Via the prep the Sand Free bonds to the plastic and as it "evaporates, Color Coat is drawn into the surface, resulting in excellent adhesion."  But it doesn't change the texture of the plastic.

However they do have a spray that does put a texture on the plastic and then you spray on the Color Coat.  That give it a bumpy texture, kind of like our door panels, which get sanded smooth when we refinish them.
Gary, AKA "Gary fellow": Profile

Dad's: '81 F150 Ranger XLT 4x4: Down for restomod: Full-roller "stroked 351M" w/Trick Flow heads & intake, EEC-V SEFI/E4OD/3.50 gears w/Kevlar clutches
Blue: 2015 F150 Platinum 4x4 SuperCrew wearing Blue Jeans & sporting a 3.5L EB & Max Tow
Big Blue: 1985 F250HD 4x4: 460/ZF5/3.55's, D60 w/Ox locker & 10.25 Sterling/Trutrac, Blue Top & Borgeson, & EEC-V MAF/SEFI

Reply | Threaded
Open this post in threaded view
|

Re: Big Blue's Bucket Seats

ArdWrknTrk
Administrator
In reply to this post by Gary Lewis
It's the only way that all your interior plastics come out matching.  👍
 Jim,
Lil'Red is a '87 F250 HD, 4.10's, 1356 4x4, Zf-5, 3G, PMGR, Saginaw PS, desmogged with a Holley 80508 and Performer intake.
Too much other stuff to mention.
Reply | Threaded
Open this post in threaded view
|

Re: Big Blue's Bucket Seats

Gary Lewis
Administrator
That's for sure!  The guy doing the upholstery asked if I want an actual 1985 color, so I told him that I'm convinced no two panels were the exact same color from the factory.  Or at least they aren't today, although that could mean they've just all aged differently.

But all of Big Blue's panels have been painted with SEM - with the exception of the dash itself.  The SEM on the other panels ties nicely, but not perfectly, with the dash.  So we picked a vinyl for the seats that matches the SEM color as close as possible in direct sunlight as it'll be the door panels and console that are right next to the seats, not the dash.
Gary, AKA "Gary fellow": Profile

Dad's: '81 F150 Ranger XLT 4x4: Down for restomod: Full-roller "stroked 351M" w/Trick Flow heads & intake, EEC-V SEFI/E4OD/3.50 gears w/Kevlar clutches
Blue: 2015 F150 Platinum 4x4 SuperCrew wearing Blue Jeans & sporting a 3.5L EB & Max Tow
Big Blue: 1985 F250HD 4x4: 460/ZF5/3.55's, D60 w/Ox locker & 10.25 Sterling/Trutrac, Blue Top & Borgeson, & EEC-V MAF/SEFI

Reply | Threaded
Open this post in threaded view
|

Re: Big Blue's Bucket Seats

Gary Lewis
Administrator
Well, there's a spanner in the works and I may be the one that put it there.  That's because this morning I tried the test in the previous instructions that said "If the type of plastic is unknown, place a drop of acetone on the back of the plastic and rub it with your finger. If the plastic smears and melts, use Sand Free. If acetone does not have an effect on the plastic, use Plastic Adhesion Promoter or XXX Adhesion Promoter."  And the plastic didn't seem to smear or melt.

So I got the Plastic Adhesion Promoter out and read the instructions for its use, as shown on the pic below.  And there I got really confused so called SEM on their tech line @ 800-831-1122.  But I had to leave a message and haven't heard back.

Here are my thoughts/questions:

1. Step 1 on the can says to use "3833() Scuff & Clean", but their website says there is no such thing as "3833".  But there are plenty of hits for "3986" so shortening the search by one digit is legit.  And Scuff & Clean is 38391 or 38398 depending on which container you get.  So what is "3833()"?

2. Step 3 says "400".  Does that mean to scuff 400 times?  Or use 400 grit sandpaper?

3. Step 5 says to lay down 1 light coat using some product.  Which one?

4. Step 7 says to lay down 1 wet coat using some product.  Which one?

I'm finding SEM's instructions far less than intuitive.  


Gary, AKA "Gary fellow": Profile

Dad's: '81 F150 Ranger XLT 4x4: Down for restomod: Full-roller "stroked 351M" w/Trick Flow heads & intake, EEC-V SEFI/E4OD/3.50 gears w/Kevlar clutches
Blue: 2015 F150 Platinum 4x4 SuperCrew wearing Blue Jeans & sporting a 3.5L EB & Max Tow
Big Blue: 1985 F250HD 4x4: 460/ZF5/3.55's, D60 w/Ox locker & 10.25 Sterling/Trutrac, Blue Top & Borgeson, & EEC-V MAF/SEFI

Reply | Threaded
Open this post in threaded view
|

Re: Big Blue's Bucket Seats

ArdWrknTrk
Administrator
Steps 2 & 4) say 38353, which is the 16oz aerosol.


Step 3) Yes. But P400, the international grit rating system.
 Jim,
Lil'Red is a '87 F250 HD, 4.10's, 1356 4x4, Zf-5, 3G, PMGR, Saginaw PS, desmogged with a Holley 80508 and Performer intake.
Too much other stuff to mention.
Reply | Threaded
Open this post in threaded view
|

Re: Big Blue's Bucket Seats

ArdWrknTrk
Administrator
You need to read it as -action- then product-action-then product.


It is a lot clearer that way.

Scrub in the scuff 'n clean

Rinse and dry

Wipe on the plastic & leather prep

Sand

Wipe on the plastic & leather prep

Spray a light coat of colour

5 minutes to tack

Spray on a wet coat of colour within 15-20 minutes and dry to touch for 30 minutes


 Jim,
Lil'Red is a '87 F250 HD, 4.10's, 1356 4x4, Zf-5, 3G, PMGR, Saginaw PS, desmogged with a Holley 80508 and Performer intake.
Too much other stuff to mention.
Reply | Threaded
Open this post in threaded view
|

Re: Big Blue's Bucket Seats

Gary Lewis
Administrator
Yes, and no.  You didn't include using any of the 39863 Plastic Adhesion Promoter, and that's where these instructions come from.

I've already done the scuffing and sanding using 38353 Plastic & Leather Prep and am just trying to figure out how to use 39863 Plastic Adhesion Promoter.  And reading the 4 Easy Steps to Refinishing Interior Plastic I see these instructions:

"To promote adhesion on plastics, such as TPO, EPDM, PP or other similar thermoplastics, use Plastic Adhesion Promoter or XXX Adhesion Promoter. Apply one light coat, let flash for 5 minutes, and then apply one full wet coat. Allow this coat to flash 10-15 minutes, but no longer than 30 minutes before topcoating."

So I think the instructions on this 39863 can should be read the same way - one light coat, wait 5 minutes, one wet coat, wait 10 - 15 minutes, and then topcoat.  These instructions just don't give you the topcoat step.
Gary, AKA "Gary fellow": Profile

Dad's: '81 F150 Ranger XLT 4x4: Down for restomod: Full-roller "stroked 351M" w/Trick Flow heads & intake, EEC-V SEFI/E4OD/3.50 gears w/Kevlar clutches
Blue: 2015 F150 Platinum 4x4 SuperCrew wearing Blue Jeans & sporting a 3.5L EB & Max Tow
Big Blue: 1985 F250HD 4x4: 460/ZF5/3.55's, D60 w/Ox locker & 10.25 Sterling/Trutrac, Blue Top & Borgeson, & EEC-V MAF/SEFI

Reply | Threaded
Open this post in threaded view
|

Re: Big Blue's Bucket Seats

ArdWrknTrk
Administrator
Okay, I am wrong.  

These are the instructions for the adhesion promoter.  

I have to assume the finish comes after the 30min dry time.
 Jim,
Lil'Red is a '87 F250 HD, 4.10's, 1356 4x4, Zf-5, 3G, PMGR, Saginaw PS, desmogged with a Holley 80508 and Performer intake.
Too much other stuff to mention.
Reply | Threaded
Open this post in threaded view
|

Re: Big Blue's Bucket Seats

Gary Lewis
Administrator
You helped me think through it, so thanks.  I think I understand what they meant, although their instructions are awful.  I'll write up what I think they meant later.

Right now we are in the 10 - 15 minute window and I'm getting ready to start topcoating.
Gary, AKA "Gary fellow": Profile

Dad's: '81 F150 Ranger XLT 4x4: Down for restomod: Full-roller "stroked 351M" w/Trick Flow heads & intake, EEC-V SEFI/E4OD/3.50 gears w/Kevlar clutches
Blue: 2015 F150 Platinum 4x4 SuperCrew wearing Blue Jeans & sporting a 3.5L EB & Max Tow
Big Blue: 1985 F250HD 4x4: 460/ZF5/3.55's, D60 w/Ox locker & 10.25 Sterling/Trutrac, Blue Top & Borgeson, & EEC-V MAF/SEFI

Reply | Threaded
Open this post in threaded view
|

Re: Big Blue's Bucket Seats

Gary Lewis
Administrator
Got the parts painted, but in the middle of that the upholstery shop called to say the seats are done.  So I finished the painting and went to get the seats.  I like them!

The left pic shows the parts in the paint booth under fluorescent lighting.  The right pic shows the seats with one of the painted parts in LED lighting.  Looking at the seats vs their picture I'd say the picture of the seats and that part is pretty accurate, colorwise.

I hope to install the seats tomorrow and start prep'ing the console for painting.

Gary, AKA "Gary fellow": Profile

Dad's: '81 F150 Ranger XLT 4x4: Down for restomod: Full-roller "stroked 351M" w/Trick Flow heads & intake, EEC-V SEFI/E4OD/3.50 gears w/Kevlar clutches
Blue: 2015 F150 Platinum 4x4 SuperCrew wearing Blue Jeans & sporting a 3.5L EB & Max Tow
Big Blue: 1985 F250HD 4x4: 460/ZF5/3.55's, D60 w/Ox locker & 10.25 Sterling/Trutrac, Blue Top & Borgeson, & EEC-V MAF/SEFI

Reply | Threaded
Open this post in threaded view
|

Re: Big Blue's Bucket Seats

grumpin
The seats look nice!
Dane
1986 F250HD SC XLT Lariat 4x4 460 C6-Sold
1992 Bronco XLT 4x4 351W E4OD
1998 GMC Sierra SLE K1500 350 4L60E
Arizona
Reply | Threaded
Open this post in threaded view
|

Re: Big Blue's Bucket Seats

Gary Lewis
Administrator
Thanks, Dane.  They feel comfortable when I sat down on one, but it is really hard to tell when your feet are straight out in front of you.  (And then you have to get up.)

The center is softer than the bolsters, so you sink in a bit when you sit down which means the bolsters are higher than your rear end and hold you in.  So I think they'll work out great.

It is supposed to be reasonably nice tomorrow so I hope to get them installed and then take it for a drive.  (The truck is clean and I'm trying to keep it that way.)
Gary, AKA "Gary fellow": Profile

Dad's: '81 F150 Ranger XLT 4x4: Down for restomod: Full-roller "stroked 351M" w/Trick Flow heads & intake, EEC-V SEFI/E4OD/3.50 gears w/Kevlar clutches
Blue: 2015 F150 Platinum 4x4 SuperCrew wearing Blue Jeans & sporting a 3.5L EB & Max Tow
Big Blue: 1985 F250HD 4x4: 460/ZF5/3.55's, D60 w/Ox locker & 10.25 Sterling/Trutrac, Blue Top & Borgeson, & EEC-V MAF/SEFI

Reply | Threaded
Open this post in threaded view
|

Re: Big Blue's Bucket Seats

Gary Lewis
Administrator
In reply to this post by Gary Lewis
Now for an attempt at listing the process I used:

  1. CLEAN: SEM says "Clean the area with SEM Soap and a gray scuff pad. Scrub thoroughly, paying close attention to textured or recessed areas. Rinse with water or wipe away residue with damp cloth and let dry."

    The need here is to get all dirt and damaged plastic off the part. So for things like my console, which has no sun-damaged plastic, a good scrub will do the trick. But I use Dawn soap first and then use SEM soap. And on smooth or lightly-textured parts scrubbing with the recommended gray scrub pad works. But if the part has a lot of texture, like the console, a Nylon brush will help you get down into it.

    However, if the part has damaged plastic you'll need to get it off. I've used wet & dry sandpaper and also a stainless steel wire brush followed by smoothing with sandpaper to remove the bad plastic. Then follow up with Dawn and/or SEM soap.
  2. RE-CLEAN: SEM says "Clean with Plastic & Leather Prep or Zero VOC Surface Cleaner using a clean, lint-free towel and wiping in one direction. If contamination still exists after cleaning, water will bead on the surface. Repeat until beading no longer occurs."

    But I haven't been able to get rid of beading, and I've been quite diligent. However, I am having good good results so I think I'm getting things CLEAN.
  3. PREP: SEM says "To promote adhesion on plastics, such as ABS, PVC or other similar plastics, apply a medium wet coat of Sand Free. While still wet, apply a light coat of Color Coat. (Avoid applying the first coat of Color Coat too heavily or sagging could occur.) As Sand Free evaporates, Color Coat is drawn into the surface, resulting in excellent adhesion."

    Further, "To promote adhesion on plastics, such as TPO, EPDM, PP or other similar thermoplastics, use Plastic Adhesion Promoter or XXX Adhesion Promoter. Apply one light coat, let flash for 5 minutes, and then apply one full wet coat. Allow this coat to flash 10-15 minutes, but no longer than 30 minutes before topcoating."

    So I'm using the Plastic Adhesion Promoter, just as it specifies - one light coat, wait 5 minutes, then a heavy coat, and wait 10 to 15 minutes before applying the Color Coat.

  4. APPLY: I didn't wait more than 30 minutes and sprayed a light coat, waited 5 minutes, and then put on a heavier coat. After 10 minutes I put on another coat, and then another after another 10 minutes. After three heavy coats, just less than running, the parts were well coated.

Gary, AKA "Gary fellow": Profile

Dad's: '81 F150 Ranger XLT 4x4: Down for restomod: Full-roller "stroked 351M" w/Trick Flow heads & intake, EEC-V SEFI/E4OD/3.50 gears w/Kevlar clutches
Blue: 2015 F150 Platinum 4x4 SuperCrew wearing Blue Jeans & sporting a 3.5L EB & Max Tow
Big Blue: 1985 F250HD 4x4: 460/ZF5/3.55's, D60 w/Ox locker & 10.25 Sterling/Trutrac, Blue Top & Borgeson, & EEC-V MAF/SEFI

Reply | Threaded
Open this post in threaded view
|

Re: Big Blue's Bucket Seats

Gary Lewis
Administrator
Got the seat bolted in today, but there's still a lot of work to do in order to get them the way I want them.  Anyway, here they are bolted in:


For instance, the "latch" for the driver's seat, which I installed on the passenger's side, hits inverter.  And I've come to realize that with the tab on the passenger's seat I can't change the angle of the seatback very much as there's not much room to slot it.  Given that I think I'll put the driver's seat on the driver's side and vice versa and lock down the passenger's seatback.  And I'm going to have to figure out how to put stops in so the passenger's seat isn't slammed back into the inverter.  But I think I'll be able to do that by placing a bolt in the track at just the right spot.

Here are the two latches side by side:


Gary, AKA "Gary fellow": Profile

Dad's: '81 F150 Ranger XLT 4x4: Down for restomod: Full-roller "stroked 351M" w/Trick Flow heads & intake, EEC-V SEFI/E4OD/3.50 gears w/Kevlar clutches
Blue: 2015 F150 Platinum 4x4 SuperCrew wearing Blue Jeans & sporting a 3.5L EB & Max Tow
Big Blue: 1985 F250HD 4x4: 460/ZF5/3.55's, D60 w/Ox locker & 10.25 Sterling/Trutrac, Blue Top & Borgeson, & EEC-V MAF/SEFI

Reply | Threaded
Open this post in threaded view
|

Re: Big Blue's Bucket Seats

ArdWrknTrk
Administrator
I'm going to suggest that a beam clamp (available in the electrical or plumbing aisle of your big box) would probably be an expedient solution for cheap.
 Jim,
Lil'Red is a '87 F250 HD, 4.10's, 1356 4x4, Zf-5, 3G, PMGR, Saginaw PS, desmogged with a Holley 80508 and Performer intake.
Too much other stuff to mention.
Reply | Threaded
Open this post in threaded view
|

Re: Big Blue's Bucket Seats

ArdWrknTrk
Administrator
In reply to this post by Gary Lewis
Vinyl colour is much better in these shots!  
 Jim,
Lil'Red is a '87 F250 HD, 4.10's, 1356 4x4, Zf-5, 3G, PMGR, Saginaw PS, desmogged with a Holley 80508 and Performer intake.
Too much other stuff to mention.
1234 ... 9