Search Forum
86 F150 6cyl Distributor Swap


|
This post was updated on .
I did this swap a month ago and wanted to document it here for others looking to do the same. My truck is a 6cyl 300 and had the factory TFI ignition system.
My truck would consistently stop running at certain temperatures and start again after cooling down. This was very unpredictable. I replaced multiple ignition modules, pickup coils, and it was time to put something more reliable (in my opinion) into the truck. A lot of people have successfully relocated the TFI ignition modules to prevent the overheating. A lot of people switch to the Duraspark setup with the module on the inner fender. I want my truck to be more of a street rod setup so I went with an HEI type distributor. I installed the DUI street/strip distributor from https://performancedistributors.com/ In addition to the distributor, I purchased the following parts * 10 awg wire - auto zone * Wire connectors * wire crimps * Fuse * Fuses * Relay * Timing Light There is great information on the web on how and why to use a fused relay. I learned about where to tap a 12v source from the Gary's technical section. //Todo - make this a link Here is my circuit. * PIN 86 was connected to the 12V wire that previously connected to the factory coil. * The ground wire on the distributor (labeled as (-) ) is not connected. * The ground wire (PIN 85) on the relay was problematic. I had to sand some paint off the fender wall to get a good ground. 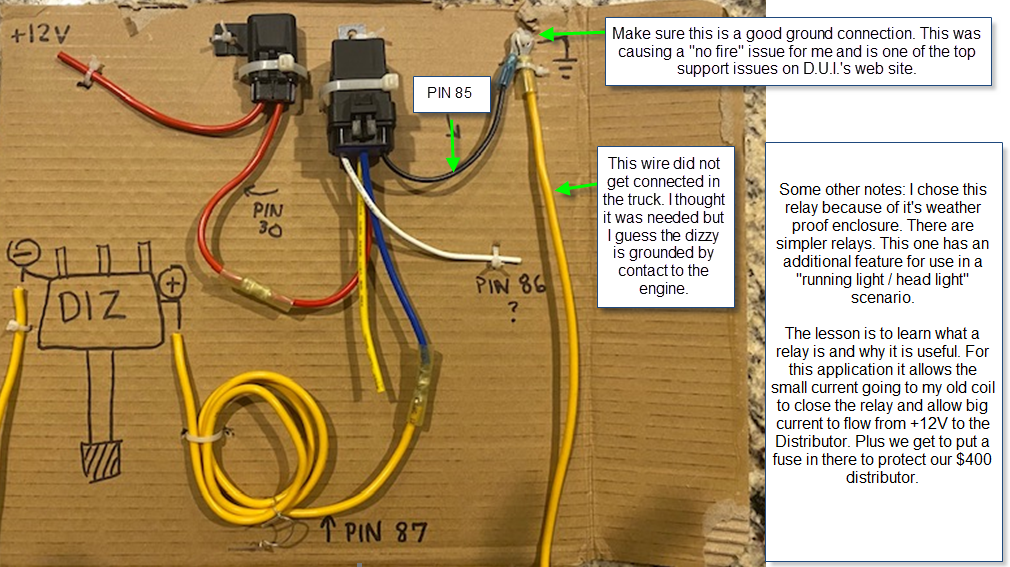 Installation Notes: Step 1 - Learn what a distributor is and does... There is a ton of information on the internet. Some more interesting topics are advance curve, vacuum advance, and mechanical advance and what / why this is a thing. Go out at there and read some stuff. Step 2 - Learn what your stock distributor does while finding the elusive "Top Dead Center" Get a wrench and learn to turn your engine over. My engine turns clockwise. My engine has a groove on the big circle. (harmonic balancer) I marked this little groove with white paint while I was under the truck. This groove is important. 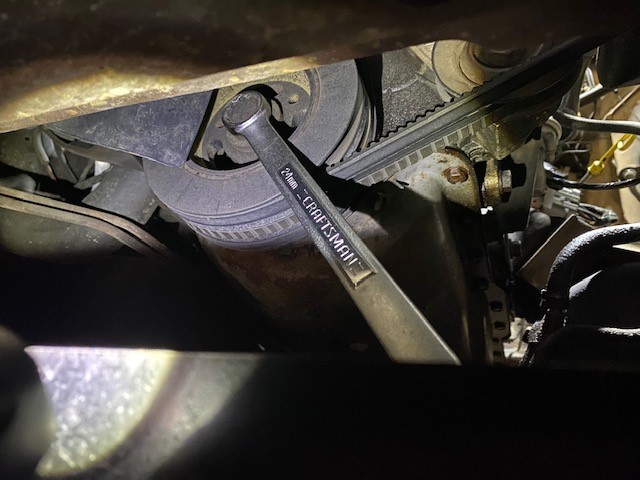 Find your distributor, leave the wires connected and remove the cap so you can see the magic inside. Remember to put the cap back on in the same orientation. Mine has two screws so there's only one way to do this.  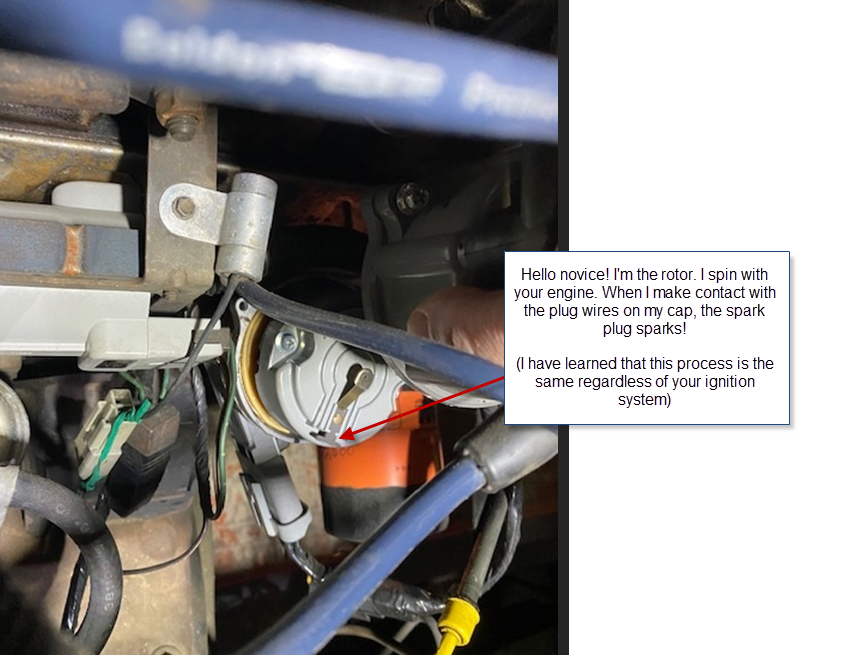 With your big wrench, turn the motor and you will see the inside of the distributor rotate with the engine. For a really good time, remove the number 1 spark plug and use a flashlight to observe Mr/Mrs Piston slowly rise to TDC (top dead center). 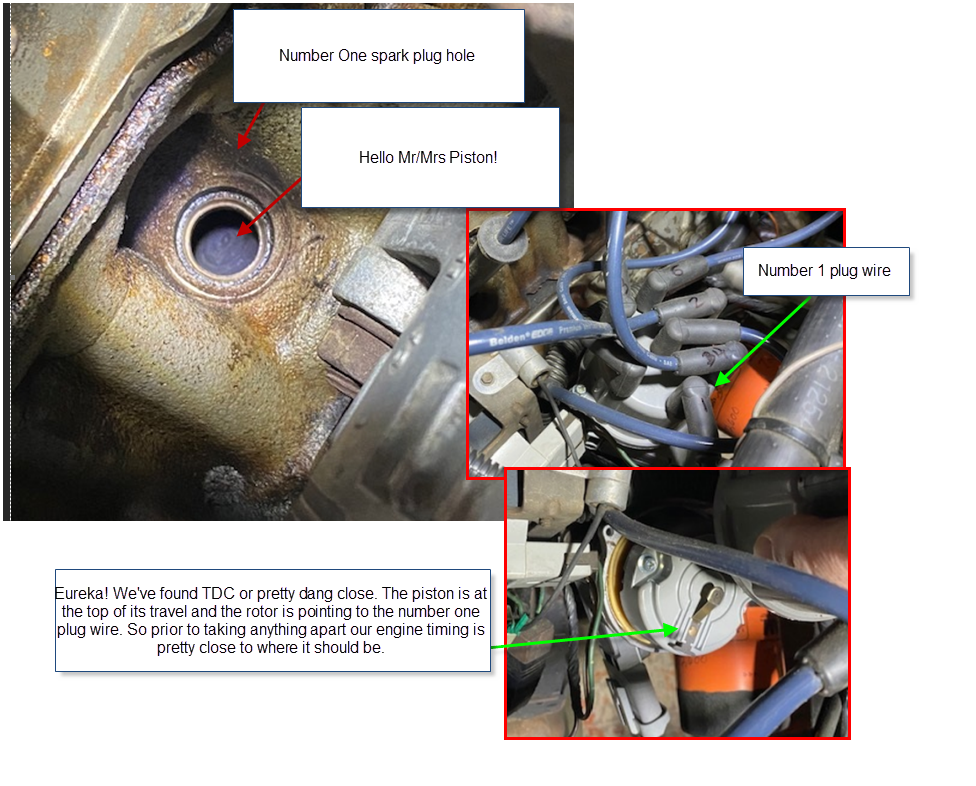 Step 3 - Remove the stock distributor and coil" Make a mark at the base of your stock distributor and the engine housing. This will help if you need to put the stock distributor back. When I removed the stock distributor, there was a long metal shaft stuck into the base. I was completely unaware this thing existed. Thankfully, after posting to these forums I was told that this piece (Oil Pump Drive Shaft) is important and needed to be transferred to the new distributor. Whew, dodged that bullet! 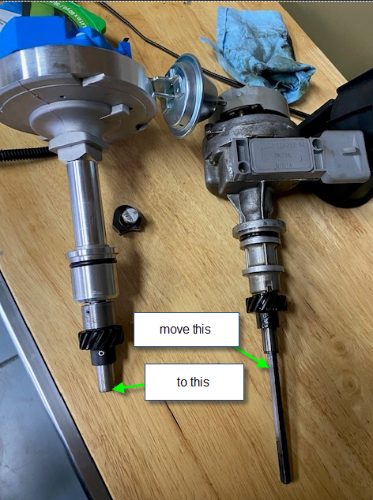 Step 4 - Insert the new distributor" Okay, I moved the oil pump drive shaft from the old distributor to the new on. When I went to put in the new distributor, it didn't want to drop into the engine. A little oil helps here. In terms of orientation, I dropped mine in with the vacuum canister pointing toward the cab. I wanted the vacuum line to go around the back of the valve cover instead of over the top and I wanted the DUI label to be parallel to the valve cover. I spun the distributor shaft until it was just before where I wanted to hook up the #1 plug wire. Essentially, the wire orientation on the cap would be the same as the other cap. The key is to get the rotor into a position so when you fully seat the distributor the rotor is at or just before where the #1 plug wire will be. Remember we are at #1 TDC so either #1 is about to fire or #5 is about to fire. We want to be close to correct timing or it will be a huge pain to tune. 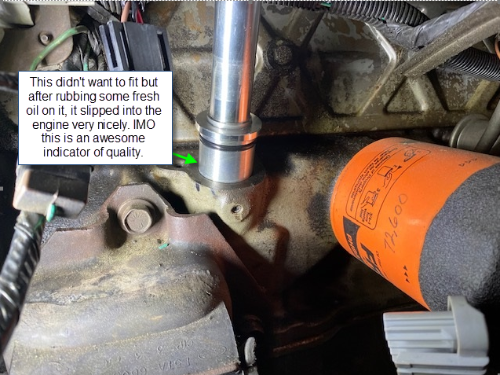 After the distributor is in place, attach the lockdown tab and bolt and hand tighten. We want to be able to turn the distributor to adjust the timing. Attach the plug wires in order. Step 4 - Wire it up" I mounted the fuse and relay to the driver side fender. //todo - add photo of the fuse and relay Step 5 - Start it up" Re connect the battery cables and start the truck. Step 6 - Adjust the timing" Use a timing light to measure the timing. Rotate the distributor to advance or retard the timing. My timing is 10 degrees before TDC. In my case, I rotated the distributor until it sounded "best" and when I checked with the timing light is was 10 degrees before TDC. Observations This was not as difficult as I thought it would be. The truck ran very well but I noticed some erratic idle behavior sitting in traffic sometimes. This is likely the feedback system missing its' TFI ignition. But it still started and ran reliably. Shifting into 3rd gear became a hard shift. I could really feel it shift into 3rd gear and this was very new. I imagine this is due to the feedback system since there is a vacuum line for the transmission and I have to assume the entire fuel / air / vacuum setup is going to operate poorly. Eventually the feedback carb and emissions stuff was replaced with a basic 2 barrel carb and the issue with shifting has gone away. //Todo - finish adding install notes
86 F150 4.9 Automatic
|
|
Administrator
|
I like it! That is going to be helpful.
But, you have the ground as Pin 15, and all the Bosch relays I've seen have pins 85 and 86 to the coil. So if you put Pin 86 to power wouldn't it be Pin 85 that is grounded?
Gary, AKA "Gary fellow": Profile
Dad's: '81 F150 Ranger XLT 4x4: Down for restomod: Full-roller "stroked 351M" w/Trick Flow heads & intake, EEC-V SEFI/E4OD/3.50 gears w/Kevlar clutches
|
|
|
This post was updated on .
Gary,
You are correct. It is pin 85 that is grounded. Not PIN 15. My schematic has a squishy 8. I have updated the original text and image in the post for clarity. I would like to find that tech section on the 12 volt accessory source to link it up. Also, there's a tech section on ignition simplification that was very helpful.
86 F150 4.9 Automatic
|
|
Administrator
|
Your how-to is looking good! But is this the link you need?
Gary, AKA "Gary fellow": Profile
Dad's: '81 F150 Ranger XLT 4x4: Down for restomod: Full-roller "stroked 351M" w/Trick Flow heads & intake, EEC-V SEFI/E4OD/3.50 gears w/Kevlar clutches
|
Bullnose Enthusiasts Forum
›
Projects
|
1 view|%1 views
| Edit this page |