Muminvaters F250 scale 1:13


|
I forget to post the finished frond end. So I will do it now
 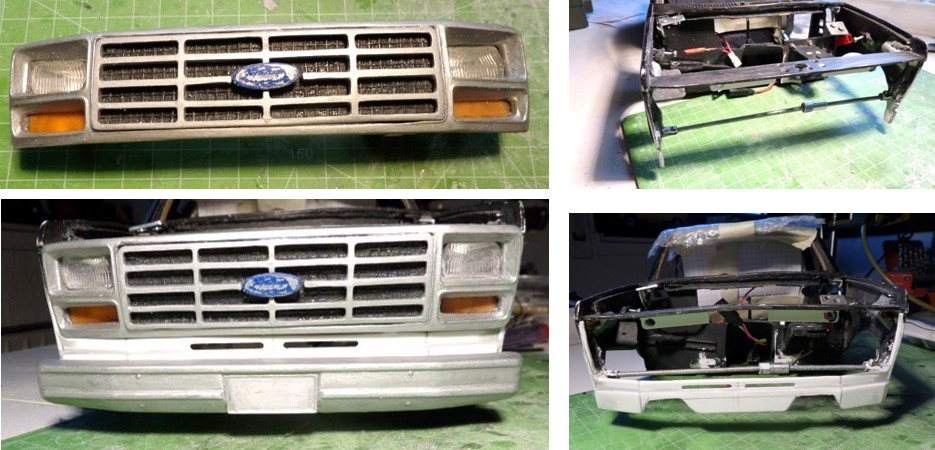 At the purchased model, the bumper and the frond end were manufactured as one part. In origin the bumper is assembled to the chassis frame. This was a task for my saw. The gap must be filled with a new body part and with this I had the chance to bring in the two elongated holes below the grille. To keep the contour on the new panel, there is a stabilizer necessarily. now it´s time to go upstairs to work on steering... 
_____________________________________________________
Winter winds take flight, circling over my grave. A haunting voice amidst the trees, rising up across the sea.... (Katatonia) _____________________________________________________ |
|
Administrator
|
Cool! Looks excellent.

Gary, AKA "Gary fellow": Profile
Dad's: '81 F150 Ranger XLT 4x4: Down for restomod: Full-roller "stroked 351M" w/Trick Flow heads & intake, EEC-V SEFI/E4OD/3.50 gears w/Kevlar clutches
|
|
|
In reply to this post by muminvater
"... there´s a dust in my eyes that blinds my sight, and silence that speak so much louder than words, of promises broken..." Pink Floyd / sorrow
 one of my favorite songs. I hear it in my head til awaking... one of my favorite songs. I hear it in my head til awaking...
Today, I think, I finsh the exterior. assy group 11 / floor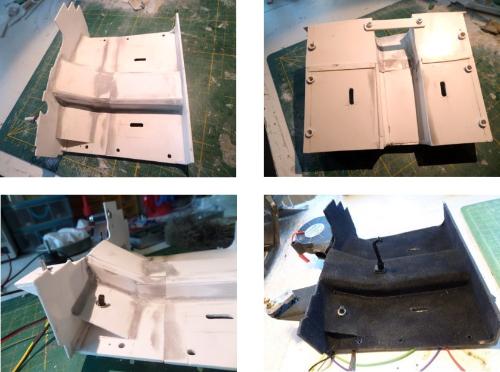 Floor and front wall. Elongated holes for the bench adjustment. The floor is a mounting part. That´s easier for the bench assembly and even for the coating. At the top you see an reinforcement plate. It gives the construction the stability with is lost caused of the tunnel. In the lower pic left you see the a momentary contact switch mounted. It´s used for the brake light. 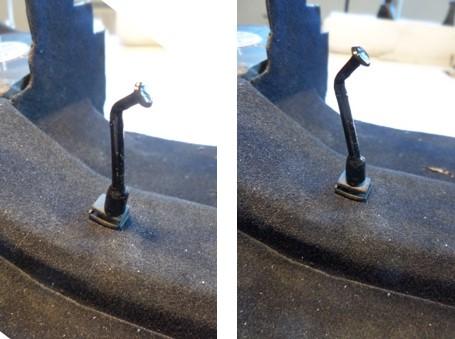 Below the floor, switched by the lever for the differential lock, the switch for hazard warning lights. There wasn´t any space on the dashboard. You see the lever in both positions ON/OFF assy group 12 / wiper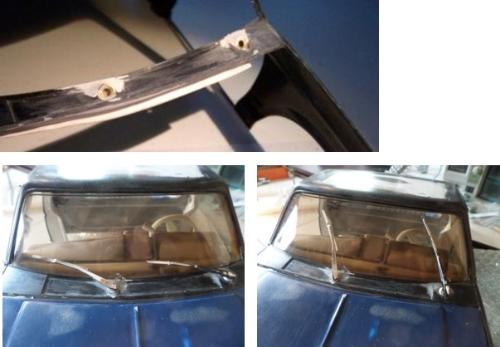 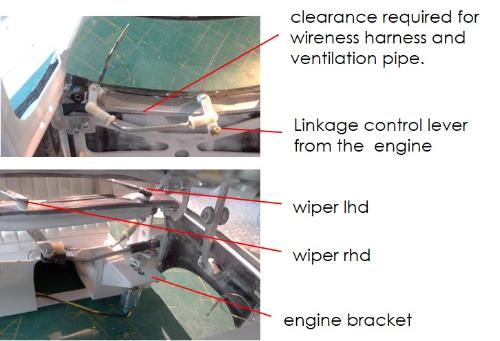 upper picture: brass guide bush for wiper axis glued in. assy group 21 / illumination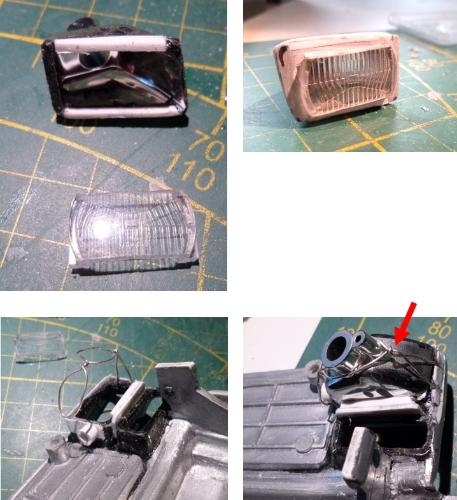 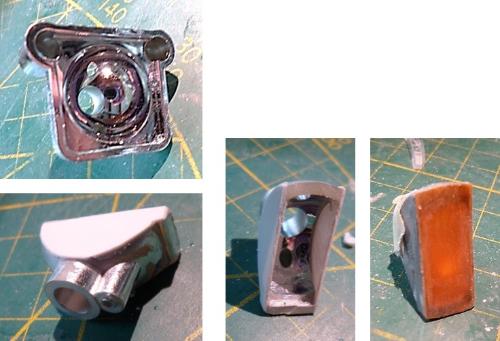 The headlamp diffuser had to be cut on the suitable size for the grille to then be glued with the reflector.The headlights and the turn signal light are glued with the frond end. The wire clamp is only for the eye. I built the housing for turn signal light out of available reflectors. Cut ´em on the required mass, glued a lower and upper plate on and finished it with a orange diffuser. The orange diffuser was sanded on both sides because 82 clear glass lights were still unknown. 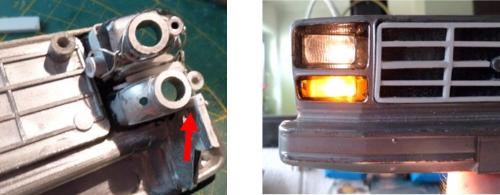 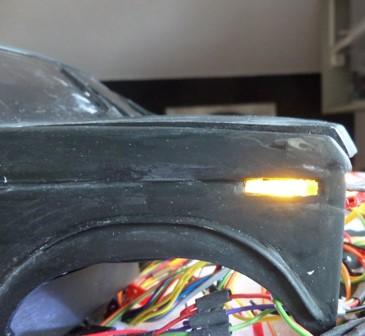 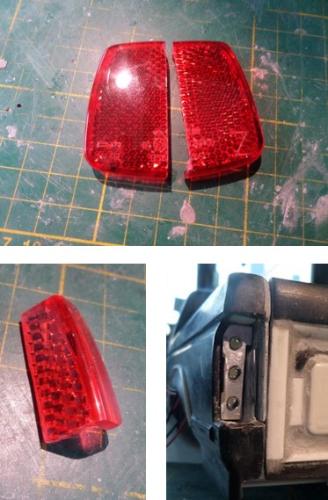 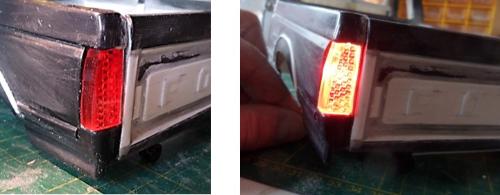 The reflector of the back light is a part from a cat´s eye from a bike. Fortuitously the contour fits to the body. For to be not so glossy, the surface is sanded with 800 paper. The reflector only snaps into the body, the joints will be sealed with butyl. 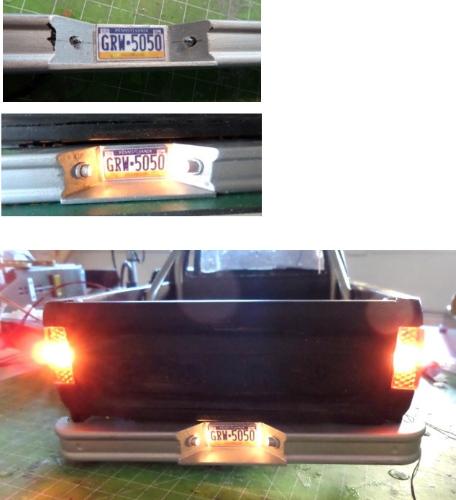 assy group 25 / ornamentation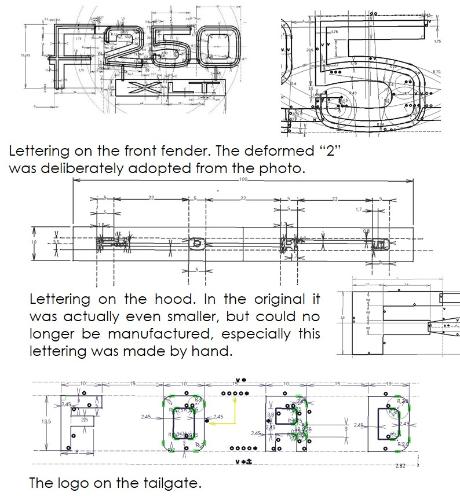  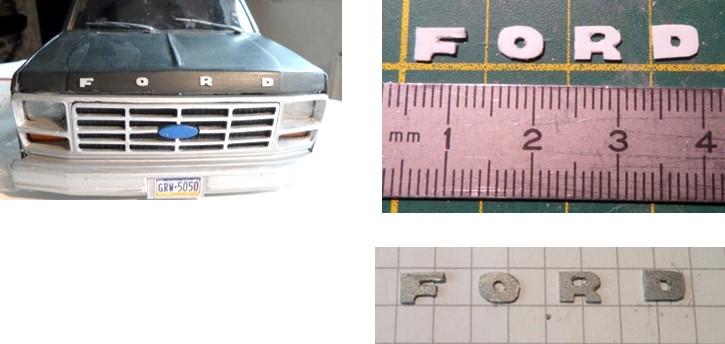 The ornamentation on the front fender is a other part out of the 3D printer (Filament ABS printer). Not the best choice for such small pieces. For that I prefer a polyjet printer. For positioning after coating, a hole and a pin is very helpful. Ornamentation for the hood. Printed on self-adhesive foil, put on a 0,5mm polystyrene plate and cut out with a cutter knife. I know, the Ford til 1981 do have the Ornamentation but no Logo in the grille and from 82 the other way round. But some trucks have both. assy group 26 / roll bar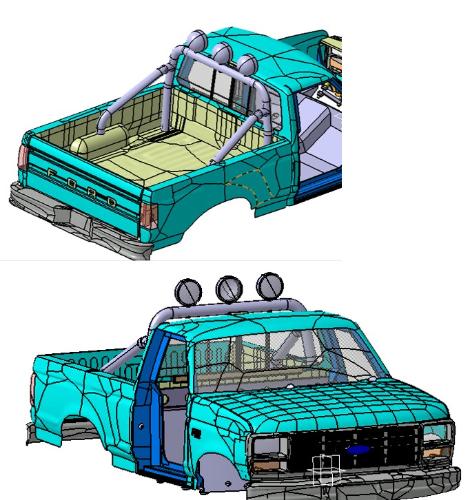 The decision in favor of the roll bar was made late. Originally, the model should to be built with the original paintwork and without a roll bar. When I decided on the exterior color by an happy accident, one thing blended in with the other. And so a roll bar had to be made. The loading bed lighting was omitted again. 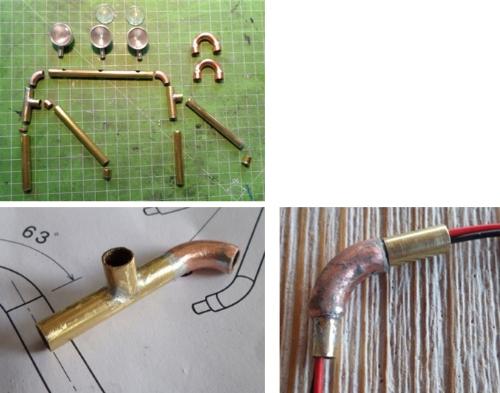 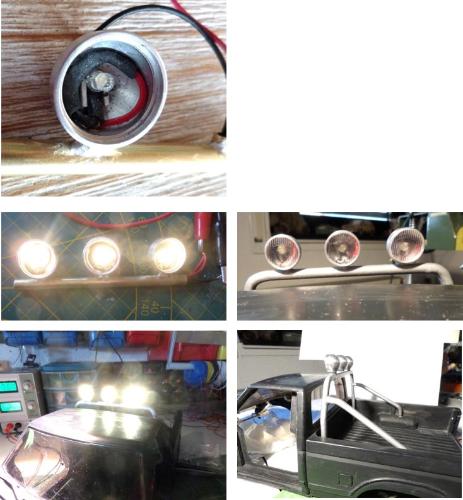 The LED should be adjusted with the lens to the front, so that they can use as a high beam. That means modifying the LED/resistor and squeeze it all into the lamp-housing.  That was the exterior... For videos nabble need a link to youtube or sth like that if I understood right. I don´t use any social media exept 2 forums and I don´t wanna change it. If there is no other way to post videos, unfortunately it has to work without it  have a nice day, greetings,  Tobias Tobias
_____________________________________________________
Winter winds take flight, circling over my grave. A haunting voice amidst the trees, rising up across the sea.... (Katatonia) _____________________________________________________ |
Re: Muminvaters F250 scale 1:13
|
|
This is some awesome work. I see the electricals actually light up, very cool. What other parts will be functional? Doors and hood open and close, wheels roll, and so on?
81 F150 Flareside, Edelbrock Pro Flow4 FI, hydraulic roller 351W, E4OD, 4x4, BW1356
92 F150 RCLB 351W E40D BW1356 mostly stock |
|
Administrator
|
Yes, that is absolutely awesome work!
 On the YouTube video, you want to copy the “embed code”. Then in your post tick the box that says “Message is in HTML format” and paste the code in to your reply. I like to double the pixel height and width. Plus, in HTML mode an “enter” doesn’t get you a line feed. So click on formatting and then Line Feed to manually enter one.
Gary, AKA "Gary fellow": Profile
Dad's: '81 F150 Ranger XLT 4x4: Down for restomod: Full-roller "stroked 351M" w/Trick Flow heads & intake, EEC-V SEFI/E4OD/3.50 gears w/Kevlar clutches
|
|
|
In reply to this post by Pete Whitstone
Hi Pete,
of course the wheels will roll. But I don´t install an engine. For that you have also have to install a battery pack, a RC-receiver and a controller. And there isn´t ans space left. But it doesn´t matter - that all only disturbs the scale and it´s a challenge for manufacturing. Eg. the steering: the steering will be controlled by the steering wheel via a transmission. At the moment I´m workin on it  exiting! exiting!
To your other question: in the first post is listing of functions the modell will have, right bevor the assy group list. Please take look. Tobias
_____________________________________________________
Winter winds take flight, circling over my grave. A haunting voice amidst the trees, rising up across the sea.... (Katatonia) _____________________________________________________ |
|
|
In reply to this post by Gary Lewis
Hi Gary,
as I understand you, there´s a need to have an you tube account to create that code. I don´t like to share my videos on a channel where others post their screwed up political opinion. However, I think another possibility is to load th video up to my one drive and set a link in the post.
_____________________________________________________
Winter winds take flight, circling over my grave. A haunting voice amidst the trees, rising up across the sea.... (Katatonia) _____________________________________________________ |
|
Administrator
|
I think you can do the embed trick with One Drive as well. I need to try that but haven’t.
Gary, AKA "Gary fellow": Profile
Dad's: '81 F150 Ranger XLT 4x4: Down for restomod: Full-roller "stroked 351M" w/Trick Flow heads & intake, EEC-V SEFI/E4OD/3.50 gears w/Kevlar clutches
|
|
|
In reply to this post by muminvater
moin moin
assy group 17 / bench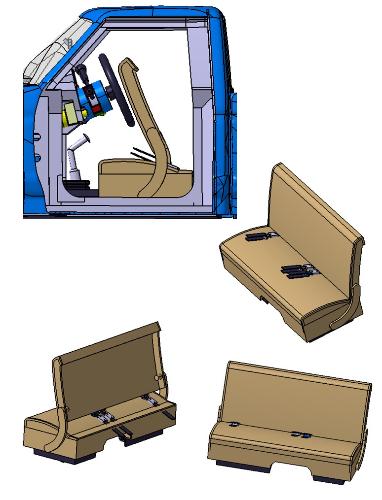 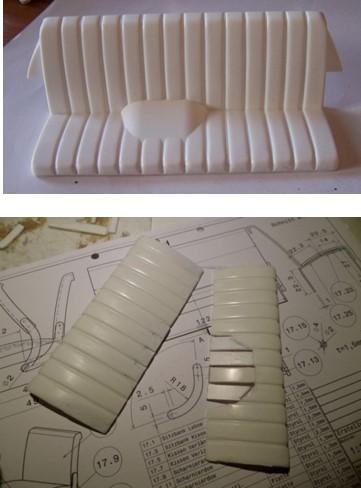 Starting basic is the bench from the Toyota Bruiser kit. For the Ford bench it must be split and the hump will be removed. 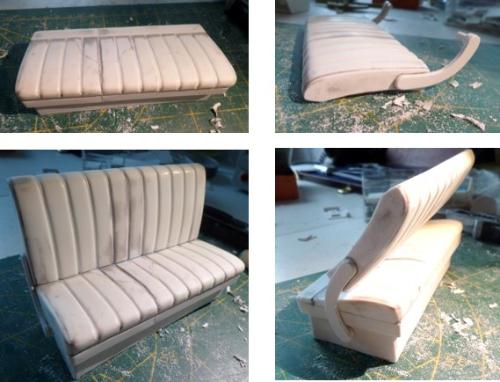 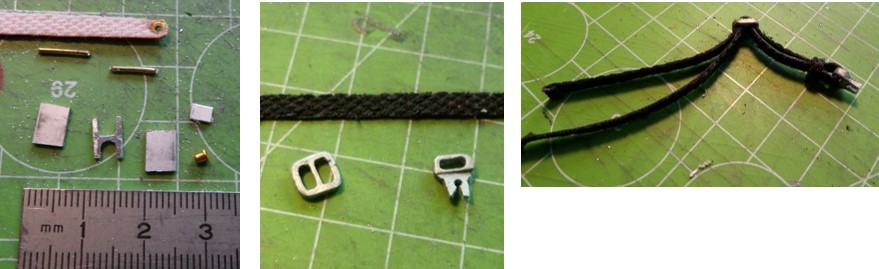 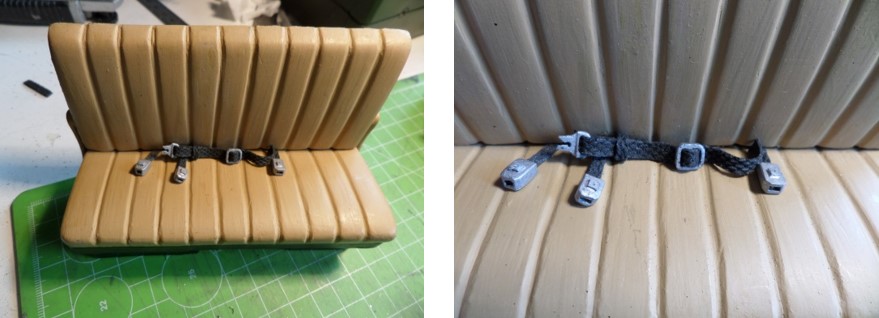 assy group 18 / dashboard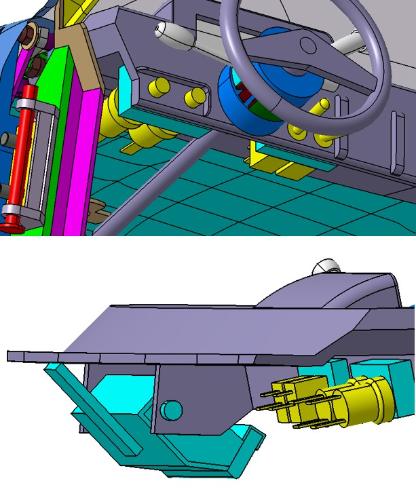 2 pressure switches for head lights and wiper 2 flip switches for ventilation fan and roll bar lights 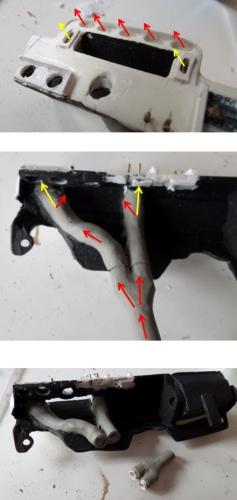 The ventilation channel. At that moment I did not know that holes above the display aren´t holes, they are pilot lights. I could not recognize it on the pixelated jpegs. However, now it is a air vent. For assembling the dashboard the Y-branch at the end is a mounting part. 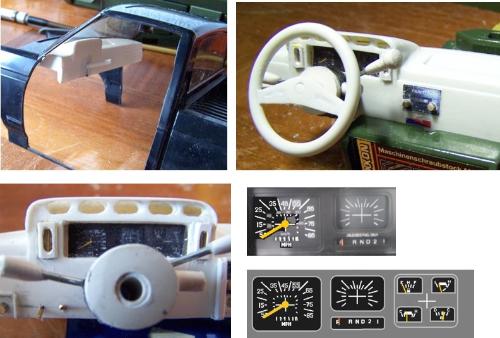 The dashboard is also a kit from the Toyota Bruiser. Above you see the starting part. Steering wheel modified to the Ford Design. To this time I still used the old filler. You see the shrinkage. The speedometer insert is covered witch an acrylic pane. For that I printed a self adhesive decal that needs some pre-work in ms-paint because the white lines weren’t color 0. So they get some color while printing. 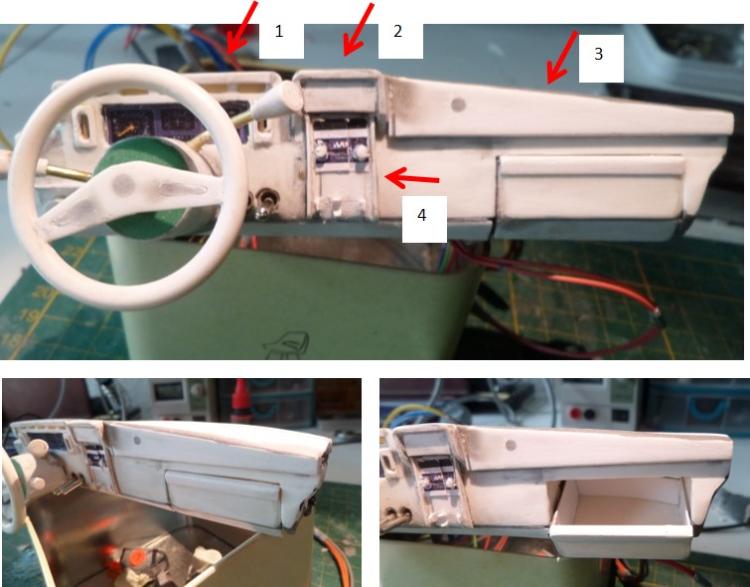 The dashboard couldn´t stay like this. A similar to the Ford was not recognizable. 1. air vends filed square, upper strip gets thicker 2. built a console for the radio 3. surface lifted and twisted phased out 4. dials for the radio and 4 switches for the heating added. Glove box to open. From this point it wasn´t far to an illuminated glove box. 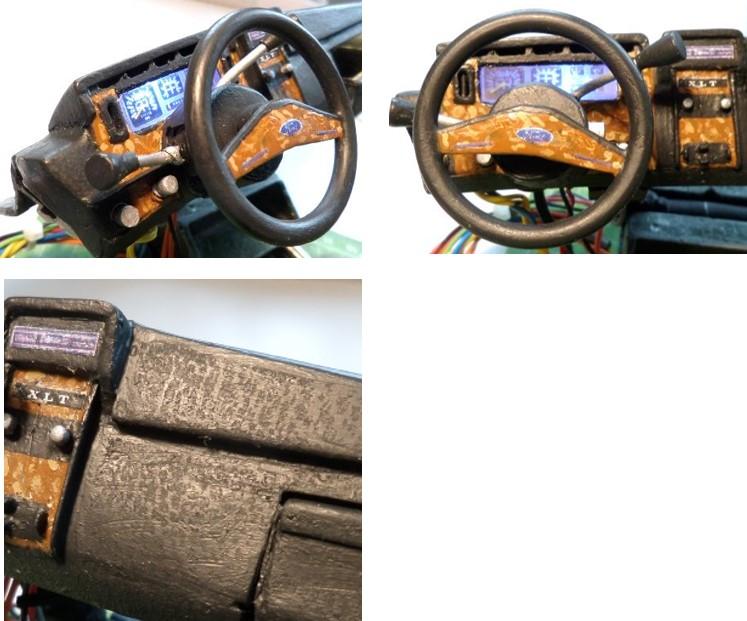 Some decals had been applied. The grain was practically stamped into the wet paint with genuine leather. 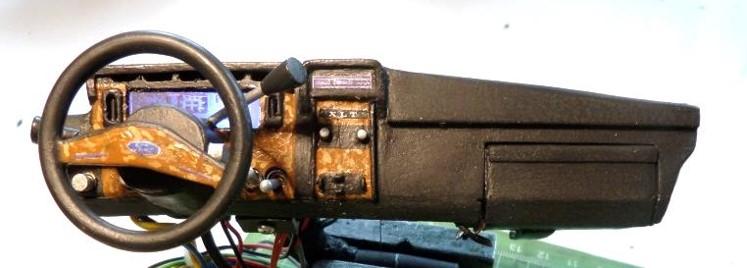 assy group 19 /steering column switch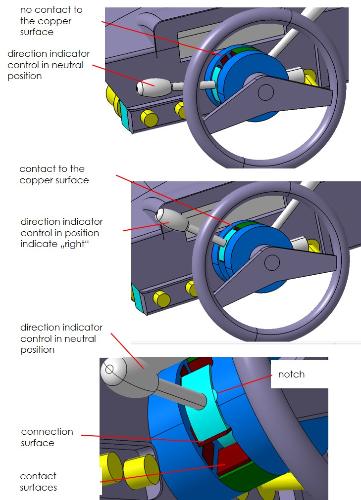 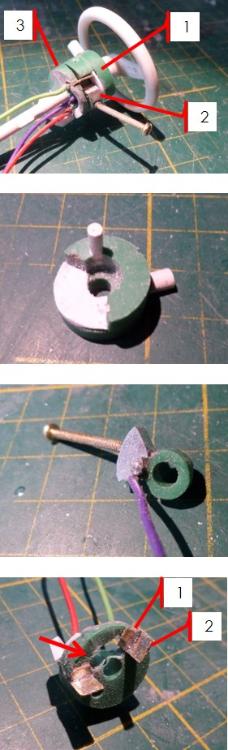 The turn signal lever dummy should then be replaced by a functional lever. This is the lever in neutral position. segment disc 1 On the right the large ignition lock. In the center the positioning-pin to avoid tilting disc 1 to disc 3. The cut out is for disc 2. segment disc 2 Deviating from the construction the complete head is made of aluminum. That simplified the angle-adjustment. The ring and the head are screwed. segment disc 3 The contacts are 2 perpendicular soldered copper plates (1+2) with are clamped in the slotted disc. The elongated hole is used by the cable from disc 2. assy group 20 / body inner trim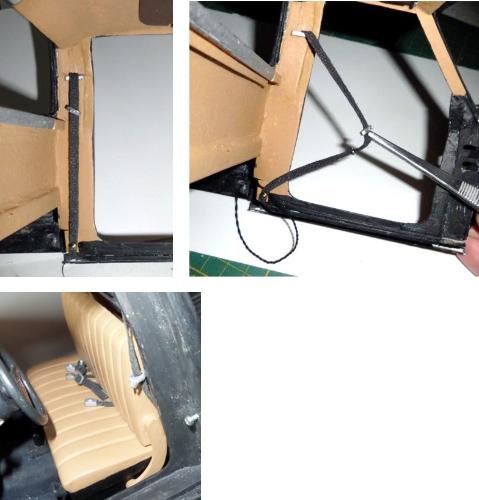 The seatbelts, fastened at the body, should be similar to the original automatic belts. The belt itself is a thin leather stripe with a fabric lamination (total thickness 0,5mm). The extraction is made possible by an elastic braid, that has been pulled through an 1,5mm eyelet at the end. The elastic braid is not too tight. The model should be a used car and so the belts may hang a bit. 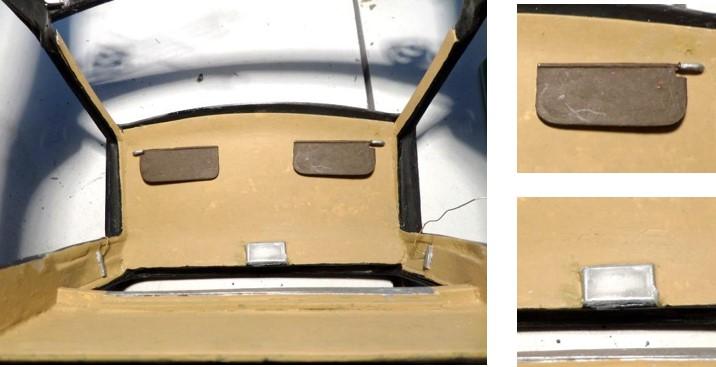 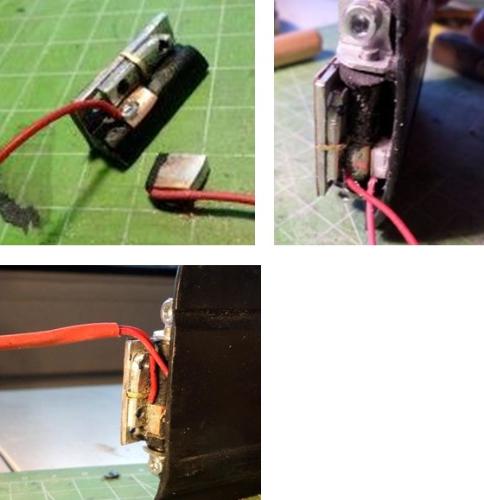 The sun visors you can fold down and sway to the side like the origin. The interior lightning is switched by the door hinges. 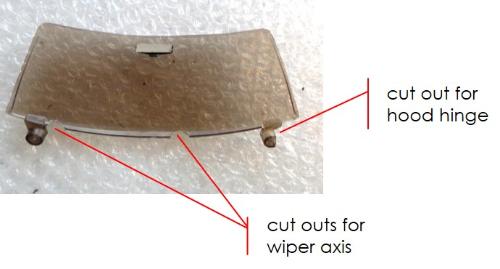  Ball-bearing interior mirror, so that the adjustment like the original is guaranteed assy group 23 / pedals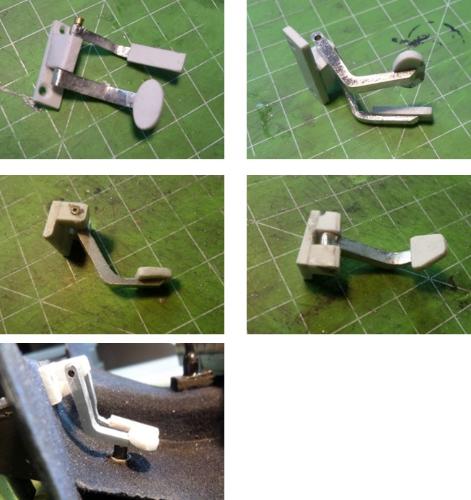 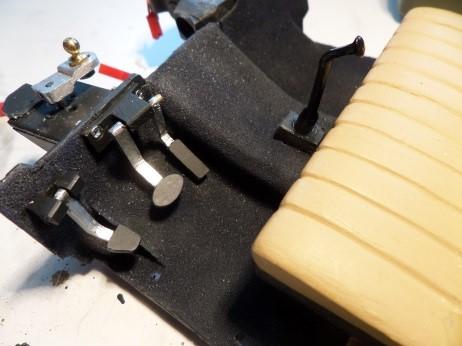 The carpet is a flocked paper colored in anthracite. On demand, the brake pedal presses the button , which in turn makes contact with the brake lights. __________________________________________________________________________- that was the interior...   now it´s time to what my bed is doing... so alone... (the bed..) lol... Tobias
_____________________________________________________
Winter winds take flight, circling over my grave. A haunting voice amidst the trees, rising up across the sea.... (Katatonia) _____________________________________________________ |
|
|
In reply to this post by muminvater
Hi guys,
now I start with the chassis frame and the landing gear. assy group 15 / chassis frame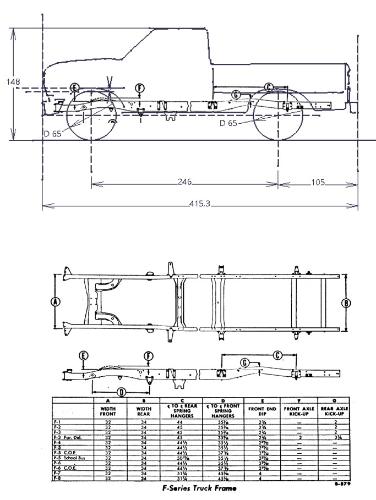 The wheels must have a tire diameter of 65mm so that the model is consistent. A frame and leaf suspension can then be installed on the rear axle as in the original. The frame was constructed according to the drawing above. The location of the tank, its fastening straps, the spare wheel and the safety bracket were taken from many original photos with were set in scale in my CAD programm. It was a bit tricky caused of the vanishing point perspective of the photos and the technical perspective of the data.
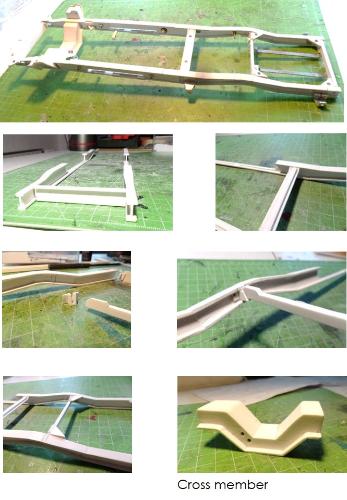 The cut outs are necessary for the body floor. For to stabilize it when the chassis frame stands alone, an insert is needed (upper picture). 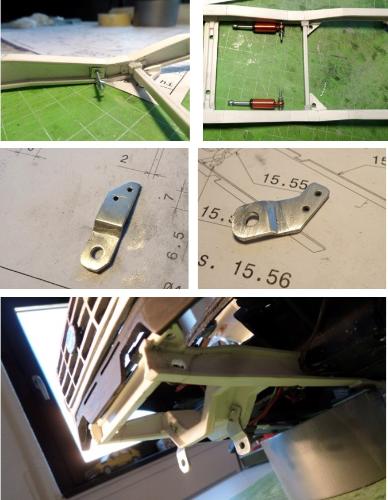 Mounting dome for rear damper. The mounting plates for the twin beams will be screwed... ...to the cross member.  spring and damper bracket assy group 22 / bumper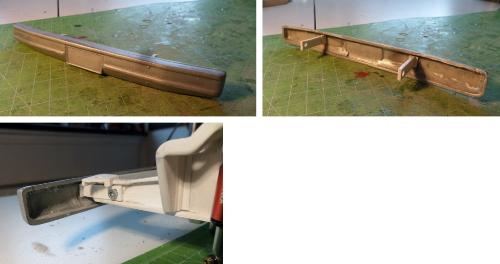 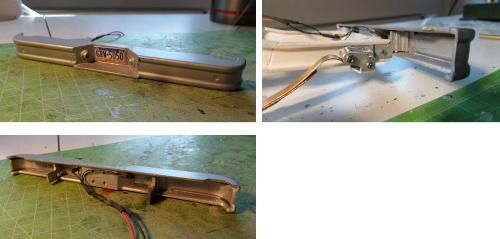 assy group 24 / underbody partstank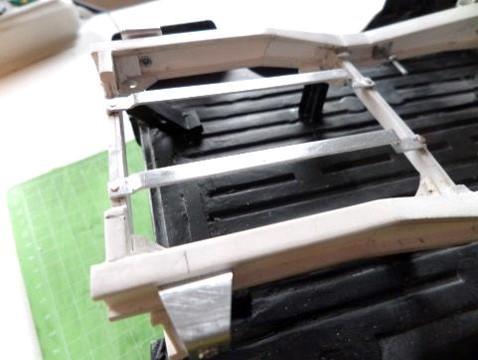 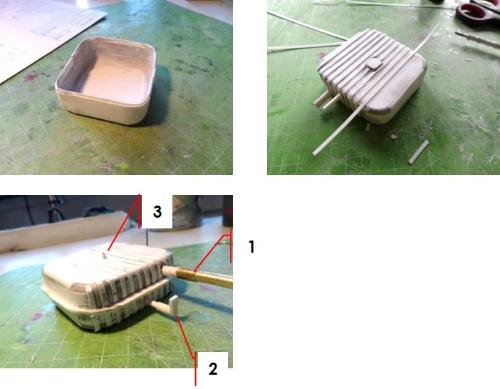 The corner radius get built under temperature, the small radius at the edge are profiles. Because the Ford has tin-tank, crimpings and a welding flange must be added.. connection 1: inlet from the filler neck connection 2: outlet with a cap. Pos.3 vent pipe The filling volume I have measured with 55ml The clamping band for the tank is pinned to the chassis frame. 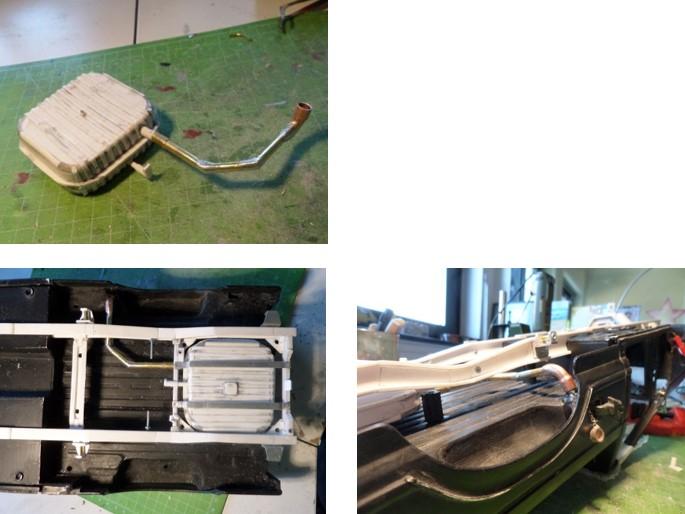 sparewheel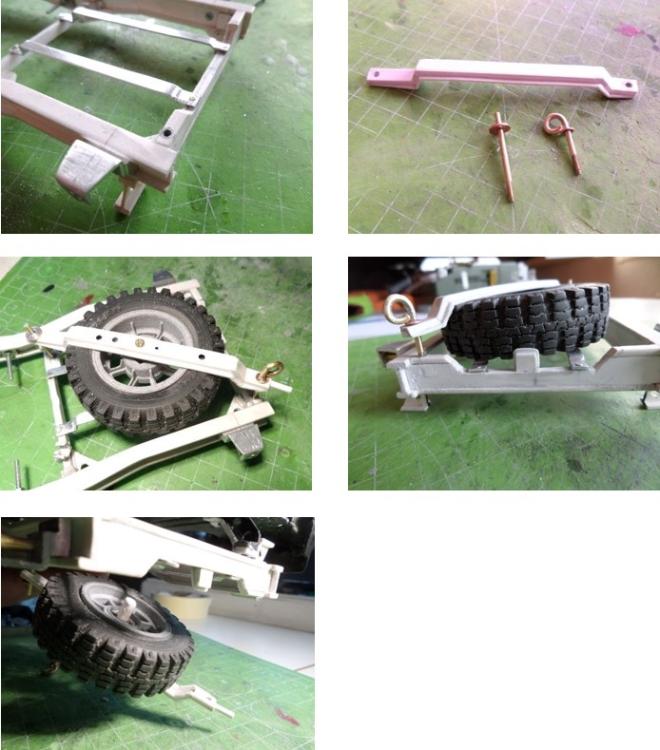 assy group 27 / chassis suspension rear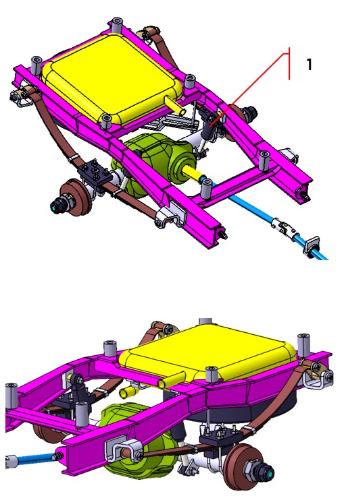 The manufacturer of the suspension struts (1) had the idea of producing suspension struts with the look of a damper, i.e. the spring lies within the cylindrical housing. Since everything is made of aluminum, it should be possible to build an oil damper from it. 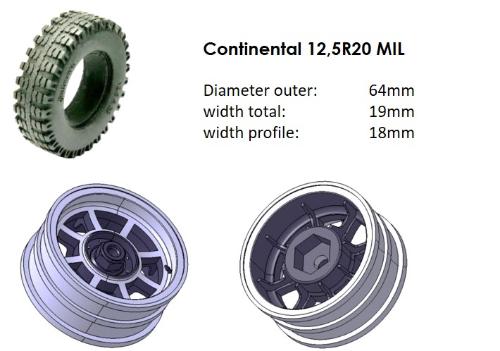 It is not so easy to find a tire-rim combination that corresponds to the required size. If the outside-Ø of 65mm fits roughly, the inside-Ø is much too large, so that only a relatively thin rubber pad results. If both are consistent, the width is completely oversized. I found what I was looking for in the truck sector. There are actually a wide variety of tires with different profiles. Only the rims don't fit the F250. The model for the design of the rim was the truck from Martin's Ranch. I will have the rims printed on a 3D printer using the MJF process. The material is PA12, a polyamide with low water absorption and very good strength. The quality is many times better than that of a filament printer and the reworking is correspondingly lower. After all, the imbalance should be as small as possible. 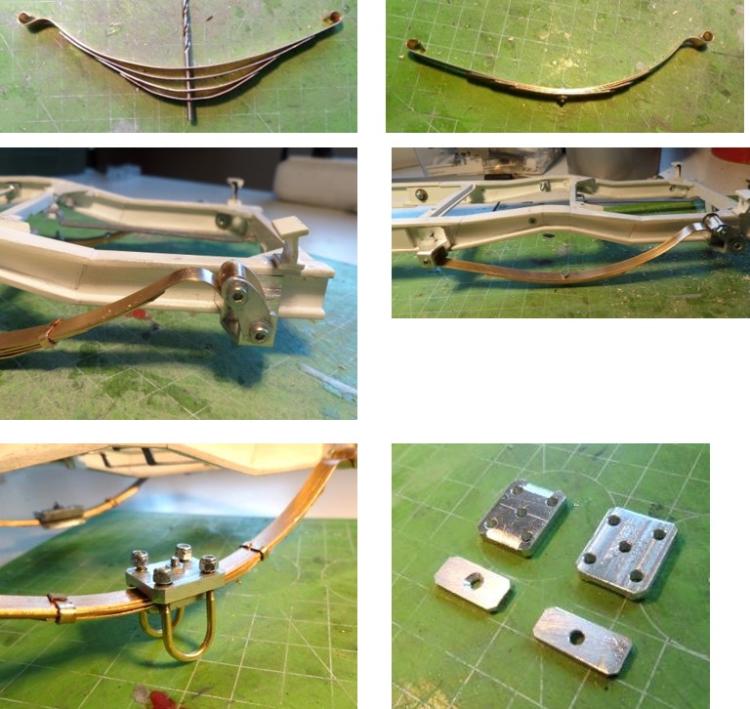 Each leaf spring is made out of a 0,5mm phosphorus bronze. The first pairing was too smooth, but a 2nd was quickly done. 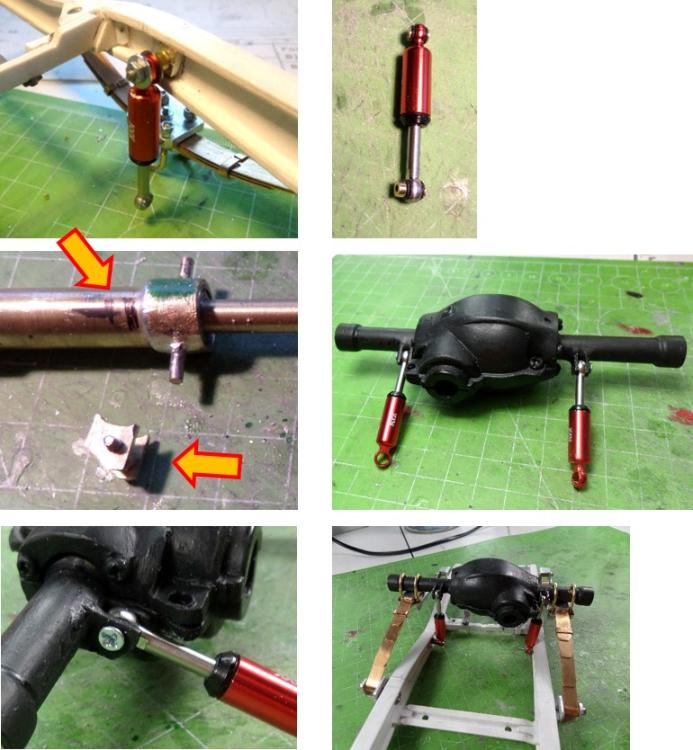 For the upper damper screwing in the chassis frame there is already a pin. For the lower one a bracket must be soldered to the outer axle tube. 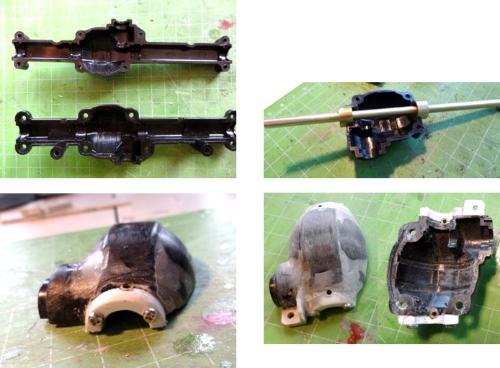 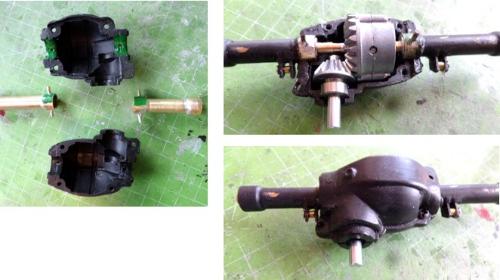 The both half parts from the purchased XC-CC-01 Chassis must be shortened and modified. I had to add new seats (??) for the ball bearings. 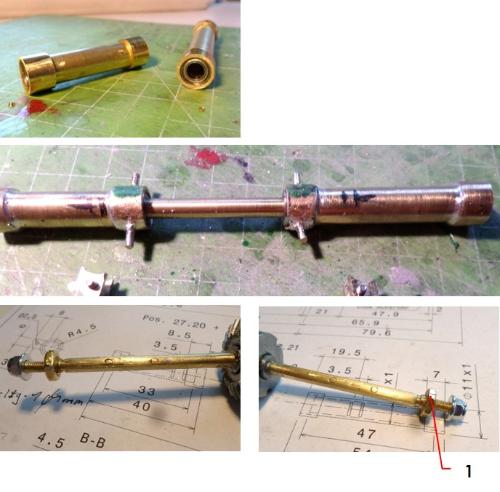 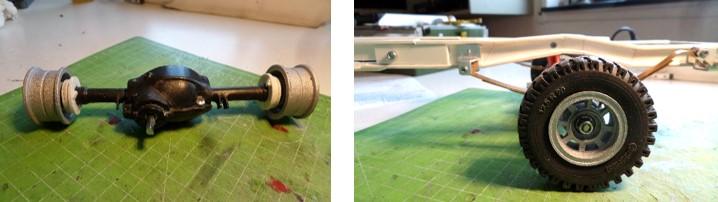 No. 1 is the attachment for the rim 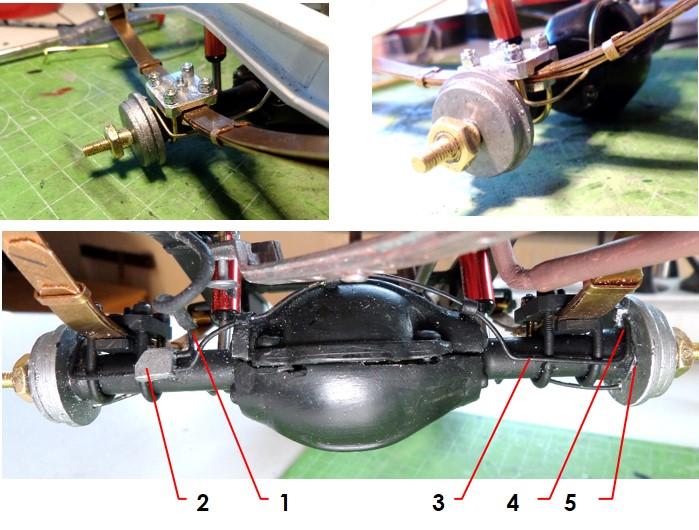 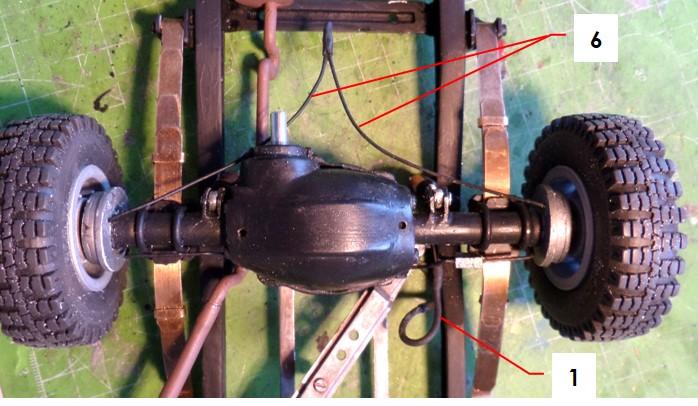 1. Brake line from front to rear. Above the flex-connection to make the landing gear shock strut compression possible. 2. Junction for right to left 3. Brake line rear 4. Connection brake line to drum brake 5. Connection wire parking brake to drum brake 6. Wire parking brake ____________________________________________________________________________  So it´s friday again... wish you a nice weekend Tobias
_____________________________________________________
Winter winds take flight, circling over my grave. A haunting voice amidst the trees, rising up across the sea.... (Katatonia) _____________________________________________________ |
|
Administrator
|
That is amazing! I will definitely want to see the finished project.
Bill AKA "LOBO" Profile
"Getting old is inevitable, growing up is optional" Darth Vader 1986 F350 460 converted to MAF/SEFI, E4OD 12X3 1/2 rear brakes, traction loc 3:55 gear, 160 amp 3G alternator Wife's 2011 Flex Limited Daily Driver 2009 Flex Limited with factory tow package Project car 1986 Chrysler LeBaron convertible 2.2L Turbo II, modified A413 |
|
Administrator
|
Yes, it is absolutely amazing! Everything looks "right", and it is easy to see how much work it has taken to do it.
Gary, AKA "Gary fellow": Profile
Dad's: '81 F150 Ranger XLT 4x4: Down for restomod: Full-roller "stroked 351M" w/Trick Flow heads & intake, EEC-V SEFI/E4OD/3.50 gears w/Kevlar clutches
|
|
|
In reply to this post by muminvater
moin moin to you,
assy group 28 / chassis suspension front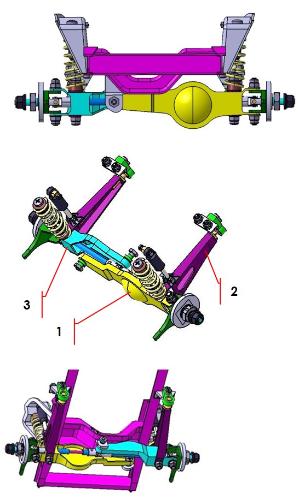 The Dana 44 axle is installed or recreated here. The front axle differential is located in the left twin beam (1) whose pivot point is located far on the right side of the vehicle. The second bearing point is at the end of the radius arm (2), so that a triangle is spanned, the hypotenuse of which is the tilt axis of the left crossbeam. The twin beam on the right (3) works in principle in the same way, but its pivot points are not a mirror image, which leads to an uneven compression result on the left / right.  The maximum compression and decompression is shown as an example on the left twin beam+/- 15°. Left steering angle of 36 ° on the left twin beam with maximum compression +15°. All attachment points, regardless of whether it is a twin beam, radius arm, damper or steering linkage, must be connected via balls in order to guarantee the kinematic degrees of freedom. 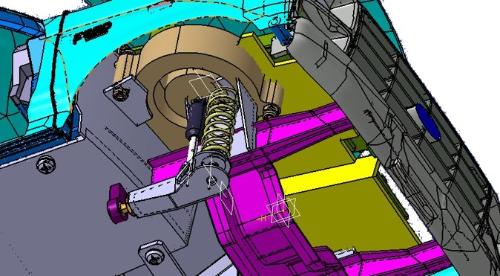 After the first sketching it was clear that the front axle would inevitably collide with the demister and the wiper motor. Lifted the vehicle by 4mm, which means 52mm in 1: 1, would significantly alleviate the problem. 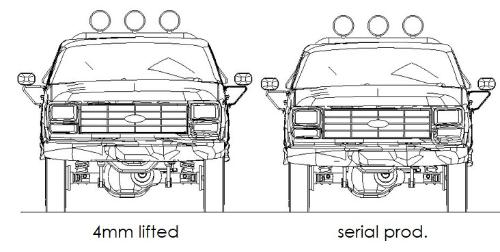 Leaving the initially fought-for series basic dimensions was not so difficult. With the choice of the exterior and interior colors, which preceded the chassis design, I had long since discarded the series idea. And the lift suits the Ford quite well. Why I leave the series idea I will explain in the chapter "coating". The both twin beams and radius arms are milled on a small modell milling mashine with I had modified with digital slide gauges. The milling was an exiting task! 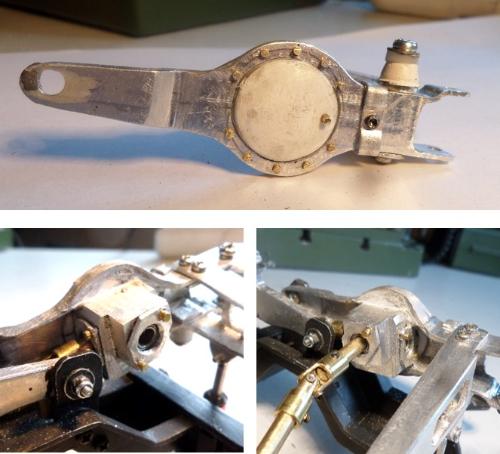
In the center of the left twin beam the front axle differential is positioned. For this, the twin beam gets a hole with will be closed with a spherical plate. Caused of it´s size the differential is only a fake. To get a functionally 4 wheel drive it necessary to insert the same gears as to the rear axle. 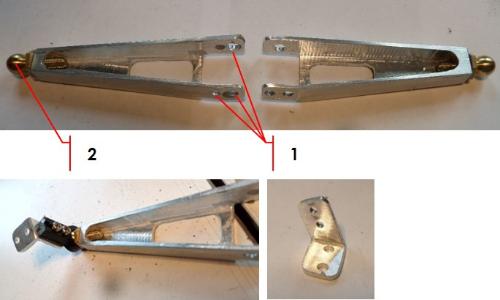 1. screwing twin beam 2. sphere for fastening to the chassis frame 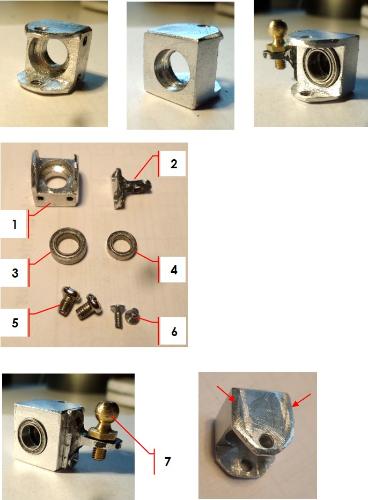 1. linkage body 2. linkage lever 3. Inner ball bearing D6x10 4. outer ball bearing D5x8 5. screwing Twin Beam 6. screwing linkage lever 7. spherical head rod Finally, the upper and lower surfaces edges were chamfered to minimize the forces when steering. 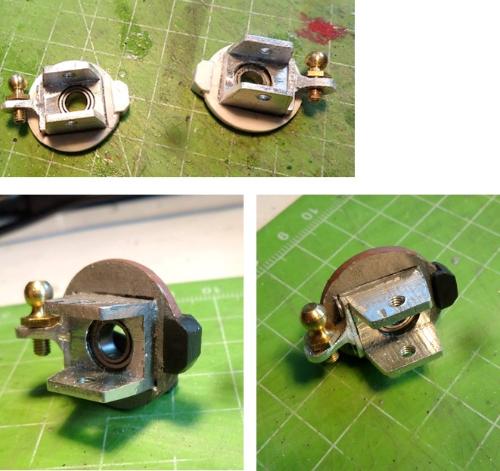 For reasons of space, the brake disc had to be placed on the linkage body instead of on the axle. The brake shoes were created without the associated brackets because the model simply does not have the space for it. These picture are still with a older version from the linkage body. 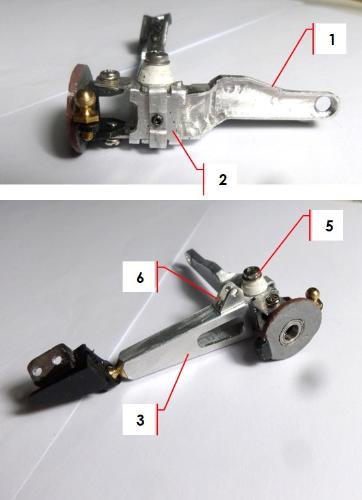  1. Twin-Beam rhd 2. assy closing plate 3. assy radius-arm 4. assy linkage body 5. bracket coil spring 6. bracket damper 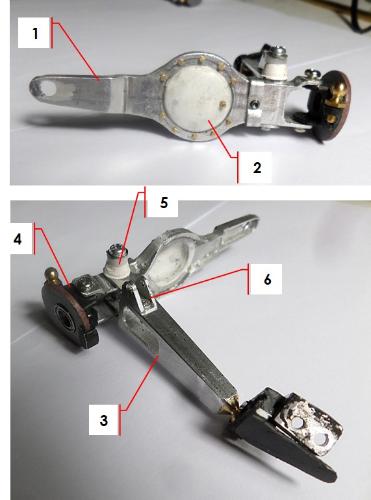 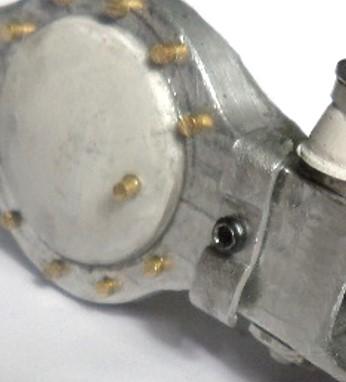 1. Twin-Beam lhd 2. assy cover plate differential 3. assy radius-arm 4. assy linkage body 5. bracket coil spring 6. bracket damper 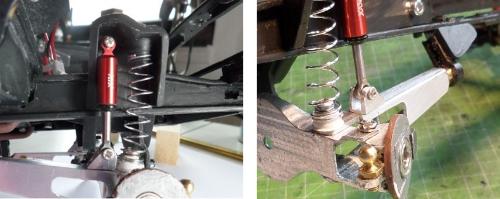 The coil spring has like the origin 8 pitches. 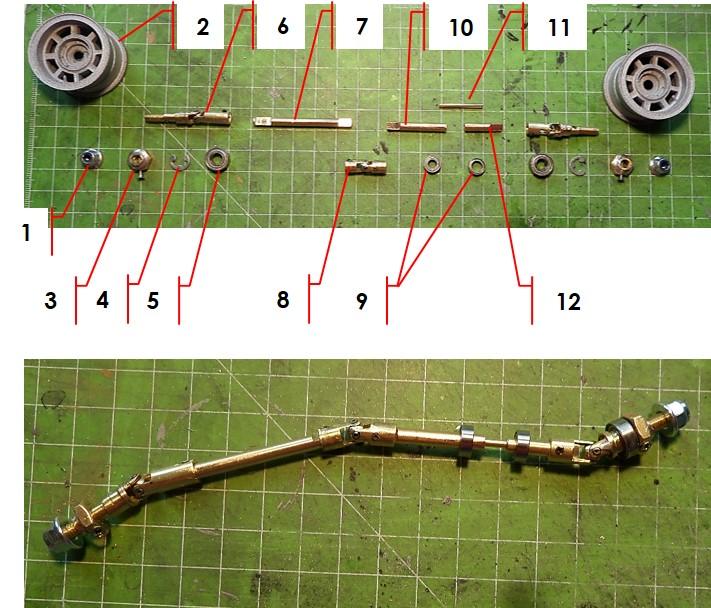 1. nut for rim 2. rim 3. carrier for the rim 4. spring lock washer 5. ball bearing (meanwhile there are 2) 6. semi axis with cardan joint 7. center axis 8. center cardan joint 9. ball bearing differential 10. differential axis rhd 11. joint axis 12. differential axis lhd assy group 30 / transaxle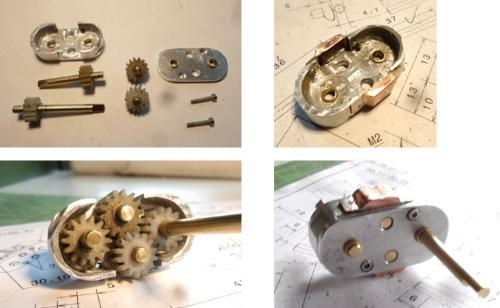 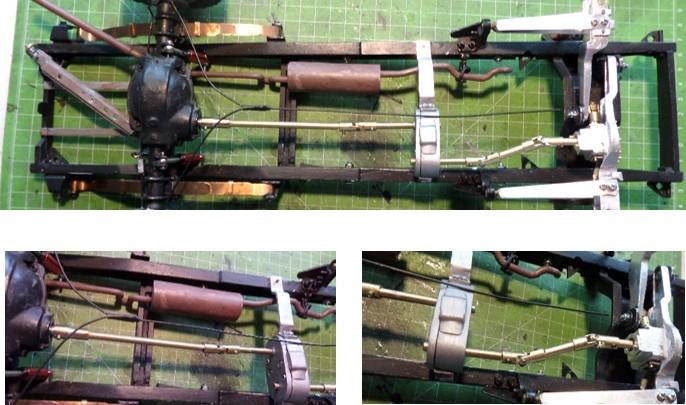 Unfortunately, the trans case could not be build smaller and in scale. The smaller gears didn´t work. The distance of the two main axis is fix (transaxle to the front and transaxle to the rear). So I have to set 2 further gears for turning the rear transaxle clockwise and the front transaxle counterclockwise. ________________________________________________________________________________  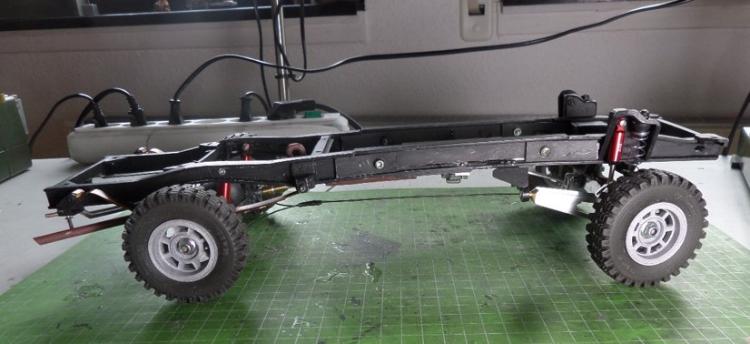 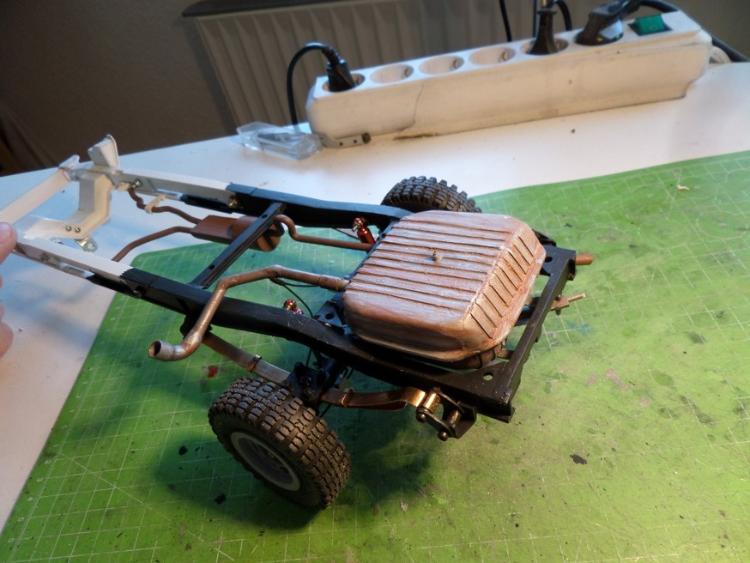 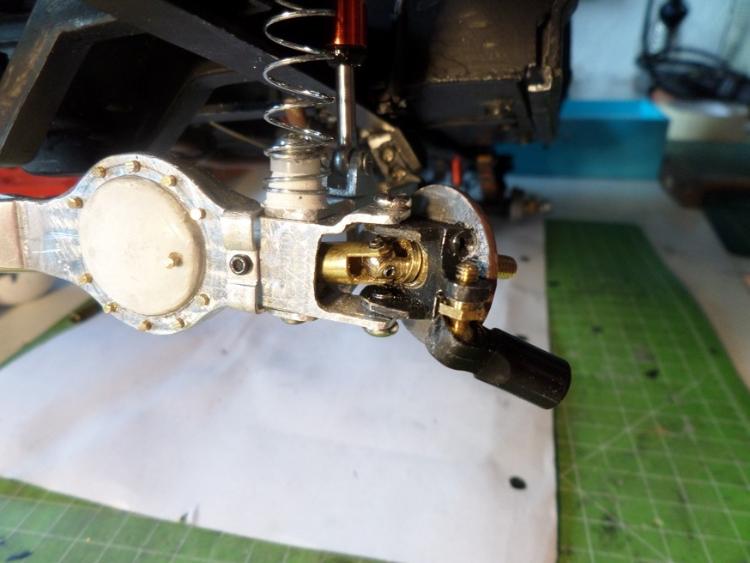 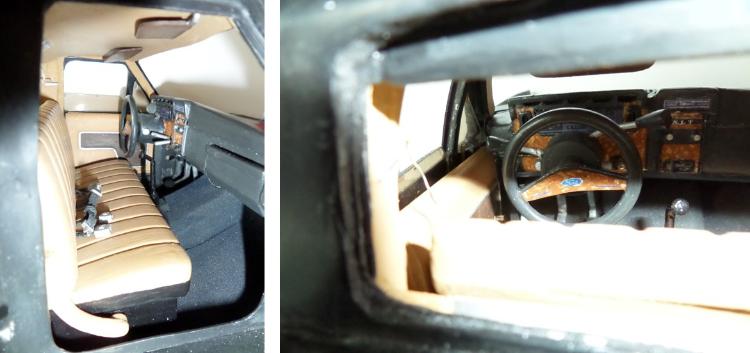  So that´s the report for today. The assembly group 29 / steering is still in work but some picutures already exists. I will make some new photos of the whole pick up tomorrow so far as it is. see you Tobias
_____________________________________________________
Winter winds take flight, circling over my grave. A haunting voice amidst the trees, rising up across the sea.... (Katatonia) _____________________________________________________ |
|
Administrator
|
In Brit parlance, I am gobsmacked: utterly astonished; astounded!
 That is really excellent work. It is like building a watch! Can't wait to see the next section.
Gary, AKA "Gary fellow": Profile
Dad's: '81 F150 Ranger XLT 4x4: Down for restomod: Full-roller "stroked 351M" w/Trick Flow heads & intake, EEC-V SEFI/E4OD/3.50 gears w/Kevlar clutches
|
|
|
I have not said anything because I am speechless
Great job Dave ----
Dave G.
81 F100 flare side 300 six / AA OD / NP435 / 2.75 gear http://cars.grantskingdom1.com/index.php/1980-Ford-F100?page=1 81 F100 style side 300 six/SROD parts truck -RIP http://cars.grantskingdom1.com/index.php/1981-Ford-F100 |
|
Administrator
|
In reply to this post by muminvater
Thank you for sharing the details.
The model machining is very impressive. I imagine getting the geometry right would be a lot more difficult without CAD.
Jim,
Lil'Red is a '87 F250 HD, 4.10's, 1356 4x4, Zf-5, 3G, PMGR, Saginaw PS, desmogged with a Holley 80508 and Performer intake. Too much other stuff to mention. |
|
|
Hi Guys, thank you all for your comments
Obviously there´s still no big error happen in the buildup otherwise you had told me...
@ Jim: yes, you are right. It would be a lot more difficult without CAD, precisely because I am a CAD-guy. Before starting sth I need the data. And, of course, it´s even easier to modify sth. Tobias
_____________________________________________________
Winter winds take flight, circling over my grave. A haunting voice amidst the trees, rising up across the sea.... (Katatonia) _____________________________________________________ |
|
|
In reply to this post by muminvater
Hello to you,
as I promised yesterday, I took a lot of pictures today. Not to blow up your server, I will post a few of them But first I will lost some words about the coating and a little bit statistics - Uuaaah 
the coating - the color choice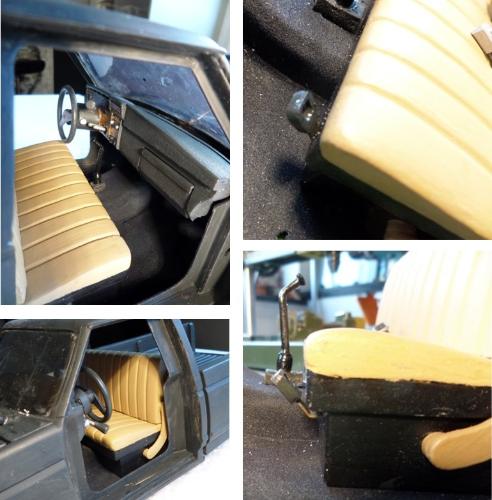 For a long time I was unsure with the exterior paintwork and the interior color. First I was sure that it should be an original finish in the "Deluxe Two-Tone" variant. The main paint should be either red or blue and the wide center stripe should be white. This would result for the interior: carpet, bench seat and dashboard in red or blue. But I didn't really like that. It was an happy accident that let me find the right color. To have a look to the finish- where still needs to be sanded, where needs to be filled – the body necessarily needs a coating or at least a painting. The blue, I used for the hood won´t fit to the Ford and because the hood should be matt black (independent of the body color)was that the color of my choice. It was an amazing effect: the color and body communicate with each other! So it should be. I decided for a 2 component coating system (basic and clear coating) from BMW – yes – It´s name is “Nachtschwarz” (night black) and it has a high proportion of anthracite. Because of this the color is not so dead (do you use this in English too?) So the interior could designed free from the origin. If the outer coating is refreshed then it´s nearby that the interior is also reworked. The dashboard have stay in the origin color of course, but delivery ex works in anthracite was possible. So the bench was covered in sand-colored leather. StatisticsIt´s named statistics, but it´s meant some data to project. 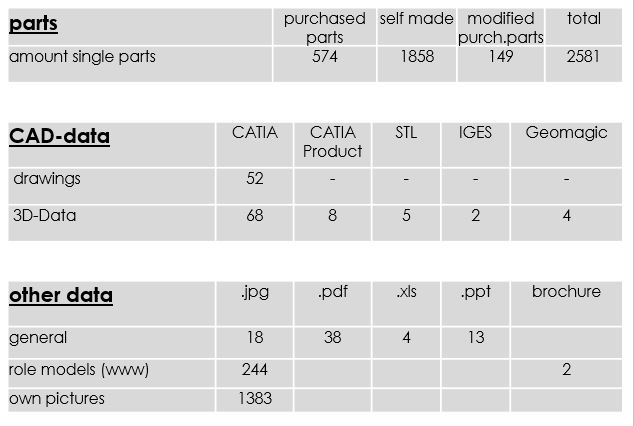 The numer of parts according to my partlist. The current total amount of parts is 2581. Catia is my engineering software, the "product" are the parents from the 3D part with is the parent from the drawing. The Geomagic software is needed for the 3D scan and for the reverse engineering. Iges ist used as a neutral transfer format. STL is used for the 3D printer. For example assy group 4, the window lifter, the parts list and the drawing 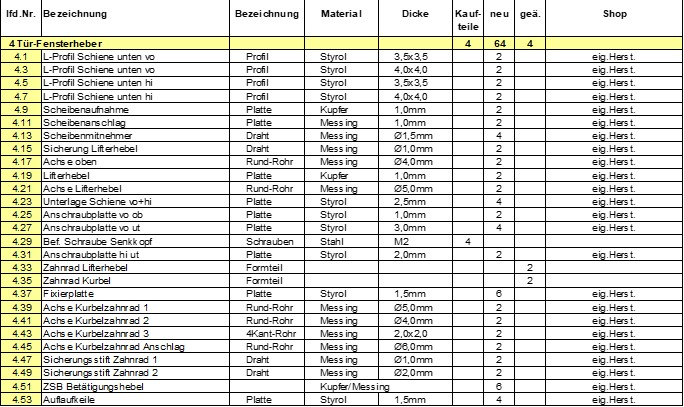 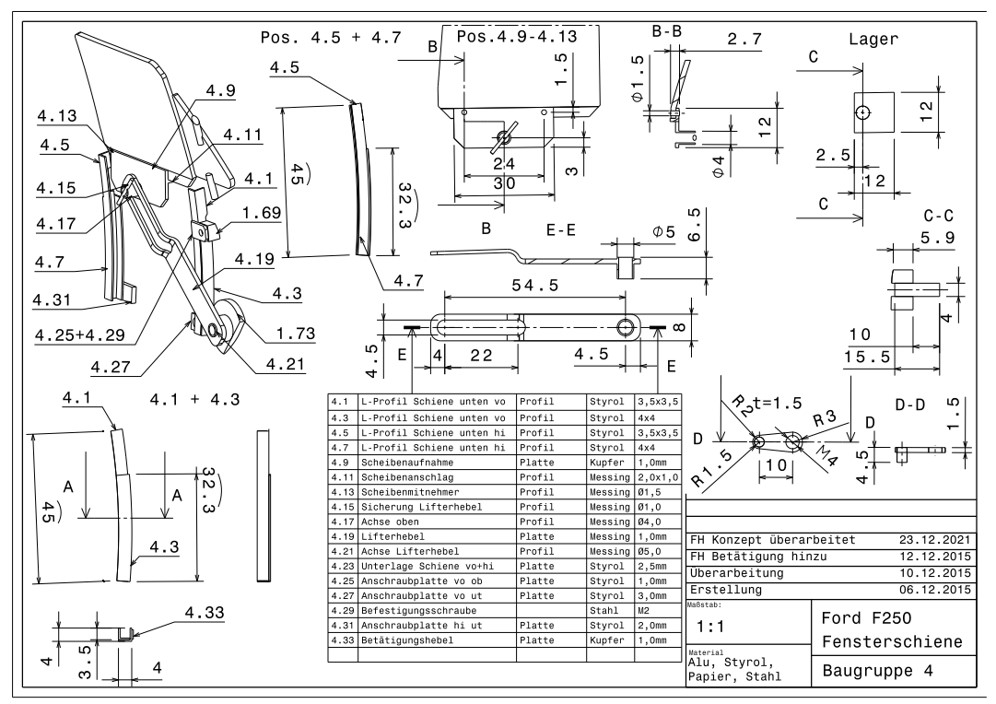 so, enought of this  next, I will post the pics from today without any comments. There are 3 steps: 1. the body 2. the chassis frame 3. combined 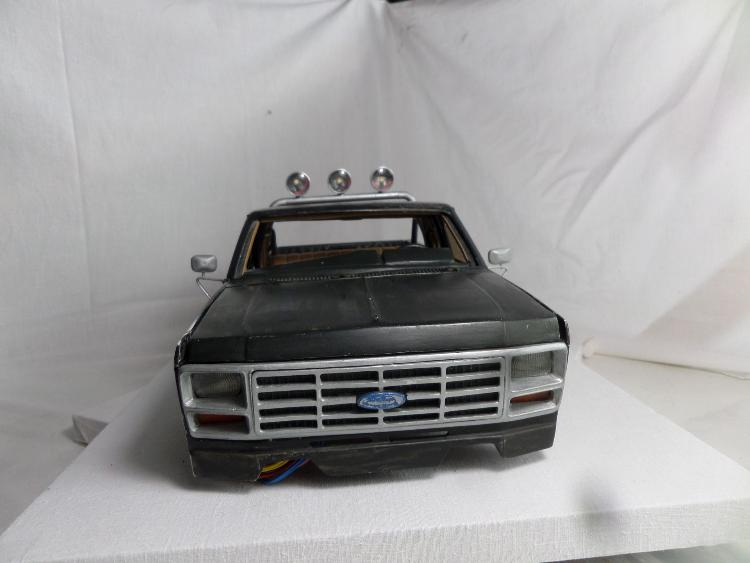 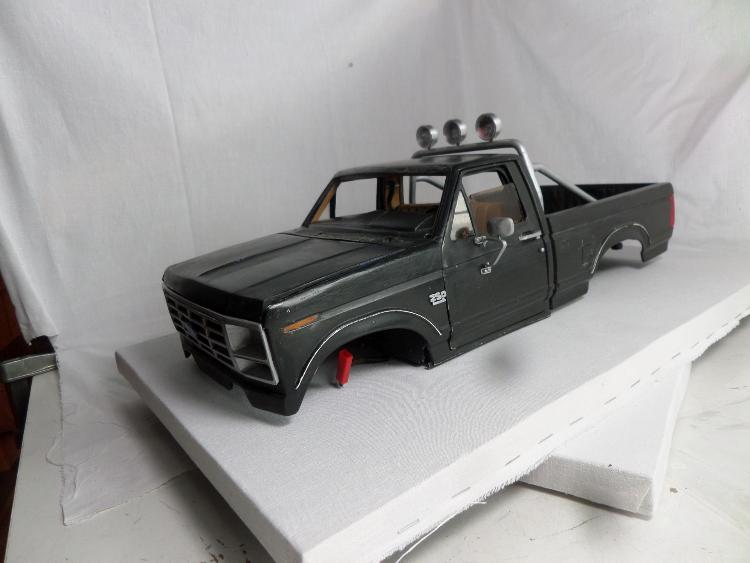 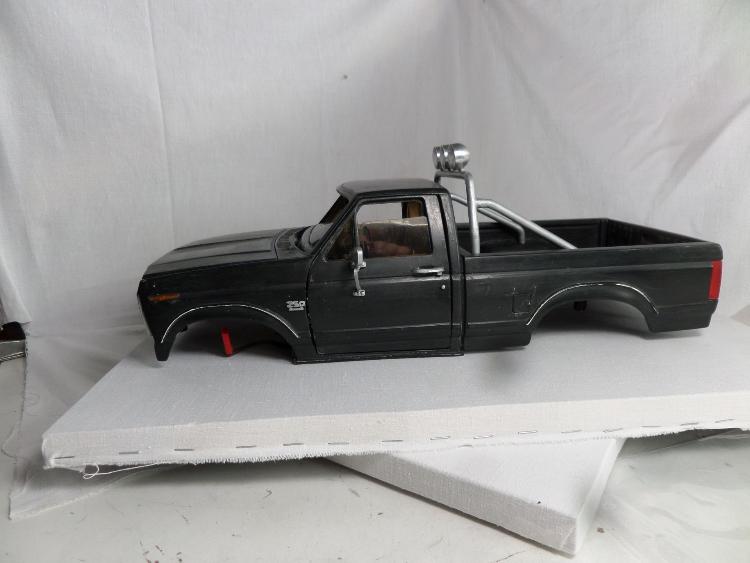 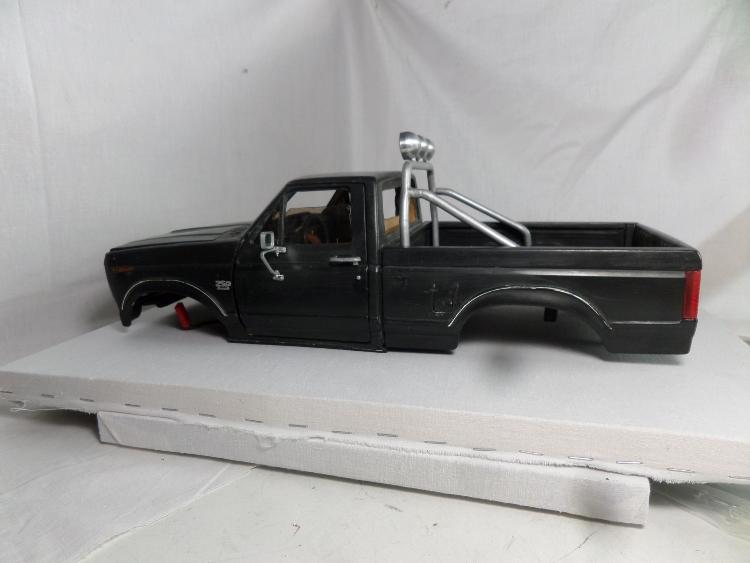 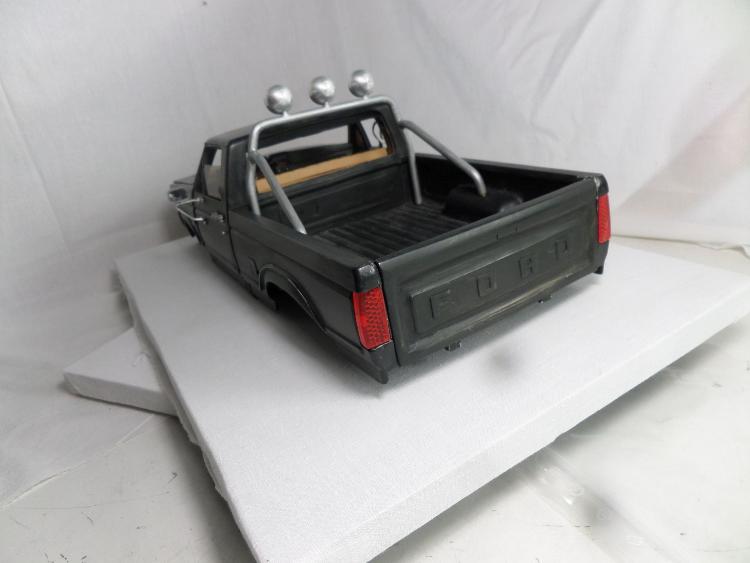 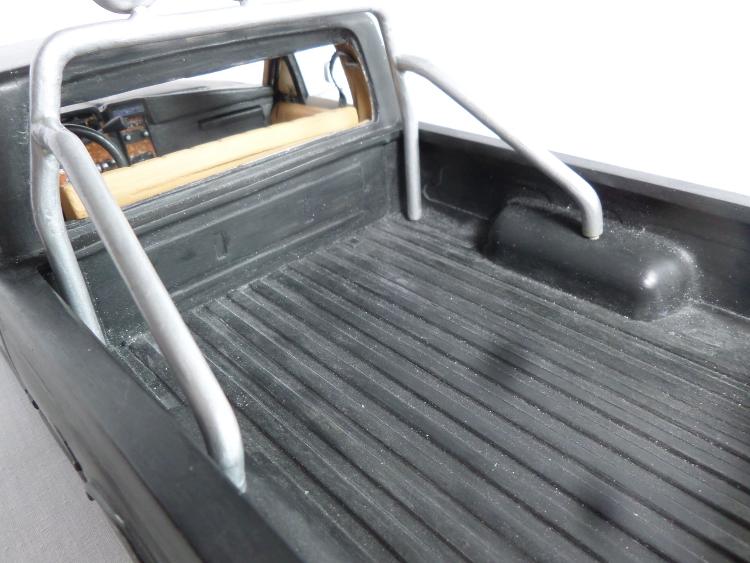 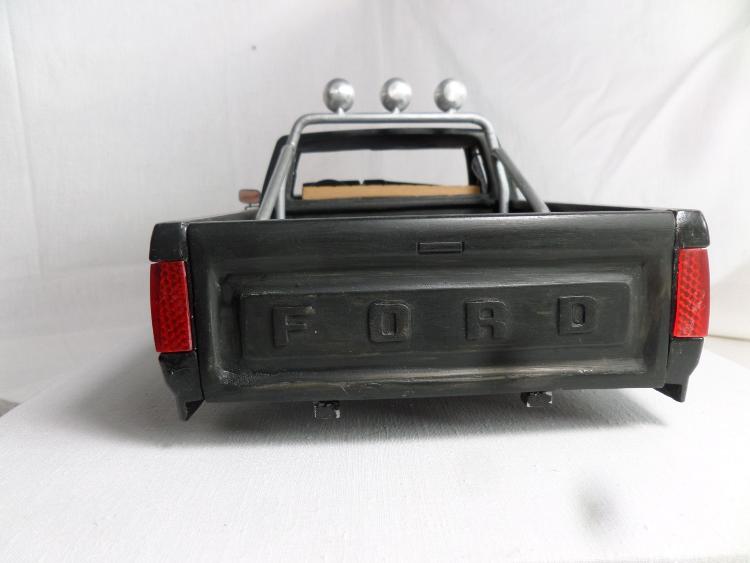 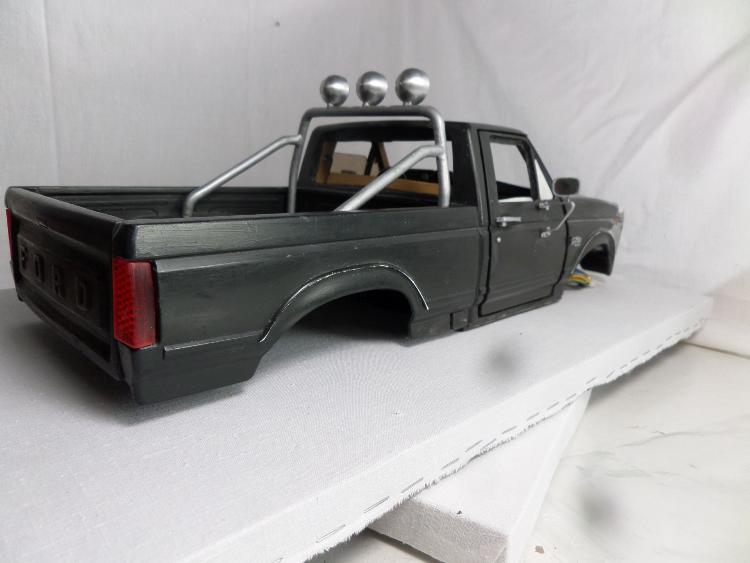  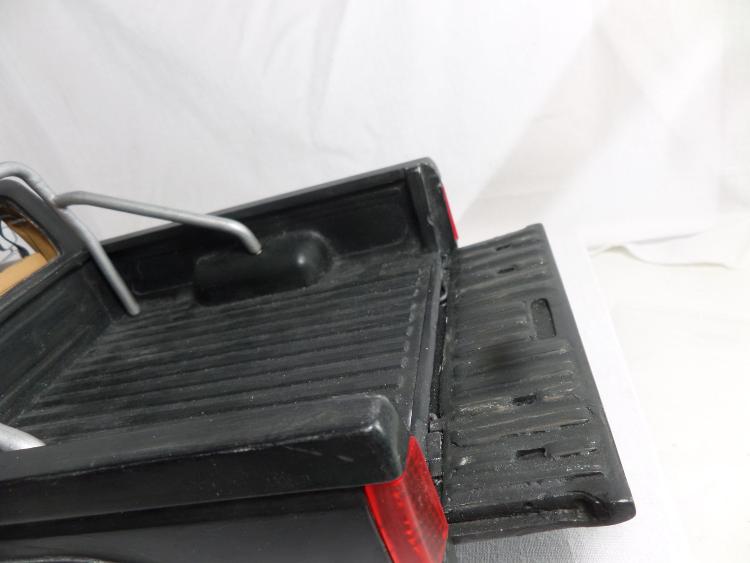 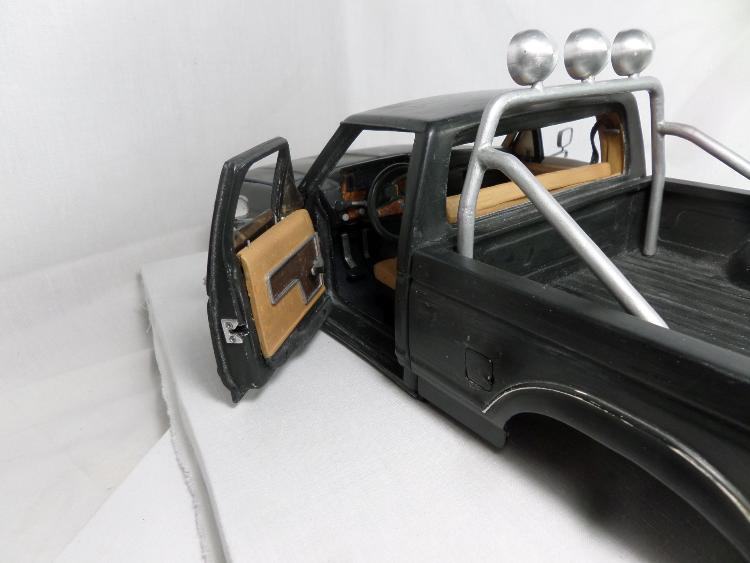 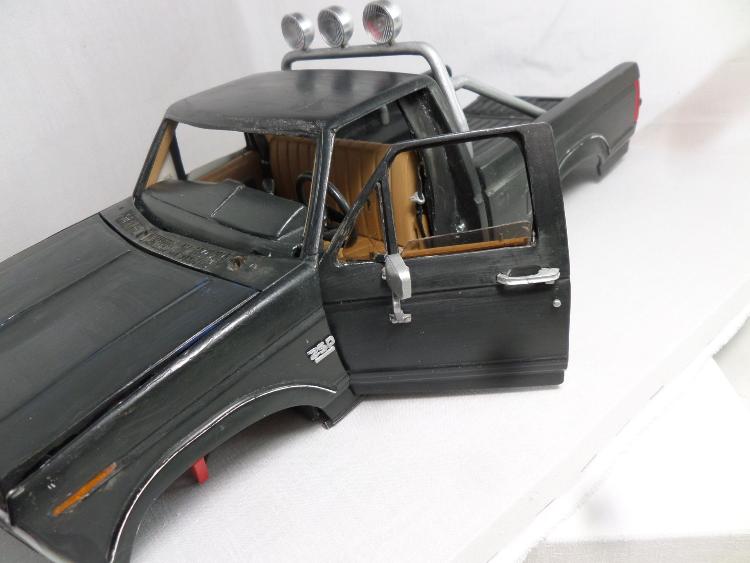 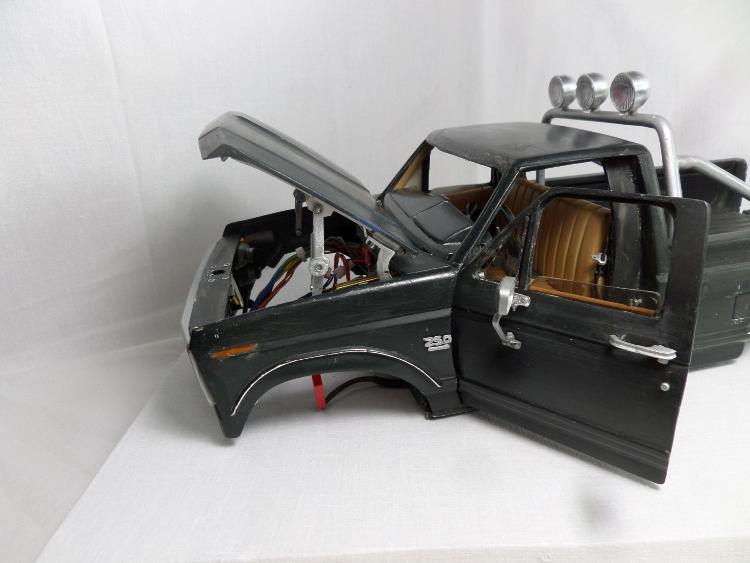 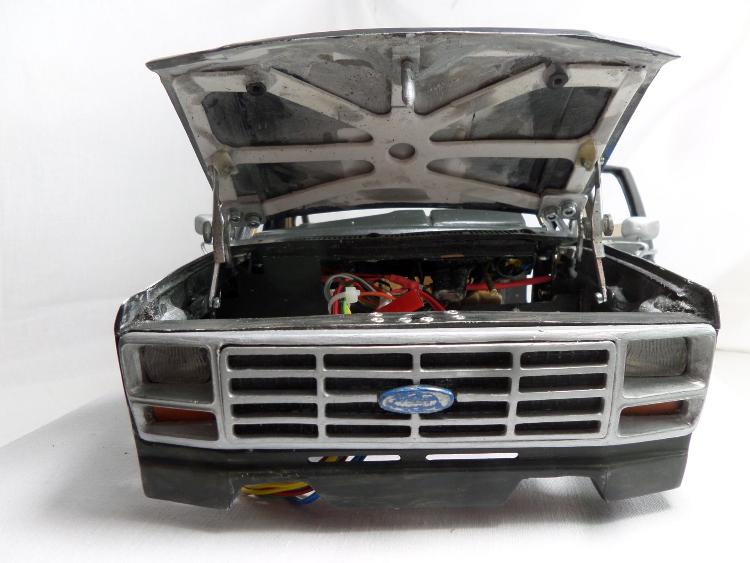 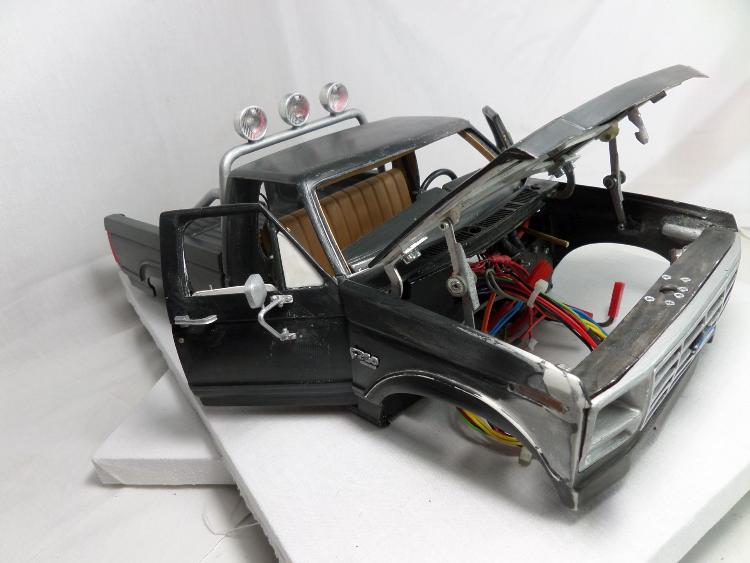 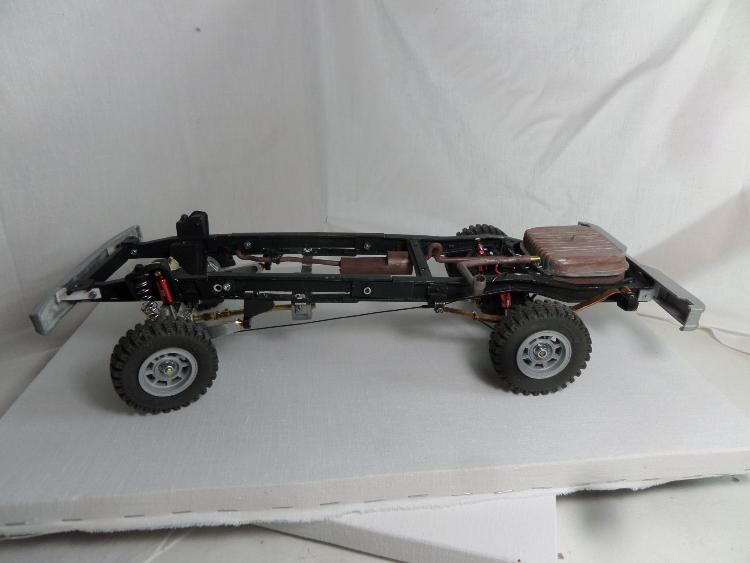 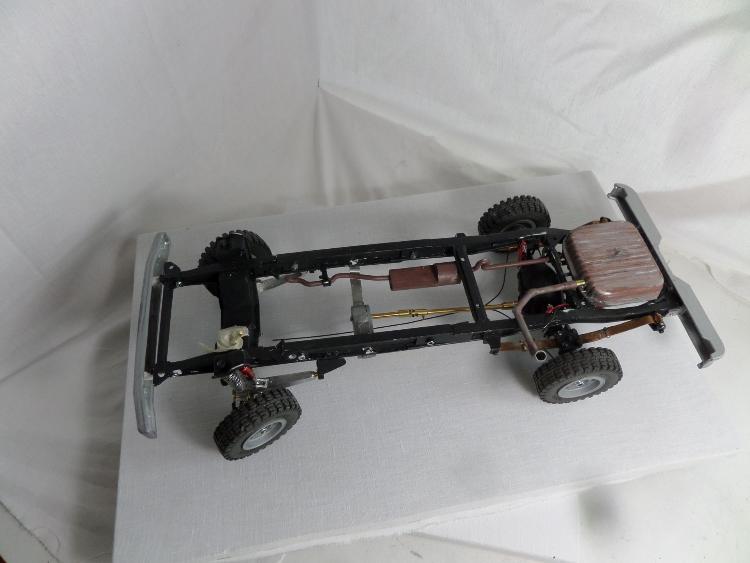 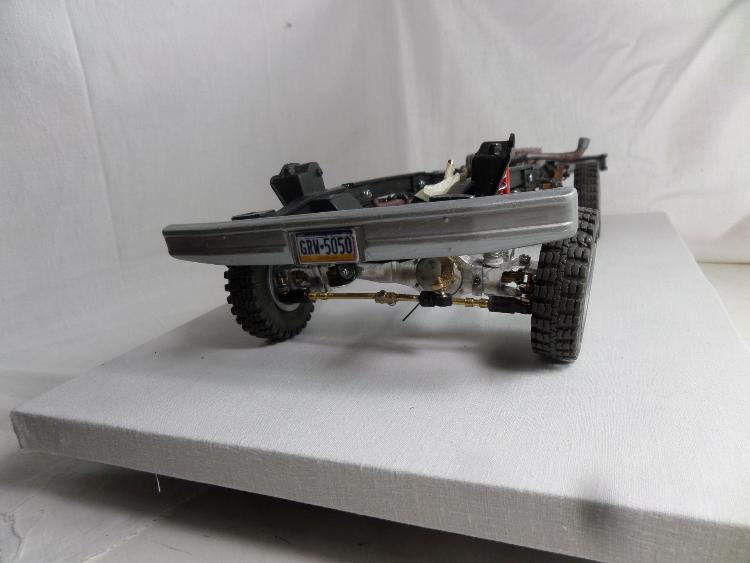 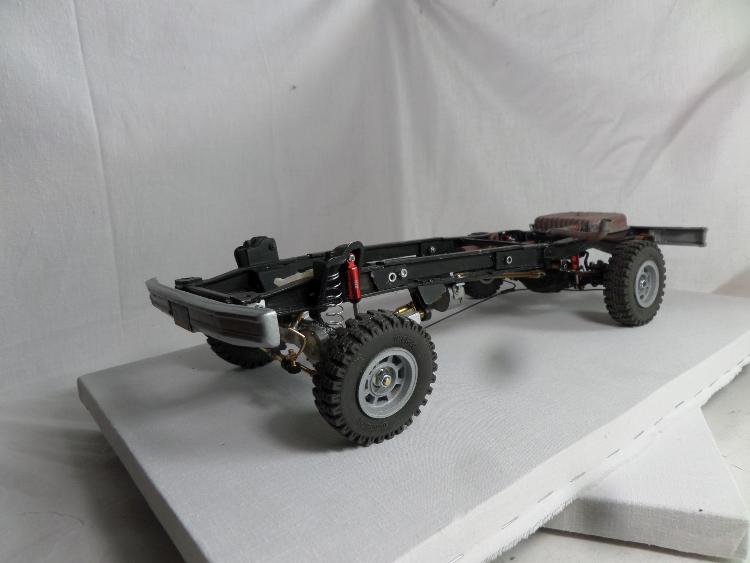  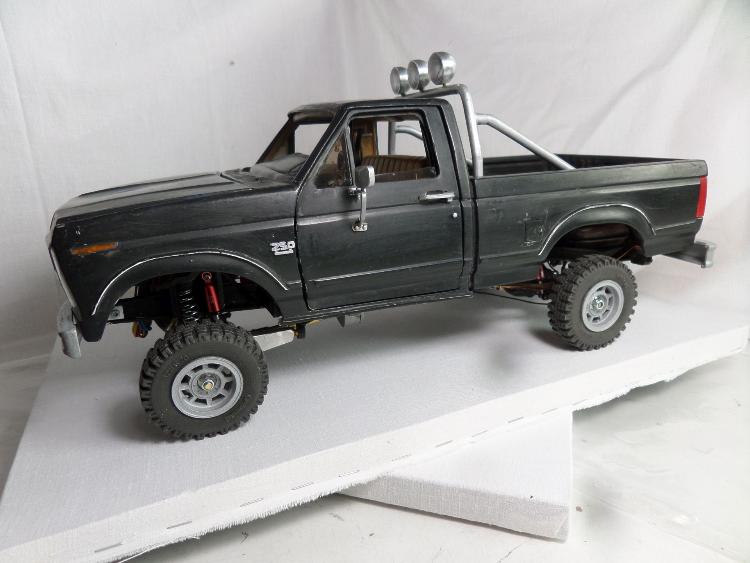 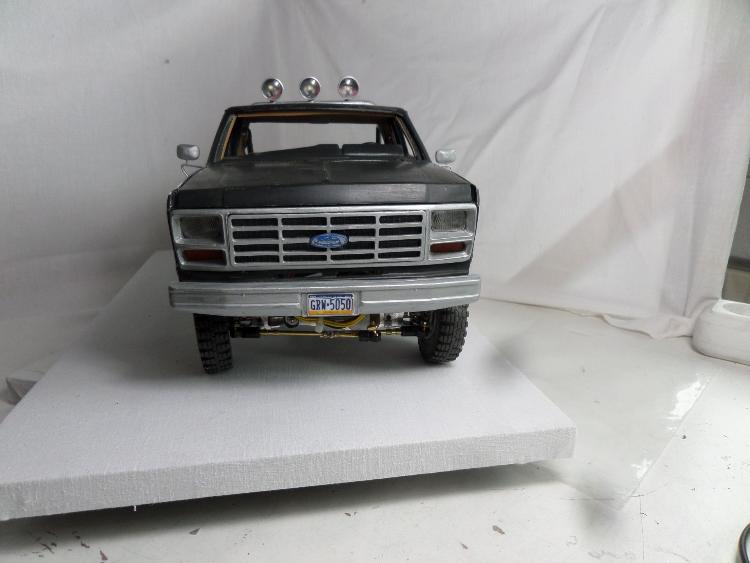 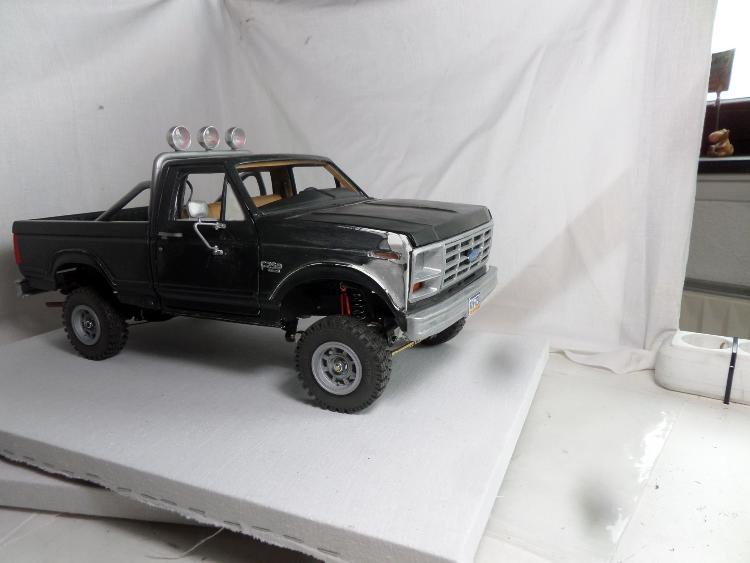 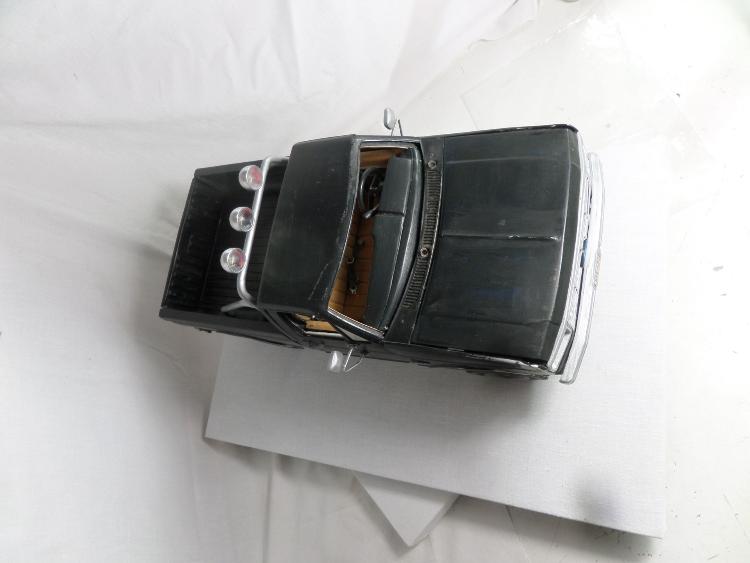 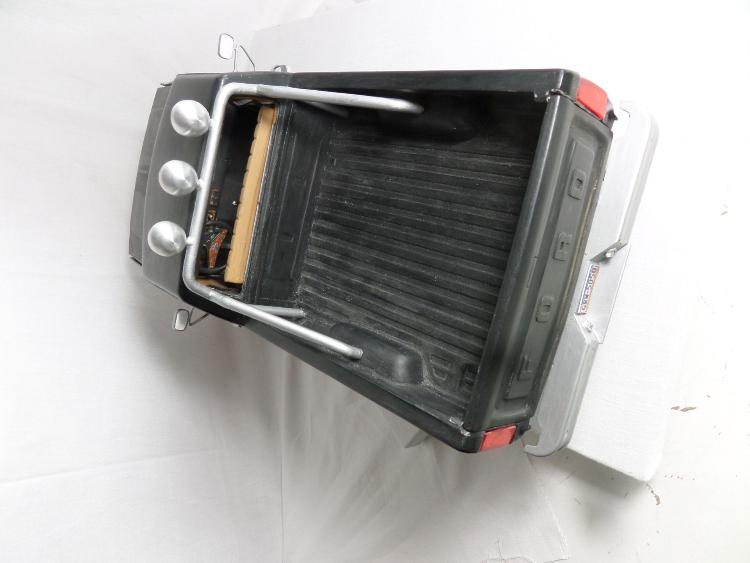 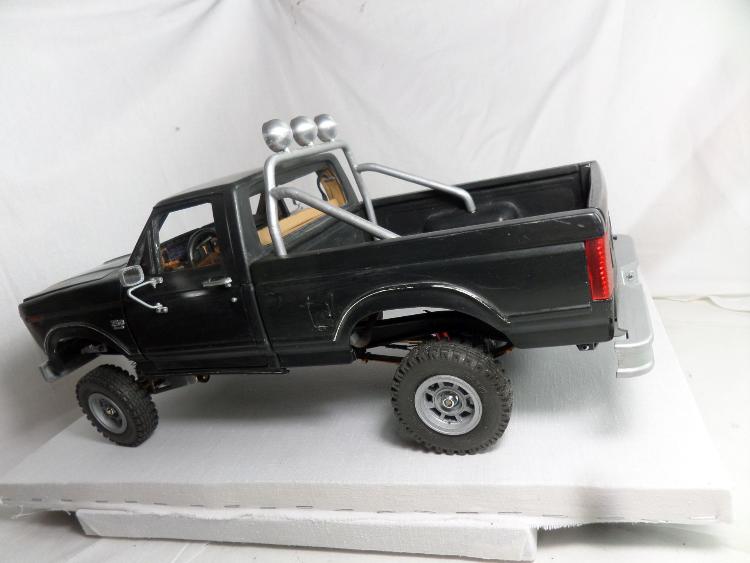 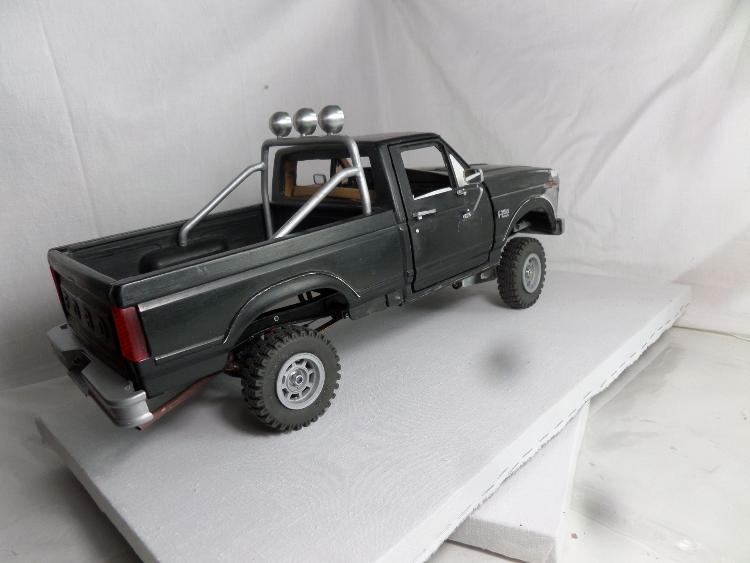
_____________________________________________________
Winter winds take flight, circling over my grave. A haunting voice amidst the trees, rising up across the sea.... (Katatonia) _____________________________________________________ |
|
Administrator
|
Amazing!
On the color, we would say "flat" instead of "dead". Flat black would have essentially no sheen and gloss black would have max sheen. The total of 2581 parts seems almost as many as a full-sized truck would have! And 52 CAD drawings is a whole bunch. Are you done with the model? How long has it taken you?
Gary, AKA "Gary fellow": Profile
Dad's: '81 F150 Ranger XLT 4x4: Down for restomod: Full-roller "stroked 351M" w/Trick Flow heads & intake, EEC-V SEFI/E4OD/3.50 gears w/Kevlar clutches
|
|
|
Hi Gary,
How it took in hours is an good question. The last 3 years I work about 5 hours each day, 7 days a week. Sometimes more, sometimes less. That´s round about 1825 hours. The 5 years before (when I was in job) it is not so easy. On sundays 5 hours like above, ok. But not during week and on saturdays mosly in fall and winter. So if I say sundays: 52 weeks x 5 years x 5 hours = 1300 hours and the saturdays: 26 weeks x 5 years x 5 hours = 650 hours total: 3775 hours for build up the model (less or more) To that you have add the hours for CAD engineering, for searching in the www and documenting. Because at the end I create a litte book to the model (like I always do) with it´s emergence. If I´m done with the model? No, I think that should take a while. There are a lot of points that do not fit. The joint from fender to hood is not parallel, the rhd door could open a bit more, the substructure of the bench ist not like origin and the coating must wait til spring til the weather is optimal for coating under the carport. Little bit warm and dry.  greetings, Tobias
_____________________________________________________
Winter winds take flight, circling over my grave. A haunting voice amidst the trees, rising up across the sea.... (Katatonia) _____________________________________________________ |
| Edit this page |