Rear Main Seal Blues


|
I'm on my 2nd bottle of miracle oil additive. I'll give it a couple more days to do its magic. With the most likely scenario where this is no magic pixie dust, I'm planning on what I might need to do in performing a rear main seal replacement.
Here's my set up: '85 F350, 460 engine, rear wheel drive, crew cab, C6 tranny, single exhaust w/ crossover between engine block and tranny. My understanding is that the following procedure is needed to replace the rear main seal: 1. drop transmission (not sure what that entails as far as disconnecting the engine shaft from the transmission) 2. raise engine (needed to remove oil pan) 3. remove oil pan 4. remove oil pump (why? needed for access to main bearings?) 5. loosen all main bearings 6. drop crankshaft a fraction of an inch 7. replace rear main seal 8. reverse previous steps While I'm in the process, I'd like to consider replacing relevant parts: 1. oil pan gasket (obviously) 2. motor mounts 3. others that I'm not thinking of?? Other questions: 1. for the opening in the oil pan for the dip stick - is this integral to the pan, or is it a separate piece that takes a gasket? 2. I'd like to add means to monitor the oil temperature. I think that the cleanest way to do this would be to add a fitting to oil pan so that a sensor can be added that is submerged in the pan oil. I could add additional fittings/hose clamps to my current external oil filter set up, but I think that adds more opportunities for oil leaks than a welded/brazed fitting in the pan. 3. I'd also like to add a means to monitor the transmission fluid temp. Like the engine oil, this is a fitting that could be added to the pan or the cooling lines. I don't think that there's any advantage to tackling this during the rear main seal circus. I need to drop the transmission pan to change fluid and filter at some point in the future anyways. I'm open to all suggestions and comments.
THE BEAST - '85 F350 2WD (non dually) Crew Cab, 460 carbureted, C6 tranny
|
|
Administrator
|
From personal experience, first question, is it a single exhaust or dual to the muffler? My understanding was it changed in mid 1984.
Second, pull everything loose at the radiator mounts, but leave the hoses connected. I do not think removing the transmission will make much difference, it actually helps keep the engine located. Once the engine is as high as you can get it (remove anything on the rear of the engine that may hit the firewall and the air filter), block it up by the exhaust manifolds, a quick look at the motor mounts will tell you why. Exhaust will probably need to be cut to get it out from under the oil pan, if you can cut the bolts out of the joint or if there is none, just a clean cut so the wye section will come out. With the engine now looking like it is ready to launch over the front end, remove the dipstick tube, both motor mounts and all the pan bolts and let the pan drop to the crossmember. Reaching over the pan flange remove the oil pump pickup from the stud and pump and take it out, or just drop it into the pan. Remove the oil pump and it's drive shaft, at this point the pan will promptly drop off the crossmember so be ready for it. Now you can see the crank and bearing caps. remove the rear and loosen the other 4 to allow the crank to drop slightly, now you can change the seal, be sure it is installed correctly and start putting everything back together. Now you know why Darth's rear seal still leaks! Plan on at least a day to do this fun job. Dipstick insert is riveted to the pan, gasket reinstall is loads of fun, later pans with the reinforcements for the pan rail use a one piece gasket. Motor mounts, unless they look bad, Darth's are still the original 1986 ones. Trans temperature, there are kits for installing a sensor in the transmission pan, good idea, put it at the rear so it can double as a drain. I probably should do that too, the E4ODs are know to get quite hot.
Bill AKA "LOBO" Profile
"Getting old is inevitable, growing up is optional" Darth Vader 1986 F350 460 converted to MAF/SEFI, E4OD 12X3 1/2 rear brakes, traction loc 3:55 gear, 160 amp 3G alternator Wife's 2011 Flex Limited Daily Driver 2009 Flex Limited with factory tow package Project car 1986 Chrysler LeBaron convertible 2.2L Turbo II, modified A413 |
|
Administrator
|
In reply to this post by baddog8it
Be glad you have 2wd. At least you can get the pan out with the engine (sort of) in the truck.
I'd like to point out the necessity of having the small heat shield in place on the motor mount. Without it the rubber will cook in short order. Be sure to check the seal journal on the crank for scoring before replacing the seal, and lubricate it so it doesn't start dry. If there is pitting, or the old seal has cut a groove, the new seal will fail. There may be a Speedisleeve to repair the crank end.
Jim,
Lil'Red is a '87 F250 HD, 4.10's, 1356 4x4, Zf-5, 3G, PMGR, Saginaw PS, desmogged with a Holley 80508 and Performer intake. Too much other stuff to mention. |
|
|
Thanks for the responses - that clarifies things a lot.
It is a single exhaust - the left side crosses over right under the rear of the engine to join the right side. There is no catalytic. I take it that when I'm lifting the engine, the radiator is getting lifted too? Since I'm not necessarily removing the transmission, I take it that the seal is replaced from the inside of the engine (vs on the back outside face of the block)?
THE BEAST - '85 F350 2WD (non dually) Crew Cab, 460 carbureted, C6 tranny
|
|
Administrator
|
That is correct, the radiator is bolted at the top and lifts out of the lower pads as the engine is raised. The seal is a split lip style seal, the originals were a rope type, but I believe by 1985 they were all the split lip style. Transmission does not need to come off.
If your engine has a rope style seal, then there is a pin in the lower rear main cap that needs to be removed, if you have a service manual for it, it will show the offset in the upper and lower portions of the seal and where to use sealer on the cap face. If you find the crank has a groove worn in it, then the transmission will need to be removed at least far enough to get the flex plate off so a repair sleeve can be installed. Don't forget when raising the engine to disconnect fuel lines and the battery ground cable from the block and, unfortunately, if you have A/C, you may have to break the system open, but, if you take the condensor loose it should come up with the radiator.
Bill AKA "LOBO" Profile
"Getting old is inevitable, growing up is optional" Darth Vader 1986 F350 460 converted to MAF/SEFI, E4OD 12X3 1/2 rear brakes, traction loc 3:55 gear, 160 amp 3G alternator Wife's 2011 Flex Limited Daily Driver 2009 Flex Limited with factory tow package Project car 1986 Chrysler LeBaron convertible 2.2L Turbo II, modified A413 |
|
|
A few more questions...
What's the best way to raise the engine? I don't have an engine hoist. Just a block of wood lifting on the oil pan with a jack? I thought I was going to be able to use a friends semi-professional garage for this job, but timing wasn't right. I'll be doing it in my home garage. Jacks, jack stands, lifts, etc will be very limited. Once it's up, it was mentioned to block it up via the exhaust headers. Block them from the ground? Seems like there won't be much room to work if I'm blocking it from the ground. Is there a good way to block it from the frame? There was mention of using a speedisleeve if the journal is scored. From pics I've seen, it looks like there's a larger diameter end on the shaft (for attachment to the torque converter and/or starter ring?) that would keep me from sliding on a repair sleeve. Or is that larger end removable? I bought Ford Racing Division rear main seals. They were PTFE (teflon). From what I heard, they are best for mating up against scored surfaces. When reading the directions for their installation, I had a few questions, but I don't have those in front of me. I'll have to add another entry once I have that in front of me.
THE BEAST - '85 F350 2WD (non dually) Crew Cab, 460 carbureted, C6 tranny
|
|
Administrator
|
I've jacked them up using a piece of ply under the pan to spread the load. And then I've kept them up with a jack stand under the harmonic balancer. But if you have to drop the crank in back to put the seal in then that won't work very well.
As for the flange on the end of the crank, it doesn't come off. So the only place I've seen the sleeve used is in the front. I doubt that your crank is grooved so you wouldn't need it in that case. Anyway, let's see what the others say on these issues.
Gary, AKA "Gary fellow": Profile
Dad's: '81 F150 Ranger XLT 4x4: Down for restomod: Full-roller "stroked 351M" w/Trick Flow heads & intake, EEC-V SEFI/E4OD/3.50 gears w/Kevlar clutches
|
|
|
Here's the instructions as provided. I've added the sentence numbers for reference.
1. INSTALL SEAL HALVES: 2. The large sealing lip must be positioned toward the front of the engine. 3. Make sure the parting lines of the seals are offset in relation to the block/main cap parting line by 3/8". 4. This will reduce the chances of leakage by insuring proper lip alignment, and preventing shaving of the backside sealing bead. 5. For your convenience, a plastic installation aid or "shoehorn" is provided to help prevent damage to the backside bead. 6. APPLY RTV SEALER to the outside edges of the cap recess' in the block 1, 2 & 3 - no quesion here. I get it. 4 - what is the 'backside sealing bead'? How is the offset going to prevent shaving of it? 5 - the plastic strip is a total of 3" long. For the majority of its length, it is 1/2" wide. On one end, it is cut back to where there is a tab, just shy of 3/16" wide, centered in the last 1/2" of its length. That tab has a full radius on it's end, and all corners are radiused. Is the 3/8" mentioned in sentance 3 a typo and they really meant 3/16 or 1/2"? Or does the 'shoe horn' have nothing to do with the 3/8" offset? 6 - I don't understand 'outside edges of the cap recess in the block'. Can someone fill me in here?  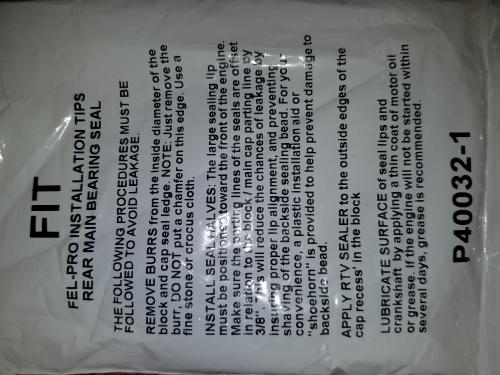  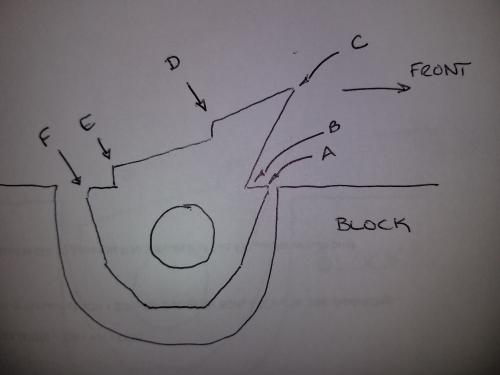 
THE BEAST - '85 F350 2WD (non dually) Crew Cab, 460 carbureted, C6 tranny
|
|
Administrator
|
Block the engine up from the perches, the mounts have to come off the back plates as their location prevents the pan from coming down. The exhaust manifolds are the best place I found to support the engine in order to drop the pan.
The "backside bead" is the portion on the seal that goes into the groove, either the upper or lower and the shoehorn is for the block part as it is being "slid" into the sharp edged groove, the cap side is just pushed straight into it's groove, the reason I read in my manual for the offset of the ends of the seal was to keep the joint from being right at the cap split. The last one I did was on my 390 FE engine I built for my 1977 F150 and it was an updated design from the original rope seal (be glad your not doing one of those). The sealer referenced is for the cap to block joint, this is to prevent oil leaks there, I usually also put a tiny spot of RTV at the ends of the seal where they join, I don't know if it's really needed, it may not be. You may want to use copper coat there if you have it, The area to be sealed is the portion of the cap to block behind the bearing. FWIW, be glad it's not a Y-block, FE or MEL engine, their rear caps require side seals that have to be inserted and then a pin driven in to wedge them in place.
Bill AKA "LOBO" Profile
"Getting old is inevitable, growing up is optional" Darth Vader 1986 F350 460 converted to MAF/SEFI, E4OD 12X3 1/2 rear brakes, traction loc 3:55 gear, 160 amp 3G alternator Wife's 2011 Flex Limited Daily Driver 2009 Flex Limited with factory tow package Project car 1986 Chrysler LeBaron convertible 2.2L Turbo II, modified A413 |
|
|
Here's how my weekend went:
Thursday eve - clean out garage, back the beast in (with MAYBE 2' to spare), pull the battery and block it up. Wanted to get an early start to let the oil make its way into the pan. Even as of Sunday late afternoon, there was still oil dripping out of the drain hole. Saturday - spent the day digging into it. Got the engine lifted, exhaust cut off. I was really dreadnig the exhaust, but it turned out to be the easiest part of the whole ordeal. Getting the pan bolts out were a booger - the engine mounts are in the way. Tried to remove the mounts, but the bolts just didn't want to budge. Even with a cheater bar, I was only able to back out one of the bolts maybe 1 revolution. By the end of the day, I had come to the conclusion that it wasn't going to happen without pulling the engine out. Sunday - putting it back into running shape. All ready to go except the exhaust flange bolt/studs and finishing the oil dipstick tube. I ended up cutting off the dipstick tube in preparation for dropping the oil pan since I couldn't get a wrench in the recess to remove the fitting. I have since bought a cheapy set of box end wrenches and cut open the 5/8" wrench to allow it to go over the tube. I've got a steel brake line that will be a perfect fit - I just need to duplicate the bends for a good fit. Bottom line, a weekend spent learning about the engine and it's attachment points, but nothing actually fixed.
THE BEAST - '85 F350 2WD (non dually) Crew Cab, 460 carbureted, C6 tranny
|
|
Administrator
|
Bummer! So, what's the plan?
Gary, AKA "Gary fellow": Profile
Dad's: '81 F150 Ranger XLT 4x4: Down for restomod: Full-roller "stroked 351M" w/Trick Flow heads & intake, EEC-V SEFI/E4OD/3.50 gears w/Kevlar clutches
|
|
|
Keep driving and leaking until I have proper resources (lift, stand, time).
THE BEAST - '85 F350 2WD (non dually) Crew Cab, 460 carbureted, C6 tranny
|
|
Administrator
|
Now you know why Darth's is still leaking. At least I know my mounts will come off (they have to to get the pan off). If I were to fix the leak, I would probably put my extra EFI pan and dipstick tube on.
Bill AKA "LOBO" Profile
"Getting old is inevitable, growing up is optional" Darth Vader 1986 F350 460 converted to MAF/SEFI, E4OD 12X3 1/2 rear brakes, traction loc 3:55 gear, 160 amp 3G alternator Wife's 2011 Flex Limited Daily Driver 2009 Flex Limited with factory tow package Project car 1986 Chrysler LeBaron convertible 2.2L Turbo II, modified A413 |
|
|
A few more tidbits that were learned along the way:
To make a new dipstick tube, I used 3/8 steel brake line. The tube OD, the flare and the nut are the same as the original dipstick. For bending, I initially used a 5" OD belt sheave. This worked great - it gripped the tube and kept it from spinning about the tubes axis and also kept the tube from flattening out as I bent it. Unfortunately, it was also too small of a radius and the dipstick would not meet that contour. I ended up bending the tube around an 8" grinding wheel. The radius better matched the original, but it's pretty tough pushing the dipstick thru it - I'm guessing from the flattening of the tube during bending, or the smaller tube ID. The original tube had 0.028" wall thickness, the new brake line 0.035".
THE BEAST - '85 F350 2WD (non dually) Crew Cab, 460 carbureted, C6 tranny
|
|
Administrator
|
Once I change engines, I can send you my original dipstick and tube. I already have the late oil pan and push-in tube installed on the engine.
Bill AKA "LOBO" Profile
"Getting old is inevitable, growing up is optional" Darth Vader 1986 F350 460 converted to MAF/SEFI, E4OD 12X3 1/2 rear brakes, traction loc 3:55 gear, 160 amp 3G alternator Wife's 2011 Flex Limited Daily Driver 2009 Flex Limited with factory tow package Project car 1986 Chrysler LeBaron convertible 2.2L Turbo II, modified A413 |
| Edit this page |