Search Forum
Making your own lines


|
I just want to share with others that it is possible and actually surprisingly easy to make your own lines and they can look amazing. I have made virtually all of the lines and hoses on my truck:
  All of those stainless lines were made by hand. Power steering, brakes, fuel, are all Aeroquip PTFE and use reusable steel fittings (or Aeromotive aluminum fittings). I went even further once I realized how easy it is to do and started making more SS lines. I found a company called Aeroflow out of Australia that makes some amazing stuff, including NPT fittings with swivel heads. I made the upper radiator hose, the heater hoses, the oil lines for the relocated filter, I even made the PCV plumbing to the air cleaner out of that stuff (see it sitting near the back of the engine?). Why would I do it? Well the reason I tried it to begin with is because it looks cooler than black rubber. But even past the aesthetic, it turned out to be really convenient. I could cut the hose to the exact length that I wanted and use the fitting with the best angle for the application. I will admit that it is an expensive route to go for things like your radiator or your heater, but for high pressure lines, I think it is actually cheaper than getting a line custom made at the shop (I found that out when I went to get one clutch line made and they wanted $170. I made that line and bought two AN adapters for about $75. The best part is that I can repair them myself if I need to. On multiple occasions I have had welders doing work on my truck and they have punctured a line. When that happens I cut a new length of hose and reattach the same fittings from the previous line with a new olive, so replacement hoses cost a fraction of what a new one costs because you can reuse a lot of your old hose. Some words of advice to make this painless: 1. There are different types of reusable fittings. Some use olives, some use compression and some use a push lock system. You cannot mix and match fittings and hose style so make sure you understand what you are using and what the correct components and applications are. 2. I have yet to find any connection that I can't convert to -# AN. Anything tricky like fuel connections can be converted to AN SAE/JIC standard so don't worry about that happening (seriously). 3. Push lock fittings are the easiest to make if you have the Kuhl Tool. If you don't have that tool, they are the hardest to make. 4. Aluminum fittings will get nicked when you build your lines. If you get anodized any color other than clear, it will likely show scratches. 5. Aluminum is softer than steel so use that to your advantage when picking adapters and fittings. For example, my prop valve is aluminum but brake fittings are steel, so I use an aluminum adapter in the prop valve because I'd rather strip the adapter than the prop valve. 6. Don't forget that welding on a bung/fitting is always an option and it's much easier before you install the part. I'm making all my A/C lines next so I'll post anything further that might apply there. If you have any questions about how I did any of this, feel free to ask. I'm guessing the first question will be "how did you connect stainless lines to the heater core".
LittleBeefy aka Chad
“Dot Doitall”: 1984 Bronco XLT 460 (C8VE), Edelbrock Pro-Flo 4, ZF5, NP205, D44HP solid axle, 4.56 urban assault vehicle "Bebe": 2022 Bronco Badlands 2dr 2.7l, Sasquatch, Iconic Silver, Black Marine-grade interior, hard-top "Celeste": 1979 Porsche 928 4.5l K-jet, 5-sp, S4/GTS brakes, LSD, Pasha interior |
|
Administrator
|
That's really nice, Chad.
 Perhaps you could do a step-by-step when you make the A/C hoses? Perhaps you could do a step-by-step when you make the A/C hoses?
Gary, AKA "Gary fellow": Profile
Dad's: '81 F150 Ranger XLT 4x4: Down for restomod: Full-roller "stroked 351M" w/Trick Flow heads & intake, EEC-V SEFI/E4OD/3.50 gears w/Kevlar clutches
|
|
|
That's a good idea, Gary. I've learned a few tricks that will shorten the learning curve for others when it comes time to turn the wrench. I'll shoot some photos when I build my A/C lines. Stay tuned.
One thing I probably should have said is that this isn't just for fancy stainless lines. For the budget minded there are plenty of less flashy options that will work just as well as a manufactured hose. I just happen to prefer the Aeroquip and Aeroflow SS lines but don't have enough experience beyond that to say what is good or bad. Also, one quick suggestion for anyone considering this is to try to stick to as few styles and size of hose as possible. Virtually all of my hose is -4an or -6an PTFE so I only have to keep extra lengths on hand of those two varieties. Also, when I made my lines I could buy those two sizes in bulk for cheaper instead of smaller amounts of more sizes and all the extra waste.
LittleBeefy aka Chad
“Dot Doitall”: 1984 Bronco XLT 460 (C8VE), Edelbrock Pro-Flo 4, ZF5, NP205, D44HP solid axle, 4.56 urban assault vehicle "Bebe": 2022 Bronco Badlands 2dr 2.7l, Sasquatch, Iconic Silver, Black Marine-grade interior, hard-top "Celeste": 1979 Porsche 928 4.5l K-jet, 5-sp, S4/GTS brakes, LSD, Pasha interior |
|
|
Good job! That looks really nice.
Thanks for posting this.
Dane
1986 F250HD SC XLT Lariat 4x4 460 C6-Sold 1992 Bronco XLT 4x4 351W E4OD 1998 GMC Sierra SLE K1500 350 4L60E Arizona |
|
|
In reply to this post by Littlebeefy
1) Push lock is great but I still use hose clamps on them cause I have had old push lock hose blow off a pushlock fitting before with just 60 psi fuel pressure.
2) Just about anything can be converted to AN. The Cold Case radiator I will be running uses 1/4 NPT fittings for the transmission cooler lines. Fitting wise I could get 1/4 NPT to AN but I dont believe I would want to try and cut and try to flare stainless transmission cooler lines that are pre made for our trucks from Inline Tube into an AN flare. So I wont be using AN fitting there, but they have compression fittings to convert hardlines if you dont have the equipment to do an AN flare, price is about the same when you figure in a AN tube nut and AN tube nut sleeve to a simple AN to hardline compression fitting, its just one looks better than the other in the end. 3) The tool does make it easier but if you put the fitting in a vice and take a heat gun and warm the push lock hose up, maybe a spritz of zep/wd40 on the barb and you can push them on by hand fairly well with a twist. Personally I am trying to find -6 AN male to a Earls Vapor Guard 3/8" barb so I can run Vapor Guard hose with its vapor barrier. Just doesnt exist which makes it hard for me to make up the connection between my frame and engine hardlines that I flared. 4) They have aluminum wrenches to avoid nicks but even them can still cause nicks. Its why I opted for stainless steel AN tube nuts and sleeves for my setup the only thing I have always been wary of is using aluminum AN fittings with steel lines/tube nuts 5) When using AN you dont have to crank down on the fitting like you would with a double flare fitting. I dont think I have ever seen a AN fitting leak just finger tight with a little more via a wrench. 6) I personally would weld/silver solder fittings on vs using compression fittings, thats just me.
"Old Blue" - '56 Fairlane Town Sedan - 292-4V, Ford-O-Matic transmission, 3.22:1
'63 Belair 2dr sdn - 283-4V, Powerglide transmission, 4.56:1 '78 Cougar XR7 - 351-2V, FMX transmission, 2.75:1 9inch "Bruno" - '82 F150 Flareside - 302-2V, C6 transmission, 2.75:1 9inch, 31x10.50-15 BFG KO2 |
|
|
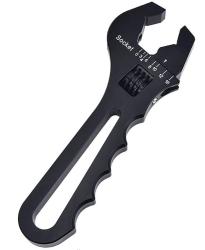
Rusty is right about the aluminum wrenches. Even so, they may still nick your aluminum fittings on occasion because of the force required to make the fittings. I suggest getting a full set of aluminum wrenches (3-12 AN at least) as well as an adjustable one from Amazon. Note that you may need two wrenches to assemble or install many fittings, so one full set and one adjustable wrench fills that need:
  Other tools that you nay need: You may need aluminum vice jaws specifically for fittings:  You may need assembly lube to ensure that your fittings assemble and install smoothly:  You should use a hose cutting tool regardless of the hose type. Some people use cut-off wheels (especially with stainless) but that seems foolish to me since it virtually ensures that you will send debris into your new lines. These wear out fairly quickly unfortunately:  Lastly, if you want to use push-lock hose, you really should get this Koul Tool. I know people say they have tricks that make it easy without the tool, but my buddy has the scars on his hands and walls that prove different. Before you decide to make a bunch of push-lock, try making one by hand and see if you really want to go that way without the tool. If you have this tool, attaching fittings is easier than making toast:  Also, to Pete's point about attaching hard lines to soft lines, they make adapters that are female flare to male AN that I am using and I don't have any leaks from them. I have a couple spots on my brake system where I am attaching hardlines on the frame to stainless hose the I made.
LittleBeefy aka Chad
“Dot Doitall”: 1984 Bronco XLT 460 (C8VE), Edelbrock Pro-Flo 4, ZF5, NP205, D44HP solid axle, 4.56 urban assault vehicle "Bebe": 2022 Bronco Badlands 2dr 2.7l, Sasquatch, Iconic Silver, Black Marine-grade interior, hard-top "Celeste": 1979 Porsche 928 4.5l K-jet, 5-sp, S4/GTS brakes, LSD, Pasha interior |
|
|
We use cut off wheels at work even on the nylon braided lines. Wrap the end in electrical tape, mark where you want to make the cut get the cut off wheel to speed and quickly zip through it. Once done use carb/brake clean to flush the hose out before assembly.
On the tool for push lock, if you are making hundreds/thousands of lines up at a time then by all means get the tool. We rarely use push lock that much as most of what we use is just regular barb fittings with clamps since we put clamps even on push lock hose as added safety.
"Old Blue" - '56 Fairlane Town Sedan - 292-4V, Ford-O-Matic transmission, 3.22:1
'63 Belair 2dr sdn - 283-4V, Powerglide transmission, 4.56:1 '78 Cougar XR7 - 351-2V, FMX transmission, 2.75:1 9inch "Bruno" - '82 F150 Flareside - 302-2V, C6 transmission, 2.75:1 9inch, 31x10.50-15 BFG KO2 |
|
|
In reply to this post by Littlebeefy
I had to replace a line, so I took some pics and will give a short explanation. This is honestly so easy. If you do it 3 times you will have it completely mastered:
There are 4 components: the hose, the female portion of the fitting which slides over the end of the hose before anything else is done, the ferrule (or olive) that goes around the end of the tubing, and the male portion of the fitting that has the designated fitting end. The fitting I'm making is a 1/4" NPT on -4AN SS hose and I am using Aeroquip steel fittings. If these were aluminum fittings, the ferrule would be aluminum instead of brass, but everything else is basically identical. Start with a hose cut to length. spread the stainless steel sleeve out and away from the inner tubing. I like to use the female portion of the fitting to do this bu simply sliding it on repeatedly with a twisting motion. As I work it on again and again at slightly different angles, I can get the wires to point outward. If you do this with your fingers you will get stabbed with the needle ends of the wires and it is extremely painful so I suggest you try this trick or find a trick that works for you. This is what it should look like when you have successfully completed this step:  Once the hose end is prepped, insert the olive (tapered end first) so the tube is entirely inside the olive and the stainless is all outside of the wire. You may need to tap the end of the ferrule with a hammer to force it on all the way. There is a lip just on the inside edge of the ferrule that will catch the tube when it is far enough in. Here is what it should look like:  Once you have the female portion and ferrule installed, you will want to place the fitting in a vice with the fittings clamp on it: 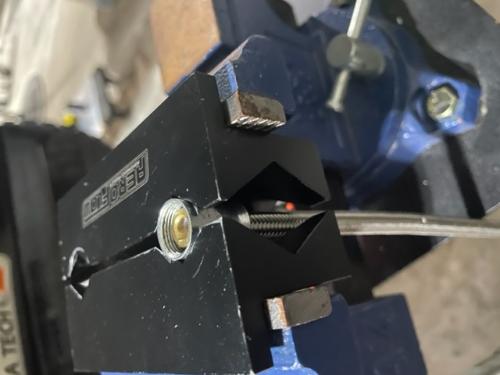 At this point, you want to make sure that the tubing inside the ferrule is all the flush with the ferrule. If you can look in the top of the ferrule and see the top edge of the hose pointing inward, it is going to block the fitting when you try to assemble. I like to take a small tapered but blunt tool and insert it into the ferrule and rotate it to press the opening of the tube further open and flush against the ferrule. Once that's done, apply sume assembly lubricant to the male portion of the threads and the metal tube that is getting inserted in your hose:  You are going to press that metal tube into the top of the ferrule and press it down until the male and female threads meet (that's why you need to make sure to get the tubing flush with the ferrule or it will be in the way):   Before tightening it on give the male portions some twist counter-clockwise until you feel it pass it thread starting point. Once it is seated correctly, then start turning it clockwise. Tichten it firmly, but you can strip them so don't overdo it. If you want it to look nice, try to get the flats to line up (unlike how I did it with this one:  
LittleBeefy aka Chad
“Dot Doitall”: 1984 Bronco XLT 460 (C8VE), Edelbrock Pro-Flo 4, ZF5, NP205, D44HP solid axle, 4.56 urban assault vehicle "Bebe": 2022 Bronco Badlands 2dr 2.7l, Sasquatch, Iconic Silver, Black Marine-grade interior, hard-top "Celeste": 1979 Porsche 928 4.5l K-jet, 5-sp, S4/GTS brakes, LSD, Pasha interior |
|
|
Good job! Thanks for sharing!
Dane
1986 F250HD SC XLT Lariat 4x4 460 C6-Sold 1992 Bronco XLT 4x4 351W E4OD 1998 GMC Sierra SLE K1500 350 4L60E Arizona |
|
Administrator
|
Yes! I like that! Thanks, Chad.
Gary, AKA "Gary fellow": Profile
Dad's: '81 F150 Ranger XLT 4x4: Down for restomod: Full-roller "stroked 351M" w/Trick Flow heads & intake, EEC-V SEFI/E4OD/3.50 gears w/Kevlar clutches
|
|
Administrator
|
That looks great! Glad you posted this.
Scott
'Camano' 1986 F250 Supercab XLT Lariat 460/C6 'Chanute' 1980 F350 C&C 400/NP 435 - Gin Pole But there ain't nothin' wrong with the radio |
|
|
In reply to this post by Littlebeefy
Why I am not a fan of the braided lines. Some of my issues with them are as follows. 1) If you have a 90* on both ends good luck in them lining up without kinking the hose as they dont make a swivel like they do for -AN due to pressure rating. 2) You cant crank them down like an -AN hose end and get the hex to square up, you always end up with a gap that is on the loose side to get the hex to line up. 3) for high pressure you can only get the stainless steel braided and I have yet to see one in anything but bright silver finish. They have a black braided but its nylon braid and the pressure rating of the hose is considerably lower than the stainless steel braided that makes it not very suitable for hydraulic system pressure lines.
"Old Blue" - '56 Fairlane Town Sedan - 292-4V, Ford-O-Matic transmission, 3.22:1
'63 Belair 2dr sdn - 283-4V, Powerglide transmission, 4.56:1 '78 Cougar XR7 - 351-2V, FMX transmission, 2.75:1 9inch "Bruno" - '82 F150 Flareside - 302-2V, C6 transmission, 2.75:1 9inch, 31x10.50-15 BFG KO2 |
|
|
You're completely right, but let me give a few more tips to address the downsides.
First, when it comes to lining up the flats, leaving the fitting a quarter crank too loose to get the flats lined up will not cause a leak and is not noticeable (it's like the width of a hair). I have done that on my Power Steering lines and they don't leak. It's just tricky and it takes practice to know when the fitting is "tight enough" to stop. Or just crank it down and get it tight because no one but you is looking at your flats anyway hahaha, Second, with the stainless hose being the only high pressure option, that is true, but... you can get a vinyl coated line in black (for example) from a couple of other manufacturers, like Fragola. I can't speak to them cuz I didn't use them. Third, and most importantly, the part about hose with angle adapters at both ends lining up is absolutely true. It is very hard to get them to line up at the right angle and the only thing I can suggest is the same as lining up the flats: know when it's tight enough to stop because that is where the angle of those fittings will permanently be at. However, it is not an issue as often as one might think. You can get around he problem by using swivel angle adapters on one end when you convert to AN (even if you don't have to adapt), but that's only a plus when you need the adapter anyway. On the benefits side, I will say that making my own hose has made it extremely easy to fix problems when they happen. Virtually all of my hose is one of two varieties and all of my fittings use one of 3 ferrules. So I keep five parts on hand and I can fix any line in my truck myself immediately in my garage. Now I'm going to make 2 x3' vacuum lines for my truck with AN fittings and throw a couple of flare adapters in the glove compartment; that way, in an emergency, I can use one of my vacuum lines to temporarily replace virtually any line in the truck. Sure, I have Hagerty Club to tow me if I have a problem, but I still think it's pretty cool that you could do something like that if you want to. I admit, though, it's not for everyone.
LittleBeefy aka Chad
“Dot Doitall”: 1984 Bronco XLT 460 (C8VE), Edelbrock Pro-Flo 4, ZF5, NP205, D44HP solid axle, 4.56 urban assault vehicle "Bebe": 2022 Bronco Badlands 2dr 2.7l, Sasquatch, Iconic Silver, Black Marine-grade interior, hard-top "Celeste": 1979 Porsche 928 4.5l K-jet, 5-sp, S4/GTS brakes, LSD, Pasha interior |
|
|
Dont get me wrong they are a great system and makes it very easy to make up your own lines custom for hydraulics. I have just seen so many leak under pressure that Ive tried leaving loose to get everything to line up and honestly in a business setting where time is money its not worth it for me to spend hours messing with something that only will get me paid a few hundred for the whole job. For my own personal vehicle if I used it then by all means I would take my time and try to do it right. Its probably the route I will end up going if I use hydroboost from a '88 F-superduty truck in place of my vacuum booster if my engine doesnt make enough vacuum. Its going to be a chore trying to get the 90s to line up properly cause I prefer using 90's on the hydroboost as it angles the line down towards the steering shaft and gives a nice drape over using straights. -AN is what I personally have been on a kick with. When I finished up that '77 C10 truck at work I flared the brake lines with my -AN flare die and I did not have to go back and mess with it there was no leaks even with full hydroboost pressure on the brake line. I am going to sleep a little easier at night on my engine build but at the same time I know my hardlines are not perfectly square so I am a little worried that the -AN flare might not seal up to 100 psi fuel pressure without leaking. I know that it should though. It also has me rethinking if I want to rent the GM male quick disconnect flare tool as I was going to flare the stainless steel hardline from Inline Tube to have it fit directly to the Corvette fuel filter/regulator assembly. But I forgot about not having a fuel pressure gauge port so I am leaning towards just AN flare on both ends of that hardline and use a male GM quick disconnect to -6 AN fitting and install a inline -6 take off fitting with pressure gauge port. I would have much rather have the pressure port up at the sniper on my setup to see what pressure is at the engine but the only place to place it where I can see it will be under the truck in front of the fuel tank as up front at the rubber flex line it would be hard to read. Plus I need to get to it as my plan is to get the RTX Retro cluster for our trucks from Dakota Digital and install a 0 - 100 psi fuel pressure sensor and attach it to a Dakota Digital interface so I can read fuel pressure live on the cluster as well as program in a warning light at 0 - 50 psi and 65 - 100 psi That is the beauty of having these tools is that all of this equipment makes it very easy for the DIY'er to make their own lines and systems.
"Old Blue" - '56 Fairlane Town Sedan - 292-4V, Ford-O-Matic transmission, 3.22:1
'63 Belair 2dr sdn - 283-4V, Powerglide transmission, 4.56:1 '78 Cougar XR7 - 351-2V, FMX transmission, 2.75:1 9inch "Bruno" - '82 F150 Flareside - 302-2V, C6 transmission, 2.75:1 9inch, 31x10.50-15 BFG KO2 |
Bullnose Enthusiasts Forum
|
1 view|%1 views
| Edit this page |