Search Forum
John's 86 F-150 4x4 Resto


Administrator
|
This post was updated on .
I'm starting this in order to put together a thread for people to see and hopefully learn through the eyes of a relative novice in automobile restoration. I am mechanically inclined and I was a welder/machinist in the military. Other than that, I have no formal background/education in automobile technology. I do however have a strong liking for it and a desire to learn, which can make all the difference. Much of what I have learned, in regards to my truck, was garnished from this website. For that, I'm very grateful to Gary and others whom have responded to all my questions since signing on here.
Due to the nature of this thread, I am locking the comments, however if you have questions or feel like I left something out, please feel free to email me and I will gladly fill in the blanks. My truck is an 86 F-150 XL 4x4 equipped with a 351 Windsor HO and C-6 trans. I bought this truck new from Red McCombs Ford in San Antonio Texas, 11/1986. Right now, as it sits, it has right at 100k miles on it. For the most part, I took pretty good care of it but time and the elements can take a toll on a vehicle and mine was no exception. Some Transformation Photos: 87-present 1987 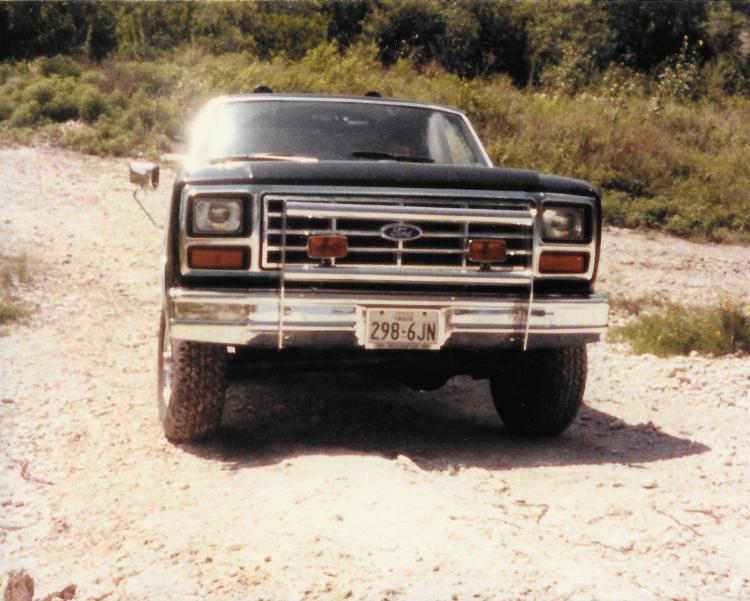 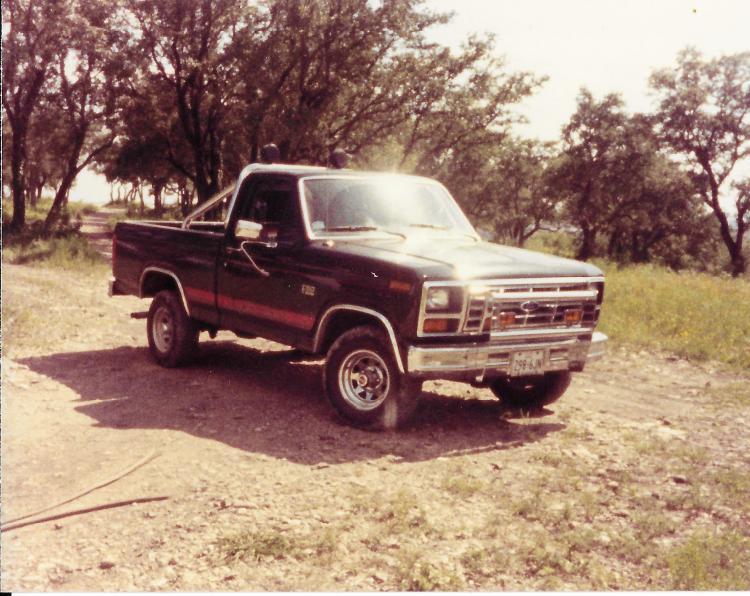 2008 - Repaint 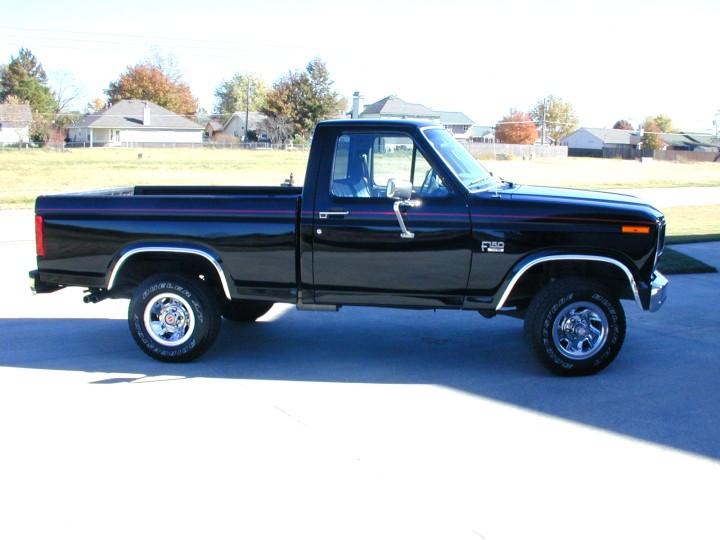 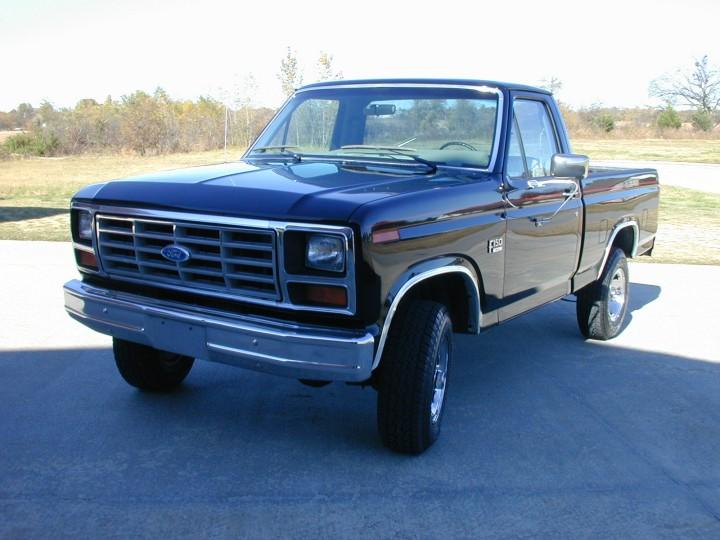 Present 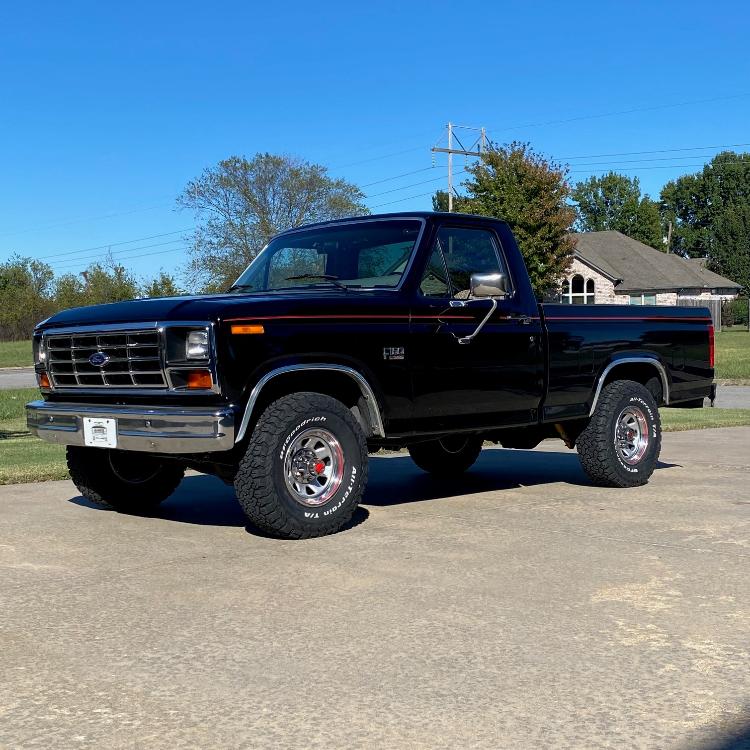 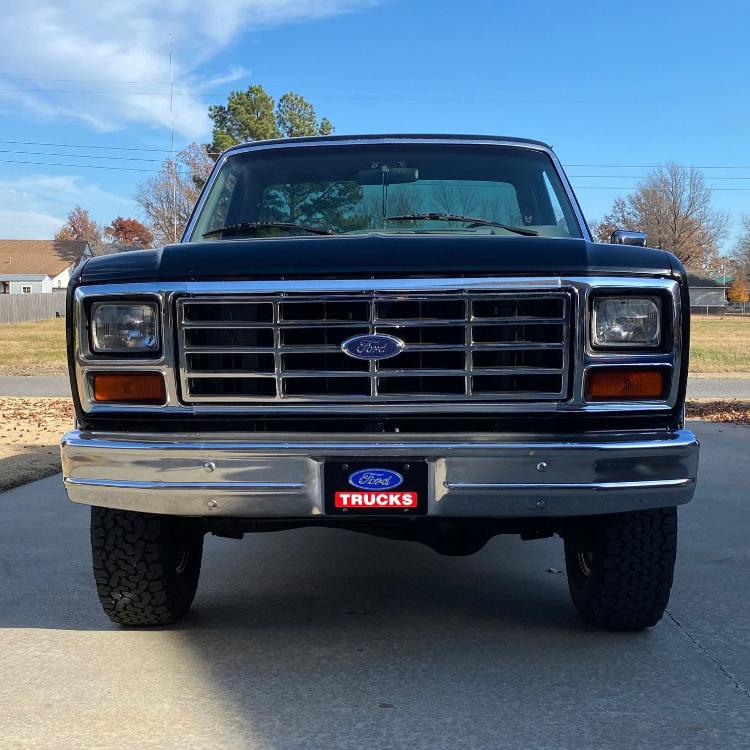
John
"Blackie" - 1986 F150 4x4 - Mildly warmed over 351W HO - Original owner |
|
Administrator
|
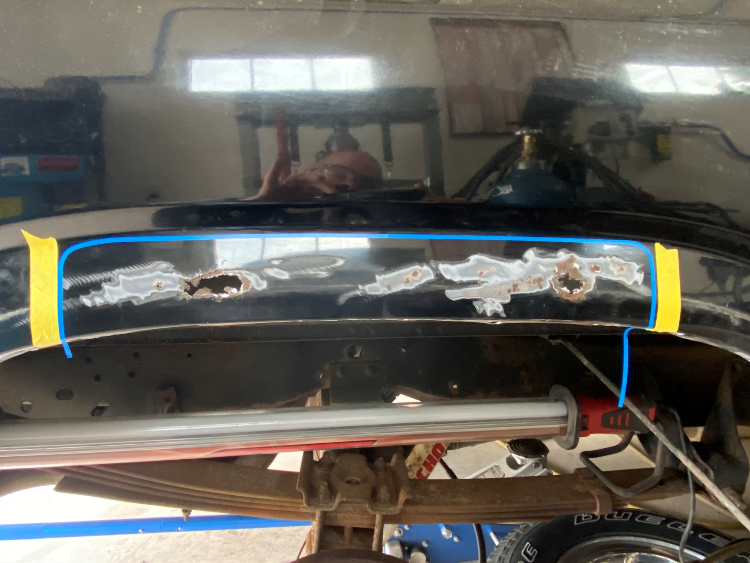
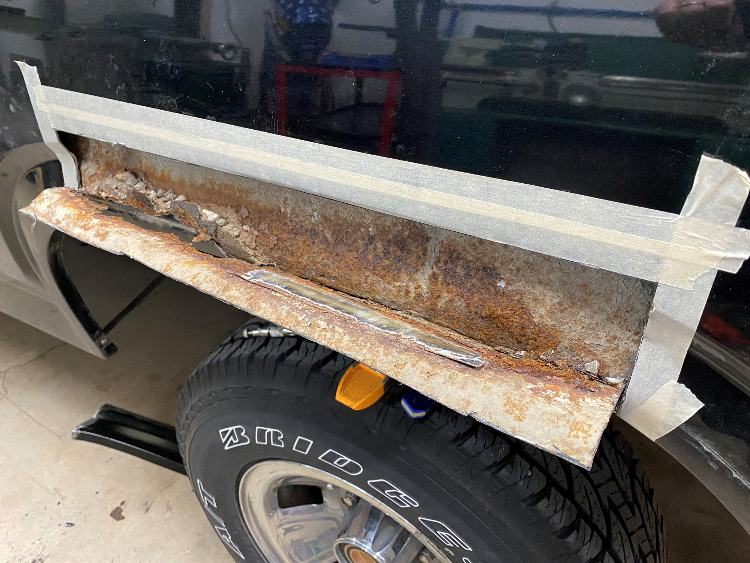
In March of 2020 I was going to sell the truck, as I had my eye on a new Dodge Ram Rebel. I signed on here in May to get some idea as to what my truck might be worth. Strange is that when I had made up my mind to sell, stuff seemed to pop up. If I wanted to sell at top dollar, I needed to fix those things. The important word there being “I”. One of the first things I noted was bubbling of the paint at the rear quarters. As I am the original owner of this truck and it being a southern state truck, I was very surprised to even see rust like this on my vehicle. It was bad too, a lot worse than I expected. As such, it amazes me when I see another Bullnose truck that is not rusted in those areas. Anyway, to fix it I had to purchase patch panels for both sides and also the inner fenders. I purchased all the sheet metal through NPD and I was very pleased with it. Here's what it looked like just before and after I cut the outer skin off.
John
"Blackie" - 1986 F150 4x4 - Mildly warmed over 351W HO - Original owner |
|
Administrator
|
This post was updated on .
In the pictures above shown previously, the two photos are not the same rear quarter. The one on the left is the passenger side, while the one on the right is the driver's side. Note the cut out pattern outlined by the tape in the two photos. One is correct and the other is not. I did the diver's side first (pic on right) and made some very bad choices in cutting it out. First bad choice was going too high above the body line. The second was not radiusing the corners. This caused me a lot of grief when I welded it back in, as I got some warpage and even some fuel canning. As hard as I tried, I could not dolly and hammer that warpage out and the more I tried the worse the fuel canning was. I was over my head in that. As such, I took it to someone who knew what he was doing and he utilized heat in the right places to straighten and remove the fuel canning. Below are photos of my work in fixing the passenger side which came out quite well.
I used weld through primer on all the spot welded areas and epoxy primed the inside of the outer quarter and the entire inner fender. When it was complete, I then sprayed a rust preventative agent in there. It will never rust in there again! This was my very first attempt in welding body panels. As stated earlier, I was a welder in the AF and those skills learned there were utilized here. But, this is MIG welding and with just a little practice anyone could do this. Big lesson learned here was to stay close to the body lines and radius the corners. 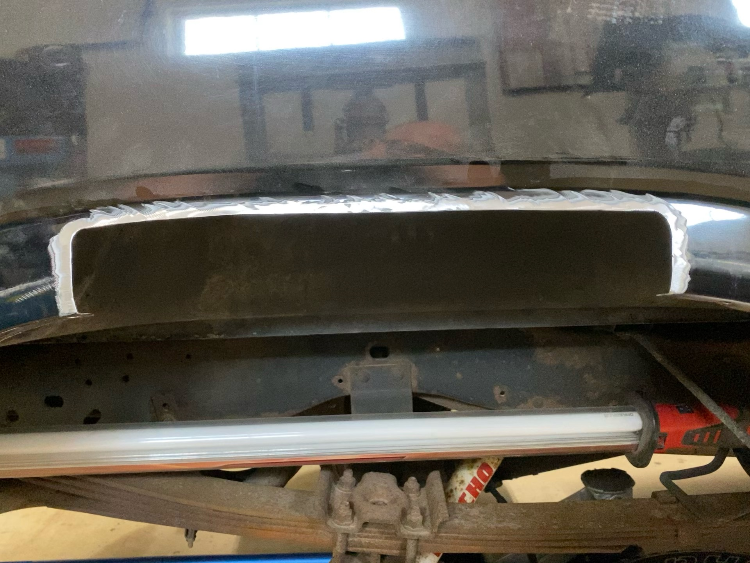 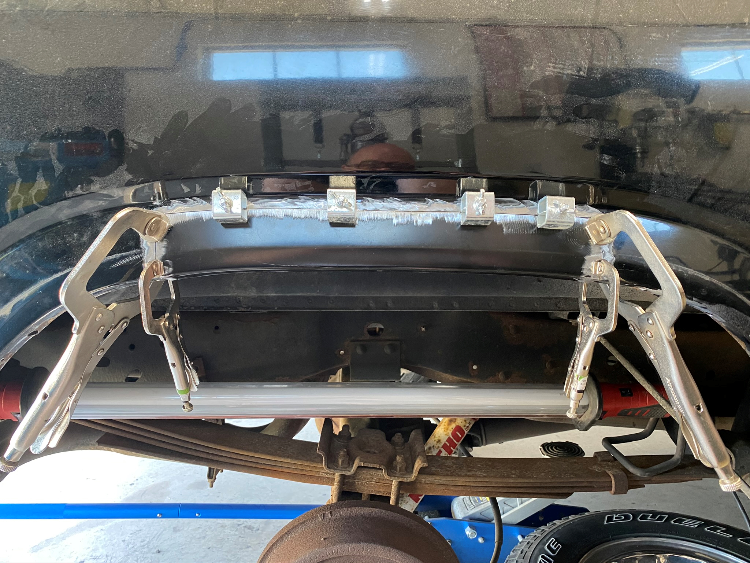 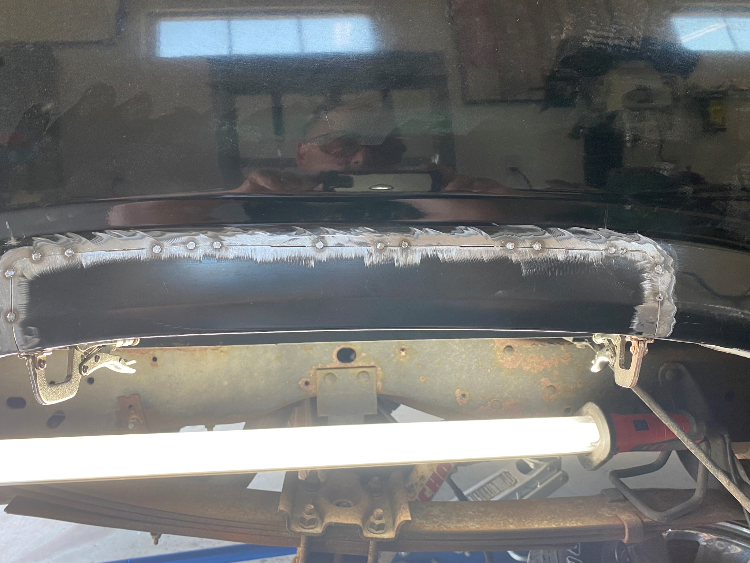 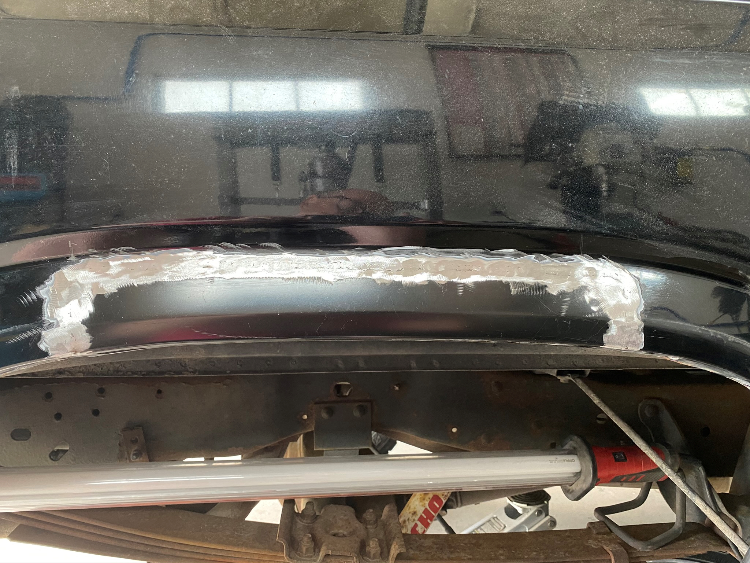
John
"Blackie" - 1986 F150 4x4 - Mildly warmed over 351W HO - Original owner |
|
Administrator
|
This post was updated on .
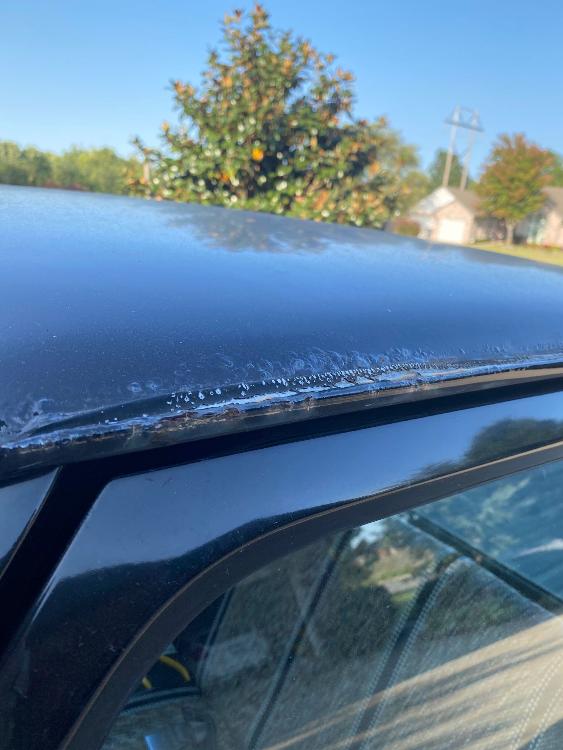
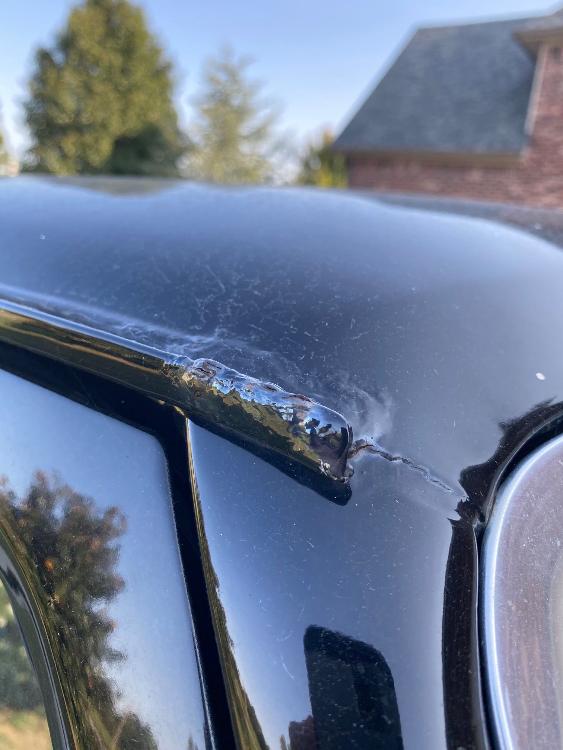
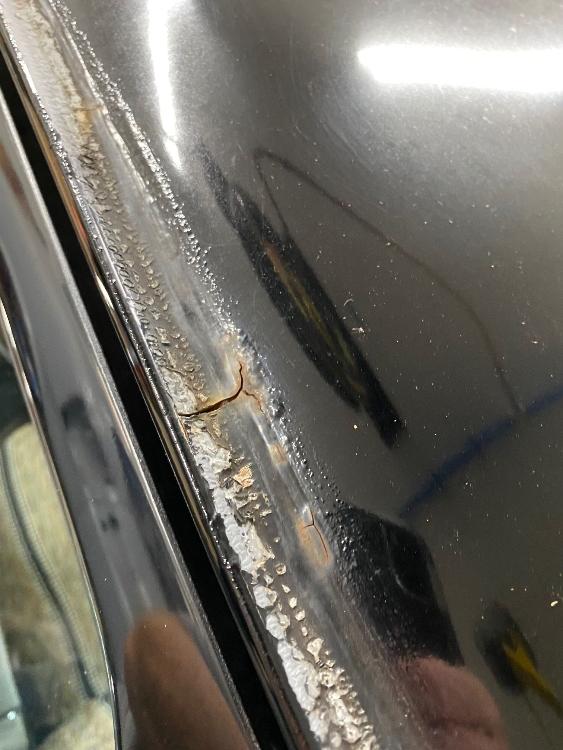
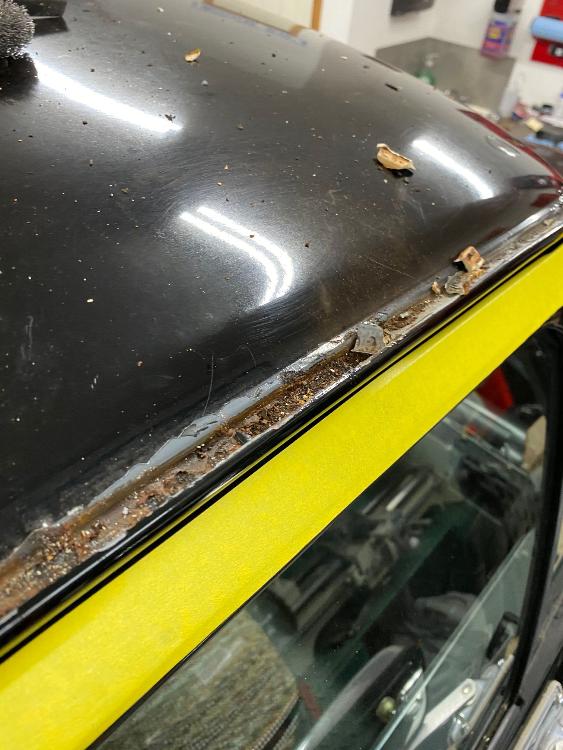
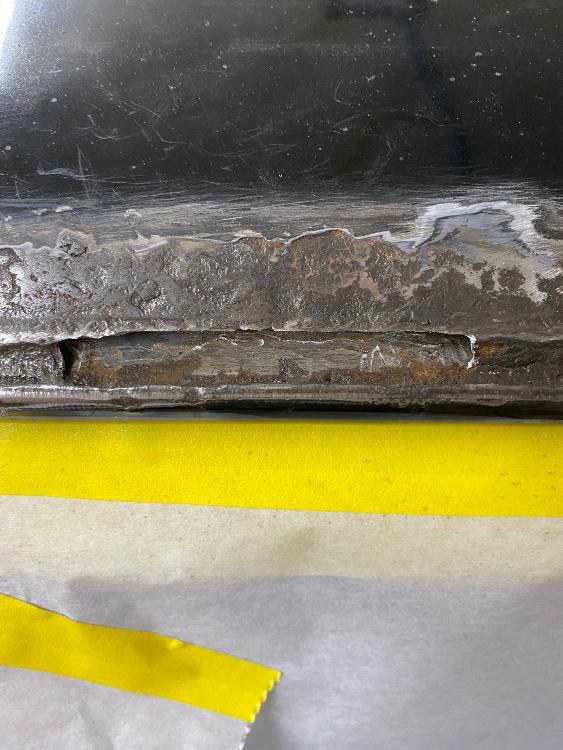
When I took the truck to the autobody guy to fix the warped driver's side panel, I asked him how much it would cost to paint the sides of my truck where the repairs were done. This is a blend and something I considered doing myself. But, I had no experience in auto painting and the surrounding paint on that bed was quite good and I didn't want to screw it up. Autobody work is expensive and honestly, I was taken back by how much it cost. I'm glad I was able to take care of the patch panel work, sheez that was the biggest part of the job. Anyway, I went ahead and had him do the work and I paid him for it. When I picked it up, I was pleased with what I saw. At that visit, the painter pointed out to me that I had some rust developing in the roof rails. What the hey!!! I had not noted that before and it was very disturbing to me. This is another problem area for our trucks. Cost for that repair, way more than I wanted to pay.
So now, it's time to learn to paint. Lot's of googling, YouTube, and some help off a forum that sells product. In fact, I used their epoxy primer on several things and it is awesome. SPI folks, google it. So my tailgate needed painting and I thought it would be the perfect place to learn on. It was not! That coffin style gate with all its curves requires some good wrist action with the gun. Took the gate to a local media blaster and he blasted it with plastic media. I brought it home, cleaned it and sanded it with 80 grit for application of two coats of SPI epoxy, followed by several coats of high build sandable primer, basecoat and then clear coat. After doing all that, I realized why painters charge so much! Lots of work to do it right. Lots more when you've never done it before. 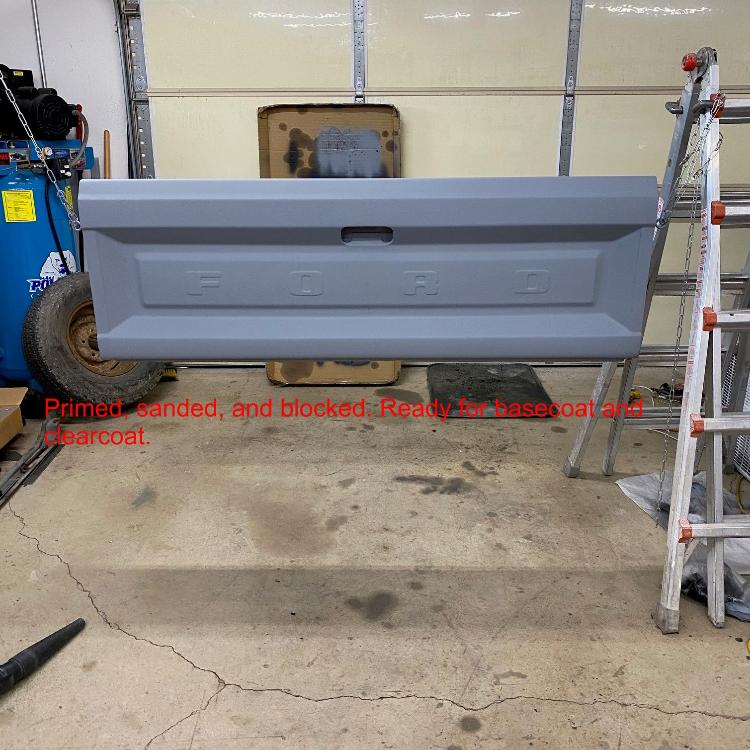 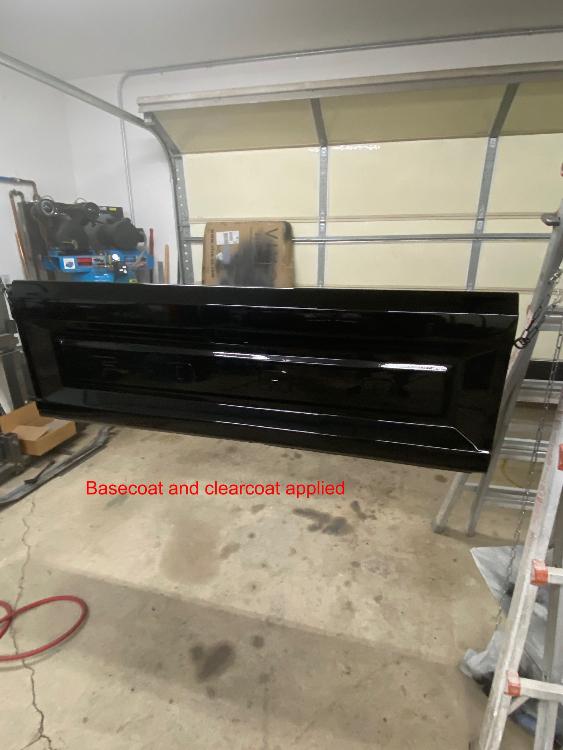 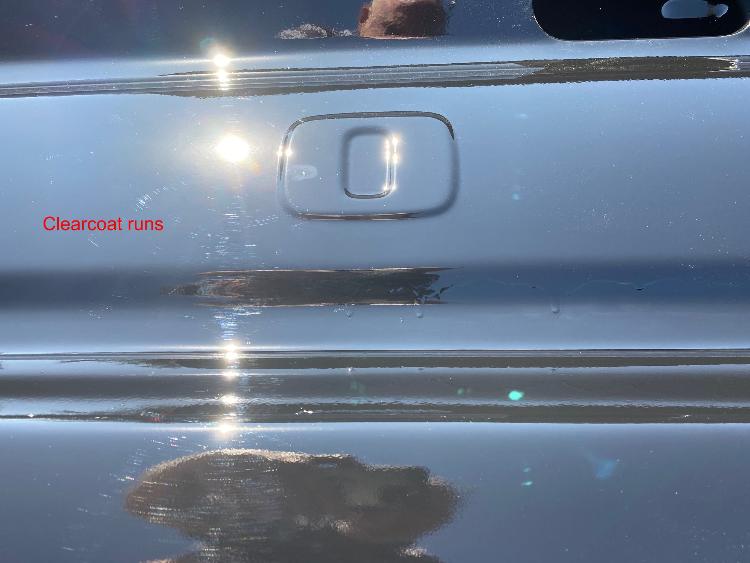 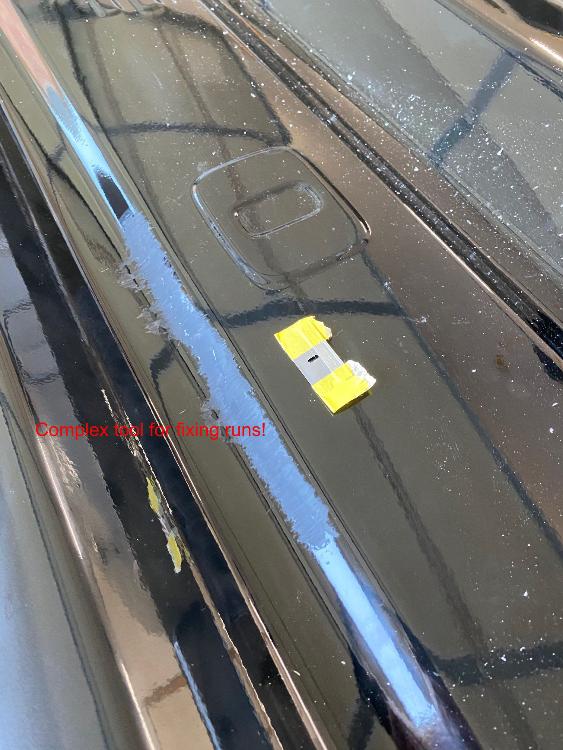 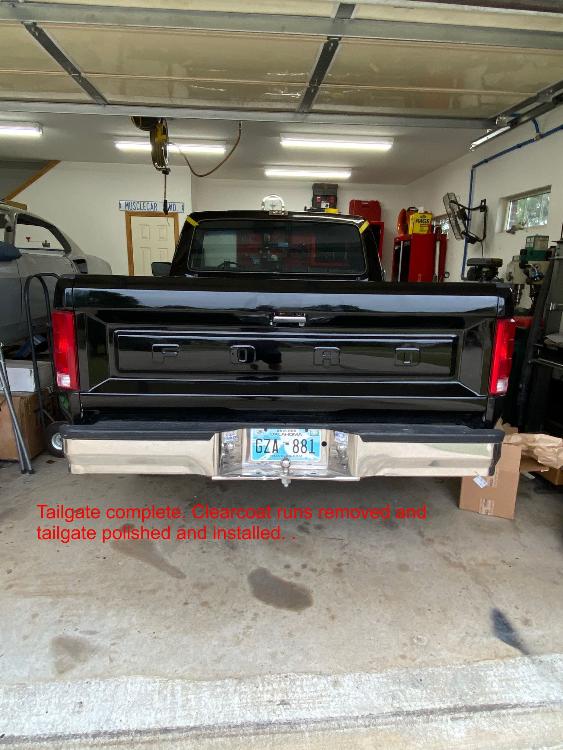
John
"Blackie" - 1986 F150 4x4 - Mildly warmed over 351W HO - Original owner |
|
Administrator
|
This post was updated on .
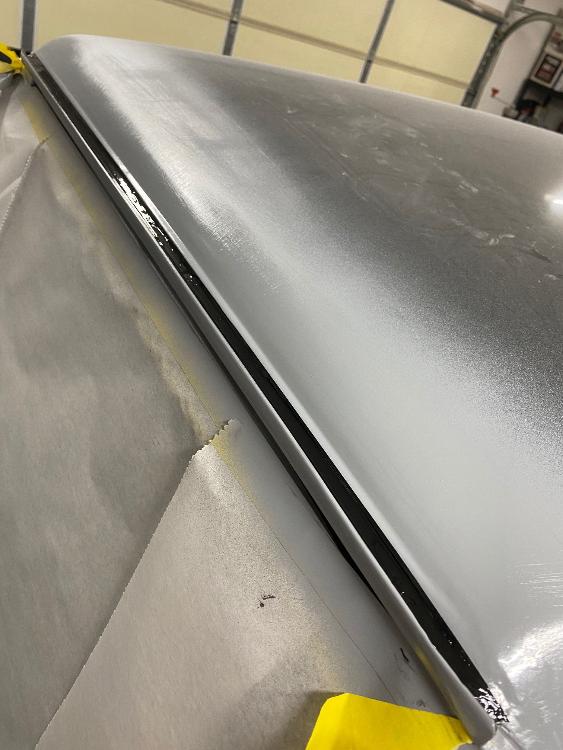
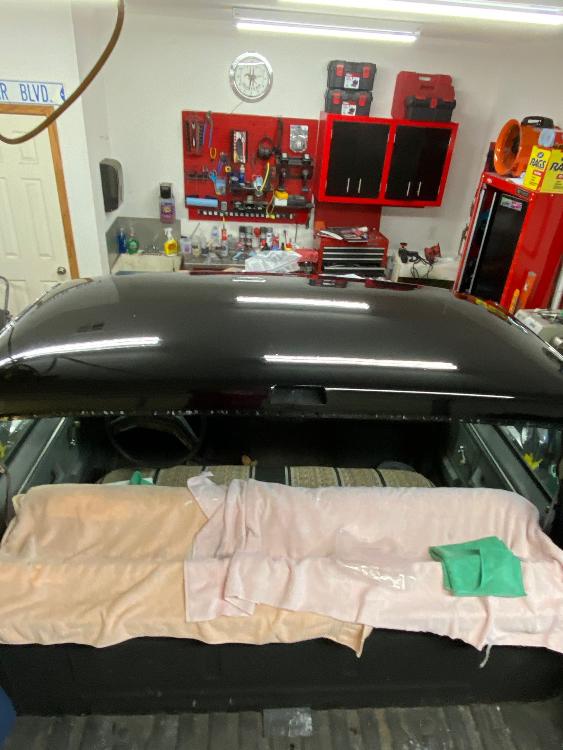
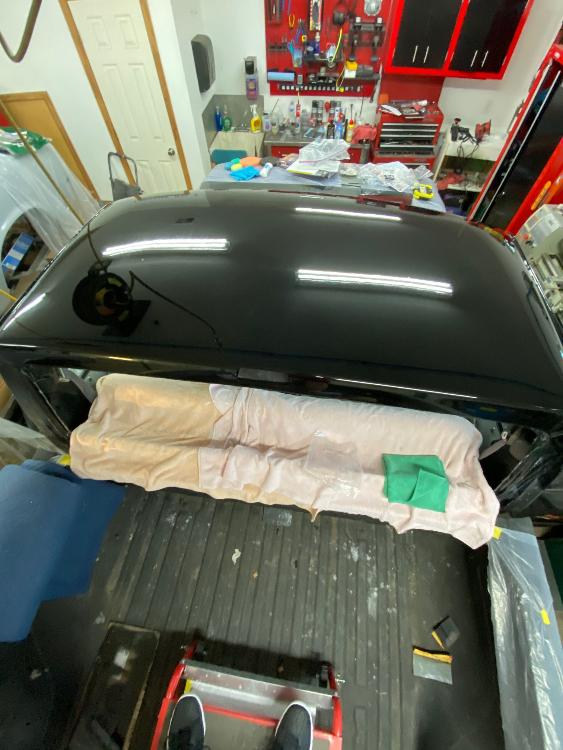
I was very pleased in how the tailgate game out. With that behind me, I felt confident in fixing the rusted out drip rail channels and painting the roof. The drip rail channels rust out due to moisture entering into cracks that develop in the sealant Ford used all those years ago. If you see cracks in your sealant, advise you seal over, or cut out and reseal. I dug out all the old sealant, cut out the rusted metal and welded in patches. Following that, I epoxy primed the bare sanded metal and then filled in the drip rails with a self leveling seam sealer. I primed over the epoxy with a sandable primer, block sanded with 400 grit and then followed up by spraying a sealer over that. The rest of the roof was scuffed with 400 grit paper which made it ready for basecoat/clearcoat application. I did pull the back window glass prior to all this and cleaned up the window channel.
John
"Blackie" - 1986 F150 4x4 - Mildly warmed over 351W HO - Original owner |
|
Administrator
|
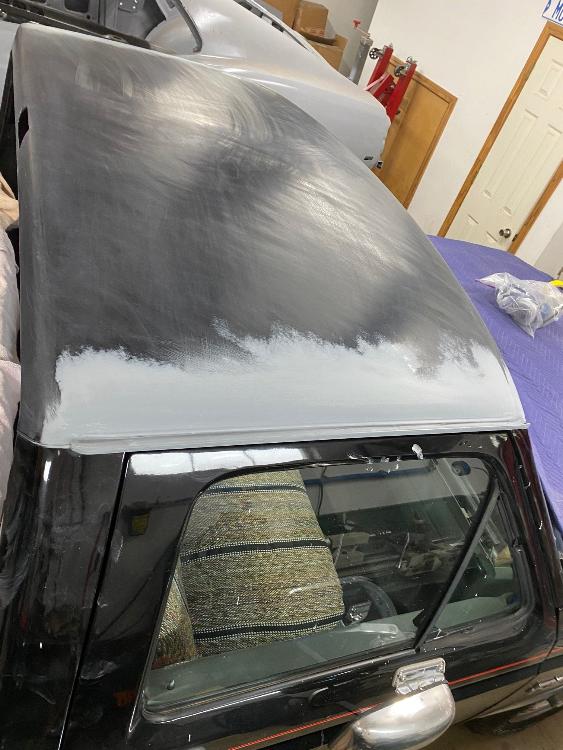
With the roof prepped and ready for paint, I loaded my spray gun with the required mixed paint. Funny thing...when I went to the paint store and had it mixed, I assumed it was straight up black. As I watched him pour a myriad of different colors into the container, I asked him if he was mixing my paint. I would never have imagined yellow and red going into the mix.
  These were taken after it was sprayed. There is some trash in the paint, which will always happen, even in a booth. However, in my case I did a stupid, making things worse by loading my gun up with clear, getting in the bed of the truck to spay and realizing I should wipe down before spraying. Too lazy to disconnect my gun and get back out of the truck to get a cloth to wipe down, I just shot the clear. Three coats flowed nicely and with the exception of the trash it came out pretty good. Not pictured is the roof after it was cut and buffed. Came out looking good but could have been better had I taken the time to wipe down. Much learned here!
John
"Blackie" - 1986 F150 4x4 - Mildly warmed over 351W HO - Original owner |
|
Administrator
|
This post was updated on .
I removed and installed my back glass referencing the starter video shown above. The gentleman does a fantastic job explaining the process. My rear glass, however, differs from the glass in the video in that it has the chrome molding. I purchased my rear window weatherstrip for my 86 F150 through NPD and it can be seen here: https://www.npdlink.com/product/weatherstrip-rear-window/133323?oh=vBb2xCMKOis3kw54JNqYNDWmUgzgXOkJqHr&ohk=PRZSKW3tzCIZHoTbACx9Z6o9W3U The product is put out by a company called Precision Replacement Parts and their website can be found here: https://www.prp.com/ Lots of information at the prp website and videos for installation of weatherstrip and glass. I also emailed them and they were prompt to respond. At $38 their weatherstrip is a bargain. When I pulled it out of the packaging, I had some concerns, as it did not appear to follow the contour of my glass. I knew what was front and back but not top and bottom/left or right. There is a vulcanized seam that is obvious upon inspection. That seam goes on the bottom and centered. See photos: 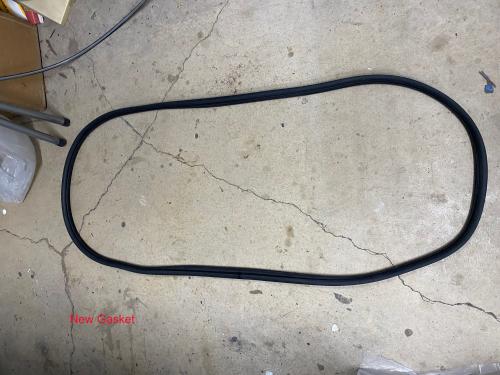 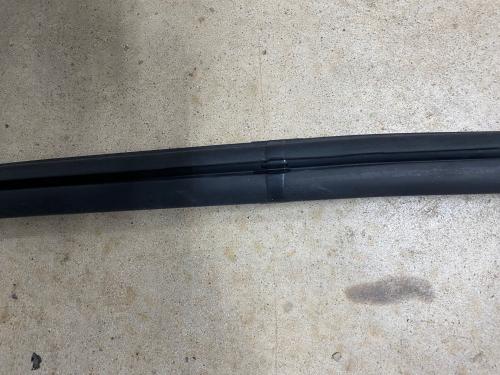 With the seam centered below the "Carlite" logo (bottom center of glass) and liberal use of soapy water, I pulled the weatherstrip around my glass. That took a little coaxing and some muscle from my son, pretty much a two man job. I then inserted some 3/8" cord in the appropriate channel and taped the rope up onto the glass. 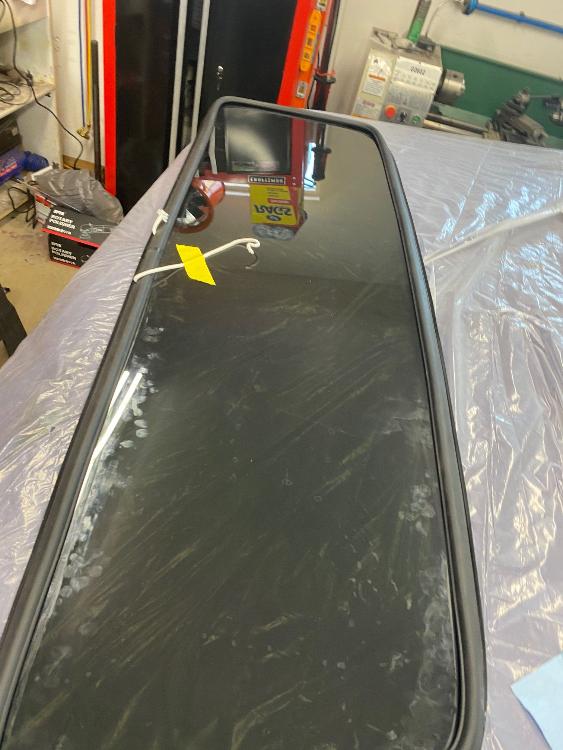 Window was then installed into truck as shown in the introductory video. The installed result was concerning to me, as all four corners were curling up and away from the cab. 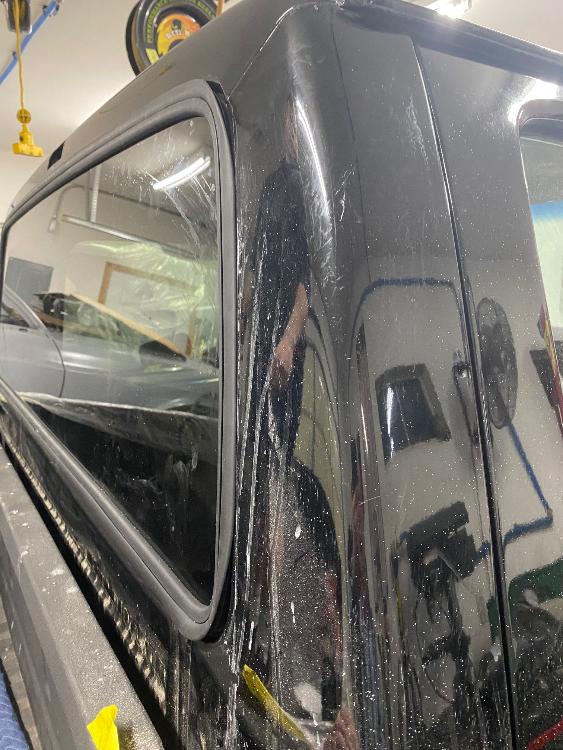 But, I had yet to install the chrome molding. Molding was also purchased through NPD. It is a Dennis Carpenter Product, thus two times more than what it should cost. Molding can be seen here:https://www.npdlink.com/product/molding-kit-window-chrome-incl-connectors/167958?oh=vBb2xCMKOis3kw54JNqYNDWmUgzgXOkJqHr&ohk=PRZSKW3tzCIZHoTbACx9Z6o9W3U Insertion of the molding pushes the gasket flush and tightly against the cab. All four corners closed up when I inserted the molding. Insertion of the molding requires a special tool and I used Lisle 47000. Use of that tool can be found on Youtube. Tools I used are pictured below along with the final installed picture. 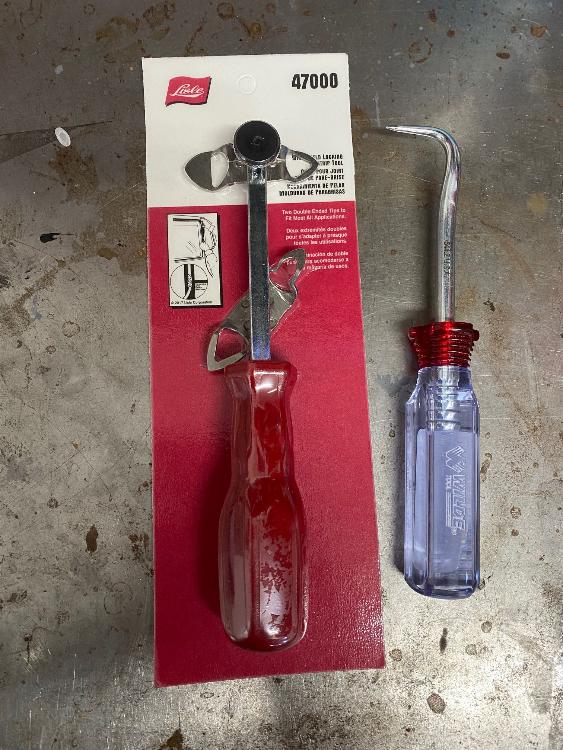  I'm not 100 percent happy with the chrome strip, as I marred it in a few places with the insertion tool during the insertion process. I'll be replacing it at a later date. Complicating matters was the fact that it was 45 degrees in my shop while installing it. Also, and this is where I really messed up, the Lisle tool comes with four different heads; I initially choose the wrong head. I had three failures before I figured out I was using the wrong head and I can tell you it was not intuitive. When you begin installation, you must ensure that the trim fully seats, as there is no going back, the whole thing needs to be pulled. Vaseline and soapy water facilitated the installation of the chrome strip. *Note* One of our members, Dave (aka Fuzzface), recommended putting the seal on the window, install the chrome insert, and then install the whole assembly with good cotton rope and soapy water. Might be some good advice.
John
"Blackie" - 1986 F150 4x4 - Mildly warmed over 351W HO - Original owner |
|
Administrator
|
I more or less finished up the exterior by applying some very nice letter graphics to the tailgate. These from Graphic Express, whom make some very nice high quality lettering on 3M paper. Their application instructions are very good and the process went without issues.
The original lettering was white and I struggle a little in changing some of the originality of the truck. I contemplated going back to white, then considered red, but ultimately went with black reflective letters. I’m glad I did too! Really like the reflective glow at night and the more subdued look during the day. Website: https://graphic-express.com/ 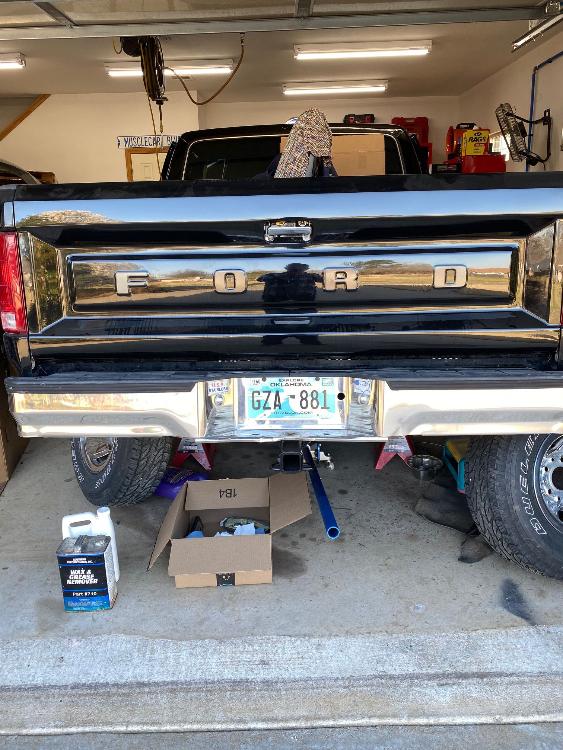 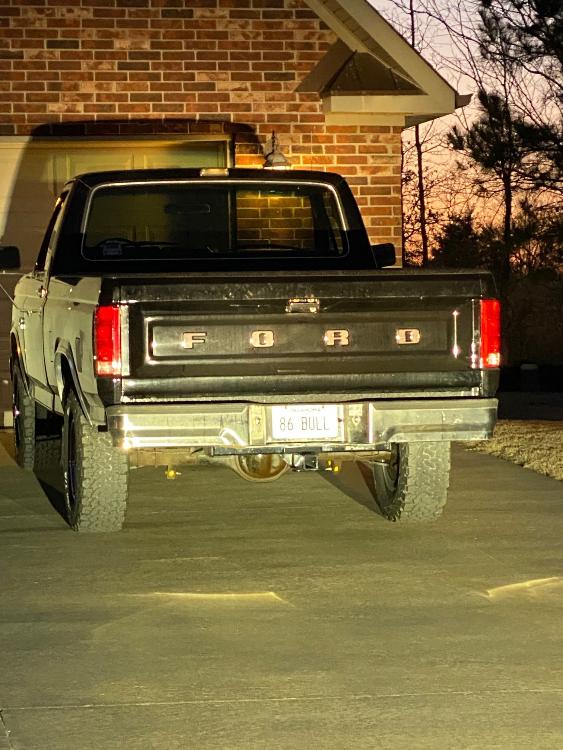
John
"Blackie" - 1986 F150 4x4 - Mildly warmed over 351W HO - Original owner |
|
Administrator
|
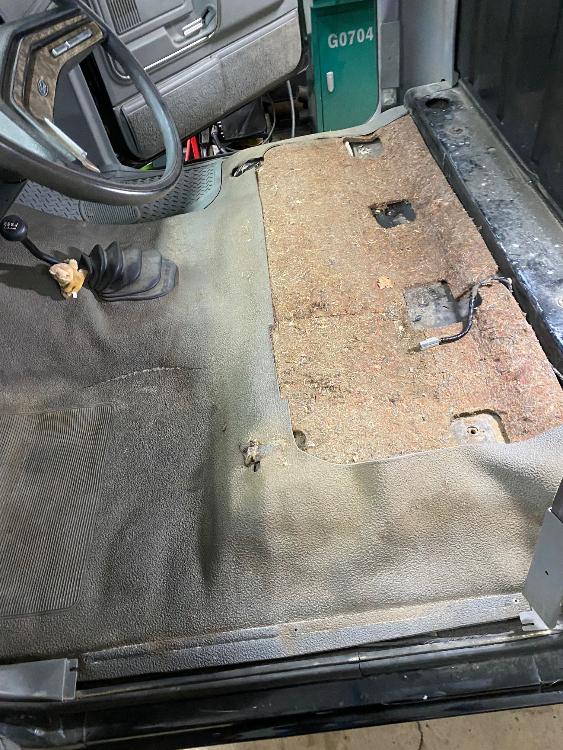
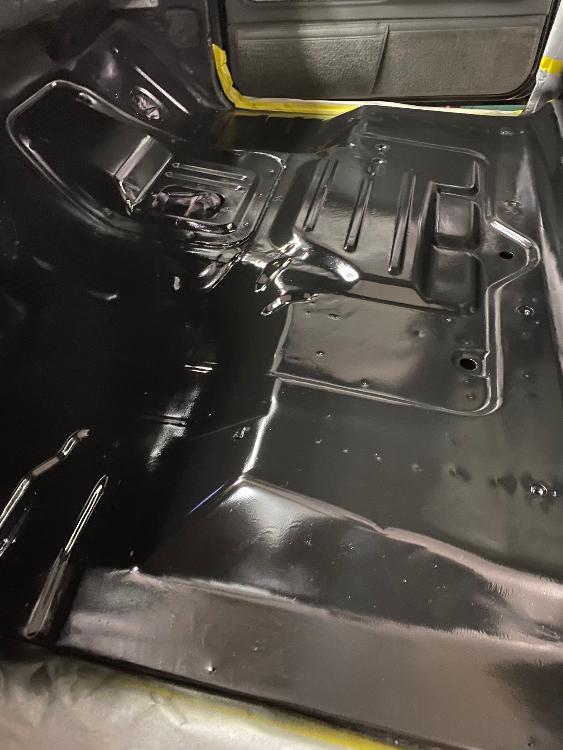
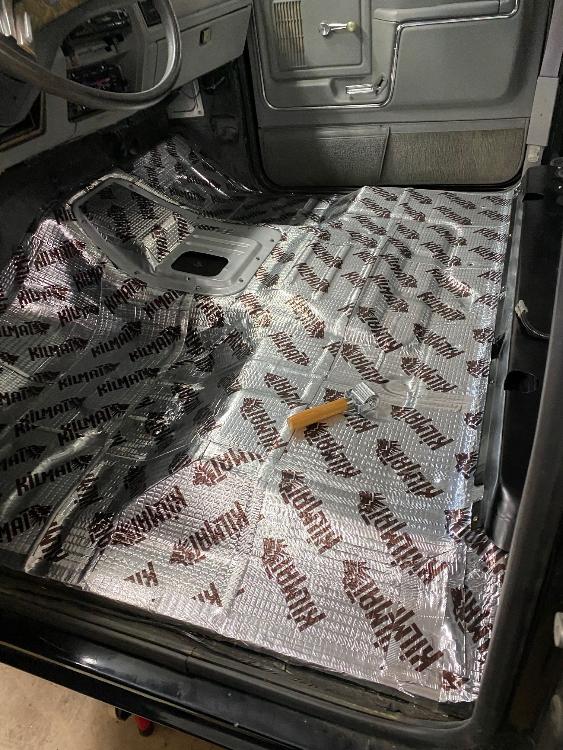
One of the biggest and most notable improvements I made to this truck was insulating the cab and doors with Kilmat sound deadener. The stuff is great, just like Dynamat but a whole lot cheaper. I could not believe the difference in the cab sound and the solid sensation you feel when the doors are closed. I pulled up the old, cracked rubber matting, sanded the metal floor, and applied two coats of epoxy primer. I then applied the Kilmat to the floor, back of the cab, roof, and doors. For the inside of the doors, I only cut a 6" x door worth piece and put it at the top of the door. I also applied some POR 15 to the bottom of the doors, hopefully eliminating any future rust issues.
John
"Blackie" - 1986 F150 4x4 - Mildly warmed over 351W HO - Original owner |
|
Administrator
|
Further enhancing the sound deadening affect and the aesthetics of my truck was going with carpet over the rubber mat. For this, I ordered ACC Mass Backed Carpeting. This is great product that required virtually no cutting and fit like a glove, laying right into place. Very, very, pleased with it! For seat belt bolts that come up above the level of the carpet and the hole for the dimmer switch, I used an old socket that I heated with a propane torch and melted through the carpet to form a perfect hole.
A couple things: If your truck came with the rubber matting as mine did, you will need to acquire the little step-up panel that you find in the carpeted trucks. It is about 6-8" wide, couple inches high and runs along the width at the back of the cab. It's held in with sheet metal screws. One of our members alerted me to this. Sadly, I don't have a good picture of that panel but you will want it to properly fit up your carpet. The other thing, take caution when ordering colors of carpet. Acquire samples and purchase from a reputable seller. I had my wife order gray carpet for me from RockAuto for Christmas. Much time went by before I opened it and RockAuto has strict guidelines on returns. Upon inspection, it had a green hue to it and looked like garbage in my truck. It's not easy to communicate with anyone from RockAuto but between ACC and RockAuto, I was finally able to return the carpet and I acquired black. This not to say that RockAuto is not reputable, best one knows their return policy. 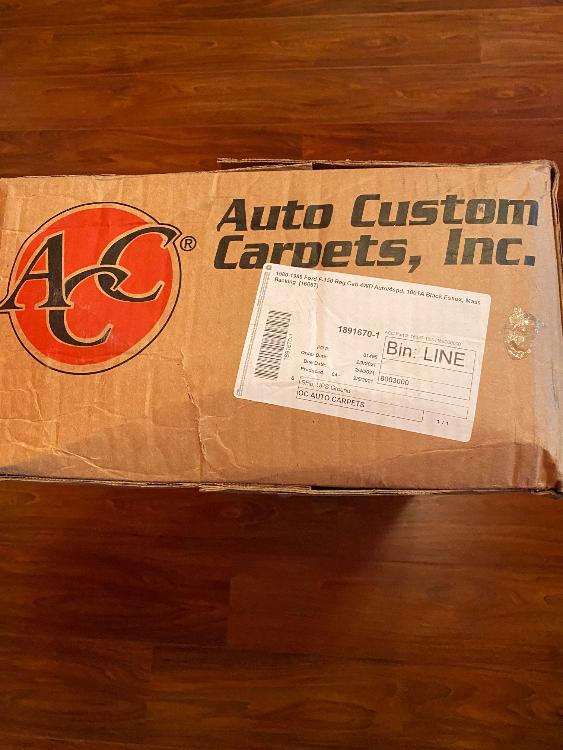 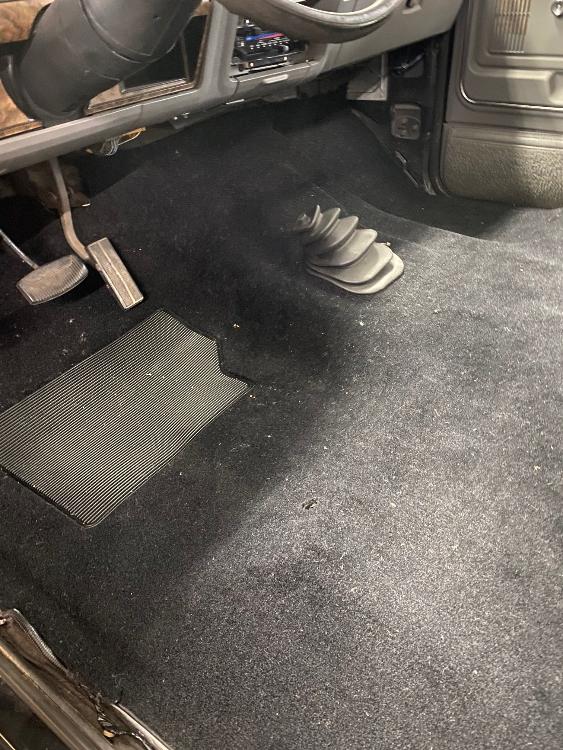
John
"Blackie" - 1986 F150 4x4 - Mildly warmed over 351W HO - Original owner |
|
Administrator
|
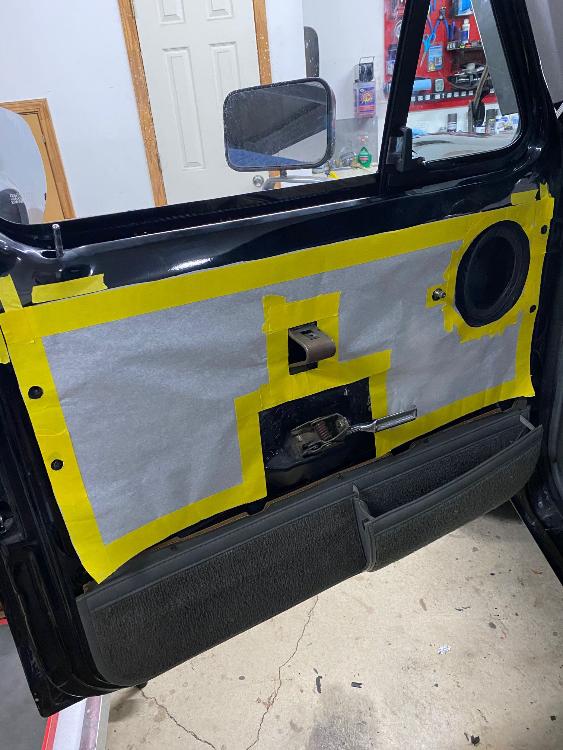
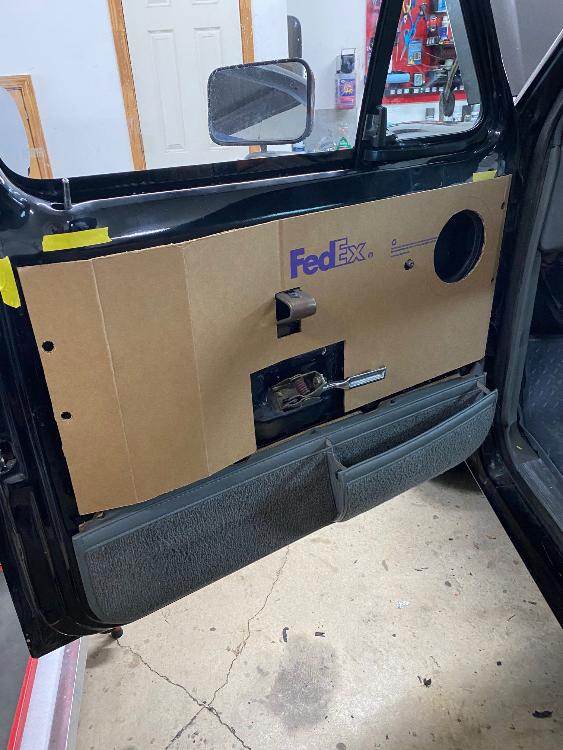
Made a couple of water shields for my doors and was very pleased at how they came out, not to mention it was all less than $15. From Ace Hardware, a $9 11 mil poly paint tarp and a roll of quality 3M tape. Basically made a rough template from paper and then a cardboard template for which the pattern could be drawn on the tarp. Cut out the water shield and taped the edges and then taped it to the door panel.
  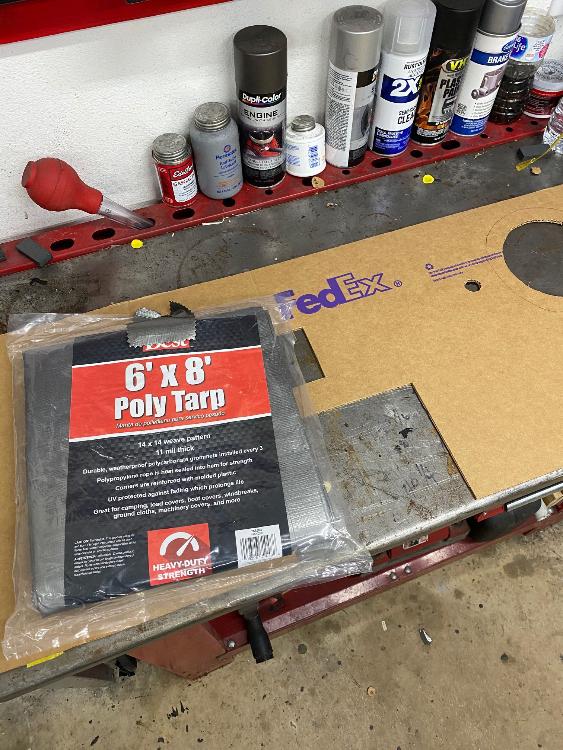 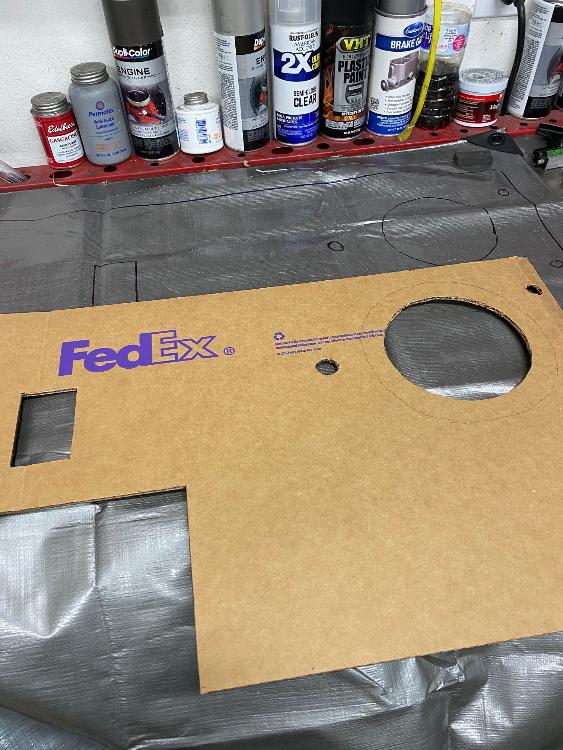 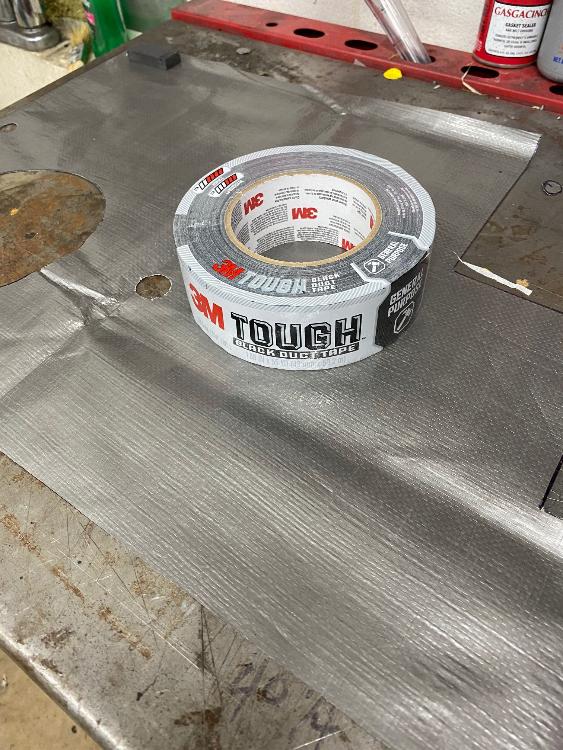 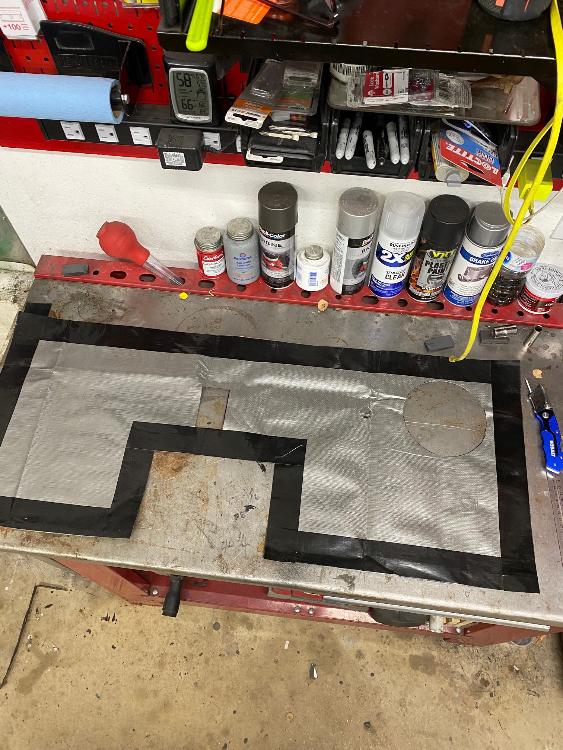 
John
"Blackie" - 1986 F150 4x4 - Mildly warmed over 351W HO - Original owner |
|
Administrator
|
After insulating the cab and applying the new carpet, I decided to address some other things in the cab, this to include repainting the interior panels, adding later model sun visors, tachometer equipped gauge, LED lighting, and a behind the seat organizer.
My interior was not that bad, but it did have some signs of wear and I wanted it to look new. SEM paint receives good reviews and rightly so. I sent off a non-UV discolored interior piece to Vinyl Pro for paint matching using SEM paint. That link below. They matched the interior color perfectly. I purchased all the products they recommended, followed their guidelines, and my interior came out better than expected. I had the option of purchasing, at less cost, mix for spraying in a spray gun or mix in their spray cans. I chose the spray cans. I purchased three cans and had plenty left over. The paint adheres nicely to plastic and vinyl so everything that was gray was painted except the seat and the headliner. https://www.vinylpro.com/ 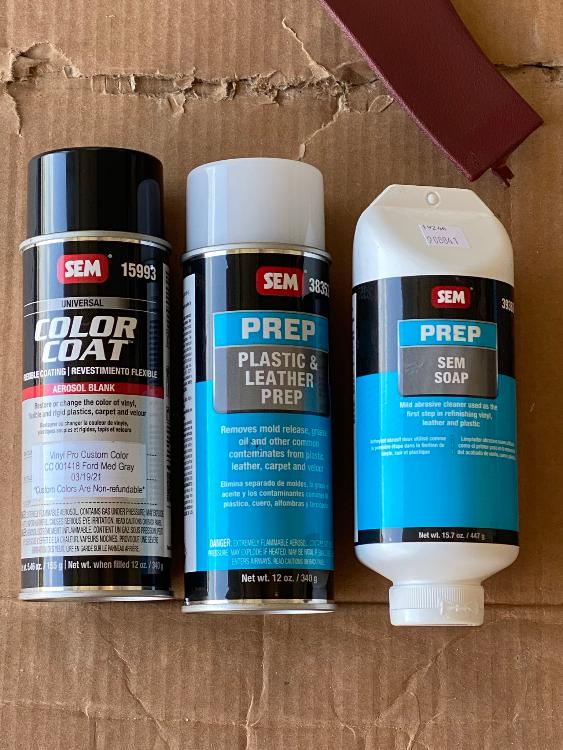 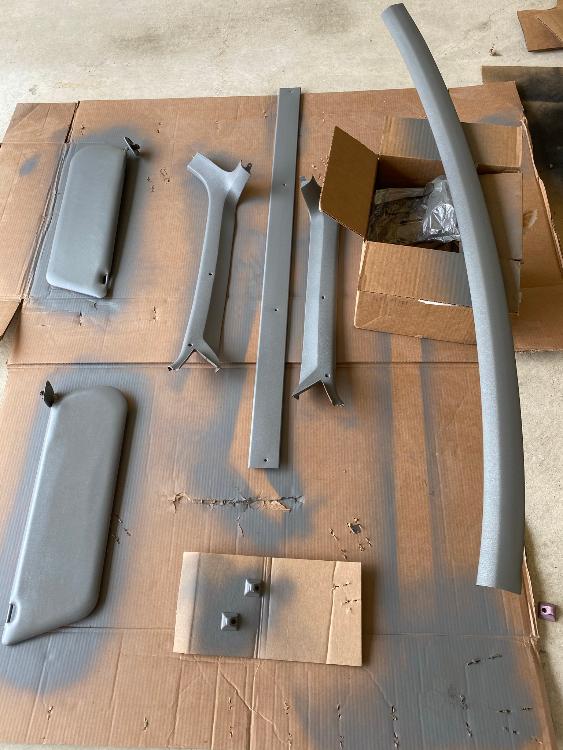 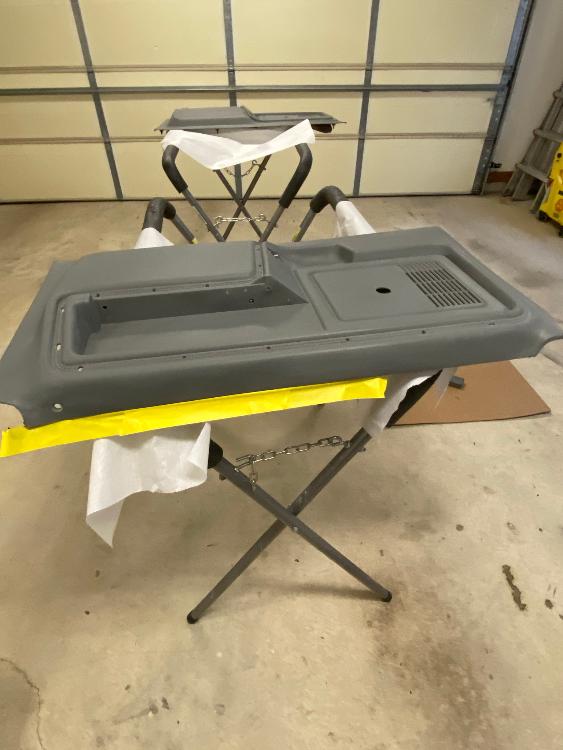 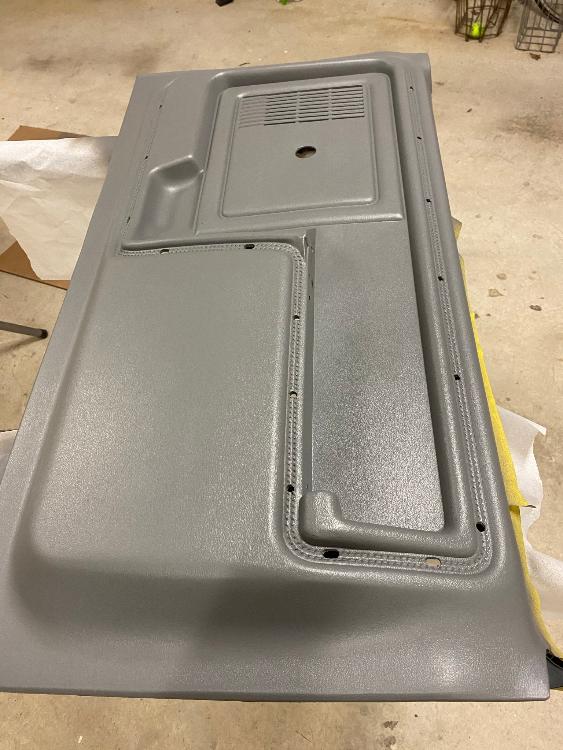
John
"Blackie" - 1986 F150 4x4 - Mildly warmed over 351W HO - Original owner |
|
Administrator
|
I hated the sun visors in my truck! They sagged and moved around freely often obstructing my viewing. Ford must have realized the Bullnose visor issues and changed things in 87. I was told somewhere that a good option is to replace them with visors off an 87-96 F150. I purchased a set off eBay, repainted, and installed them. As I recall, they were a screw in fit apart from the clip that secures the end of the visor.
I also drew up and printed the appropriate visor decals on a silver adhesive decal paper. They came out nicely, but the adhesive proved to be ineffective, as the summer heat caused them to sag and dislodge. I’m still looking for some kind of adhesive to apply to the paper to make them stick. 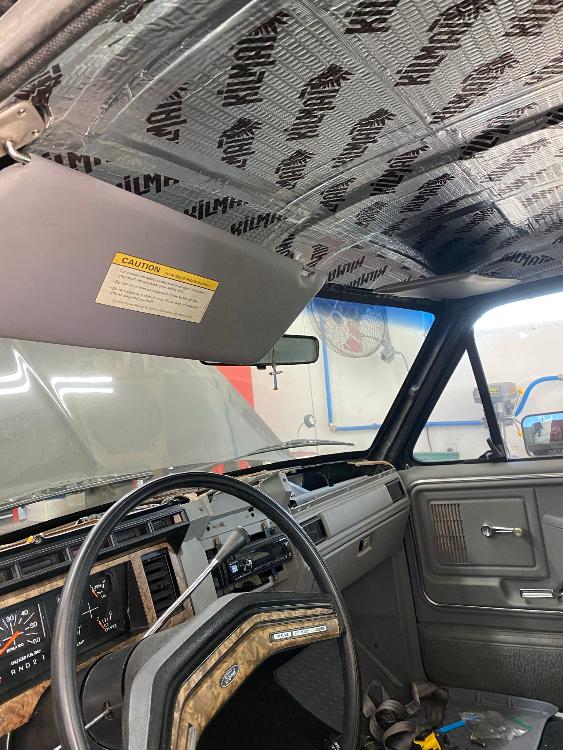 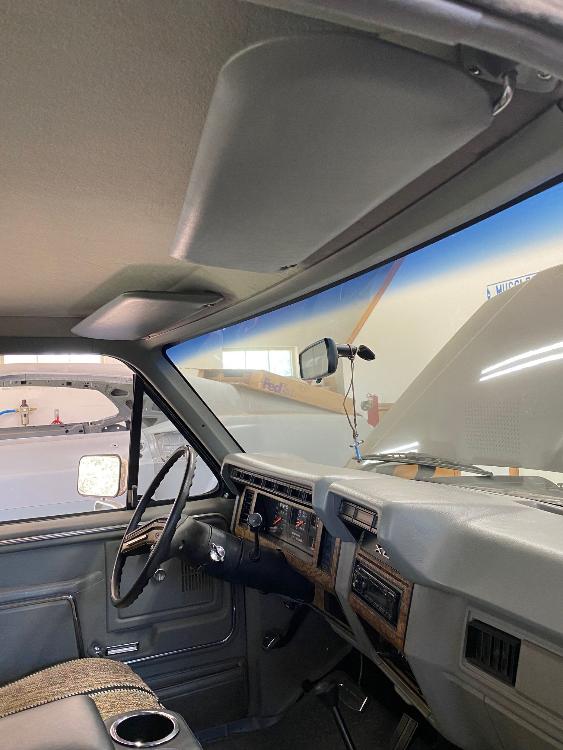  
John
"Blackie" - 1986 F150 4x4 - Mildly warmed over 351W HO - Original owner |
Bullnose Enthusiasts Forum
›
Projects
|
1 view|%1 views
| Edit this page |