Instrument Bezel Control Panel - 3D Printed

classic Classic list List threaded Threaded
42 messages Options
123
Reply | Threaded
Open this post in threaded view
|

Instrument Bezel Control Panel - 3D Printed

kramttocs
Administrator
As part of the 86 rebuild I am adding a few non-factory functions (some just for fun) that require controls.
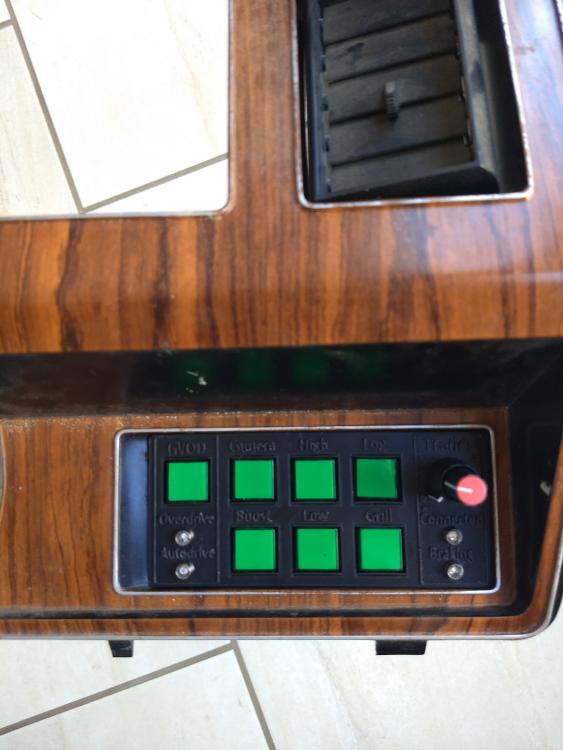
My 80 has switches and gauges all mounted under the dash but it also has the dealer added A/C which consists of a two knob panel that clips into the cubby/glove holder to the right of the steering column on gas trucks.

This A/C panel is what initially got me thinking about mounting my controls there to keep with a somewhat factory look. Once I started looking around I saw that several people have mounted gauges in there, including Gary whose CAD drawings provided some helpful measurement, and they look really good.

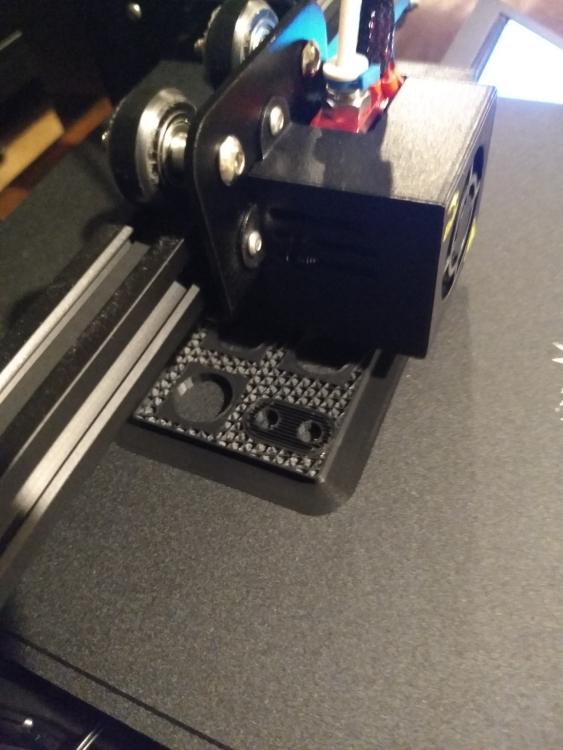
I picked up a 3D printer awhile back on sale for this purpose, although the kids have found many other uses for it, and finally got around to drafting something up last week.

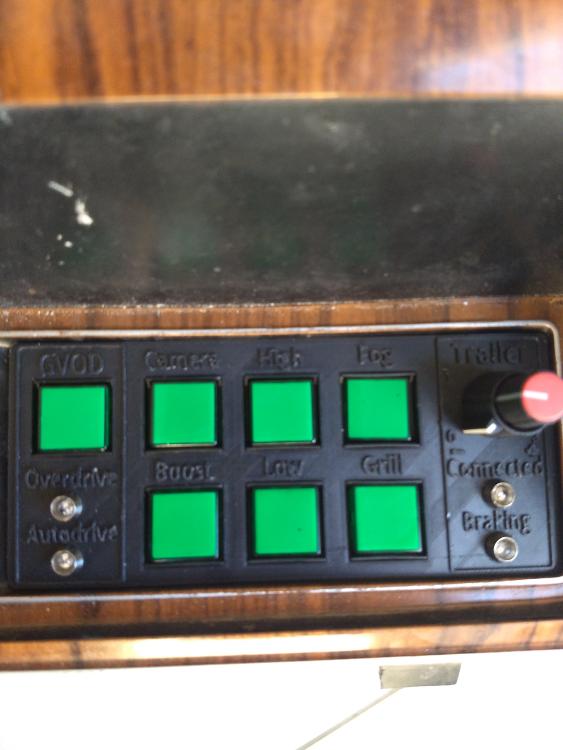
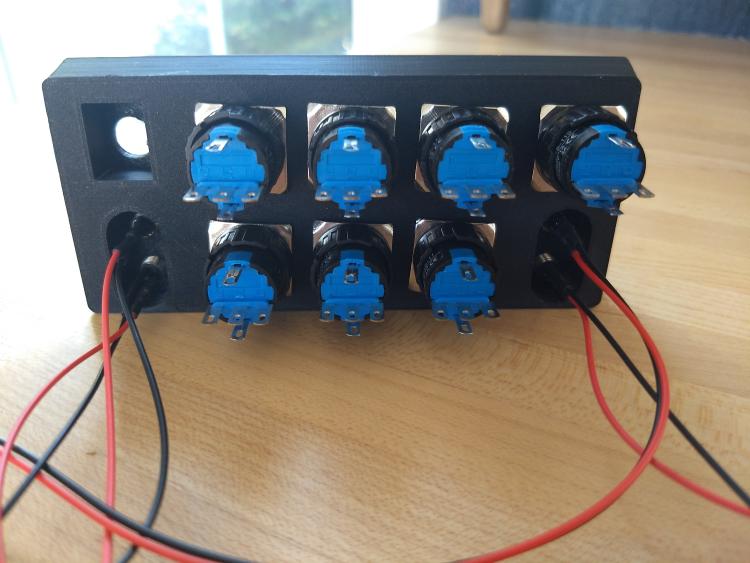
Went through a few iterations but here is the final-ish product:


My printer is an entry level printer so even on the highest quality it's not perfect but I am happy with how the letters came out considering their size. I need to do some cleanup on them and then paint the letters and two borders.

After reading Gary's instrument panel thread I was thinking maybe the Hi-Po fluorescent white? Although the actual bezel has silver edging and I don't want this to stand out.
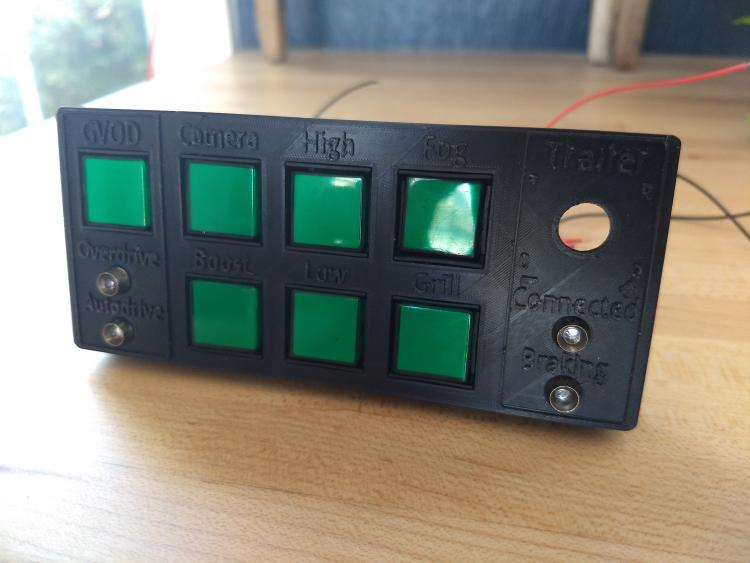
 Thoughts?

Yes, there are a lot more stylish buttons out there  but I felt like these square ones really fit the 80's and were as close to a factory look as I can get.

How I am using it:

1. Gear Vendors Overdrive (GVOD).
     a. The button is latching and will light when in automatic mode. Unlit will be manual mode.
     b. Overdrive led - will light when in overdrive
     c. Autodrive led - will light when the overdrive is set to turn on - either launch mode [gear 1.5] or at the default mph [4th gear]

2. Camera - momentary button that will display the backup camera on the head unit at any time regardless of being in reverse. Will light when button is pushed

3. Boost - momentary button that triggers the smart aux battery solenoid to join the two batteries regardless of voltage. Will light based on the status indicator of the smart solenoid i.e this button will light independent of the button being pushed if the solenoid is closed due to the voltage threshold being met

4. High - momentary hi-beam. Will light when pushed

5. Low - momentary lo-beam. Will light when pushed

6. Fog - latching button for my bumper mounted PIAA fog lights. Will light when on

7. Grill - latching button for my aftermarket grill fog lights. Will light when on. Not sure if I will use these or not yet but needed something else for this spot...

8. Trailer knob - this knob controls the output, boost, and test functionality
     a. Connected led - will light when trailer is connected
     b. Braking led - will light when trailer is braking

Some more photos:

Scott
'Camano' 1986 F250 Supercab XLT Lariat 460/C6
'Chanute' 1980 F350 C&C 400/NP 435 - Gin Pole

But there ain't nothin' wrong with the radio
Reply | Threaded
Open this post in threaded view
|

Re: Instrument Bezel Control Panel - 3D Printed

1986F150Six
Administrator
Wow! Definitely thinking outside the box!
Reply | Threaded
Open this post in threaded view
|

Re: Instrument Bezel Control Panel - 3D Printed

Gary Lewis
Administrator
In reply to this post by kramttocs
Scott - That is COOOOOOOOL!!!!  I really like it!  

I may want to do something like that for Dad's truck as I have to figure out where to put the overdrive switch, and had been thinking about down there.

Did it slip into that spot pretty easily?  How do you secure it in there?
Gary, AKA "Gary fellow": Profile

Dad's: '81 F150 Ranger XLT 4x4: Down for restomod: Full-roller "stroked 351M" w/Trick Flow heads & intake, EEC-V SEFI/E4OD/3.50 gears w/Kevlar clutches
Blue: 2015 F150 Platinum 4x4 SuperCrew wearing Blue Jeans & sporting a 3.5L EB & Max Tow
Big Blue: 1985 F250HD 4x4: 460/ZF5/3.55's, D60 w/Ox locker & 10.25 Sterling/Trutrac, Blue Top & Borgeson, & EEC-V MAF/SEFI

Reply | Threaded
Open this post in threaded view
|

Re: Instrument Bezel Control Panel - 3D Printed

kramttocs
Administrator
It fits in tight and you have to get your fingernail under the left edge lip to remove it but that isn't flexing or bouncing up and down in a truck. It shouldn't take much to hold it since all the real force (fingers) will be pushing it in. Open to ideas but my plan is to see if it bounces out and if so maybe put two small screws into it coming down from the outside top of the cubby. This way the holes won't be seen if I end up removing it. Same goes for the wire access hole - going to drill a hole toward the back of the cubby on top to route them through.
Scott
'Camano' 1986 F250 Supercab XLT Lariat 460/C6
'Chanute' 1980 F350 C&C 400/NP 435 - Gin Pole

But there ain't nothin' wrong with the radio
Reply | Threaded
Open this post in threaded view
|

Re: Instrument Bezel Control Panel - 3D Printed

Gary Lewis
Administrator
Coming in from above should do it.  The ideal would be from the back to suck it into the taper, but then you'd see the holes if you didn't use it.
Gary, AKA "Gary fellow": Profile

Dad's: '81 F150 Ranger XLT 4x4: Down for restomod: Full-roller "stroked 351M" w/Trick Flow heads & intake, EEC-V SEFI/E4OD/3.50 gears w/Kevlar clutches
Blue: 2015 F150 Platinum 4x4 SuperCrew wearing Blue Jeans & sporting a 3.5L EB & Max Tow
Big Blue: 1985 F250HD 4x4: 460/ZF5/3.55's, D60 w/Ox locker & 10.25 Sterling/Trutrac, Blue Top & Borgeson, & EEC-V MAF/SEFI

Reply | Threaded
Open this post in threaded view
|

Re: Instrument Bezel Control Panel - 3D Printed

kramttocs
Administrator
Uncanny

So I actually came to the same conclusion and figure it's worth the risk. If nothing else, some black rubber plugs will take care of any holes on the back wall of the cubby. I won't be that picky.

Looking at the back of one of my earlier attempts there should be enough meat to drill and tap into.

Roughly in these spots:


I'll drill a couple holes in the back wall, cut some all thread to length, and throw on a nut/washer.

Will be much easier to remove without taking the bezel off also. Trying to blindly unscrew two tiny screws at the top might be rough.
Scott
'Camano' 1986 F250 Supercab XLT Lariat 460/C6
'Chanute' 1980 F350 C&C 400/NP 435 - Gin Pole

But there ain't nothin' wrong with the radio
Reply | Threaded
Open this post in threaded view
|

Re: Instrument Bezel Control Panel - 3D Printed

Gary Lewis
Administrator
It would be nice if you could find some 3 1/2" long #10 sheet metal screws.  At least that's what the length looks like it would need to be.  However, the longest I have are 2".
Gary, AKA "Gary fellow": Profile

Dad's: '81 F150 Ranger XLT 4x4: Down for restomod: Full-roller "stroked 351M" w/Trick Flow heads & intake, EEC-V SEFI/E4OD/3.50 gears w/Kevlar clutches
Blue: 2015 F150 Platinum 4x4 SuperCrew wearing Blue Jeans & sporting a 3.5L EB & Max Tow
Big Blue: 1985 F250HD 4x4: 460/ZF5/3.55's, D60 w/Ox locker & 10.25 Sterling/Trutrac, Blue Top & Borgeson, & EEC-V MAF/SEFI

Reply | Threaded
Open this post in threaded view
|

Re: Instrument Bezel Control Panel - 3D Printed

kramttocs
Administrator
My thought with the threaded rods would be that I could use plastic glue to permanently attached the rods to the panel. Then to remove or install it would be using the nut/wingnut on the back of the cubby.

Since the panel is honeycombed inside, without the glue I am not sure either the screw or rod would be solid alone.

Will have to add some solid material to the drawing in these areas for future use.
Scott
'Camano' 1986 F250 Supercab XLT Lariat 460/C6
'Chanute' 1980 F350 C&C 400/NP 435 - Gin Pole

But there ain't nothin' wrong with the radio
Reply | Threaded
Open this post in threaded view
|

Re: Instrument Bezel Control Panel - 3D Printed

Gary Lewis
Administrator
I like the idea of the studs much better, after I thought about it, than my idea of screws.  Getting the screws in the right spots from 3 1/2" away would NOT be easy.

But, if you are reprinting, you could print in the threads.  I did it on the dash patch.
Gary, AKA "Gary fellow": Profile

Dad's: '81 F150 Ranger XLT 4x4: Down for restomod: Full-roller "stroked 351M" w/Trick Flow heads & intake, EEC-V SEFI/E4OD/3.50 gears w/Kevlar clutches
Blue: 2015 F150 Platinum 4x4 SuperCrew wearing Blue Jeans & sporting a 3.5L EB & Max Tow
Big Blue: 1985 F250HD 4x4: 460/ZF5/3.55's, D60 w/Ox locker & 10.25 Sterling/Trutrac, Blue Top & Borgeson, & EEC-V MAF/SEFI

Reply | Threaded
Open this post in threaded view
|

Re: Instrument Bezel Control Panel - 3D Printed

kramttocs
Administrator
What size threads did you use? I was thinking m4 or m6. Shouldn't need much but wasn't sure how that small of threads would turn out even after chasing them.
Scott
'Camano' 1986 F250 Supercab XLT Lariat 460/C6
'Chanute' 1980 F350 C&C 400/NP 435 - Gin Pole

But there ain't nothin' wrong with the radio
Reply | Threaded
Open this post in threaded view
|

Re: Instrument Bezel Control Panel - 3D Printed

Gary Lewis
Administrator
I don't remember what we used, but I could check later.  However, I will say that the threads were pretty precise.  
Gary, AKA "Gary fellow": Profile

Dad's: '81 F150 Ranger XLT 4x4: Down for restomod: Full-roller "stroked 351M" w/Trick Flow heads & intake, EEC-V SEFI/E4OD/3.50 gears w/Kevlar clutches
Blue: 2015 F150 Platinum 4x4 SuperCrew wearing Blue Jeans & sporting a 3.5L EB & Max Tow
Big Blue: 1985 F250HD 4x4: 460/ZF5/3.55's, D60 w/Ox locker & 10.25 Sterling/Trutrac, Blue Top & Borgeson, & EEC-V MAF/SEFI

Reply | Threaded
Open this post in threaded view
|

Re: Instrument Bezel Control Panel - 3D Printed

grumpin
Cool!
Dane
1986 F250HD SC XLT Lariat 4x4 460 C6-Sold
1992 Bronco XLT 4x4 351W E4OD
1998 GMC Sierra SLE K1500 350 4L60E
Arizona
Reply | Threaded
Open this post in threaded view
|

Re: Instrument Bezel Control Panel - 3D Printed

kramttocs
Administrator
Thanks Dane.

Have the drawing updated to include the 6mm threads in the back and may start that one printing tomorrow after work.
Scott
'Camano' 1986 F250 Supercab XLT Lariat 460/C6
'Chanute' 1980 F350 C&C 400/NP 435 - Gin Pole

But there ain't nothin' wrong with the radio
Reply | Threaded
Open this post in threaded view
|

Re: Instrument Bezel Control Panel - 3D Printed

Gary Lewis
Administrator
Gary, AKA "Gary fellow": Profile

Dad's: '81 F150 Ranger XLT 4x4: Down for restomod: Full-roller "stroked 351M" w/Trick Flow heads & intake, EEC-V SEFI/E4OD/3.50 gears w/Kevlar clutches
Blue: 2015 F150 Platinum 4x4 SuperCrew wearing Blue Jeans & sporting a 3.5L EB & Max Tow
Big Blue: 1985 F250HD 4x4: 460/ZF5/3.55's, D60 w/Ox locker & 10.25 Sterling/Trutrac, Blue Top & Borgeson, & EEC-V MAF/SEFI

Reply | Threaded
Open this post in threaded view
|

Re: Instrument Bezel Control Panel - 3D Printed

ArdWrknTrk
Administrator
In reply to this post by 1986F150Six
More like thinking inside the box (or cubbie, whatever you call it)  

Have you considered brass thread inserts?
They make these to either be printed into the finished part, or heated and melted in after the part is finished.
These are MUCH stronger than threads in plastic and hold up to repeated use.

Put a chamfer to the rear in order to help guide the screw/stud in.
6mm is way overkill IMO.

Good going Scott!
 Jim,
Lil'Red is a '87 F250 HD, 4.10's, 1356 4x4, Zf-5, 3G, PMGR, Saginaw PS, desmogged with a Holley 80508 and Performer intake.
Too much other stuff to mention.
Reply | Threaded
Open this post in threaded view
|

Re: Instrument Bezel Control Panel - 3D Printed

Rembrant
In reply to this post by kramttocs
Very clever Scott. Cool part.
1994 F150 4x2 Flareside. 5.0 w/MAF, 4R70W, stock.
1984 F150 4X2 Flareside. Mild 302 w/ 5spd. Sold.
1980 F150 4X4 Flareside. 300i6 w/ 5spd. Sold in 2021.
1980 F100 4X2 Flareside. 351w/2bbl w/NP435. Sold in 1995

Reply | Threaded
Open this post in threaded view
|

Re: Instrument Bezel Control Panel - 3D Printed

1986F150Six
Administrator
In reply to this post by ArdWrknTrk
ArdWrknTrk wrote
More like thinking inside the box (or cubbie, whatever you call it)  
Touche!
Reply | Threaded
Open this post in threaded view
|

Re: Instrument Bezel Control Panel - 3D Printed

kramttocs
Administrator
In reply to this post by ArdWrknTrk
I agree completely that 6mm is way more than needed for this. The only reasons I went with that is that I have some spare 6mm x 100mm stainless threaded rods that I am using for the inner fender platform stand-offs and I am not sure how well the printer will do smaller threads as I've never tried it.
I'll look into those inserts though - didn't even think about something like that. Thanks!
Scott
'Camano' 1986 F250 Supercab XLT Lariat 460/C6
'Chanute' 1980 F350 C&C 400/NP 435 - Gin Pole

But there ain't nothin' wrong with the radio
Reply | Threaded
Open this post in threaded view
|

Re: Instrument Bezel Control Panel - 3D Printed

ArdWrknTrk
Administrator
There's a cool YouTube channel 'CNC Kitchen' with a young German guy.

Lot's to learn, while keeping it dumbed down for those of us without a lot of experience.
 Jim,
Lil'Red is a '87 F250 HD, 4.10's, 1356 4x4, Zf-5, 3G, PMGR, Saginaw PS, desmogged with a Holley 80508 and Performer intake.
Too much other stuff to mention.
Reply | Threaded
Open this post in threaded view
|

Re: Instrument Bezel Control Panel - 3D Printed

Ford F834
Administrator
In reply to this post by kramttocs
This is a really neat idea! I like it, and the square button design does have a “period correct” feel. I don’t like the over-large rocker style switch supplied with the GVOD. I was thinking of doing something else, like re-purposing the fuel selector switch in the HVAC panel and using the ^upshift^ indicator lamp from a 83/84 bezel to indicate when the overdrive is on. Your solution is great, and addresses much more than just the GVOD. On the dealer installed AC parts truck for my 4x4 swap, the whole pocket was simply sawed off the bezel, leaving a rectangular hole like the medium duty bezels.
SHORT BED 4-DOOR DIESEL: 1986 F350 4x4 under construction-- 7.3 IDIT ZF5+GVOD

STRAIGHT SIX 4X4: 1981 F150 2wd to 4x4-- 300 I6 close ratio diesel T19, hydroboost brakes, Saginaw steering

BIG F: 1995 F-Superduty under construction— converting to 6.9L IDI diesel ZF5+DNE2
123