Big Blue's Transformation


Administrator
|
I'm having a hard time getting to where you are. I've included the drawing again, albeit reduced a bit in size, so I can try to get my head around it. And, here goes: Parts 11, 12, & 13 are the nuts and washers that go on the spindle, so don't touch the axle. Parts 14, 15, & 16 are said to be "thrust washers", with 14 & 16 steel and 15 plastic. And, 16 is splined so it must engage the splines on the axle. So depending on the ID of the washers they either take up the space between the end of the spindle or the outer nut of the nut/washer/nut combo and snap ring #17. But in either case, the "thrust" is when the axle tries to come in and those washers prevent that. So, I AGREE! The washers and inner snap ring hold the axle out.  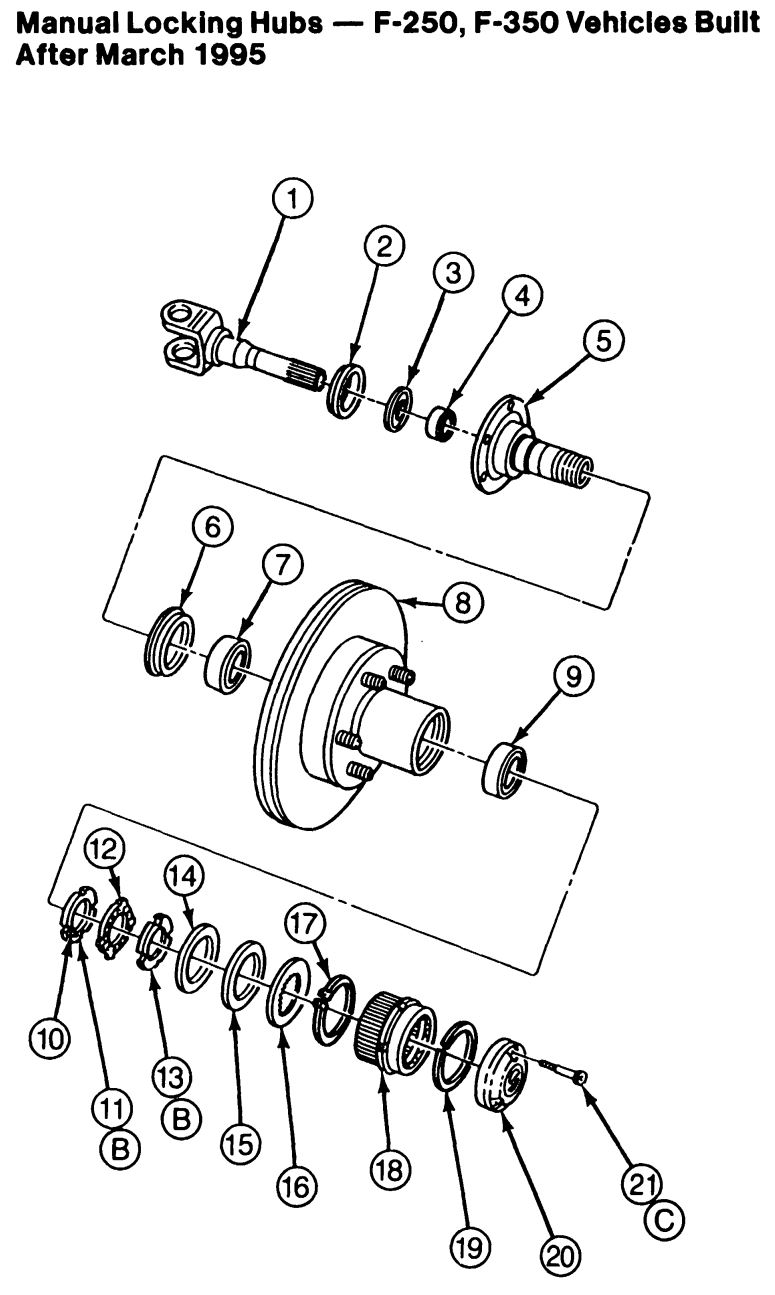 Dad's truck has Mile Markers, which I just rebuilt - and powder coated. I wasn't overly impressed with them, but they work fine. Big Blue has Warn Premiums and they work well. I can't say they are easy to turn, but even on the truck they are far easier to turn than just these 3-bolt caps from the Dana 60 are, and that's w/o the caps being on the hubs. As for the chrome, you may have gotten ones that weren't done well as the Warns on BB look great after 2 1/2 years I've had the truck plus whatever Vernon had them. All in all I think I'm leaning heavily to the Warn Premiums. But keep those cards and letters coming, please.
Gary, AKA "Gary fellow": Profile
Dad's: '81 F150 Ranger XLT 4x4: Down for restomod: Full-roller "stroked 351M" w/Trick Flow heads & intake, EEC-V SEFI/E4OD/3.50 gears w/Kevlar clutches
|
|
Banned User
|
This post was updated on .
In reply to this post by Gary Lewis
It's possible they made it, using pieces from other diagrams & some of their own. That's how I came up with this one:  They market it, just like TorqueKing & everyone else. But most are made by Dana/Spicer. #17 is either drawn wrong for that location, or shown in the wrong location for how it's drawn. It should be the wide C (#19) in my diagram just above, and in the bottom center of my photo from before.  The one in their diagram is drawn as the main retainer ring for the lock body in this & the NEXT pics:  ...until it DOESN'T self-center. Then something like this will happen:  Yet in the ~3 months I worked at the dealership, I submitted at least 3 corrections to the service manual and one to a safety recall. All were adopted, proving that the documentation had errors before. I think you're going OCD about it.  It'll never be "sealed". It wasn't sealed when it was designed or built. Or when it left the factory. There's no reason to think you can seal it 40 years later. I'd put it together, drive the hell out of it, and follow the "severe duty" maintenance schedule. It'll be fine. It'll never be "sealed". It wasn't sealed when it was designed or built. Or when it left the factory. There's no reason to think you can seal it 40 years later. I'd put it together, drive the hell out of it, and follow the "severe duty" maintenance schedule. It'll be fine.Add a Teflon washer against the metal. Throw it in your powdercoat oven to melt the Teflon onto the metal semipermanently. That'll tighten up the O-ring and make it last longer. The problem is that the diagram isn't drawn to scale. 10, 12, & 13 should be larger. 10 holds 9 against 8 against 7 on 5. 12 prevents 10 from turning. 13 holds 12 against 10. 14, 15, 16, & 17 should be smaller. They hold 1 inside 4 & 5 against 2 & 3. 1's outer end is supported by the bearing inside 18. 18 is held in 8 by 19. 21 holds 20 on 8 by pulling against 18 & 19, sealing the outer end of 8. 6 seals the other end of 8 to 5. I ran MMs for years without problems. It wasn't until just before I rebuilt the Bronco (from bullnose to aero) (when I started driving it more-abusively) that they shattered a few times. |
|
Administrator
|
I was with you about melting the Teflon until I looked up its melting point and read this in The PTFE Handbook, which sure looked familiar as I used to work for DuPont:
Teflon® PTFE resins enter into a gel state at 327°C (621°F), which is not conducive to melt flow...My oven can reach 500 °F, but I doubt it can make 600 °F. So I don't think that is going to work, at least not with the oven. And while I agree the hub isn't ever going to be "sealed", right now I'm not 100% sure it would keep rain out due to the etching at that spot and the material I've removed. But, one approach I'd not considered is a heavy layer of powder on that land. I could mask the cap and shoot epoxy powder in there. Powder doesn't really flow out and "level" things, so the underlying texture is seen. But I could then machine it smooth and then put another layer of powder on top of that as a finish. Or I could buy some better lockouts and use my limited time elsewhere. I think I'll talk to my better-half about this and get her advice.
Gary, AKA "Gary fellow": Profile
Dad's: '81 F150 Ranger XLT 4x4: Down for restomod: Full-roller "stroked 351M" w/Trick Flow heads & intake, EEC-V SEFI/E4OD/3.50 gears w/Kevlar clutches
|
|
Banned User
|
I think an extra dab of silicone grease would keep rain out.
|
|
Administrator
|
I think I've worked out a buy-back from Brandon/Bruno2 of the Warn Premiums that came in the stash with Big Blue. They were marked "May be wrong size", and obviously were as they are the 38826's that are for a D60. Brandon bought them but hasn't used them, so I'll buy them back.
In addition we are discussing a price on the whole D44HD front end off Big Blue. 
Gary, AKA "Gary fellow": Profile
Dad's: '81 F150 Ranger XLT 4x4: Down for restomod: Full-roller "stroked 351M" w/Trick Flow heads & intake, EEC-V SEFI/E4OD/3.50 gears w/Kevlar clutches
|
|
Administrator
|
Remember, Janey's an enabler....
 Glad you have a pair of hubs. I would probably have filled the pits with JB Weld or something. And even better that you might sell the D44 on to Brandon. One more piece of this complex equation solved.
Jim,
Lil'Red is a '87 F250 HD, 4.10's, 1356 4x4, Zf-5, 3G, PMGR, Saginaw PS, desmogged with a Holley 80508 and Performer intake. Too much other stuff to mention. |
|
Administrator
|
Yes, she is. And I forgot to say that Janey said "Do it right. Get new hubs." And with that she authorized the anticipated $300 expenditure.
But she was happy that it'll probably be less than that, and that I may sell the D44HD. Oh, and the problem with JB Weld is that I don't know that it would stand up to powder coating. Perhaps I could have used it after PC'ing the rest of the hub?
Gary, AKA "Gary fellow": Profile
Dad's: '81 F150 Ranger XLT 4x4: Down for restomod: Full-roller "stroked 351M" w/Trick Flow heads & intake, EEC-V SEFI/E4OD/3.50 gears w/Kevlar clutches
|
|
Banned User
|
It'll stand up to much more. But it won't TAKE powder because it's not electrically-conductive, so the powder won't be attracted to it. I don't know how well it would stick to glossy powder; I don't think I'd trust it on flat powder, either. But it probably won't hurt anything to try. |
|
Administrator
|
All of this explains why I wanted new lock-outs: time, or the lack thereof.
I do believe I could have fixed the original hubs. But it would have been a time-consuming process. For one, just getting the JB Weld in there and machining it back smooth would have been a lengthy process. Here's one approach to the whole project:
One of the issues I didn't mention before is that the cap I worked on isn't concentric. Said another way, when I mount it on the chuck of the lathe there's runout in the center, meaning at the hole where the dial and o-ring go. And since there are several rough spots on the land, I'd want to put JB Weld all around on the land so when I machine it the hole is concentric with the rest of the cap. And that's just another example of how time-consuming this would be. So, while it can be done it isn't where I want to spend my time. I really want to use Big Blue for some overlanding. Janey has graciously agreed to go with me on a trip to Colorado when I get the truck together. And our son wants to go on trips, and even got me some equipment for such a trip for my recent birthday and Father's Day. But it remains to be seen if he can find the time to do it.
However, since I've just turned 72, time is of the essence! I want Big Blue back on the road ASAP so I can both use him as well as get back to Dad's truck. And the clock is ticking......
Gary, AKA "Gary fellow": Profile
Dad's: '81 F150 Ranger XLT 4x4: Down for restomod: Full-roller "stroked 351M" w/Trick Flow heads & intake, EEC-V SEFI/E4OD/3.50 gears w/Kevlar clutches
|
|
Banned User
|
Again: put it together, grease the locks, and enjoy. After driving through deep water, service the hubs as recommended. If you find them dry, you'll know the grease is working. If they get more contamination than you like, replace them THEN (after a few maintenance cycles).
|
|
Administrator
|
Steve - I appreciate your suggestion. But at this stage of my life I'm wanting to make it "right" as I do it rather than potentially come back to do it again later. Having said that, this is a new philosophy for me and I'd have probably done it as you suggested just a few years ago.
My situation is one of not nearly enough time to do everything I want to do, so I want to do something once and not have to worry about doing it again. Otherwise I'd have had the guy who said he'd swap gears with me do so and also check out the differential bearings & seals. Instead, I'm having the differential made "new" and will do the same to the wheel bearings & seals as well as the brakes, bushings, etc. The one exception is the calipers since they are a relatively easy re-build and I trust I'll do at least as good of a job as others would. Anyway, thanks.
Gary, AKA "Gary fellow": Profile
Dad's: '81 F150 Ranger XLT 4x4: Down for restomod: Full-roller "stroked 351M" w/Trick Flow heads & intake, EEC-V SEFI/E4OD/3.50 gears w/Kevlar clutches
|
|
Banned User
|
I hear what you're saying - I don't like redoing things either. But the fact is: hub locks are high-maintenance parts. So no matter what you do to them, or how much you spend on new ones, you still need to maintain them periodically. Especially immediately after fording deep water.
|
|
Administrator
|
My plan is to not Ford deep water. I'll Dodge it.
 Seriously though, I do hope to stay out of the deep stuff. But, as I'm new to overlanding I don't know what I'll find. However, I suppose I should take grease and the right tools to pull the hubs down and clean them while on any long-distance trip.
Gary, AKA "Gary fellow": Profile
Dad's: '81 F150 Ranger XLT 4x4: Down for restomod: Full-roller "stroked 351M" w/Trick Flow heads & intake, EEC-V SEFI/E4OD/3.50 gears w/Kevlar clutches
|
|
|
That’s what I would do and have problems! Someone else could drive the entire length of the Mississippi River, never touch the hubs and never have a problem! Do I whine much... 
Dane
1986 F250HD SC XLT Lariat 4x4 460 C6-Sold 1992 Bronco XLT 4x4 351W E4OD 1998 GMC Sierra SLE K1500 350 4L60E Arizona |
|
Administrator
|
Nah, not much.
I find that if I've prepared for "it" then "it" rarely happens. So I tend to go loaded for bear, and I don't see one very often, which is fine by me.
Gary, AKA "Gary fellow": Profile
Dad's: '81 F150 Ranger XLT 4x4: Down for restomod: Full-roller "stroked 351M" w/Trick Flow heads & intake, EEC-V SEFI/E4OD/3.50 gears w/Kevlar clutches
|
|
Administrator
|
Well, we are grandtwinless for the weekend, and I got to play in the shop today - before weedeating and mowing. (Without getting the mower stuck, again, David.
 ) )
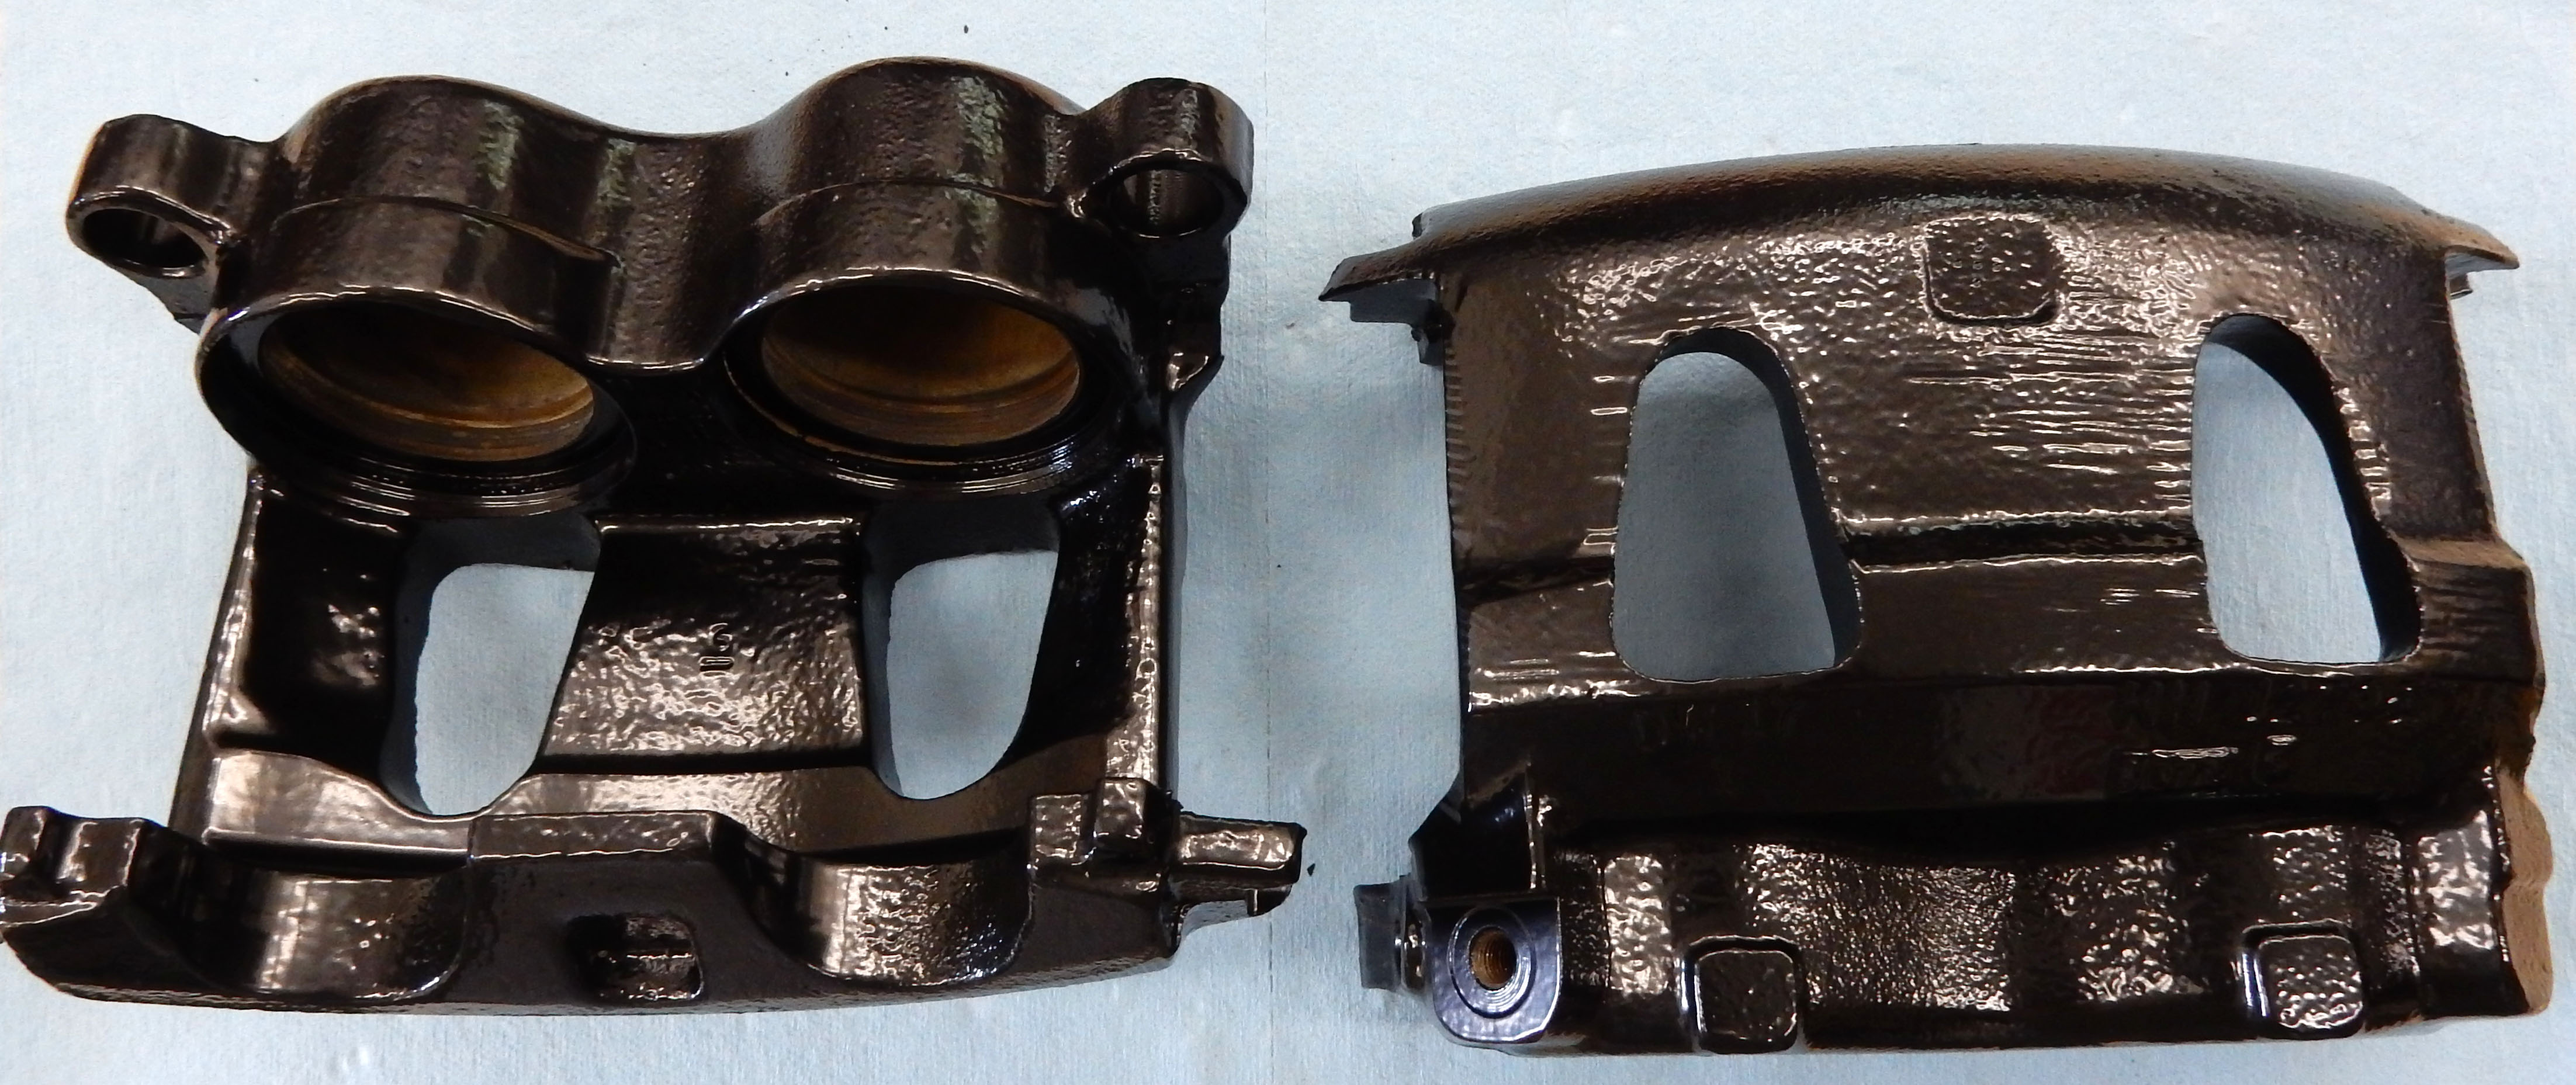
I media blasted the other brake caliper and then phosphated both of them. Here's one of them, although in person they looked a lot more gray than brown. 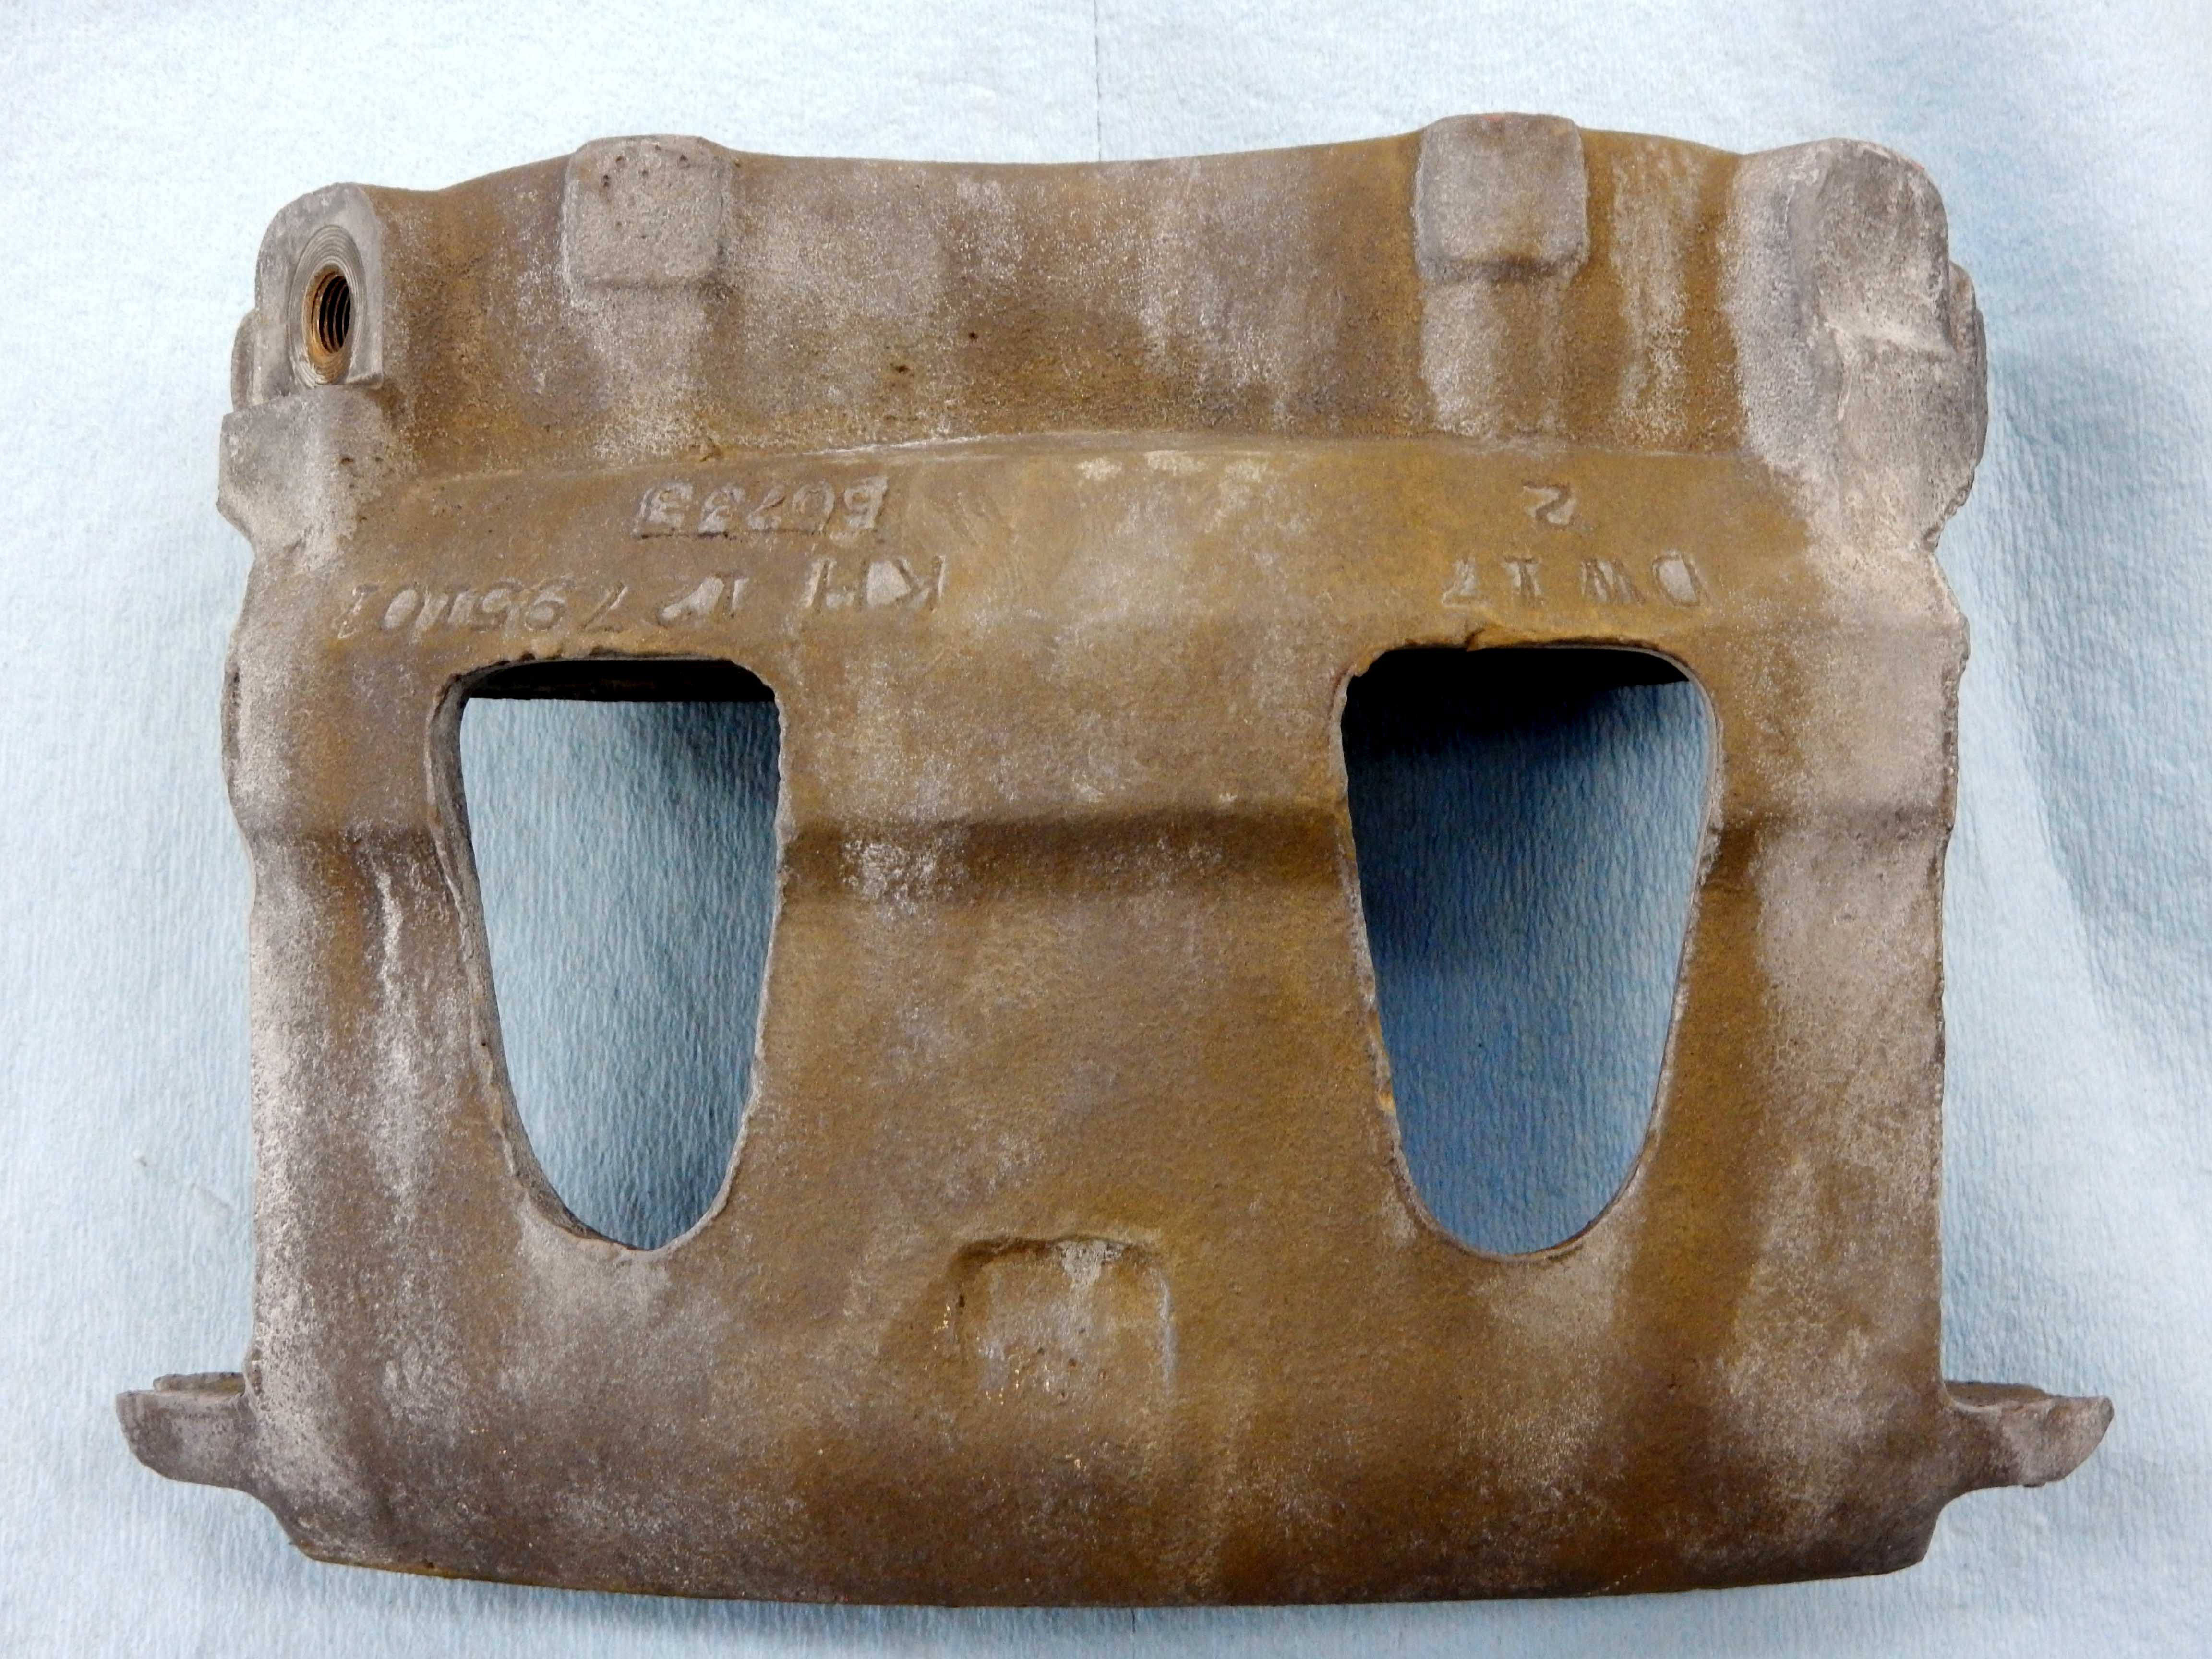 And here they are after being powder coated. (Jim - I must have gotten the wrong bottle of powder as I was sure they were going to come out red.  ) )
 But, in doing the phosphating I got the bores as well. I don't think that will hurt anything, but what do y'all think? Here's a shot of the bores on one of the calipers. Note that I didn't get powder into the bores, which I did by slipping the old pistons in, applying the powder, and then pulling the pistons out. 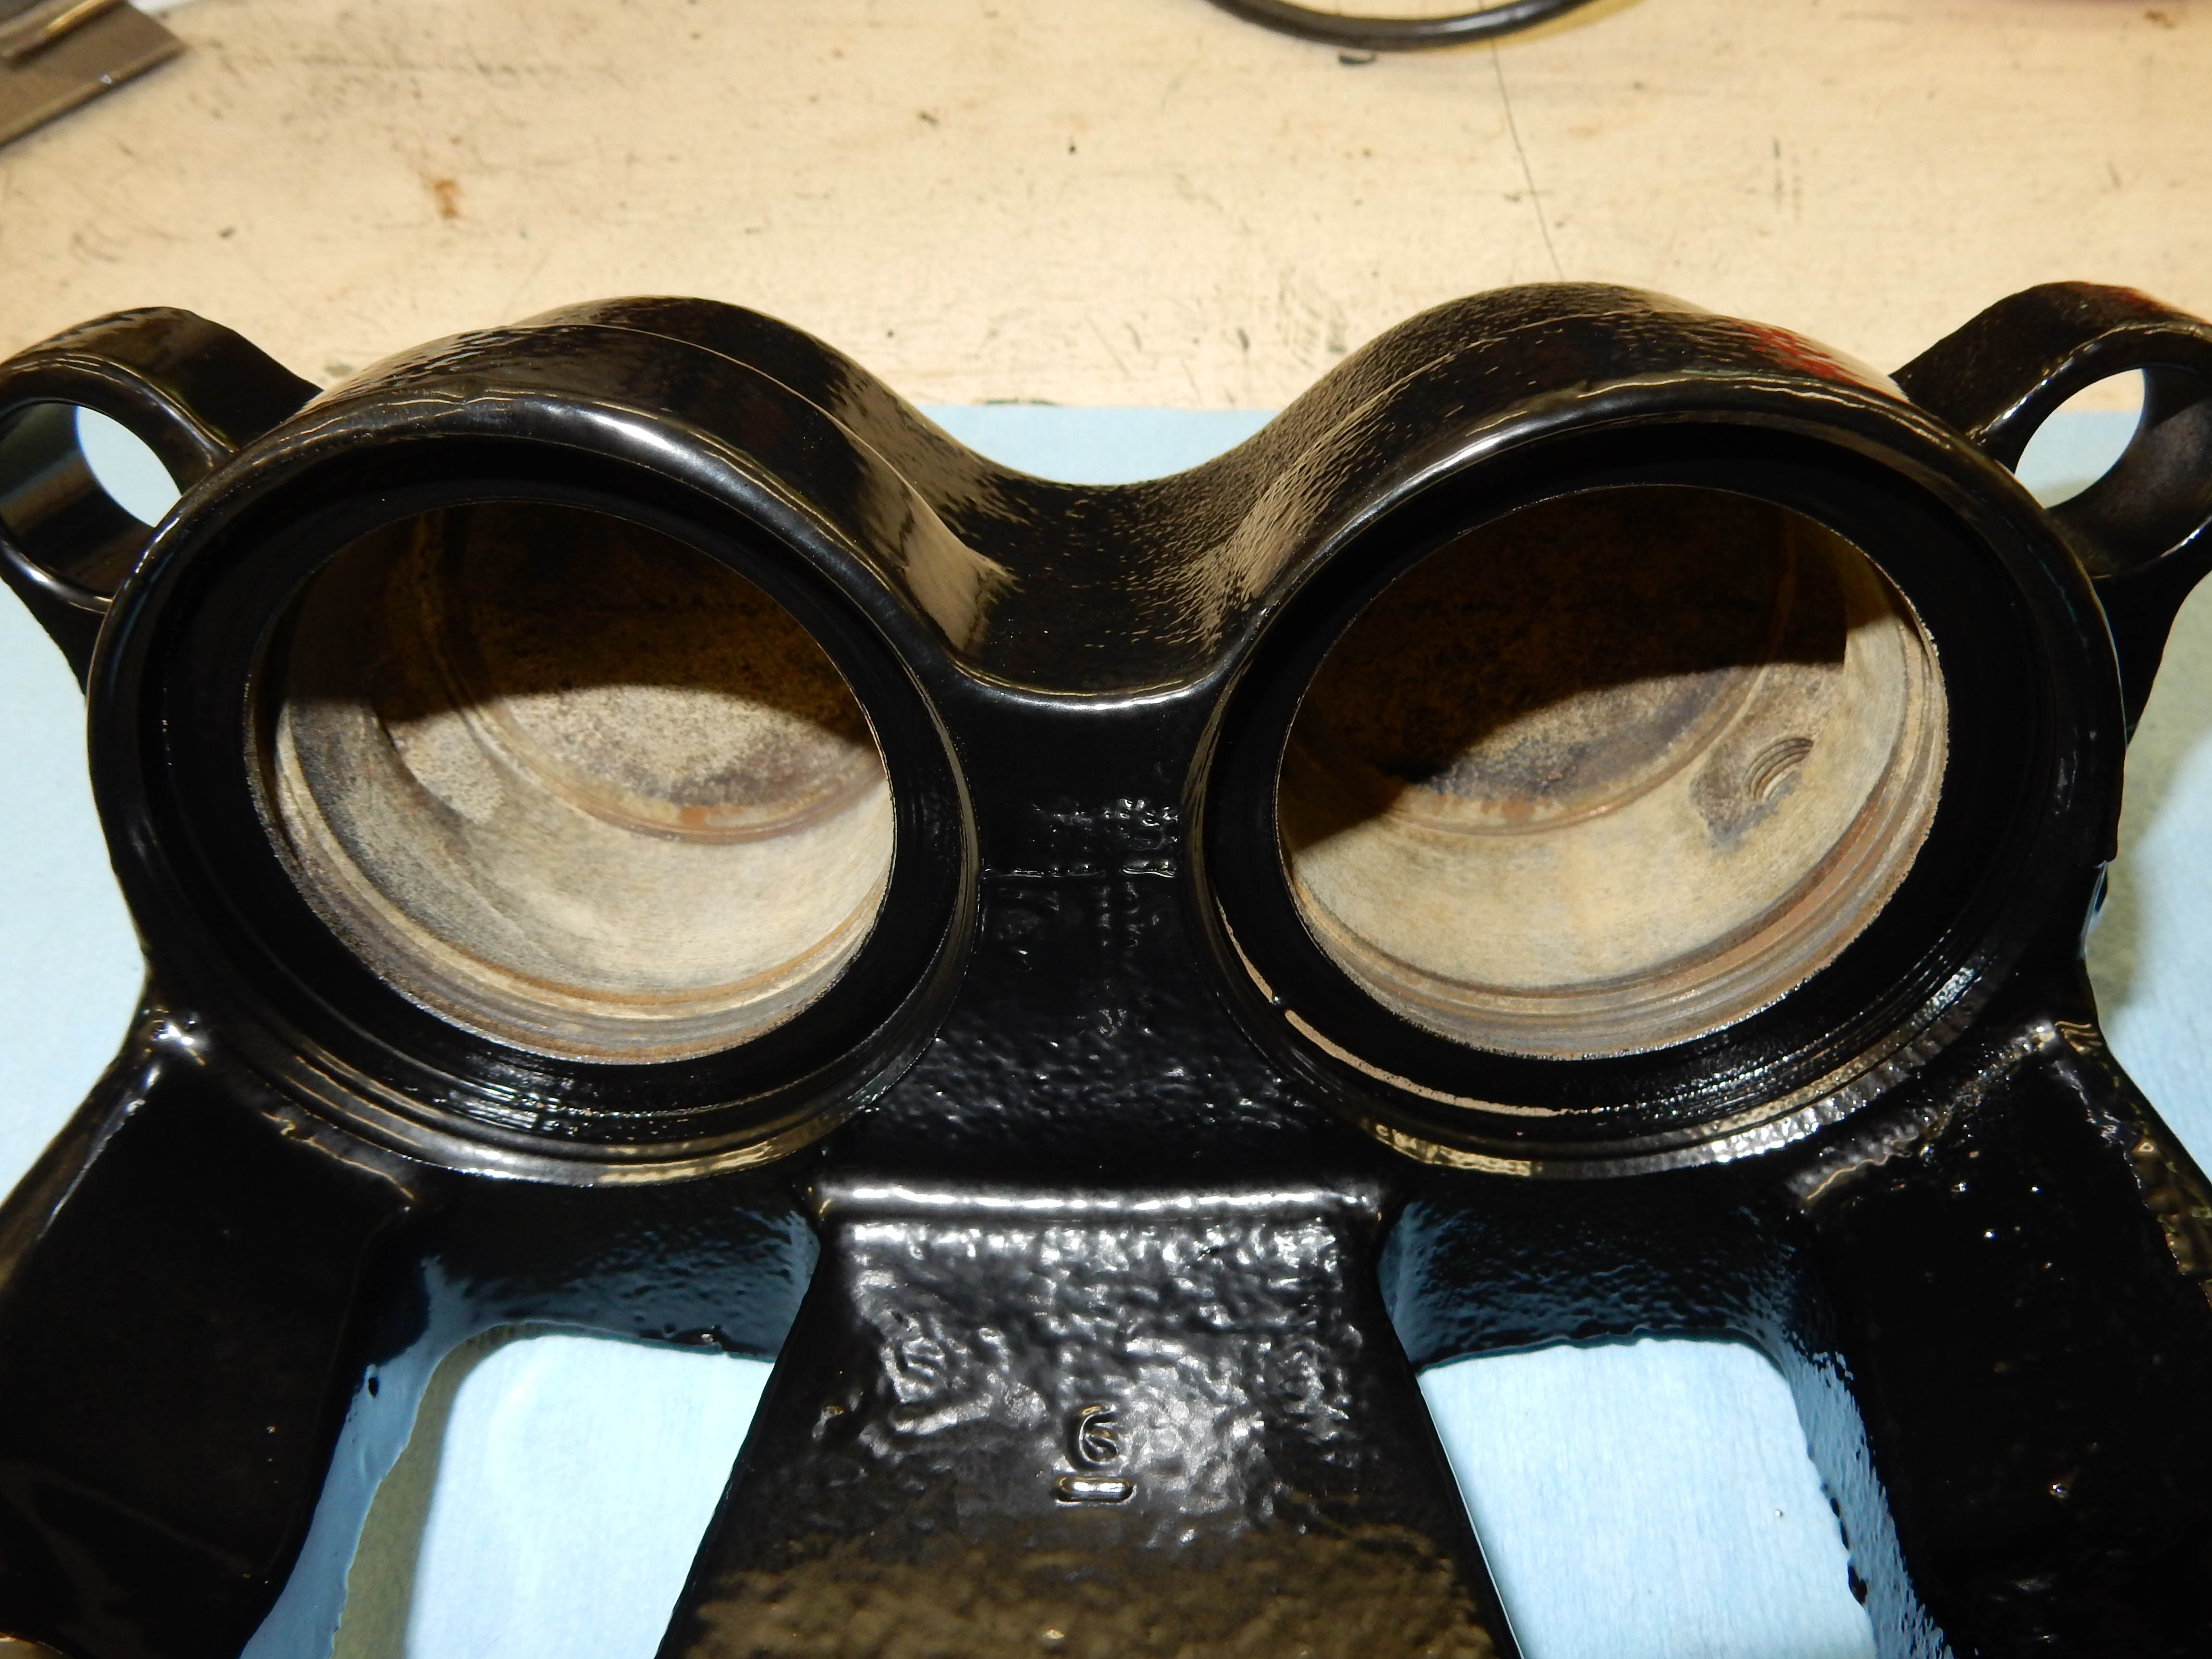 Also, I bought the new issue of Outdoor X4 magazine, and there's an article in it called Built For Adventure. In it a guy explains how he built a 2011 Toyota Tacoma pickup into and overlander. And one of the things he did was to add Hellwig air bags and Daystar cradles for those bags. So I went to the Daystar site and read this: Did you know you lose up to 20% of your suspension travel when installing a set of convoluted airbags on the rear of your truck? Daystar has the answer to this problem: The Universal Air Bag Cradle. This unique product will recover your lost suspension travel while keeping all the benefits you want in a set of air bags!
What do y'all think?
Gary, AKA "Gary fellow": Profile
Dad's: '81 F150 Ranger XLT 4x4: Down for restomod: Full-roller "stroked 351M" w/Trick Flow heads & intake, EEC-V SEFI/E4OD/3.50 gears w/Kevlar clutches
|
|
Administrator
|
I've done some searching to see about the Daystar cradles and ran across this video that I thought might help you see how they work:
Gary, AKA "Gary fellow": Profile
Dad's: '81 F150 Ranger XLT 4x4: Down for restomod: Full-roller "stroked 351M" w/Trick Flow heads & intake, EEC-V SEFI/E4OD/3.50 gears w/Kevlar clutches
|
Re: Big Blue's Transformation
|
|
That would certainly deal with the limitation on droop I experienced in my F-150. If it works in real life as well as it looks there it would seem to be a great thing!
Bob
Sorry, no '80 - '86 Ford trucks "Oswald": 1997 F-250HD crew cab short box, 460, E4OD, 4.10 gears "Pluto": 1971 Bronco, 302, NV3550 5 speed, Atlas 4.3:1 transfer case, 33" tires "the motorhome": 2015 E-450-based 28' class C motorhome, 6.8L V-10 "the Dodge": 2007 Dodge 2500, 6.7L Cummins |
|
Administrator
|
Agreed. However, Firestone doesn't think so. I also found this in the TruckSpring Times:
Firestone Ride-Rite Air Bag Kits & Daystar Air Bag Cradle Not Compatible.
|
|
Administrator
|
Ok, with the calipers properly phosphated and powder coated it was time to pull the trigger on ordering the rest of the brake parts. So I just ordered these from Amazon:
Raybestos WK2885 Professional Grade Disc Brake Caliper Boot and Seal Kit: Two of these for $9.48/ea as one set does one caliper.Raybestos S6858 Kits: These are the bleeder screws, and a set is supposedly $12.95. But the only review says it isn't a set but is only one bleeder screw! However, if you look elsewhere from Amazon that part number says it is a set of 10. Who needs 10? We shall see.Centric 145.56003 Front Brake Caliper Piston: These phenolic pistons go for $5.31/ea and I ordered four.Motorcraft BRPK5621A Front Disc Hardware Kit for $8.23, with one kit supposedly doing two calipers.Motorcraft BRSD655 Front Severe Duty Pads for $37.79Unfortunately Amazon only has one of the brake rotors in stock, and while it kept saying "More coming" it refused to let me order two of them. One or none. So I chose none and ordered two RAYBESTOS 66476 rotors from Rock Auto for a total of $146.97, including $28.98 in shipping. The Rock Auto price for each rotor was ~$10 less than Amazon's, but they wanted ~$15 for shipping. So each rotor costs ~$5 more delivered than from Amazon, but I wanted to keep them together so ordered both from one place. So, for $104.89 + $146.97 = $251.86 I'll have all new brakes on the new front axle. 
Gary, AKA "Gary fellow": Profile
Dad's: '81 F150 Ranger XLT 4x4: Down for restomod: Full-roller "stroked 351M" w/Trick Flow heads & intake, EEC-V SEFI/E4OD/3.50 gears w/Kevlar clutches
|
| Edit this page |