1981 F150 "Old Blue" needs a new interior


|
"This is a great tip, however prying too hard on the slide locks may detach the plastic face from the metal backing as many of us 80-81 owners have found out, and it's very hard to reattach the faces and get them to stay."
I think the trick is to pull the panel part way off, then push the slider out from the back, instead of trying to pry it out from the front. Although I haven't tried it, it looks to me like a big pair of channel locks would span the metal spring part, so you could compress it a bit to pop out. BTW, the JB Weld seemed to work. I put a blob on each of the plastic weld points, then pushed a bead under the edge, where the metal and plastic joined. Seems sturdy enough and went back in OK. I'm not testing it at this point, just crossing my fingers.
"Old Blue" 1981 F150 Custom, short box, 2wd, straight 6, manual 4-speed; purchased new in NY, now happy in Oregon
|
|
|
In reply to this post by FuzzFace2
"What are you doing with the seat? I have not looked does LMC sell a re-cover kit where you pull what is left of the old one off. Then re-pad and put the new back on?
I have 1 rip in mine that is not bad and I bought a cover but would be nice to have the factory look to the seat with out rips." That is today's project. LMC sells a recovering kit for $200 and a "seat rebuilding kit" that comprises a 2" piece of foam and fiber mat. Look at their video on how to rebuild - it looks very simple, just peel off the old cover and put the new one on, insert hog rings (included), and you're done. The video is for a Chev, I think, and also shows a complete seat cushion being replaced (it is not listed at LMC that I could find). I'm only 160 lb, so the seat cushion is in pretty good shape. I'm hoping the new topper pad will be just a little extra padding. Anyway, I'll fully document the process and post it.
"Old Blue" 1981 F150 Custom, short box, 2wd, straight 6, manual 4-speed; purchased new in NY, now happy in Oregon
|
|
|
Door panel replacement complete and new wind-wing rubber.
 So here's what I was dealing with. The top edge was gradually crumbling away and the slider was missing. First step is to pull off the panel and see what it looks like underneath.  Ooo. This looks pretty sad. The oiled paper has deteriorated significantly in 38 years. Hmm.  So I took the heavy plastic bag the new panels came in and laid the old liner on top, traced with a Sharpie, and cut it out. Did not have to be a precision job, and as you can see, didn't end up one. Lots of crud to clean up first: Started with a putty knife to peel off all the old tarry gunk that stuck the old liner on. Next, lots of compressed air. Then about a half gallon of Windex and a roll of paper towels to remove the water-soluble stuff. Finally a good dose of surface cleaner/tar remover to clean up the tarry stuff. It actually looked pretty good. Now that it was clean enough to work on, I pulled the wind wing out and put new rubber in the channel. The new rubber fit nicely, after about 3 rounds of pulling and pushing and starting over to get it distributed evenly so there wasn't a big bulge of extra rubber somewhere. The first one took about an hour, the second maybe 30 min -- the story of my life: just when you figure out how to do the job, you don't need that skill anymore. Before I put the new liner in, I lubed the door crank parts - the big gear and the channel the roller travels in. 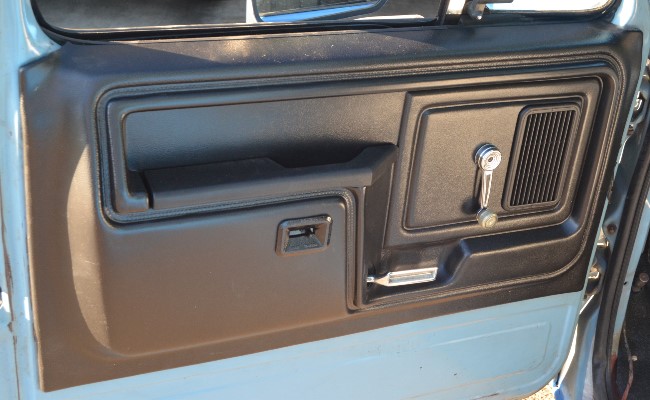 Finally, I put the new panel (and arm rests) on and it looks quite nice, if I don't say so myself. Yes, I did have to do it twice, because I forgot the spring behind the window crank the first time. And yes, I did break my brand new slider while installing it, so I actually put the new panel on three times. It does go on pretty easily. The new slider came in tan, so I painted it with a rattle can of black vinyl paint from NAPA. As I posted earlier, I fixed the slider with some JB Weld - it looks like it is holding OK after popping it back in. And also as noted in an earlier post, I discovered that the panel goes on first, then the slider gets twisted on the control rod and popped into the panel. I invested several hours on this portion of the project. Breaking the slider didn't help. And the wind wings took more time than anything else. But it looks nice and works well.
"Old Blue" 1981 F150 Custom, short box, 2wd, straight 6, manual 4-speed; purchased new in NY, now happy in Oregon
|
Re: 1981 F150 "Old Blue" needs a new interior
|
Administrator
|
Impressive results! Thank you for sharing.

|
Re: 1981 F150 "Old Blue" needs a new interior
|
Administrator
|
In reply to this post by JohnnyD
Well done! You are making excellent progress.
Gary, AKA "Gary fellow": Profile
Dad's: '81 F150 Ranger XLT 4x4: Down for restomod: Full-roller "stroked 351M" w/Trick Flow heads & intake, EEC-V SEFI/E4OD/3.50 gears w/Kevlar clutches
|
|
|
New floor mat is next.
 You can see that I've had my money's worth out of this one!  Here's what the new mat looked like when I rolled it out on the driveway. They said to put it someplace warm to settle out the shipping wrinkles. I was a bit disappointed at first that it didn't flatten out very well. Then on a closer look I discovered it is shaped to a certain extent. The white label is the front center at the firewall. The arrow shows the most prominent shape to fit over the bump around the gear shift. I'm not sure if they do this in molding or heat it over a shaped object. Also note that it is quite a bit bigger than the original. The original one stopped at the front edge of the seat. This one goes all the way to the back of the cab, including up and over the little step behind the seat. Then I had a little rust fixing to do: 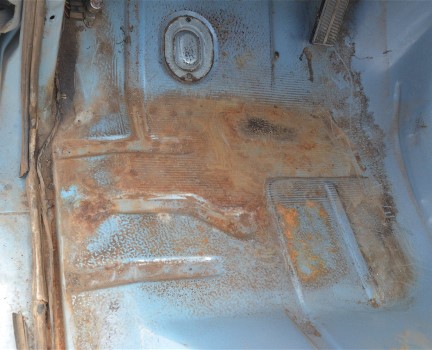 You can see that there is a little surface rust on the driver's side under the mat. Not surprising, since there was a hole in the mat and another smaller mat on top of it. Most of this was so minor that all I had to do was wire-brush it, wash it with surface cleaner, and spray on some Rustoleum primer. The passenger side was in much better shape. The worst part was the door channel on each side: 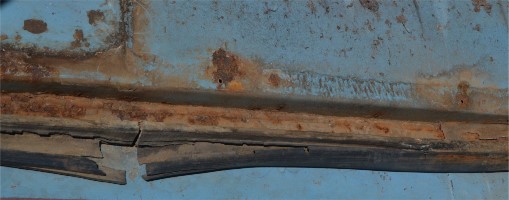 You can see that it is pretty gnarly, but nothing has rusted through and there doesn't appear to be any weakness. Lots of elbow grease with an old chisel and wire brush plus lots of air and a vacuum cleaned it up acceptably to get a coat of rust-stop paint. This done on both sides, it was time to put back in the garage for the night. (Ever drive your truck sitting on a 5 gallon bucket? -- I wouldn't recommend it for everyday use...) Now for the mat. I first pulled the shifter out, because the hole was not cut for it and I wanted to make sure it was carefully lined up before I cut anything. The mat is quite thick and a bit awkward to handle, but I figured out if I rolled it up with the label last, it could be set roughly in place and rolled backwards pretty easily. After a trial fit to see what I was dealing with, I put in the sound-proofing padding (came with the mat). It covered everything in front of the seat. I duct taped it in place to be sure I didn't move it around when I installed the mat. I cut out the hole for the shifter and snipped the edges in a couple places until I was happy with the sub-floor. The mat went in next I pushed and shoved until the hump fit perfectly. There's a grommet hole in the firewall in the middle, so I poked a hole in the mat with an awl and used one of those panel fasteners to hold everything centered. Then it was slow and steady. First the passenger side, pushing everything until the mat fit the sides of the shifter hump and up the firewall. I folded the excess (a couple inches wider than needed) up by the side vents. I little cut here and there on the edges to allow things to flex. The driver's side was a bit more challenge. I pulled the gas pedal mount out of the way and trimmed a U-shape around the steering column. Had to cut a hole for the floor-mounted dimmer switch. When I was happy with this part of the fit, I stuck a couple more panel fasteners in to match holes in the firewall on the left and right. Finally I rough-trimmed the sides so the mat was not rolled up on the edges anywhere. It was getting to be Guinness time, so I cut the hole for the shifter, re-mounted the shifter on the tranny, and screwed the shifter boot back in, settling the edge of the mat over the metal mounting ring. Enough for the day, so back in the garage. Next day I moved to a sunny spot, rolled up the windows and let the cab get to a zillion degrees inside to relax the mat completely. Once it was nice and toasty, final trims around the edges weren't too hard. Just little cuts and adjustments. Only place I couldn't get it perfect was on the driver's side - there's a bit of a bubble there, but I think it will stretch out with use. This is an amazingly nice mat. 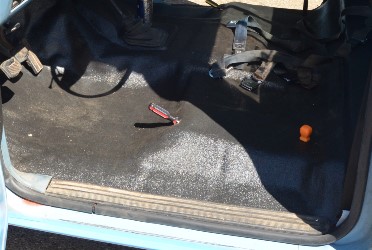 You can see how well the mat hugs the contours of the floor. The door edge strips hold it down on the sides, as does the trim that goes around the kick vents. I cut holes for the seat mounts and seat belt bolts. I figure those will hold everything in place. Next time I'll talk about the new seat cover (which I actually did while I was waiting for the mats to warm up in the sun).
"Old Blue" 1981 F150 Custom, short box, 2wd, straight 6, manual 4-speed; purchased new in NY, now happy in Oregon
|
|
|
Johnny, looking good. I have the same vinyl mat to go in mine too. I am waiting for the very last for that. After I get the engine running, everything cleaned up.
1988 F250 Supercab Longbed 7.3 IDI, C6, 1356, GEARVENDORS, 4.10 Sterling with autolocker
1986 F150 302, C6, 9" 2.75, Wood Flatbed |
Re: 1981 F150 "Old Blue" needs a new interior
|
Administrator
|
In reply to this post by JohnnyD
Wow! You are on a mission! Well done! Hope you'll share a pic of the whole thing done - w/o the shaded spot.
As for the bucket, don't hit the gas or the brake hard.
Gary, AKA "Gary fellow": Profile
Dad's: '81 F150 Ranger XLT 4x4: Down for restomod: Full-roller "stroked 351M" w/Trick Flow heads & intake, EEC-V SEFI/E4OD/3.50 gears w/Kevlar clutches
|
|
|
Time for the new seat cover.
I've been using a saddle blanket type cover over the seat for years, so I haven't kept track of what was going on to the real seat. 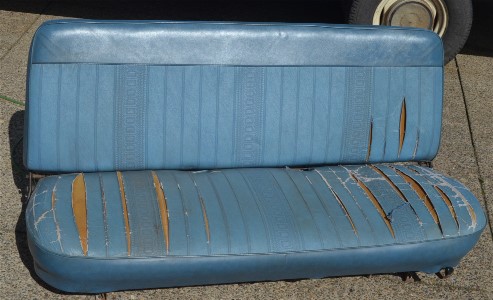 You can see that things look pretty grim once the protective cover was removed. Though I was happy to see all the damage seems to be limited to the cover itself. The fact that it only slit in one direction probably saved the underlying pads. Also the fact that I weigh about 160 lbs doens't hurt. So I bought a "vinyl bench seat kit - blue" and a "seat rebuilding kit" ($235 total) from LMC. Before starting (and actually before buying), I watched the video on their website about how to install it. The video describes a Chevy application, but it was essentially the same. I took the back off the seat bottom, but the seat rails didn't seem like they would get in the way, so I left them attached. 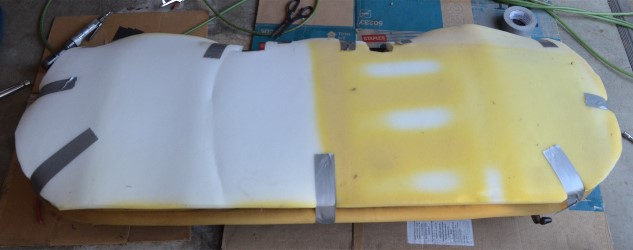
Sorry I didn't take a photo of the seat pad before I put the topper on it. It was in good shape with no deterioration or cracking. I blew a ton of dust off it with the compressor before doing anything else. The rebuilding kit included a piece of 1-1/2" foam, some spare wire parts, and a chunk of light weight carpet. The carpet was designed to go on top of the springs if there was damage there, but I didn't use it. I stuck the topper on with duct tape so it wouldn't move around while I put the cover on it.Then I contoured the ends and corners to roughly match the original pad underneath. And I trimmed U-shaped holes in the back where the seat belts come up. The seat pad cover came with holes for the metal seat-back stops at each end, so I started by stretching the back part of the cover over the two stops. Then it went over the rest of the pad pretty easy, just some pulling and grunting to get it started over the front corners. 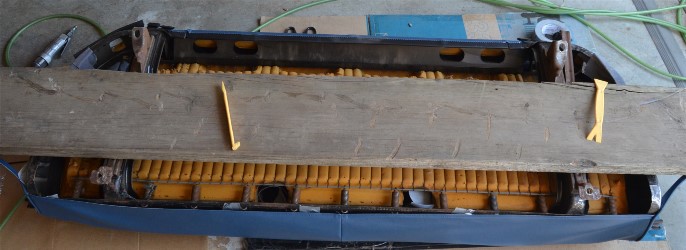 Now the whole thing was flipped over on a piece of cardboard. The front lip of the cover had a plastic U-shaped piece that fits over the frame on the bottom of the seat (closer view in the next photo). However, with the added height of the topper, it was a very tight fit and I couldn't seem to get it started. So I put a 2x10 across the seat rails as shown above, and by kneeling on the board the seat cushion was compressed enough to wrestle the U-strip on the middle of the seat. One lifesaver was the yellow plastic tool shown just left of center on the board. This was part of the cheapie kit of panel tools I bought at Harbor Freight. The hook end allowed me to pull the U slightly open and roll it onto the seat frame. My finger strength wasn't quite enough. 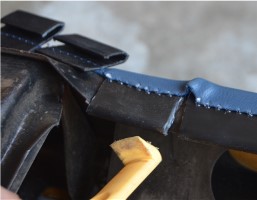 There were U-strips on each end of the seat and they went on in a similar manner. However, at the corners, I discovered a design flaw. The original Ford cover had a segmented strip, so it bent around the corner, but this cover had a 6" long strip in one piece that would not make the curve. So I got out my handy vibrator saw tool and did a little shaping, cutting it part way through to make a series of 1-2" pieces, like the small ones shown here that were on the cover to go around the seat rail. I thought I took a photo of this, too, but I can't find it. Once the segments were small enough, the corners went on well. At the back of the seat was a plastic rod sewn into the edge of the fabric. The video showed this being fastened to holes along the frame with hog rings. Guess what, the original Ford seat had U-shaped fasteners all the way around, so no hog-ring holes in the back edge. The spring holes were too far from the edge for the hog rings to span. So I ended up using the hog rings to fasten the back edge of the cover to the loops on the springs where they poked through the frame. Not ideal, but it looks like it works OK. Before I flipped the bottom back over I lubed the seat tracks so they slid nicely. Next was the cover for the seat back. This was a great improvement on the original, which left the back of the seat exposed. The new one is a pocket that slips over the seat, giving a finished back as well (shown in one of the finished photos below). The two edges get hog-ringed together at the bottom. The only catch was that the point they joined ended up directly under the heavy bar that connects the seat back release. This meant that the cover needed to be pulled past the bar to give clearance for hog-ringing. I solved this by putting my 2x10 on a couple of 2x4 blocks so it sat up off the floor a couple inches. Then I laid the seat back on this with the bottom edge hanging off the edge of the board a bit (the pad next to your back was up). By kneeling on the pad, I could compress the back just enough to get some slack to hog ring everything in place. Work from the center out to the edges. The edge doesn't look very fancy when it is finished, but it is hidden from view when in service. NOTE on hog rings. The kit came with the world's cheapest hog ring pliers and hog rings. By the time I had put in about 30 or 40 of these suckers the palm of my hand was complaining. Next time, I'll buy a better set (Harbor Freight sells a nice looking pair with padded handles for $9). Now the back is reinstalled and we're done! 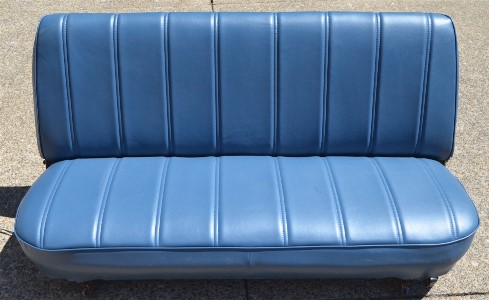 Looks like new! I'm impressed with the looks of this fix - should have done it 20 years ago. 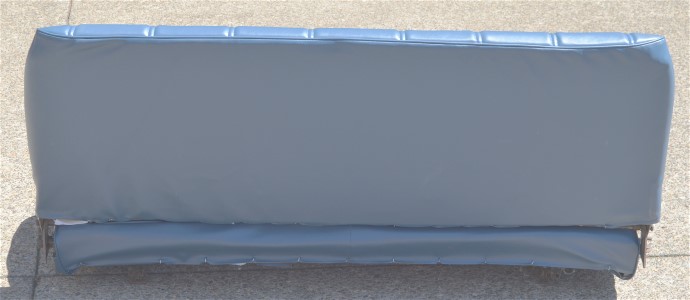 You can see the hog rings along the bottom of the back and bottom of the seat from behind, but since I have a standard cab, no one will ever see them. If I had a crew cab I would have needed to be a little more artful. 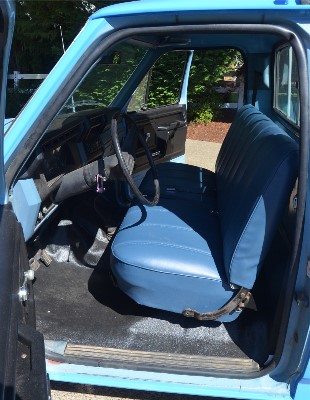 Here is installed. (I'll try to remember to get a photo of the interior with better lighting when I'm done with the project.) I had already cut holes in the floor mat where the seat bolts needed to go, but after putting the bolts in the front sections of the seat rails, I found the back holes were off about half the width of the hole. I shoved and pushed and huffed and puffed and finally forced the back holes into position so I could tighten everything down. It really puzzled me how I could have tweaked the frame along the way. Then I ran the seat forward and backward a couple times and there was a big POP and I realized that when I had lubed the seat rails they must have been off one notch between the two ends. This would make the seat crab down the road relative to the rails. NOTE - if you go through this process, be sure the rails are in the same point on both ends of the seat and you shouldn't have the misalignment problem I had. So the seat is now complete.  Remaining items: seat belts (actually put in before the seat was installed), hood release, and a couple fasteners in the grill. I'll leave those for another post.
"Old Blue" 1981 F150 Custom, short box, 2wd, straight 6, manual 4-speed; purchased new in NY, now happy in Oregon
|
Re: 1981 F150 "Old Blue" needs a new interior
|
Administrator
|
Bravo!

|
Re: 1981 F150 "Old Blue" needs a new interior
|
Administrator
|
In reply to this post by JohnnyD
Beautifully done! You are really on a roll with that truck!
Gary, AKA "Gary fellow": Profile
Dad's: '81 F150 Ranger XLT 4x4: Down for restomod: Full-roller "stroked 351M" w/Trick Flow heads & intake, EEC-V SEFI/E4OD/3.50 gears w/Kevlar clutches
|
|
|
Back again to wrap up a few final items. SEATBELTS for this one.
I actually replaced the seatbelts before reinstalling the seat (earlier post). 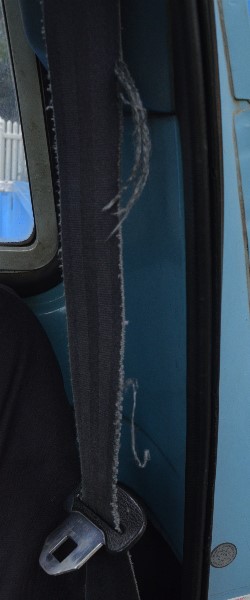 Here's what I was working with, frayed belts and retractors that no longer worked. The retractor sides (outer belts) went flawlessly, with no problems. Only regret is that I didn't order a new plastic belt protector for the bottom segment - the old one was too brittle to reuse. 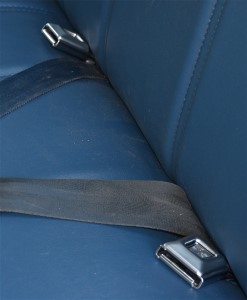 When I "finished" the job, here's what I was left with. The inner end of the belt was a bit short. It barely stuck out from under the seat. And this is with the seat all the way back (I have 38" inseams). 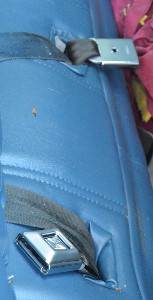 But if, heaven forbid, I tip the seat forward to look for my broom after emptying out a load of junk, the belts pulled back under the bar. My wife has arthritis in her fingers and I didn't think she'd enjoy digging in the seat crack to find half the belt. 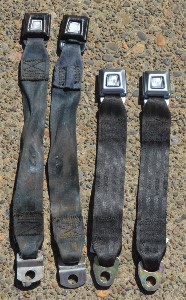 Fortunately, I hadn't discarded the old belts yet, so I unearthed them and cleaned the inner ends. Notice that they are about 4" longer than the new set. 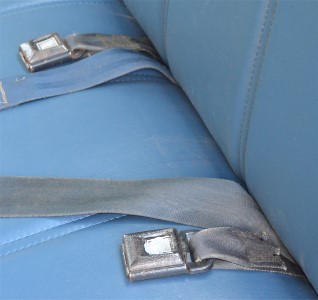 So the old inner ends (buckles) went back in. You can see that it is a much better fit. Fortunately, this was a pretty simple fix and I didn't have to pull out a bunch of later-installed items.
"Old Blue" 1981 F150 Custom, short box, 2wd, straight 6, manual 4-speed; purchased new in NY, now happy in Oregon
|
|
|
Next HOOD RELEASE CABLE
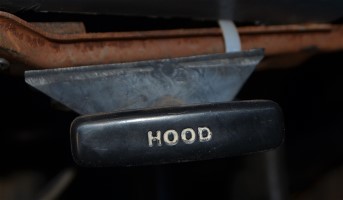 Several years ago the right side of the hood release mount died. You can peek at the white zip-tie on the right. 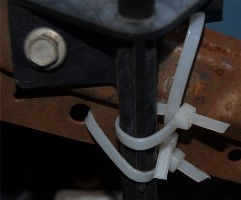 Pretty fancy fix from the bottom view, huh? Just goes to show that a temporary fix lasts much longer than originally anticipated. I don't know if I'd have bothered to fix this if I didn't already have a large order from LMC being assembled. 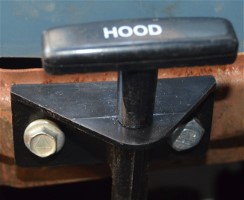 Here's the new one. This was a nice project near the end of all the interior work, because it went nearly flawlessly. The old cable unhooked from the latch merely by flipping a loop of cable off. Although several of the holding clips were hanging from the cable instead of holding it in place, all were present and accounted for. I dreaded trying to get the grommet loose that went through the firewall, but it slipped out with a little poke of a screwdriver. And the new one pulled through with just finger pressure. The whole thing was the right length, and I was a happy camper. The slowest part was digging through my bold box to find a second lag bolt to hold the new mount in place. I didn't even drop any fasteners in inaccessible places! Wish all part replacements were this easy.
"Old Blue" 1981 F150 Custom, short box, 2wd, straight 6, manual 4-speed; purchased new in NY, now happy in Oregon
|
Re: 1981 F150 "Old Blue" needs a new interior
|
Administrator
|
Well done! But what brand were the seat belts? I want to steer clear of them.
On the other hand, the hood release was perfect. Isn't it amazing how much better the truck is starting to feel? What's next? You're gonna mow it down.
Gary, AKA "Gary fellow": Profile
Dad's: '81 F150 Ranger XLT 4x4: Down for restomod: Full-roller "stroked 351M" w/Trick Flow heads & intake, EEC-V SEFI/E4OD/3.50 gears w/Kevlar clutches
|
|
|
Belts were LMC 48-2352-BL, $200 for a set. Of all the stuff I bought from them, this is the only item that I was disappointed with. The other thing about these was that the L-shaped mounting tab for the floor on the outside mounts was bent the wrong way. In my truck, the bolt hole is against the door pillar, so the tab where the belt mounts is toward the center of the truck. When they were mounted this way, there is a half-twist in the belt. It is not noticeable in use, but it doesn't match the original in that manner.
"Old Blue" 1981 F150 Custom, short box, 2wd, straight 6, manual 4-speed; purchased new in NY, now happy in Oregon
|
Re: 1981 F150 "Old Blue" needs a new interior
|
Administrator
|
That is certainly disappointing. Thanks for telling us.
Gary, AKA "Gary fellow": Profile
Dad's: '81 F150 Ranger XLT 4x4: Down for restomod: Full-roller "stroked 351M" w/Trick Flow heads & intake, EEC-V SEFI/E4OD/3.50 gears w/Kevlar clutches
|
|
|
In reply to this post by JohnnyD
GLOVE BOX
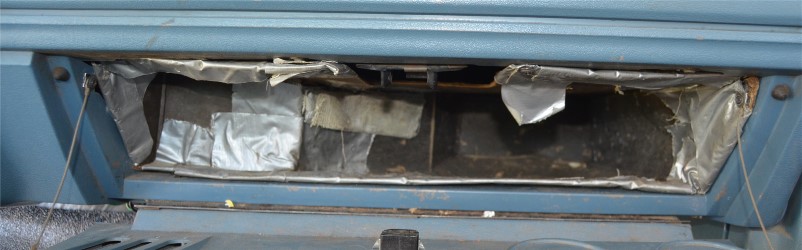 This is what a glove box looks like after the duct tape patches wear out... 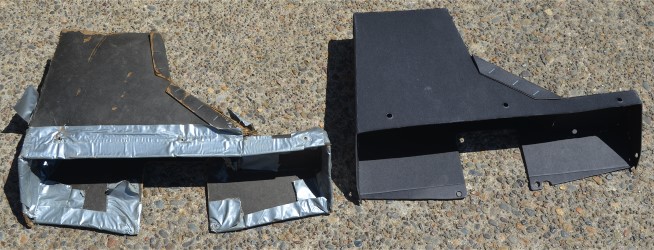 Here's quiz. Quick, without thinking a lot, can you tell which one is the new one? 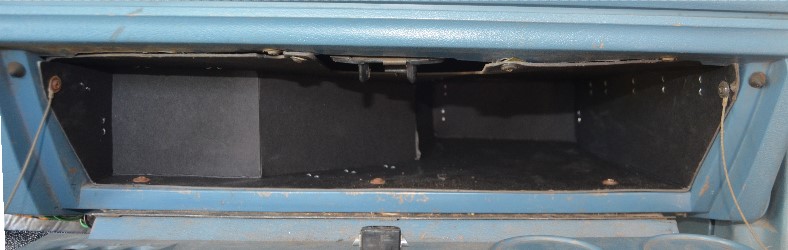 Ta Dah! This is another one of those items like the dash cover that should have been done 15 years ago. And a bargain to boot - $15! Considering time and labor, it is probably cheaper to put a new one in than duct tape the old one again. All the holes were in the proper place and with a little larger diameter than necessary so the screws were easy to get started. I'm not sure if the box had a slightly wider front lip or what, but I did have to adjust the latch a little so the door closes smoothly. But the total time on this one from start to finish couldn't have been more than 20-30 min. Most of it was just the pain in the neck of working with a stubby screwdriver in a place that isn't conducive to trifocals. I highly recommend this upgrade. There was a second box in the LMC catalog that was aluminum, but listed only for A/C equipped vehicles. I assume it is a bit different shape to accommodate a blower or something. This one was just folded heavy duty cardboard held together with staples. If you have access to a sheet metal brake, you could make one of steel or aluminum and pop rivets and it would outlast your truck.
"Old Blue" 1981 F150 Custom, short box, 2wd, straight 6, manual 4-speed; purchased new in NY, now happy in Oregon
|
Re: 1981 F150 "Old Blue" needs a new interior
|
Administrator
|
Ford went to plastic in '85 if I remember correctly, so you could probably get one from a salvage. I have. But, there are heater-only ones, Hi-Lo Vent/Air Conditioning ones, and High Output ones. I think.
Anyway, well done! Trifocals? Must be time for cataract surgery. I sure like the results from mine.
Gary, AKA "Gary fellow": Profile
Dad's: '81 F150 Ranger XLT 4x4: Down for restomod: Full-roller "stroked 351M" w/Trick Flow heads & intake, EEC-V SEFI/E4OD/3.50 gears w/Kevlar clutches
|
|
|
In reply to this post by JohnnyD
And a little GRILL repair:
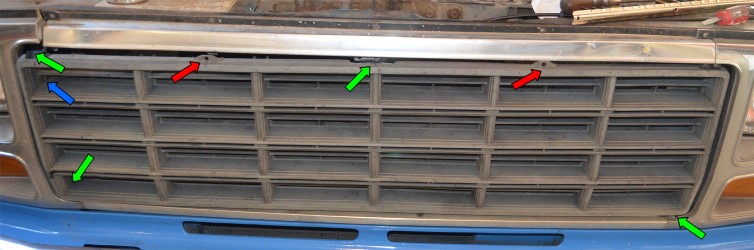 Here's what I was working with. The plastic pieces on the top trim into which the grill screws at the red arrows have been missing for years. Every once in awhile I push the tabs back under the trim, but they pop out again. This was all I had noticed, so I just ordered new plastic mounts with my big order. After I got down to it, I realized that the mounting tabs at the upper left and lower right corners had broken off, as had the one in the middle of the top (green arrows). Further spelunking revealed that the screw mount inside the grill itself (blue arrow) was cracked, but looked like a longer screw and appropriate flat washers would solve the problem (which they did). By the time I got the grill out of the truck I wish I had ordered a new one, but remember, this is a "better is the enemy of good enough" project, so I decided to do the best with what I have, and if it doesn't work, I'll order a new grill. 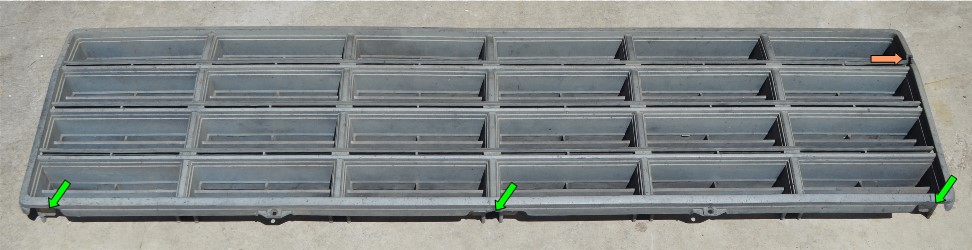 When I pulled the grill I could see the broken mounts better (green arrows; the bottom of the photo is the top of the grill). Also I found that the grill was cracked through along one of the edges (orange arrow) and had bounced around long enough that super glue wasn't going to do the job.  Isn't it amazing what a rattle can of paint can do to a tired plastic part?! When I was done I found that I had just enough mounting places left that the grill doesn't bounce around. Also with the top two screws in place, the top piece of trim doesn't droop any more. I think this looks pretty snazzy, considering the context. You'll notice that when I had the truck painted I had the guy putty up all the emblem holes, so no F-O-R-D along the edge of the hood. Actually, you can see that little dent just above the left edge of the grill - that's where the "F" went, and broke the tab on it that kept it from twisting, so it hadn't been straight for years.
"Old Blue" 1981 F150 Custom, short box, 2wd, straight 6, manual 4-speed; purchased new in NY, now happy in Oregon
|
|
|
In reply to this post by JohnnyD
What a good read! Love the pictures.
Ford Grand Wagoneer - 1990 Jeep Grand Wagoneer preparing to receive a Ford drivetrain...
A Keeper - 1993 F-150 XLT Super-Cab 5.0 EFI 2WD E4OD 8.8" with 3.55 gear Sold it for my Grand Wagoneer project! |
| Edit this page |